Pressbooks Guide

Pressbooks Guide

A reference for open textbook authors using Pressbooks

Lauri M. Aesoph

Josie Gray

BCcampus

Victoria, B.C.

Contents

1

About This Guide

This is one of many support guides from BCcampus Open Education. It is designed to supplement the central resource: Self-Publishing Guide.

Welcome to BCcampus Open Education’s Pressbooks Guide. This support resource was written for open textbook authors who want to use this writing platform to create a new book, or instructors interested in customizing an existing open textbook.

BCcampus Open Education began in 2012 as the B.C. Open Textbook Project with the goal of making post-secondary education in British Columbia more accessible by reducing students’ costs through the use of open textbooks and other OER. BCcampus supports the post-secondary institutions of British Columbia as they adapt and evolve their teaching and learning practices to enable powerful learning opportunities for the students of B.C. BCcampus Open Education is funded by the British Columbia Ministry of Advanced Education, Skills & Training, and the Hewlett Foundation.

Open educational resources (OER) are defined as teaching, learning, and research resources that, through permissions granted by the copyright holder, allow others to use, distribute, keep, or make changes to them. We consider this publication—along with our guides, webinar slide decks, and other support materials—as a type of OER that trains faculty, staff, and students how to build, customize, and use open textbooks.

The BCcampus Writing Guidelines for Style and Tone and BCcampus Open Education Style Guide, along with the attached style sheet [Word file], were referenced during the copy editing and proofreading phases of this guide.

To ensure that standard barriers are addressed for maximum access by as many readers as possible, this guide meets the criteria laid out in the Checklist for Accessibility—including an Accessibility Statement—and is flagged as “Accessible” in the B.C. Open Textbook Collection.

If you find an error in this guide, please report it using the Report a Textbook Error form. For other feedback or comments, fill out the BCcampus contact form.

2

Acknowledgements

This, like our other guides, is the result of collaboration between members of BCcampus Open Education and our colleagues in the B.C. post-secondary sector and beyond.

Thank you, Hugh McGuire, for creating Pressbooks. And thank you to your team—Zoe, JC, Apurva, Ned—for keeping it humming and providing excellent documentation for users.

Thanks to Lucas Wright from UBC and Josie Gray at BCcampus for your dedication to helping the rest of us understand Pressbooks.

And finally, thank you to Brad Payne, our lead developer and Pressbooks wunderkind, who has initiated and led the journey toward making Pressbooks the platform for writing open textbooks.

3

Acknowledgements: eCampusOntario

Share

If you adopt this book, as a core or supplemental resource, please report your adoption in order for us to celebrate your support of students’ savings. Report your commitment at www.openlibrary.ecampusontario.ca.

We invite you to adapt this book further to meet your and your students’ needs. Please let us know if you do! If you would like to use Pressbooks, the platform used to make this book, contact eCampusOntario for an account using open@ecampusontario.ca.

If this text does not meet your needs, please check out our full library at www.openlibrary.ecampusontario.ca. If you still cannot find what you are looking for, connect with colleagues and eCampusOntario to explore creating your own open education resource (OER).

About eCampusOntario

eCampusOntario is a not-for-profit corporation funded by the Government of Ontario. It serves as a centre of excellence in online and technology-enabled learning for all publicly funded colleges and universities in Ontario and has embarked on a bold mission to widen access to post-secondary education and training in Ontario. This textbook is part of eCampusOntario’s open textbook library, which provides free learning resources in a wide range of subject areas. These open textbooks can be assigned by instructors for their classes and can be downloaded by learners to electronic devices or printed for a low cost by our printing partner, The University of Waterloo. These free and open educational resources are customizable to meet a wide range of learning needs, and we invite instructors to review and adopt the resources for use in their courses.

4

Introduction

Pressbooks is an authoring platform built on the popular WordPress publishing and blogging website. If you have used WordPress in the past, Pressbooks should feel familiar. Pressbooks allows you to create content once and publish it in many formats including a website, PDF document, EPUB (usable in most eReaders), MOBI (for Kindle readers), and various editable files.

This Pressbooks Guide does not replicate information provided by the Pressbooks Userguide published by Pressbooks.com. Instead, in parts and chapters laid out to mimic the steps an author might take to create or modify an open textbook in Pressbooks, it redirects readers to pertinent chapters in the Pressbooks Userguide, supplements it with additional information, and includes instructions specific to post-secondary faculty and staff working in British Columbia and the Yukon.

Guide layout

Each section of this guide begins with a list of topics covered in its chapters. Key terms, specific to Pressbooks and its features, are set in bold and defined in the text body as well as summarized in the Glossary. This guide does not come with an index. Instead, use the search field located in the top-right of each page in the online version to locate a specific topic. The URLs for all external links are provided by chapter for print users in Appendix B.

Pressbooks Userguide chapters are highlighted with a textbox containing the Pressbooks (PB) logo and a link to the material. (See example below.)

"" For more information, see Writing Directly in Pressbooks in the Pressbooks Userguide.

When appropriate, chapters within this Pressbooks Guide are mentioned in a shaded textbook. (See example below.)

For more information on tools available in the Pressbooks visual editor, see Enhance Content.

Links to chapters in other BCcampus Open Education guides and toolkits are also included in a shaded textbox to complement the Pressbooks material. (See example below.)

To learn about standard layout for a chapter, see Textbook Outline in the Self-Publishing Guide.

If information is missing about a specific feature, this is noted as “MORE TO COME” in a standard textbook. (See example below.)

MORE TO COME: Information on how to interpret validation error logs and make corrections to a book will be added when available.

Items to take note of are marked with “IMPORTANT.”

Finally, outstanding Pressbooks issues are identified and, if available, coupled with a temporary work around in coloured textboxes. (See example below.)

Issue to Note

Styling tables can be a challenge when the CSS of a book overrides the HTML for individual chapters. For help with this issue, see Customizing your Exports with Custom Styles in the Pressbooks Userguide.

Updates and development

The Pressbooks development community is very active and attentive to the needs of its users, and strive to keep and improve this platform for optimal functionality. As features are added or changed, the information in this guide will be updated, and noted on the Versioning History page. Go to the Pressbooks Updates page for upcoming and past upgrades, urgent issues, and the most current version of the BCcampus Pressbooks instance.

5

Accessibility Statement

BCcampus Open Education believes that education must be available to everyone; this means supporting the creation of free, open, and accessible educational resources. We are actively committed to increasing the accessibility and usability of the textbooks we produce.

Accessibility features of the web version of this resource

The web version of the Pressbooks Guide has been designed with accessibility in mind by incorporating the following features:

Other file formats available

In addition to the web version, this book is available in a number of file formats including PDF, EPUB (for eReaders), MOBI (for Kindles), and various editable files. Here is a link to where you can download this book in another file format. Look for the Download this book drop-down menu to select the file type you want.

Known accessibility issues and areas for improvement

While we strive to ensure that this resource is as accessible and usable as possible, we might not always get it right. Any issues we identify will be listed below. There are currently no known issues.

List of Known Accessibility Issues
Location of Issue Need for Improvement Timeline Work Around

Accessibility standards

The web version of this resource has been designed to meet Web Content Accessibility Guidelines 2.0, level AA. In addition, it follows all guidelines in Appendix A: Checklist for Accessibility of the Accessibility Toolkit – 2nd Edition.

Let us know if you are having problems accessing this guide

We are always looking for ways to make our resources more accessible. If you have problems accessing this resource, please contact us to let us know, so we can fix the issue.

Please include the following information:

You can contact us one of the following ways:

This statement was last updated on September 13, 2018.

I

Accounts and Users

Section Topics

This section describes the Pressbooks services in B.C., including:

  • A description of the self-serve instance of Pressbooks provided free for faculty and staff at all post-secondary institutions in British Columbia
  • How to set up an account for the pressbooks.bccampus.ca instance of Pressbooks
  • How to recover the username and reset the password for a Pressbooks account
  • How to add users to a book in Pressbooks

1

Pressbooks for B.C. and the Yukon

BCcampus Open Education provides a self-serve instance of Pressbooks called “B.C. Faculty Pressbooks” for faculty and staff at post-secondary institutions in British Columbia and the Yukon.

This is a free service.

When accessing this instance of Pressbooks, faculty and staff must use their institutional email address. A list of accepted email domains are below.

bcit.ca camosun.bc.ca camosun.ca capilanou.ca
cnc.bc.ca cotr.bc.ca douglascollege.ca ecuad.ca
jibc.ca kpu.ca langara.bc.ca nic.bc.ca
nlc.bc.ca nvit.bc.ca nwcc.bc.ca okanagan.bc.ca
royalroads.ca selkirk.ca sfu.ca tru.ca
ubc.ca ufv.ca unbc.ca uvic.ca
vcc.ca viu.ca yukoncollege.yk.ca
MORE TO COME: The email domain for Coast Mountain College (coastmountaincollege.ca), the new name for Northwest Community College, will be added soon. We will also be allowing faculty working at private post-secondary institutions based in B.C. to create Pressbooks accounts. When these changes have been implemented, we will update the above table.

The Sign up/Register page used to create an account says one must be a post-secondary faculty member, but post-secondary staff are eligible as well. Yukon faculty and staff are also eligible, and Yukon College is included in the “B.C. Institution” drop-down list on the account sign-up page. (See Pressbooks Accounts.)
Only public post-secondary institutions in B.C. (plus Yukon College) are listed on the drop-down list, but B.C. private post-secondary faculty and staff may use this Pressbooks instance as well. Those from a private college or university should contact the BCcampus Helpdesk for account set-up assistance.

Ontario post-secondary faculty and staff

Post-secondary faculty and staff from Ontario should email eCampusOntario at inquiry@ecampusontario.ca for Pressbooks help.

Other post-secondary faculty and staff

The Rebus Community provides Pressbooks access to post-secondary faculty and staff from post-secondary institutions around the globe, providing they are a member. To join, create an account at Rebus Community. Once that has been done, request access to a Pressbooks account by filling out the Rebus Community Press – Request for Access form.

Accounts are also available through the main Pressbooks website.

2

Pressbooks Accounts

This chapter describes how B.C. post-secondary faculty and staff can create and manage an account with the BCcampus self-serve instance of Pressbooks.

Chapter table of contents

Special features

How to create an account

Account purging schedule

User profile

Find help

Special features

Take note of two features on the Pressbooks home page before you create an account. (Refer to first screenshot at the beginning of this chapter.)

  1. For those with visual impairment, there is an option to increase the font size of content in Pressbooks. Just click the Increase Font Size button in the upper right-hand corner.
  2. For additional information about this self-serve instance of Pressbooks and links to Pressbooks support resources, click on “Learn More.”
  3. If you click on the BCcampus logo in the top left-hand corner (or anywhere else in this Pressbooks system), you will be redirected to the home page of pressbooks.bccampus.ca

How to create an account

Step 1: Create the account

To create an account, go to pressbooks.bccampus.ca and select “Sign Up.”

""

Next, fill in the following fields:

""

""

You can also select “Register my book now.” This is the default setting and means that a book shell will be created in addition to setting up your account. The book shell can be used to create a new book or upload an existing book. If you don’t want to create a book yet, you may choose to register or create a book later. Then you can click “Next.”  (See Add a New Book.)

Step 2: Activate the account

During the account-creation process, you will be notified that your account must be activated before it can be used. To do this:

  1. Go to the email account that you entered when creating your Pressbooks account.
  2. Retrieve the email generated by the system. You may need to check your junk/spam folder if you do not see an email in your inbox.
  3. Click on the link in the email body to activate your Pressbooks account.

If activation is not completed within two days, you must create an account again.

Once the activation link is clicked, a Pressbooks page will open up that says: “Your account is now active,” along with your username and password. From this web page, you can choose to immediately log in or go back to the Pressbooks homepage (where you can also log in by clicking on “Sign In”). Alternately, you can select “Sign In” in the top-right corner of the web page to login to your account.

""

Step 3: Welcome email

Within 5-10 minutes of account activation, you will also receive another email containing the username and password chosen for this account, along with a link to the login page on the B.C. Faculty Pressbooks website.

This email also contains a list of resources to help you use Pressbooks and informs that you have “been added to the PBNotifications mailing list in order to receive email notifications when there is a scheduled maintenance outage, system upgrade, or other significant change to the Pressbooks website.”

You are asked to contact the BCcampus Helpdesk (helpdesk@bccampus.ca) if you have questions.

User profile

For more information, see User Profile in the Pressbooks Userguide.

Account purging schedule

BCcampus purges Pressbooks accounts that have been inactive for 12 months or longer and do not contain an active textbook. If an account contains private books, the BCcampus Helpdesk will contact the account owner with the email address used during account creation to inquire about the account and books.

Find help

At the bottom of this web page, notice a dark blue banner identified by the BCcampus OpenEd logo with links to “About” Pressbooks and “Help” for Pressbooks (circled in light green). These links will redirect you to information specific to this BCcampus instance of Pressbooks.

""

The black banner at the very bottom of the page is marked by “Powered by Pressbooks” and circled in light blue. These links redirect you to information and help provided by Pressbooks.com, the organization that developed this platform. If you need help, use the BCcampus help links and not those that redirect to Pressbooks.com.

3

Passwords and Usernames

Change a password

"" See Changing Your Password in the Pressbooks Userguide.

Note: The profile page can also be accessed from Users > Your Profile on the Dashboard menu.

Reset a password

If you forget your password, you can request that a new one to be generated and emailed to you. The system does not allow you to retrieve an existing password; it must be reset. This is how:

  1. Go to the login page for Pressbooks.
  2. Underneath the login box, click on “Lost your password?”""
  3. Enter your username or, if you cannot remember your username, enter the email address used to create this account.
  4. Click “Get New Password.”""
  5. You will receive an email that contains your username and a link to reset your password. If you do not receive an email within a few minutes, check the Junk or Spam folder in your email account.
  6. After clicking on the link, you will be redirected to the “Reset Password” page.
  7. You can accept the “strong” password provided by the system by clicking on “Reset Password” or clear this field and create your own.
  8. The system will judge the strength of your password as you enter it. The criteria for a strong password include:
    • lots of characters (12 mentioned here)
    • upper and lower case letters, along with numbers and symbols""
  9. Once your password has been reset, you can log in.""

Retrieve username

If you forget your username, use the Lost your password? link to retrieve it. This features provides a lost username by entering the email address used to create an account. (See Reset a Password.)

4

Provide Access to Others

Only Administrators of a book can add users to that book in Pressbooks. Here is how it’s done:

First, make sure the person you would like to add has a Pressbooks account. If they don’t, they will need to create one.

To add a user,

  1. Go to your book’s Dashboard.
  2. Find the Users tab in the left-hand menu.
  3. Click “Add Existing.”
  4. Enter the email of the person you would like to add to the book. (It must be the email they gave when they signed up for Pressbooks.)
  5. Select the desired role for your new user. See below for role options.

User roles include:

Dashboard Links by User Type
Dashboard Link Administrator Editor Author Contributor Subscriber
WP-Piwik x x x x
Organize x
Private/ Public setting (Organize) x x x x
Book Info x x x x
Appearance √ (but no “Themes”) x x x
Export x
Plugins x x x x
Media x x
Users x x x x
Tools x
Settings x x x x
Import x
Textbooks for PB x
Profile x (see “Users”)

The person who has been added will receive an email invitation and a link to the book. They will need to click a confirmation link in order to access the book.

"" For more information, see Users and Collaborators in the Pressbooks Userguide.

II

Book Set Up

Section Topics

This section covers things that should be considered before setting up a book, as well as the building blocks used to create a book. Topics include:

  • Accessibility for all types of learners
  • Language and script support so authors can write books in a variety of languages, including font support for those that use a non-Latin alphabet
  • How to annotate, during and after creation, with the Hypothes.is tool
  • How to enable the Comments feature in Pressbooks and how this might be used
  • A comprehensive description of an account’s Dashboard explaining where tools and features are found
  • How to create a new book (an account can hold many books)
  • Adding, changing, and organizing parts, chapters, front matter, and back matter
  • Determining word count for a chapter, part, or an entire book
"" For more information, see What is in a Book? in the Pressbooks Userguide.

5

Accessibility

The first step to setting up a book is to consider how it will be made accessible, i.e. designing and setting it up in Pressbooks in such a way that as many readers as possible can enjoy and learn from it. See below for a list of specific elements to consider and how each can be addressed.

The Accessibility Toolkit – 2nd Edition provides a comprehensive guide to creating accessible content in Pressbooks.
Use Pressbooks to Increase Accessibility
Element Challenge Solution
Colour Physical: low vision, poor colour-contrast vision, colour blindness

Technological: a device with a monochrome display or a black-and-white print copy

Colour Contrast
Images Physical: blind or low vision, colour blindness, cognitive disability

Technological: black and white printer, poor Internet connection, monochrome display on device

Images
Links cognitive or physical disability, deaf or hard of hearing, blind or low vision Links
Math and Formulas cognitive or physical disability, blind or low vision Formulas
Multimedia Physical: cognitive disability, deaf or hard of hearing, blind or low vision

Environmental: loud, difficult to hear or play media, lack of headphones

Language: non-native English speaker

Multimedia
Tables cognitive disability, blind or low vision Tables

Use the Checklist for Accessibility to ensure that standard barriers are addressed for maximum access by as many readers as possible.

For more information, see Accessibility, Diversity, and Inclusion in the Self-Publishing Guide.

6

Language and Script Support

A book can be written in a variety of languages in Pressbooks including those that use a non-Latin alphabet. Font support is currently offered for the following languages:

"" For more information, see Languages in the Pressbooks Userguide.

7

Annotation with Hypothes.is

Hypothes.is is a web annotation tool that allows collaboration between authors and editors, personal note taking and annotation, and engagement with readers. It can also be used as a teaching tool with students.

While the tool is available as a browser extension that can be used on any webpage, Pressbooks allows you to build its capabilities into the pages of your webbook.

"" For more information, see Hypothesis for Webbook Annotation and Comments in the Pressbooks Userguide.

8

Comments

"" See Comments and Review in the Pressbooks Userguide.

9

The Dashboard

Once an account and book have been created in Pressbooks, the Dashboard or Dashboard page is where the account holder is automatically directed after logging in. The account holder is automatically assigned as the Administrator and has access to all functions listed on the Dashboard. Lesser roles, such as Editor, AuthorContributor, and Subscriber do not see/access all of these tools. (See Provide Access to Others.)

The Dashboard is also where an author will spend most time writing and where links to various tools and functions can be found. This chapter will provide an overview of the Dashboard.

IMPORTANT: If you have been assigned a user role other than Administrator, you will not have access to the “Users” or “Settings” panels.

Chapter table of contents

My Catalogue

Organize

Book Info

Appearance

Export

Media

Users

Tools

Settings

Import

Textbooks for PB

My Catalogue

The My Catalogue link in the top red toolbar allows you to add a new book, clone a book, and see and select all books in your Pressbooks Catalogue. (See Add a New Book and Clone a Book.) So if you’ve got more than one book, you can rapidly switch between them right here. You can also locate the Dashboard for a specific book as follows:

""

On a book’s Dashboard, various tools are listed in the left-hand column Dashboard menu, the parts and chapters of the book are in the middle, and users who have access to the book are shown in a Users box on the far right.

""

"" For more information, see My Catalog in the Pressbooks Userguide.

Most of the major Pressbooks features are found on the Dashboard menu. These are described below.

Organize

Clicking on Organize reveals a drop-down list that provides links to these functions:

Notice too the Add | Organize options inside the table of contents in the middle of the Dashboard. “Organize” is the same as the Organize tab on the Dashboard menu and “Add” allows the addition of a chapter.

The Users box on the right side also has an Add | Organize option. This is where an Administrator can add new users or organize existing users, i.e., change their role or remove access. (See Users.)

""

Book Info

The Book Info page is where information is added or edited regarding your book, including book title, authors, editors, publisher, copyright owner/year/notice, licence type, descriptions of the book, keywords, and more. Much of the data entered on this page displays on the home page of the webbook and as part of the various exported file formats.

It is suggested that the author and/or publisher fills this page out as the book is being written and as information becomes available. This page can be updated as needed.

"" For more information, see Book Info in the Pressbooks Userguide.
Also see Book Info Page.

Appearance

"" For more information, see Appearance in the Pressbooks Userguide.

The Appearance tab provides access to the following:

Themes

Pressbooks core has created 20 themes, each with different styles (font, headings, etc.) and features. These can be viewed and activated from navigating to the Appearance tab in the Dashboard menu and clicking “Themes.” Scrolling over a specific theme option reveals a Theme details box that, when clicked, describes the theme.

The BCcampus instance of Pressbooks provides eight of the 20 themes. They are:

"" For more information, see Themes for Academic and Educational Texts and Theme Lock in the Pressbooks Userguide.

Theme Options

In Theme Options, you can customize the appearance and functionality of your entire book. There are four tabs on this page, with each affecting different parts of your book. It is suggested that Administrators “play” with these features during set up to understand how they work and to assist with decisions about which options to use. Options include the following (by tab):

""

"" For more information, see New Theme Options in the Pressbooks Userguide.

Custom Styles

"" See Customizing Your Exports with Custom Styles in the Pressbooks Userguide.

Export

See Export Files for details.

Media

The Media tab is where all media for a book—images, videos, audio—are uploaded. Click “Add New” to upload media content or click “Library” to see and manage media you have uploaded previously. Media in the Library can be embedded or linked to in the content of your book. (See Images and Files.)

"" For more information, see Media and Image Editing in the Pressbooks Userguide.

Users

The Users tab is where a book Administrator can add other people to their book. (See Provide Access to Others.) It has the following options:

Tools

Settings

The Settings tab contains numerous options for privacy and exporting and for displaying formulas with the LaTeX tool (used for rendering mathematical formulas).

Import

The Import tool pulls content into Pressbooks from various file types. (See Add Content.)

Textbooks for PB

The Textbook for PB (Pressbooks) panel contains tools for importing content from other open textbooks.

Textbooks for PB

This page defines open textbooks and other OER, lists their benefits, and describes the 5 Rs behind the CC or open-copyright licence. A link is provided to the Textbooks for Pressbooks settings page.

Search and Import

The Search and Import tool allows you to import content (whether it be an entire book or individual chapters) from books in the same or other instances of Pressbooks. (See Search and Import a Pressbooks File.)

Download Textbooks

The Download Textbooks tool allows Pressbooks users to download open textbooks directly from the B.C. Open Textbook Collection. This is a feature unique to the B.C. Faculty Pressbooks instance.

10

Add a New Book

A book—or book shell—needs to be created in your Pressbooks account in order to:

Create a new book

A book can be created during initial account creation. (See Pressbooks Accounts.) However, if you skipped that step when creating your account, or if you need to create an additional book (your account can hold many books), here’s how to begin.

  1. Log into your Pressbooks account.
  2. Hover over the “My Catalogue” link in the top left corner of the upper red banner in your Pressbooks account to reveal a drop-down menu.
  3. Click “Add a New Book.”

""
You will land on the “Create a new book” page where you will be asked to provide:

  1. Webbook Address. This is a short descriptor that is added to the end of “https://pressbooks.bccampus.ca” to create your webbook’s URL or web address.
    • the title or abbreviated title of the book (with no spaces) is often used.
    • it must be at least four characters, letters, and/or numbers.
    • it cannot be changed so choose carefully.
  2. Book Title. This can be changed later if needed.
  3. Book Language. “English (Canada)” is the default selection.
  4. Privacy. The default is setting is “Yes,” which will make the book public. However, we recommend you select “No” so you can work on your book in private.

Once you have filled in all of the fields, click the Create Book button.

""

Textbook shell

After clicking on the Create Book button, you will be redirected to your new book’s Dashboard. To get you started, Pressbooks creates a number of empty parts and chapters:

""

"" For more information, see Automatic Pages: Title Page, Copyright and Table of Contents and Table of Contents: Adding a Second Level in the Pressbooks Userguide.

11

Parts: Add, Change, Organize

A book written in Pressbooks is made up of chapters which are grouped and ordered into parts. chapters are web pages or building blocks within which content is added. Parts are overarching sections that hold chapters.

Most of the open textbooks published by BCcampus use parts as chapters, and chapters as chapter sections. This is done to:

For an example, see the organization of the open textbook, Canadian History: Pre-Confederation.

"" For more information, see Parts in the Pressbooks Userguide.

12

Chapters: Add, Change, Organize

"" See Chapters in the Pressbooks Userguide.
To learn about standard layout for a chapter, see Textbook Outline in the Self-Publishing Guide.

13

Front Matter: Add, Change, Organize

"" See Front Matter in the Pressbooks Userguide.
To learn about standard layout for front matter, see Textbook Outline in the Self-Publishing Guide.

14

Back Matter: Add, Change, Organize

"" See Back Matter in the Pressbooks Userguide.

To learn about standard layout for back matter, see Textbook Outline in the Self-Publishing Guide.

15

Automatic Pages and Features

Pressbooks takes care of creating key elements for a book such as:

"" For more information, see the following in the Pressbooks Userguide:

16

Word Count

Word count is available for each chapter, each part, and for the entire book.

Chapter word count

Word count is posted at the bottom of each chapter’s content body. Words in the chapter title field are not included.

""

Part word count

Word count is posted at the bottom of each part’s content body. Words in the part title field are not included.

""

Book word count

Word count for an entire book can be found at the top of the Organize page. Here is also where you can find the word count for all chapters selected for export.

""

.

III

Add Content

Section Topics

There are many ways to add content to Pressbooks. This section describes these options, including how to:

  • Add new content directly into Pressbooks
  • Clone an existing open textbook or other OER from any Pressbooks instance
  • Search and import a Pressbooks book or chapter from another Pressbooks instance
  • Import any web page or Pressbooks webbook
  • Import a Word document
  • Copy and paste content from Word
  • Import a file from Google Docs
  • Import an OpenDocument Text (ODT) file
  • Import an EPUB file

17

Create New Content

Chapter table of contents

Chapter title and permalink

Editing tools and views

Save and autosave

Special features

Books in Pressbooks are made up of chapters, which are the building blocks of content, and parts, which are organizational blocks that house those chapters. If you intend to have your book hosted in Pressbooks, it is best practice to work on the book directly in Pressbooks as soon as possible, rather than work in another application like Microsoft Word and then copy the content into Pressbooks.

Chapter title and permalink

When a chapter is opened, you will see the WYSIWYG toolbar, which contains three rows of tools that can be used to add and format content in the chapter.

""

Above the toolbar is the chapter-title field where the title of the chapter can be added and edited.

""

Underneath the chapter-title field is the permalink—the URL or web address for that chapter. This link is automatically generated when you add a title for a new chapter. Once the link has been created, it will not change unless you edit it.

You can edit a chapter’s permalink as follows:

1. Click the “Edit” button on the right side of the permalink.

""

2. This action opens the permalink field where a new or revised segment can be entered.

""

3. For example, “-different-title” can be added to the end of the permalink to better describe the chapter. To save the changes, click the OK button and save the page. To back out of this action, select “Cancel” located under the Permalink label.

""

It is recommended, as part of a book’s final review, that the author checks the permalinks of all parts and chapters to make sure they are relatively short and reflect the title of a chapter or part. Permalinks do not need to match a chapter or part title exactly.

IMPORTANT: Changing a permalink will break all internal links to that page in a book, therefore, be sure to locate and update affected links.

Editing tools and views

The editing view—accessed through the Organize tab on the Dashboard menu of a book—is used to add content directly in a chapter or part. From the editing view, you can choose to work in the Visual Editor or the Text (HTML) Editor and can switch back and forth between them when necessary. The Visual Editor lets you see formatting and styling as you work, and includes a comprehensive WYSIWYG toolbar with 32+ features at the top of the page. The Text Editor gives you the ability to edit and see your work in HTML. Fewer tools—14 in total—are available in this latter view.

"" For more discussion and screenshots of these editors, see Using the Visual and Text Editors in Pressbooks from the Pressbooks Userguide.

The reader’s perspective is called the book view, or the webbook. To check this view while editing, use:

Save and autosave

Pressbooks automatically saves work every five minutes. However, it is recommended that the Save button be regularly used as well. (See Revisions Tool.)

Markup: HTML and CSS

"" See The Importance of “Good Markup” in the Pressbooks Userguide.

Special features

Distraction-free writing mode

If you like to work on content without the distraction of the entire Pressbooks interface, click on the distraction-free writing mode (DFWM) button in the top-right corner of the WYSIWYG toolbar, and the left and right sides of the interface will fade out unless you move the mouse over the edges. To return to the original mode, click on the DFWM button again.

""

Toolbar toggle

On the far right end of the WYSIWYG toolbar is another button called Toolbar Toggle. The default setting for each newly created chapter is for all three rows of features in the WYSIWYG toolbar to display. If you click on the Toolbar Toggle button, these three rows will collapse leaving just the top one. Click the button again to reveal all features.

""

""

Special characters

In the second row of the WYSIWYG toolbar, there is a Special character button that gives you access to a large collection of special characters. To use, click on the Special character button, and locate the symbol you need. Click on it, and it will be inserted right into the text.

More information

"" For more information, see Writing Directly in Pressbooks in the Pressbooks Userguide.
For more information on tools available in the Pressbooks visual editor, see Enhance Content.

18

Import Options for Pressbooks Content

Josie Gray

This chart compares the four methods of importing content that is already in Pressbooks. While these import options can ultimately have the same result, they each have their own use case.

IMPORTANT: These import routines only work for books marked as “public,” and they may not work if the book has All Rights Reserved or a Creative Commons licence with a -ND (NoDerivs) restriction.

Pressbooks Import Options
Import Option What You Need What This Option Does When to Use This Option
Clone a Book
  • The URL of the Pressbook you want a copy of
  • Creates an exact copy of an entire book
  • Adds a notice that it is a cloned version, with a link back to the original book
  • Provides the option to allow readers to compare the cloned book with the original
  • If you do not already have a book shell
  • If you want an exact copy of an entire book
  • If you want readers to be able to see how your version of the book differs from the one you cloned it from
Search and Import
  • An existing Pressbook to add content to
  • A list of Pressbook domains that you want to search (you must manually add the domains you want to search)
  • Search terms
  • Allows you to search multiple Pressbooks domains for books and chapters
  • Allows you to select chapters and books from different sources and import them at once
  • If you need help finding content that you want to add or adapt but don’t know what’s out there or where to look
  • If you are looking for a specific book or chapter to import

The search feature is finicky and can be frustrating to use. Start with simple search terms, and be prepared to try different things.

Pressbooks/WordPress XML (.wxr or .xml)
  • An existing Pressbook to add content to
  • The Pressbooks XML file of the Pressbook you want a copy of
  • Creates an exact copy of an entire book, or
  • Allows you to select the parts and chapters you want imported
  • If you don’t want the features that come with cloning (the link between and option to compare the two versions)
  • If you want to select the parts and chapters to import (not possible when cloning)
Web Page or Pressbooks Webbook (.html or URL)
  • An existing Pressbook to add content to
  • The URL of the Pressbook you want a copy of
  • Creates an exact copy of an entire book, or
  • Allows you to select the parts and chapters you want imported
  • Allows you to import content from non-Pressbooks web pages
  • If you don’t want the features that come with cloning (the link between and option to compare the two versions)
  • If you want to select the parts and chapters to import (not possible when cloning)
  • If you have web content not in Pressbooks that you want to import

19

Clone a Book

"" See Book Cloning in the Pressbooks Userguide.
"" For information on the Source Comparison Tool, see Source Comparison for Cloned Books in the Pressbooks Userguide.

There are many ways to obtain an editable copy of openly licensed Pressbooks content. For more information, see Import Options for Pressbooks Content.

20

Search and Import a Pressbooks File

Another way to obtain a copy of content already in Pressbooks is through the Search and Import feature, which appears under the Textbooks for PB tab on the Dashboard menu.

This feature allows you to search for chapter or book titles in a given Pressbooks instance. From there, you can select which chapters or books you would like to import into your existing book.

To use this feature:

  1. Enter the term(s) that you would like to search for in the Search terms field. If you are just browsing, these terms should be general. If you are looking for a specific chapter or book, you may use an exact title instead.
  2. Select which Pressbooks instance you would like to search. As a pressbooks.bccampus.ca user, that instance is the default search option.
  3. Select if you want to search chapter titles or book titles.
  4. Click “Search the collection.”

""

Search a different Pressbooks instance

You can search any Pressbooks instance that has public, openly licensed content available, as long as you know the URL for that instance. To search another instance of Pressbooks, e.g., the BCcampus internal instance (opentextbc.ca) or another instance such as Open SUNY’s (milnepublishing.geneseo.edu/), click “manage the list of domains” on the Search and Import page.''

You can also get to this page by clicking the Textbooks for PB link under the Settings tab on the Dashboard menu.

""

On the Textbooks for Pressbooks Setting page, you can add different Pressbooks instances that contain Creative Commons licensed materials to search against with the Search and Import feature. If you know the URL of another Pressbooks instance, you can add it as follows:

  1. Click the Add URL button.
  2. Enter the URL of the Pressbooks instance that you would like to search against.
  3. Click “Save Changes.”

To return to the Search and Import page, scroll over the Textbooks for PB tab in the Dashboard menu and select “Search and Import” from the drop-down list.

""

All Pressbooks instances added to the Textbooks for Pressbooks Settings page will be available to search against with the Search and Import feature. However, you can only search one domain at a time.

Navigate the search results page

In the below example, the following have been selected as search options:

""

This is the result of this search. Here and some things to notice:

""

  • The search will look for titles containing any of the search terms provided. In this case, it searched for “graphic” OR “design” in the title of all books in the opentextbc.ca instance of Pressbooks. This produced the following results:
    • Database Design – 2nd Edition
    • Nature of Geographic Information
    • Graphic Design and Print Production Fundamentals
  • The licence for each search result is displayed (see arrow #1).
  • You have the option to import all search results by selecting the box beside “Select all” (see arrow #2). If you don’t want to import everything, you can select the radio button beside the resource you want to import (See arrow #3).

To import, click “Start” (see arrow #4). The import can take several minutes, depending on the size of the file.

When the search is finished, it lands on the “Organize” page shown here. Notice that:

""

  1. The book is set to “Private.”
  2. Chapters and sections are not selected to “Show in Web.”
  3. Chapters and sections are not selected to “Show in Exports.”
  4. The title for each section and chapter is set to “Show Title.”

The disadvantage of using the Search and Import feature to import a whole book is the inability to select the chapters and parts wanted before importing. Instead, one must accept all chapters and parts as they appear in the original book and make changes after the import.

Issue to Note

When importing an entire book using the Search and Import feature, chapters and parts may be separated. In the below example, the chapters were taken out of their parts and added to the Main Body part that appeared when the book shell was created. The parts are listed after. We are aware of this problem and are working to resolve it.""In the meantime, if this happens to you, you can use the drag-and-drop feature to reorganize the chapters and move them into their proper parts, and then delete the Main Body part when you are done.

There are many ways to obtain an editable copy of openly licensed Pressbooks content. For more information, see Import Options for Pressbooks Content.

21

Import a Pressbooks or WordPress File

Another way to pull an existing open textbook into a Pressbooks account is by importing the Pressbooks or WordPress file of the textbook. Before you begin, you will need an existing book shell to import the content into. (See Add a New Book.)

Note that although this page focuses on importing a book’s Pressbooks file, the same procedure can be followed when importing a WordPress file.

Where to find a book’s Pressbooks file

You will need to download the Pressbooks file (.xml) of the textbook that you wish to import to your computer. For books in the the B.C. Open Textbook Collection, you can find these files in two different places.

  1. The book record page for the book in the B.C. Open Textbook Collection. Download the Pressbooks file. It will be titled “EDITABLE: Pressbooks file (.xml)”""
  2. The book’s Pressbooks homepage. Go to the book record page for the book in the B.C. Open Textbook Collection and navigate to the book’s Pressbooks homepage by clicking “Read this book online.”""

Pressbooks files are also found:

  1. Listed in the Download this book drop-down list that appears under the book’s cover photo.
  2. Select the Pressbooks XML file from the drop-down list and save it to your computer. ""

How to import a Pressbooks file into Pressbooks

To import the Pressbooks file:

  1. Go to the Dashboard of the new book, and click the Import tab in the Dashboard menu.
  2. From the Import Type drop-down list, select “Pressbooks/WordPress XML (.wxr or .xml).”
  3. Select “Upload File” as the Import Source and click “Choose File” to select the downloaded Pressbooks file from wherever you saved it on your computer.
  4. Click “Begin Import.”

""

Once the content has been imported successfully, you will be redirected to an Import page with a list of all the parts and chapters in the book.

""


  1. You will land on a page that says “Import” at the top, and on the Dashboard menu, the Tools tab will be highlighted.
  2. To ensure that each item ends up in the right place in the book, confirm that the correct category (Front Matter, Chapter, Part, or Back Matter) is selected for each of the rows.
  3. If you only want to import certain parts or chapters, select the items to be imported by clicking on their box in the far left column.
  4. If you want to import the entire book, select the “Title” option at the top of the list. IMPORTANT: This is recommended if you plan to use the whole book or will only be making minor revisions.

""

Before you begin the import process, you can chose if you want the content you are importing to appear in the webbook by selecting “Show imported content in web.” If this check box is not selected, then all parts and chapters that you are importing will appear as drafts, meaning they will not be seen in the webbook. If you do select the check box, parts and chapters will appear in the webbook and the Show in Exports option for every part and chapter will be marked as yes, which makes sure that parts and chapters are included when a book is exported.

If you do not select this check box now, you will need to check the “Show in Web” and “Show in Exports” check boxes by each part and chapter after it’s been imported.

Once you have selected the parts and chapters you want to import, scroll to the bottom of the page and click “Import Selection.” With a large book, the import process may take several minutes. Do not interrupt this process. If you decide that you do not want to import any content, click “Cancel.” This will cancel the import process.

After import: The book’s Organize page

Once the import routine has completed, you will be taken to the Organize view.

""Based on the options selected during the import process you can see the following things:

  1. The book’s global privacy is set to “Private.” This means that the webbook will only be visible to people listed as Users for the book.
  2. Parts and chapters are selected to “Show in Web.”
  3. Parts and chapters are selected to “Show in Exports.”
  4. The title for each parts and chapters is set to “Show Title.” All three of these are default settings.
  5. The summary statement which indicates how many front matter, parts, chapters, back matter were imported. The word count for the entire book (70,262) is also listed below that.

Once you have finished the import process, check to make sure that chapters were placed in their correct parts. If there are any empty parts or chapters left over from the original book shell, you can delete them.

There are many ways to obtain an editable copy of openly licensed Pressbooks content. For more information, see Import Options for Pressbooks Content.

22

Import a Web Page or Pressbooks Webbook

You can also import a Pressbook (or another web page) using a URL (web address). Before you begin, you will need an existing book shell to import the content into. (See Add a New Book.)

To use this feature:

  1. Select the Import tab from the Dashboard menu.
  2. Select “Web page or Pressbooks webbook (.html or URL)” from the Import Type drop-down list
  3. Select “Import from URL” as the Import Source.
  4. Enter the URL in the available field. If importing a Pressbook, use the URL of the webbook‘s homepage.
  5. Click “Begin Import.”

""

If importing a Pressbook, the rest of the import process is the same as that for importing a Pressbooks/WordPress file.

There are many ways to get your own editable copy of openly licensed Pressbooks content. For more information, see Import Options for Pressbooks Content.

23

Import a Word Document

We understand that some authors prefer to work in the familiar environment of a Word document. Other times, when a group of authors is contributing to a book in Pressbooks, it makes sense for each writer to compose in Word and then allow the lead author to import the final drafts into Pressbooks. This approach allows for better control of a book’s content as only one person has control of styling. Finally, there are cases where people may wish to add existing openly licensed content into Pressbooks from a Word file.

The Word import routine recognizes standard markup language for lists (bullets and numbers), headings, and textboxes. However, the Word import routine built into Pressbooks cannot include all markup language used in a Word document because there’s just too much of it. Formatting and layout created in a Word document that uses proprietary markup language (vs. standard markup language) is unlikely to make it through intact from the Word document into Pressbooks. This includes images added to a Word document using Smart Art.

""

For more information, see Import from Word (docx) in the Pressbooks Userguide.

24

Copy and Paste from Word

"" See Copy Paste: Tried and True in the Pressbooks Userguide.

25

Import a Google Doc

If you prefer to use Google Docs to write content, you can also transfer the final result into Pressbooks. To begin:

  1. Export the Google Docs file as an EPUB. (See Export Google Docs files as EPUB publications.)
  2. Import the EPUB file into Pressbooks. (See Import an EPUB File.)

26

Import an OpenDocument Text (ODT) File

The ODT file is one option found in the suite of documents known as OpenDocument Format for Office Applications (ODF), or OpenDocuments for short. Other file types include a spreadsheet, a presentation document, and a chart."OpenDocument," Wikipedia, August 6, 2018, https://en.wikipedia.org/wiki/OpenDocument (accessed August 14, 2018).

To import this file type:

  1. Select “OpenOffice (.odt)” from the Import Type drop-down list.""
  2. By Import Source
    1. select the Upload File radio button.
    2. locate the ODT file to upload using the Browse button.""
  3. Click “Begin Import.”

Part two of this import process is the same as that for importing a Pressbooks or WordPress file.

Help using an ODT file

An OpenDocument Text (ODT) file is an open-source word-processing format. It is “compatible with Word and open source applications like OpenOffice and LibreOffice,” though formatting differences exist between the two and certain Word features are not available in ODT files."Differences between the OpenDocument Text (.odt) format and the Word (.docx) format," Microsoft, August 17, 2015, https://support.office.com/en-us/article/differences-between-the-opendocument-text-odt-format-and-the-word-docx-format-d9d51a92-56d1-4794-8b68-5efb57aebfdc (accessed August 14, 2018).

An ODT file can be opened using Word. However, not all of its elements will work. See differences between the OpenDocument Text (.odt) format and the Word (.docx) format for more information.

For help using an ODT file, see the frequently asked questions posted by the OpenDocument online community.

27

Import an EPUB File

An EPUB file can be used to import an open textbook into Pressbooks. Before you begin, you will need an existing book shell to import the content into. (See Add a New Book.)

To import this file type:

  1. Select the Import tab from the Dashboard menu.
  2. Select “EPUB (.epub)” from the Import Type drop-down list.""
  3.  Select “Upload File” as the Import Source.
  4. Locate the EPUB file on your computer using the Browse button.""
  5. Click “Begin Import.”

Part two of this import process is the same as that for importing a Pressbooks or WordPress file.

IV

Enhance Content

Section Topics

This section outlines several ways to improve and enhance content. Features covered include how to:

  • Hyperlink material within and between chapters and to external sources
  • Add both bulleted and numbered lists
  • Add and design tables
  • Insert standard, shaded, and specialized textboxes
  • Upload images and PDF files
  • Embed videos, audio files, and other interactive media
  • Use footnotes and endnotes
  • Use LaTeX to create formulas and equations

29

Blockquotes and Pullquotes

Blockquotes

Blockquotes are used for long quotations that must be placed in a stand-alone block of text without using quotation marks. The blockquote feature in Pressbooks is useful because it automatically formats the text according to blockquote requirements. For guidelines on when blockquotes should be used, check your chosen style guide.

""

The blockquotes feature is identified in the WYSIWYG toolbar by the double quotation mark icon. To use this feature:

  1. Highlight the text you want included in the quotation (this may include the in-text citation, depending on your style guide) and click on the blockquote icon.
  2. In the visual editor, the text that marked as a blockquote is indented and have a smaller font than the main-body text.""

In the webbook, the blockquote is indented and highlighted in gray.""

Pullquotes

A pullquote is a quotation that has been pulled from the body of a book or other piece of writing that highlights a key piece of information in a way that adds visual interest to that same book.

"" For more information, see Adding Pullquotes in the Pressbooks Userguide.

30

Lists: Bulleted and Numbered

Bulleted (unordered) lists

""

You can add a bulleted list by selecting the Bulleted list icon from the WYSIWYG toolbar.

  1. Place the cursor where you want the list to appear.
  2. Click on the Bullet list icon. Write your list item. Alternatively, you can write a list item first, highlight it, and then select the Bullet list icon to insert a bullet.
  3. When finished with your first list item, press the Enter key on your keyboard to add another list item.
    ""

There are two ways to add a secondary-list level to a primary list:

  1. Highlight the items in a primary list that you want changed to secondary-list items, and click the Increase indent icon in the WYSIWYG toolbar.
  2. Place your cursor at the beginning of a list item that you want changed to a secondary-list item and press the Tab key on your keyboard.

""

An unlimited number of sub-lists can be created under a primary bullet list.

""

Numbered (ordered) lists

""

See Formatting Ordered Lists in the Pressbooks Userguide.

31

Tables

""

See Tables and Textboxes in the Pressbooks Userguide.

Issue to Note

Styling tables can be a challenge when the CSS of a book overrides the HTML for individual chapters. For help with this issue, see Customizing your Exports with Custom Styles in the Pressbooks Userguide.

32

Textboxes

Specialized textboxes

In the last row of the WYSIWYG toolbar, there are three icons for specialized textboxes. Each of these is designed with special content in mind:

While it is recommended that these special textboxes be used as designed—metadata has been added to each textbox for optimal discoverability—the headings can be rewritten to better reflect the exact content added.

""

Specialized textboxes can also be added using the Textboxes drop-down list available in the second row of the WYSIWYG toolbar.

""

For more information, see Tables and Textboxes in the Pressbooks Userguide.

Standard and shaded textboxes

""

See Tables and Textboxes in the Pressbooks Userguide.

Sidebar Textboxes

All textboxes available in the Textboxes drop-down list of the WYSIWYG toolbar are also available as sidebars. Here are characteristics to take note of:

33

Images and Files

Pressbooks allows you to upload and insert many different types of files and media into your book. When uploading media into Pressbooks, note the following:

"" See the following chapters in the Pressbooks Userguide:

Optimize images for web and print

If your goal is to produce a book for both web and print delivery at the same time, image set up and placement must be considered. We recommend centring all images and keeping the maximum image size to a width of 500 pixels and height of 600 pixels.

If you use a larger image, there is a risk that it will be pushed to another page in the PDF—sometimes several pages away from its webbook position. One solution is to add page breaks to key spots in the book.

"" See Section Breaks, Page Breaks and Blank Pages in the Pressbooks Userguide.

Some authors choose to create a separate version for print, sometimes using a different system such as InDesign, so that text and image layout for the web version can be more creative.

Image captions

For a comprehensive discussion on caption styling, see Resources: Captions and Attributions in the Self-Publishing Guide.

Issues to Note

  1. Images without a caption do not render properly in all eReaders.
  2. Images without captions cannot be centred. An easy work around is adding a period to the caption field, or adding the following CSS to the Custom Styles for the webbook, PDF, and eBook:
    .front-matter img, .part img, .chapter img, .back-matter img {
    display: block;
    height: auto;
    margin-left: auto;
    margin-right: auto;
    max-width: 100%;
    padding: 0;
    page-break-inside: avoid !important;
    prince-image-resolution: 135dpi; }

Upload files to a book

In a book, you can link to files hosted the Pressbooks Media Library so people reading the book can access those files. This feature may be useful if you want to share files that will not display directly in Pressbooks, like PDFs, Excel spreadsheets, or PowerPoint slides.

To add a link to a file in a book in Pressbooks, follow the following steps:

  1. Click “Add Media” at the top of the Visual Editor in Pressbooks.
  2. Select the Upload Files tab and select the file you want to upload.
  3. Click “Insert into chapter.”
  4. You will be able to edit the link text as you would for a normal hyperlink.

34

Videos, Audio, and Interactive Media

Videos

"" See Embedded Media and Interactive Content in the Pressbooks Userguide.

Align Embedded Videos

When a video is embedded on a book’s webpage in Pressbooks, it aligns to the left by default. This alignment can be adjusted as follows:

  1. Enter the video URL. This action will automatically embed the video, which makes it difficult to align.
  2. Go to the Text (HTML) editor and locate the video’s URL.
  3. Click any part of the video URL.
  4. Return to the Visual Editor and you should see that the video has converted from its embedded form to its URL.
  5. Use the Align feature in the WYSIWYG toolbar to align the URL centre or right and click “Save.”
  6. Click “View Chapter” to navigate to the webbook. The embedded video should be aligned correctly. Note: While the embedded video will appear in the webbook, the Visual editor view will only show the video’s URL.

Videos in PDFs

The PDF files (print and digital) exported from Pressbooks do not include the URLs for videos embedded in a book. In order to provide full access to these media for readers using printed copies of an online open textbook, it is recommended that URLs be provided for each embedded video.

For more information, see “Provide web addresses for print users” in the Links chapter in the Accessibility Toolkit – 2nd Edition.

YouTube

Many BCcampus open textbook publications post videos on YouTube to be embedded in a textbook. This is done for a few reasons:

  1. YouTube is easy to use.
  2. Videos on YouTube can be assigned a Creative Commons licence.
  3. YouTube will help ensure that videos get a broad exposure beyond the textbook in which they are embedded.

If you own the copyright for a video posted on YouTube intended for an open textbook, take steps to change the video’s licence from the default “Standard YouTube license” to the “Creative Commons Attribution license (reuse allowed).” (See How to Change the License of Your YouTube Video to Creative Commons.)

""Not all videos from YouTube can be embedded into Pressbooks. YouTube videos have three privacy settings that account holders can select. Pressbooks can only embed videos set to “Public” (can be viewed by anyone) and “Unlisted” (can be viewed by anyone who has a direct link to the video). Videos that are set to  “Private” (can only be viewed by video owner) cannot be embedded into Pressbooks. (See How to Upload a Video to YouTube for instructions on how to adjust privacy settings while uploading a video.)

Videos grouped in a playlist on YouTube are designed to play continuously in sequence. To prevent rollover for an embedded video taken from a playlist, use the URL found under the Share link found above the video description box. Highlight the URL by double clicking the link, then copy the URL by right clicking on the link and selecting “Copy.”

Here is an example of an embedded video:

Thumbnail for the embedded element "Two Person Ladder 001"

A YouTube element has been excluded from this version of the text. You can view it online here: https://ecampusontario.pressbooks.pub/pressbooks/?p=149

Media 1: “Two Person Ladder 001” can be found online at https://youtu.be/WjDhFVfP8f0

Audio

Audio files posted in a repository, such as Sound Cloud, can be embedded in Pressbooks the same way that videos are embedded—using a URL.

Here is an example of an embedded audio clip:

Thumbnail for the embedded element "Jess Mitchell by Creative Commons"

A SoundCloud element has been excluded from this version of the text. You can view it online here: https://ecampusontario.pressbooks.pub/pressbooks/?p=149

Media 2: “Jess Mitchell” can be found online at https://soundcloud.com/wearecc/jess-mitchell
MORE TO COME: Information on how to upload and embed audio files will be added at a later date.

Other interactive media

"" See Embedded Media and Interactive Content in the Pressbooks Userguide.

For information on adding interactive activities to your Pressbook, see H5P for Interactive Material.

35

Footnotes and Endnotes

"" See Footnotes and (Chapter) Endnotes in the Pressbooks Userguide.

36

LaTeX for Formulas

LaTeX is a programming language used for technical and scientific documents, but in small snippets, it can also be used to easily create formulas and equations in Pressbooks. Each character has its own code, and there are functions for common formatting as well."Equations and Formulas: How to Use LaTeX," Pressbooks Userguide, https://guide.pressbooks.com/chapter/equations-and-formulas/ (accessed July 25, 2018).

"" For more information, see Equations and Formulas: How to Use LaTeX in the Pressbooks Userguide.

Other LaTeX resources

37

Revisions Tool

Pressbooks saves the previous 25 versions of each chapter and part in a book. These are useful if you want to review changes or return to a past version of your work.

To review previous versions of a chapter or part, open that part or chapter in the visual editor. Find the Status & Visibility box, which is located in the right sidebar, and click the Browse link that follows “Revisions.”

""

On the Compare Revisions page, the most recent version is posted beside the current version (which appears on the right). You can view older versions by moving the horizontal scroll bar positioned near the top of the page. At the top right of the screen, there is a Compare any two revisions option, which allows you to view any two versions side-by-side. If you find a version that you would like to restore, click the Restore This Revision button.

""

Deleted material is highlighted in red and new material is highlighted in green.

V

Plugin Features

Section Topics

This section defines plugins and describes how to:

  • Activate select plugins in Pressbook
  • Use the H5P plugin
  • Use the Hypothes.is plugin
  • Use the Quick LaTeX plugin

38

Activate Plugins

Plugins are software components that can be added to an existing computer program, such as Pressbooks, in order to provide additional features."Plug-in (computing)," Wikipedia, June 24, 2018, https://en.wikipedia.org/wiki/Plug-in_(computing) (accessed August 10, 2018).

There are three plugins that account holders can activate for each book within their account: H5P, Hypothes.is, and WP Quick LaTeX. Only the Administrator for a book has the ability to do this. If you are the Administrator of more than one book, you will have to activate the plugins in each book you want them turned on in.

To activate these plugins:

""

39

H5P for Interactive Material

The H5P plugin allows Pressbooks users to create interactive material, such as quizzes, timelines, drag-and-drop questions, and more. This free and open-source technology was first released in 2013."H5P," Wikipedia,  https://en.wikipedia.org/wiki/H5P (accessed August 10, 2018). For more information, visit the H5P website.

For those who chose to use this plugin in a book, be aware that it is not meant to replace a graded or summative test. Instead, H5P activities are most useful for student self-quizzing and encouraging interaction with content.

Once this plugin is activated, two new tabs will be added to the book’s Dashboard menu: the H5P Content tab and the H5P link under the Settings tab.

""

Settings for H5P range from how the toolbar is controlled to whether to automatically share usage statistics with the H5P developers. Click “Save Changes” at the bottom of this page if you make any changes.

""

The H5P Content tab is where you can create new H5P activities and manage activities that you created previously.

""

"" For more information, see H5P Interactive Content in the Pressbooks Userguide.

40

Hypothes.is

41

WP Quick LaTeX

Enabling the WP Quick LaTeX plugin allows authors to type and publish native LaTeX syntax directly into the Visual Editor of book chapters in Pressbooks. No LaTeX installation is required.

When this plugin is activated, a QuickLaTeX link will be added to the Settings tab in the Dashboard menu.

""

There are five tabs for QuickLaTeX settings. The Getting started and About tabs provide additional information about this plugin. Under the Basic Settings tab, you can adjust things like font size and colour. The Advanced and System tabs include default settings recommended for most users.
""

"" For more information, see “QuickLaTeX” in the Equations and Formulas: How to Use LaTeX chapter of the Pressbooks Userguide.

To learn how to use LaTeX, see LaTeX for Formulas.

VI

Delete Content

Section Topics

This section describes how to remove some or all of a book. Instructions include how to:

  • Delete a chapter
  • Delete a part
  • Delete a book

42

Delete a Chapter

Chapters can be deleted from any part in a book. To do this:

  1. Click the Organize tab in the Dashboard menu to view the parts and chapters in a book.
  2. Scroll over the name of the chapter that you want to delete to reveal the Edit, Trash, and View options.
  3. Click “Trash.” (Note that there is no warning message.)

""

Restore a deleted chapter

To restore a deleted chapter:

  1. Scroll over (or click) the Organize tab in the Dashboard menu to reveal a drop-down menu.
  2. Click “Trash” at the bottom of the menu.
  3. Locate the deleted item, and click “Restore” in the far-right Action column.

IMPORTANT: Items in the trash will be permanently deleted after one day.

""

"" For more information, see Chapters in the Pressbooks Userguide.

43

Delete a Part

To delete Main Body parts:

  1. Click the Organize tab in the Dashboard menu to view the parts and chapters in a book.
  2. Scroll over the name of the part that you want to delete to reveal the Edit, Trash, and View options.
  3. Click “Trash.” (Note that there is no warning message.)

""

If the deleted part contains chapters, these will be moved to another part. If the deleted part was below the first Main Body part, the orphan chapter(s) will move to the first part. If the deleted part is the first Main Body part, the orphan chapter will move to the last part. Consider moving chapters to another part before deleting the part.

IMPORTANT: The front matter and back matter parts of a book cannot be deleted, but chapters within these parts can be added or deleted.

Restore a part

To restore a deleted part:

  1. Scroll over (or click) the Organize tab in the Dashboard menu to reveal a drop-down menu.
  2. Click “Trash” at the bottom of the menu.
  3. Locate the deleted item, and click “Restore” in the far-right Action column

IMPORTANT: Items in the trash will be permanently deleted after one day.

""

"" For more information, see Parts in the Pressbooks Userguide.

Attributions

Some of this text has been taken from Parts by Hugh McGuire, a chapter in the Pressbooks Userguide, and is used under a CC BY 4.0 International Licence.

44

Delete a Book

To delete an entire book:

  1. Go to the book’s Dashboard.
  2. Scroll over the tab containing the book’s name in the top menu to reveal a drop-down list.
  3. Click “Delete Book.”


On the “Delete Book” page it says:

If you do not want to use your BC Open Textbooks book any more, you can delete it using the form below. When you click Delete My Book Permanently you will be sent an email with a link in it. Click on this link to delete your book.

Remember, once deleted your site cannot be restored.

To continue:

  1. Select the check box by “I’m sure I want to permanently disable my book, and I am aware I can never get it back or use pressbooks.bccampus.ca/YOUR BOOK’S URL/ again.”
  2. Click “Delete My Book Permanently.”
  3. Check the email associated with your Pressbooks account for a link to confirm your action. Your book will not be deleted until this hyperlink is clicked.

VII

Prepare for Publication

Section Topics

There are several tasks that need attention before publishing a book. The following are covered here:

  • Completing the Book Info page
  • Exporting files
  • Making the book public
Also see Pre-publication in the Self-Publishing Guide.

45

Book Info Page

"" See Book Info in the Pressbooks Userguide.

Copyright and licence information

Using information entered on the Book Info page, Pressbooks automatically generates a number of automatic pages, information blocks, and statements to provide licence and copyright information. (See Automatic Pages and Features.)

Although it may look different, this information will appear in all formats, including the webbook:

Webbook

The home page of the webbook will contain the book title, subtitle, author, the licence type, and a licence statement. Farther down the home page will be the metadata for the book, including the book title, author, publisher, reviewer, translator, illustrator, licence type and licensing statement. Licence and copyright information is also listed at the end of every chapter.

PDF

PDFs will contain a title page providing the book title, subtitle, author, and publisher name and city. There will also be a copyright page that provides the licensing statement, which includes the book title, author, and licence type.

Other things to note

Here are some items to take note of:

Copyright Notice field

See below for suggested language to use in the Copyright Notice field on the Book Info page for both a new and adapted open textbook.

Copyright notice for a new open textbook

Following the Copyright Holder and Copyright License fields, is the Copyright Notice field where information is provided about copyright, the licence, and related actions. Items that can be added are:

Here is a sample:

The CC licence permits you to retain, reuse, copy, redistribute, and revise this book—in whole or in part—for free providing it is attributed as follows:

Introduction to Korean by John Kim is used under a CC BY 4.0 International Licence

This textbook can be referenced. In APA citation style, it would appear as follows:

Kim, John. (2016). Introduction to Korean. Victoria, BC: BCcampus. Available from [url].

Cover image attribution: Another hand mirror reflection by Frank Kovalchek is used under a CC BY 2.0 Licence.

Copyright notice for an adapted open textbook

The copyright notice for an open textbook that is an adaptation is similar to that of an original textbook, with a few exceptions. Items that can be added are:

Intermediate Korean is an adaptation of Introduction to Korean by John Kim, also copyrighted by John Kim. The original textbook, unless otherwise noted, was released under a Creative Commons Attribution 4.0 International (CC BY) licence.

The new and revised material in this adaptation is copyrighted 2017 by the adapting authors Jane Green and Joe Smith and is released under a Creative Commons Attribution-ShareAlike 4.0 International (CC BY-SA) Licence. The revisions and new material made to the original textbook are listed below.

  • Chapter 1: Added section on “Living in the City.”
  • Chapter 2: No changes made.
  • Chapter 3: Three audio clips added. Removed section 3.5.
  • Chapters 4 and 5: New.
  • Chapter 6: Real life scenario added.
  • Glossary of key terms: New.

In general, language was revised to improve flow, links to other chapters were added, spelling was corrected. Exercises for all chapters were revised to suit the more difficult material.

This textbook can be cited in APA citation style as follows:

Green, J. & Smith, J. (2017). Intermediate Korean. Victoria, BC: BCcampus. Available from [url].

Cover image attribution: Another hand mirror reflection by Frank Kovalchek is used under a CC BY 2.0 Licence.

Chapter licences

If you need a different licence for a specific chapter, scroll to the bottom of the chapter’s page in the visual editor and select one from the Copyright License drop-drop menu. This action will override the book licence for that page only.

46

Add Contributors

Before filling out the Book Info page, add the names of all individuals who contributed to the textbook. This list can include the following: authors, editors, reviewers, illustrators, translators, and others.

To add contributors:

  1. Go to the Book Info page on the Dashboard menu, and select one of the Create New Contributor buttons.""
  2. Fill in the contributor’s name in the Name field and click “Add New Contributor.” You can fill in as many of these fields as you want.""
  3. This action places the contributor’s name in the list to the right of the Add New Contributor box and as an option on the drop-down list for each contributor type on the Book Info page.""
  4. After all contributors have been added, go to the Book Info page and add the names to the correct fields by selecting them from a drop-down list. The drop-down list appears by clicking inside the field of any contributor type.""

47

Export Files

Pressbooks allows you to export a book into different file formats such as PDF, EPUB, MOBI, and more.Books published by BCcampus are exported in all available formats. Export options are found in the Export tab in the Dashboard menu.

"" See Export and PDF Export and Options in the Pressbooks Userguide.

PDF: blank pages

If a book has unnecessary blank pages in the PDF file:

  1. Go the the Dashboard menu
  2. Under the Appearance tab select “Theme Options” and then the PDF Options tab.
  3. Scroll down this page and select “No blank pages.”
  4. Save changes.

IMPORTANT: This option is only available for the Digital PDF file, not the Print PDF version.

""

PDF formats: print vs. digital

When exporting different file types, there are two PDF options to choose from:

Here are the differences between the two:

Characteristics PDF (Print) PDF (Digital)
Purpose Designed for printing. Blank pages are inserted where expected for print outputs. Internal navigation links will not work. Designed for reading on an electronic device and sharing online. Internal navigation links will work.
Pressbooks Icon Colour red green
File Name/Extension print.pdf .pdf
Image Resolution high (print quality: 300 dpi) lower (web quality: 72 dpi)
File Size Larger Smaller

Validation error reports

On the Export Settings page, a book Administrator has the option to receive validation error logs for exported files.

To enable this feature:

  1. On the Dashboard menu, select the Settings tab and click “Export.”
  2. By “Email Validation Logs” select “Yes. Email me validation error logs on export.”
  3. Click “Save Changes.”

""

If errors are detected in any of the exported files, a validation error report—one for each file type that contains an error—is sent to the email associated with the Pressbooks account of the person who exported the files.

MORE TO COME: Information on how to interpret validation error logs and make corrections to a book will be added when available.

48

Make a Book Public

During the book creation process, the account holder is asked “Would you like your webbook to be visible to the public?” The default setting is “Yes,” though most authors decide to keep their book private during the writing process.

To change a book’s privacy setting, click the Organize tab in the Dashboard menu. The privacy options are displayed at the top of the Organize page.

""

If someone who has not been given access by the book’s Administrator attempts to read a “private” book, an Access Denied message appears. To give someone access to a private book, they will have to be added as a User. (See Provide Access to Others.)

""

To open a book to the public, go to the Organize page and select the Public radio button at the top of the page.

""


VIII

Statistics

Section Topics

There are several ways to track statistics on how many people are using an open textbook and downloading files. This chapter describes three different methods:

  • Statistics inside a Pressbooks account
  • Statistics for books hosted in the B.C. Open Textbook Collection
  • Statistics for BCcampus-published books in Pressbooks
Also see Track Adoptions in the Self-Publishing Guide.

49

Book Statistics Inside Pressbooks

Pressbooks Users have the ability to view statistics for each book that they are the Administrator of, thanks to the WP-Piwik plugin activated for the B.C. self-serve instance of Pressbooks.WP-Piwik is an open-source analytics tool for WordPress platforms.

Statistics are displayed in a couple of places within a book. WP-Piwik numbers for the last 30 days are found in an Overview box on the lower-right section of a book’s Dashboard. This box comes with a collapse arrow to hide the information.

""To view detailed statistics, begin by selecting “WP-Piwik” from the Dashboard menu.

""

This action will reveal the Piwik Statistics page, which contains information about the webbook, such as the number of visitors that have looked it. See the Matomo Glossary for definitions of the metric terms used by this tool.

""

IMPORTANT: WP-Piwik was renamed WP-Matomo on January 9, 2018. The announcement blog explained that the name was changed “to ensure that Matomo does not/will not share its name with any other businesses unlike Piwik.Piwik PRO (https://piwik.pro/) is an example of a business that uses the label "piwik." We also want to protect the Matomo brand and for it to remain the open source community project name forever.” The label for this plugin in Pressbooks has not yet been changed.

50

Statistics for Books in the B.C. Open Textbook Collection

BCcampus Open Education provides statistics for each textbook hosted in the B.C. Open Textbook Collection under the “open.bccampus.ca” tab on the Open Textbook Stats page.

A Download Stats button is provided for each book. There is also a link to the book in the collection to the left of each book title.

""

The Download Stats page for a book shows:

""

51

Statistics for BCcampus Publications

Most of the open textbooks that have been fully funded, managed, and published by BCcampus during the initial phase of the open textbook project are hosted on on BCcampus’ internal instance of Pressbooks (opentextbc.ca). For each of these textbooks, there are stats available for how often the webbook is accessed and how often the files on the webbook’s home page are downloaded. These statistics are found under the “opentextbc.ca” tab on the Open Textbook Stats page.

""

IX

Pressbooks Support Resources

Section Topics

The support resources in this section are designed for the post-secondary sector in British Columbia and the Yukon. However, anyone is welcome to reference and adapt these materials. They include:

  • Pressbooks Updates
  • Pressbooks Training Webinars
  • Webinar PowerPoint slides
  • Webinar recordings
  • Pressbooks FAQs
  • Pressbooks Feedback form

52

Pressbooks Updates

BCcampus maintains a Pressbooks Updates page to help keep the community informed of what’s going on with Pressbooks.

See Pressbooks Updates for information about the BCcampus instances of Pressbooks, including:

  • The current Pressbooks version
  • Link to the Pressbooks change log
  • Information on reporting issues
  • Dates and information for upcoming and past updates
  • Detailed descriptions of significant changes and updates to the Pressbooks platform

Information of about Pressbooks updates is also sent out through a Pressbooks email distribution list. Everyone who has created a Pressbooks account in the pressbooks.bccampus.ca instance of Pressbooks should be on this list. If you have a BCcampus Pressbooks account and are not receiving these emails (but would like to be), email helpdesk@bccampus.ca, and ask to be added to the PB Notifications distribution list.

53

Pressbooks Training Webinars

BCcampus Open Education offers Pressbooks Training Webinars to post-secondary faculty and staff in British Columbia and the Yukon.

Webinars are scheduled every six to eight weeks during the fall and spring terms for a total of five or six each year. Each session is comprised of a one-hour Introduction webinar followed by a one-hour Intermediate webinar.

For faculty and staff who do not have experience using Pressbooks, it is strongly recommended they take the Introduction webinar before the Intermediate session. These two webinars are conveniently scheduled so they can be taken on the same day. Registrants are referred to this Pressbooks Guide and the BCcampus FAQs (see Main Topics: Pressbooks) as support resources and are encouraged to review these in advance of the class.

These webinars are not only learning opportunities for users, but also a chance for BCcampus Open Education to hear questions and receive feedback with the goal of improving the support materials we create and maintain for Pressbooks users.

54

Webinar PowerPoint Slides

At BCcampus, we encourage all B.C. post-secondary institutions to train their faculty and staff on how to use Pressbooks. To assist with this effort, we have made the PowerPoint slides used during our webinar sessions available for all to use.

These slides are released with a CC BY licence.


55

Webinar Recordings

Below are recordings from past Pressbooks Training webinars.

Introduction

View recording for the June 12, 2018 session of the Pressbooks Introduction webinar.

Intermediate 1: How to import/export files

View recording for the April 16, 2018, session of the Pressbooks Intermediate 1 webinar.

Intermediate 2: Layout and styling tips

View recording for the June 12, 2018, session of the Pressbooks Intermediate 2 webinar.

Intermediate 3: Finding, citing, attributing OER

View recording for the November 28, 2017, session of the Pressbooks Intermediate 3 webinar.

Intermediate 4: Embedding and adding multimedia: beyond the basics

View recording for the January 23, 2018, session of the Pressbooks Intermediate 4 webinar.

56

Pressbooks FAQ

See the BCcampus Open Education Frequently Asked Questions. For FAQ’s specifically relating to Pressbooks, set “Pressbooks” as the Main Topic.

57

Pressbooks Feedback

Use the Pressbooks Feedback form to submit comments about the BCcampus instance of Pressbooks including feature suggestions, problems, or suggestions for improvement.

1

Appendix A: Administrators, Developers, Technical Support

For administrators managing their organization’s Pressbooks instance, individuals who provide technical support, and developers who build and fix Pressbooks features, see below for support communities and resources:

2

Appendix B: List of Links by Chapter for Print Users

This page contains a list of links to external resources referenced in this book for people who are using a print version. Links are listed by the parts and chapters in which they appear and are listed alphabetically. Internal links are not included in this list.

About This Guide

Introduction

Accessibility Statement

Pressbooks for B.C. and the Yukon

Pressbooks Accounts

Passwords and Usernames

Provide Access to Others

Book Set Up

Accessibility

Language and Script Support

Annotation with Hypothes.is

Comments

The Dashboard

Add a New Book

Parts: Add, Change, Organize

Chapters: Add, Change, Organize

Front Matter: Add, Change, Organize

Back Matter: Add, Change, Organize

Automatic Pages and Features

Create New Account

Clone a Book

Import a Word Document

Copy and Paste from Word

Import a Google Doc

Import an OpenDocument Text (ODT) File

Hyperlink Material

Blockquotes and Pullquotes

Lists: Bulleted and Numbered

Tables

Textboxes

Images and Files

Videos, Audio, and Interactive Media

Footnotes and Endnotes

LaTeX for Formulas

H5P for Interactive Material

WP Quick LaTeX

Delete a Chapter

Delete a Part

Prepare for Publication

Book Info Page

Export Files

Statistics

Book Statistics Inside Pressbooks

Statistics for Books in the B.C. Open Textbook Collection

Statistics for BCcampus Publications

Pressbooks Updates

Pressbooks Training Webinars

Webinar Recordings

Pressbooks FAQ

Pressbooks Feedback

Appendix A: Administrators, Developers, Technical Support

Versioning History

3

Glossary

Pressbooks Definitions and Features

Administrator: The highest level of permissions that a user can have in a book in Pressbooks. Administrators can add, edit, and delete parts and chapters, they can add and delete users, and they can delete a book. (See Provide Access to Others.)

Anchor: A unique, case-sensitive ID used to mark a spot within a Pressbooks book to create an internal link. Anchors can be inserted by clicking the Anchor icon in the third row of the WYSIWYG toolbar. (See Hyperlink Material.)

Appearance/Themes: A tab in the Dashboard menu where a book’s Theme, Theme Options, and Custom Styles can be changed. (See Appearance.)

Author: A level of permissions that a user can have in a book in Pressbooks. Authors can write, edit, and publish their own parts and chapters, but not those of others. (See Provide Access to Others.)

back matter: A kind of part that comes at the end of a book after the main content. It can include chapters like a glossary, bibliography, and appendices. (See Back Matter: Add, Change, Organize.)

blockquotes: A tool found in the first row of the WYSIWYG toolbar that can be used to format long quotations. (See Blockquotes and Pullquotes.)

Book Info: A tab in the Dashboard menu where a textbook’s publication information can be added. It includes fields such as title, author, editor, book description, licence, and copyright information. (See Book Info Page.)

book view: See webbook.

chapter: The term used in Pressbooks to indicate a section within a part. You may also see chapters sometimes being referred to as a “post.” (See Chapters: Add, Change, Organize.)

Chapter Author: A field found in the Chapter Metadata box at the end of each chapter. It is used when a chapter author is different from the book author.

Chapter Metadata box: A collection of fields at the bottom of each chapter where information can be changed for a specific chapter when it differs from the rest of the book.

Clone a Book: An action that allows users to copy or clone a book in any instance of Pressbooks, as long as it has been made public. (See Clone a Book.)

comments: A feature that an author can use to solicit feedback from readers. This option is disabled, book-wide, by default. (See Comments.)

Contributor: A level of permissions that a user can have in a book in Pressbooks. Contributors can only write and edit their own posts.(See Provide Access to Others.)

Copyright Notice: A field on the Book Info page in Pressbooks where licence type, copyright holder, and related information are added. (See Book Info Page.)

copyright statement: Copyright information that is added to the Copyright Notice field on the Book Info page in Pressbooks.

Custom Styles: An area in Pressbooks where the CSS of a book can be customized in web, PDF, and eBook formats. It is accessed from a book’s Dashboard menu under the Appearance tab. (See Custom styles.)

Dashboard: An area in Pressbooks where an user can work on a specific book. This is where a book’s content is hosted and where users will find links to various tools and functions. It is also where a user is automatically directed after logging in. (See The Dashboard.)

Dashboard menu: The left-hand navigation column which lists links to a variety of tools and features in a textbook.

Distraction-Free Writing mode: A button at the top right of the WYSIWYG toolbar that allows users to hide the side bars when working in the Pressbooks editor for a distraction-free writing experience. The sidebars return by clicking the Distraction-Free Writing mode button again or by mousing over the sidebars. (See Special features.)

Download Textbooks: A page found under the Textbooks for PB tab in the Dashboard menu that allows Pressbooks users to download open textbooks from the B.C. Open Textbook Collection. This feature is unique to the B.C. Faculty Pressbooks instance.

edit view: What a user sees when working in the Pressbooks editor. See Text (HTML) Editor and Visual Editor.

Editor: A level of permissions that a user can have in a book in Pressbooks. Editors can add, edit, manage, and publish posts, even those of others. (See Provide Access to Others.)

Exercises (EX button): A textbox option available in the Pressbooks WYSIWYG toolbar used to add exercises or problems as part of a Pressbooks part or chapter. It is recommended that this textbox be restricted to this usage because of the related meta tags. See textboxes.

Export: A tab in the Dashboard menu used to export a book into different file formats such as PDF, EPUB, and MOBI. (See Export Files.)

Footnotes (FN button): An option in the Pressbooks WYSIWYG toolbar for creating footnotes. (See Footnotes and Endnotes.)

front matter: A kind of part, placed at the beginning of book content, that contains content like introductions, dedications, prefaces, and acknowledgements. (See Front Matter: Add, Change, Organize.)

Import: A tab in the Dashboard menu where content is imported into Pressbooks from other sources such as Word, EPUB, and HTML files. (See Add Content.)

instance: A self-contained version of Pressbooks administered by a particular group. Different instances of Pressbooks may have different features, or may be reserved for particular users. A Pressbooks instance is also called a “domain” or “network.”

Key Takeaways (KT button): A textbox option available in the Pressbooks WYSIWYG toolbar used to summarize key points in at the end of a Pressbooks part or chapter. It is recommended that this textbox be restricted to this usage because of the related meta tags. See textboxes.

LaTeX: A programming language built to input, format, and display mathematical and scientific formulas. (See LaTeX for Formulas.)

Learning Objectives (LO button): A textbox option available in the Pressbooks WYSIWYG toolbar used to list the learning outcomes for a Pressbooks part or chapter. It is recommended that this textbox be restricted to this usage because of the related meta tags attached. See textboxes.

Main Body: The default label given to a part found in the central portion of a book. It can be relabeled as needed.

Media: A tab in the Dashboard menu that contains a library where imported images, videos, and files are stored for the purpose of embedding or linking in the book. Media can also be added to the Media Library by clicking the Add Media button above the main content in the Pressbooks editor. (See Media.)

My Catalogue: Found in the top, red navigation bar; it displays and allows selection of other books found in a Pressbooks account. (See My Catalogue.)

Order: The field used to determine the order in which parts are displayed.

Organize: Tool used for adding, editing, assigning types, and reorganizing content into parts and chapters. This tool can also be used to select chapters for exporting, display a title (Show Title), and make a textbook private or public. (See Organize.)

parts: Overarching sections in Pressbooks that hold chapters. A book is made up of chapters which are sequentially ordered in parts. (See Parts.)

permalink: Another name for a chapter’s URL or web address. (See Chapter title and permalink.)

pullquotes: A quotation that has been pulled from the body of a book, or other piece of writing, that highlights a key piece of information in a way that adds visual interest to a book. (See Blockquotes and Pullquotes.)

reader view: See webbook.

Settings: A tab in the Dashboard menu that contains numerous options such as privacy, exporting, and displaying formulas with the LaTeX tool. (See Settings.)

source book: A book used to clone a copy. (See Clone a Book.)

Special character button: A button in the WYSIWYG toolbar that reveals a table of special characters that can be inserted into a Pressbooks page. (See Special features.)

Subscriber: The lowest permission level that a user can have in a book in Pressbooks. Subscribers can only read posts. (See Provide Access to Others.)

target book: The destination book into which a cloned/source book is copied. (See Clone a Book.)

Text (HTML) tab: The HTML editor view in Pressbooks that allows editing of content as plain text HTML.

Textbooks for PB: A tab in the Dashboard menu that provides tools for working with content from other open textbooks. (See Textbooks for PB.)

textboxes: A drop-down list of textbox options in the WYSIWYG toolbar. There are a number of standard and educational textbox options that can also appear as sidebars. (See Textboxes.)

Theme Options: An page under the Appearance tab on the Dashboard menu where Administrators can select different appearance and formatting options. (See Theme Options.)

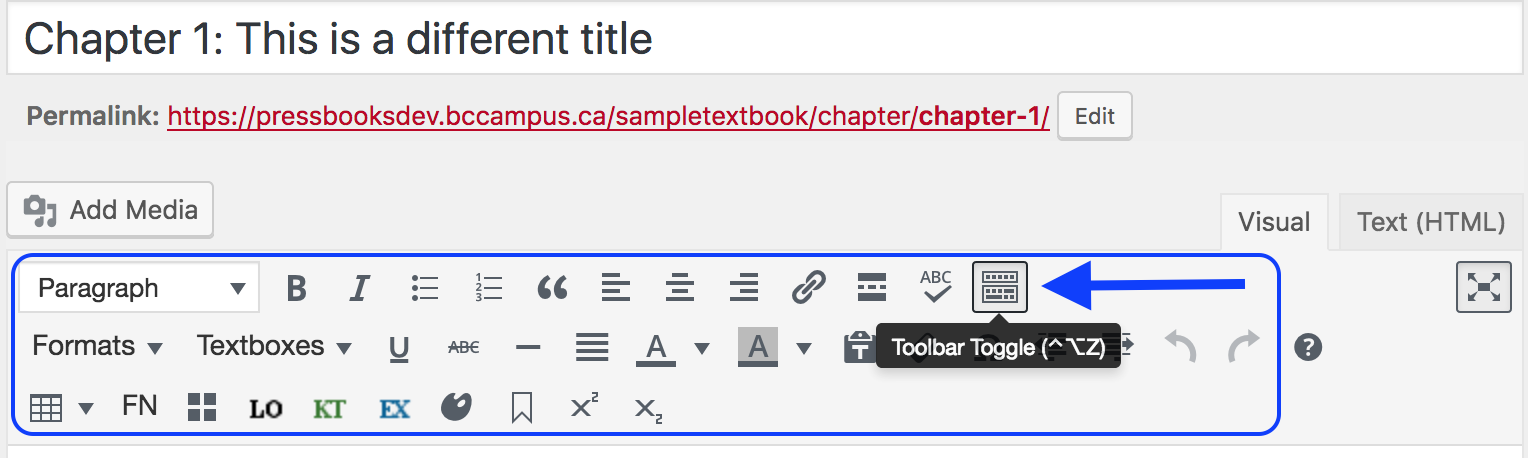
Toolbar Toggle: A toggle button on the WYSIWYG toolbar that will show/hide advanced tools, such as textboxes, headings, special characters, footnotes, superscript, and subscript. (See Special features.)

Visual tab: The visual—WYSIWYG—editor view in Pressbooks which allows you to see how content will be formatted in different exported files and webbook. See WYSIWYG.

Users: A tab in the Dashboard menu where an Administrator can add and delete Users in a book and change permissions. Users can have any of the following roles: Administrator, Editor, Author, Contributor, or Subscriber. (See Users.)

webbook: The online version of a book authored in Pressbooks.

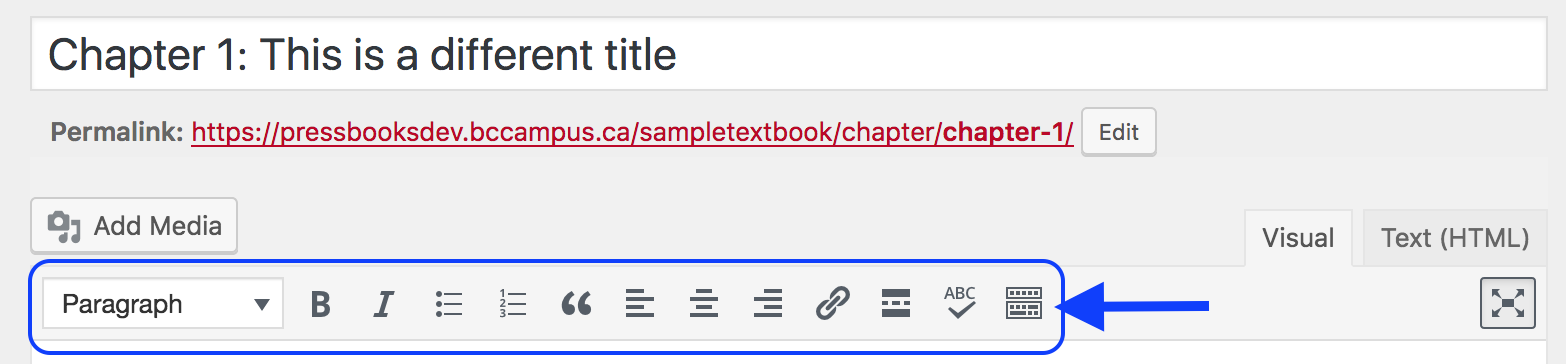
WYSIWYG toolbar: The three rows of tools and formatting options available in the Pressbooks Visual Editor. (WYSIWYG is the acronym for “what you see is what you get”.)

4

Versioning History

This page provides a record of changes made to this toolkit. Each set of edits is acknowledged with a 0.1 increase in the version number. The exported files for this toolkit reflect the most recent version.

If you find an error in this toolkit, please fill out the Report an Open Textbook Error form.

Version Date Change Details
1.0 March 29, 2016 Open creation of this guide is added to the B.C. Open Textbook Collection
1.1 September 11, 2018 Completion of guide Updates and changes log [Word file]
1.2 September 27, 2018 Updated Pressbooks for B.C. and the Yukon page. Added information about our intention to allow faculty at private post-secondary institutions to create Pressbooks accounts.