
Creating Online Learning Experiences by Matt Crosslin is licensed under a Creative Commons Attribution-NonCommercial 4.0 International License, except where otherwise noted.
Creating Online Learning Experiences by Matt Crosslin is licensed under a Creative Commons Attribution-NonCommercial 4.0 International License, except where otherwise noted.
Creation of this resource was supported by Mavs Open Press, operated by the University of Texas at Arlington Libraries (UTA Libraries). Mavs Open Press offers no-cost services for UTA faculty, staff, and students who wish to openly publish their scholarship. The Libraries’ program provides human and technological resources that empower our communities to publish new open access journals, to convert traditional print journals to open access publications, and to create or adapt open educational resources (OER). Resources published by Mavs Open Press are openly licensed using Creative Commons licenses and are offered in various e-book formats free of charge. Optional print copies may be available through the UTA Bookstore or can be purchased through print-on-demand services, such as Lulu.com.
OER are free teaching and learning materials that are licensed to allow for revision and reuse. They can be fully self-contained textbooks, videos, quizzes, learning modules, and more. OER are distinct from public resources in that they permit others to use, copy, distribute, modify, or reuse the content. The legal permission to modify and customize OER to meet the specific learning objectives of a particular course make them a useful pedagogical tool.
Pressbooks is a web-based authoring tool based on WordPress, and it is the primary tool that Mavs Open Press (in addition to many other open textbook publishers) uses to create and adapt open textbooks. In May 2018, Pressbooks announced their Accessibility Policy, which outlines their efforts and commitment to making their software accessible. Please note that Pressbooks no longer supports use on Internet Explorer as there are important features in Pressbooks that Internet Explorer doesn’t support.
The following browsers are best to use for Pressbooks:
This publication was designed to work best online and features a number of hyperlinks in the text. We have retained the blue font for hyperlinks in the print version to make it easier to find the URL in the “Links by Chapter” section at the back of the book.
Information about open education at UTA is available online. If you are an instructor who is using this OER for a course, please let us know by filling out our OER Adoption Form. Contact us at pressbooks@uta.edu for other inquires related to UTA Libraries publishing services.
This book was created as a publication for the LINK Research Lab at the University of Texas at Arlington (UTA). The initial goal was to provide a resource for the faculty at UTA and many other institutions to utilize as they designed MOOCs and other online courses for LINK Research Lab programs – as well as for other departments and programs. In the spirit of openness and collaboration, that goal was expanded into making this book as general and context-independent as possible. Where specific needs for unique contexts were needed (for example, how to assess learners in a MOOC that might have thousands of learners), we have noted the specific contexts where they are most applicable. We also invited a wide range of authors and reviewers from different contexts and countries to add as many viewpoints as possible. However, we know that we are still falling short in many areas. If you see something you would like to add, improve, or expand, please contact us (matt@mattcrosslin.com). We would like to continually update this book with new, expanded editions in the future.
The first version of this book was more of a brief guide to dictate how instructors would create MOOCs for the LINK Research Lab at UTA. After the lead author wrote the initial handbook, additional LINK Lab personnel were brought in to add more sections. At the suggestion of George Siemens, we decided to expand the UTA MOOC Handbook to include all forms of online course design in as many contexts as we could cover (the original guide being focused entirely on public 4-year universities). This began the process of recruiting other authors and contributors- first from within UTA, and then from experts around the world. When the guide expanded to a book, the content was divided into chapters. However, the typical model of “one author writes one chapter” didn’t fit the best flow of the content. Therefore, we decided to move away from that model by allowing authors to contribute as much as they wanted – be it a chapter, a section, or a paragraph. Many people were invited, but we really only scratched the surface of those that we wanted to reach out to. Hopefully in the next edition we will get more of that list added. Also, we began to specifically reach out to people from different states, countries, and contexts from UTA to review the book for places we missed important contextual information. These reviewers gave us incredible feedback that improved the book immensely. The only regret was, again, time restraints, as we would have liked to invite so many more to review. Again, that will hopefully be improved upon in the next edition.
“Online learning experiences” is a broad term that covers a large number of contexts and possibilities. Not all ideas and processes covered in this book are going to work in every learning context. We encourage you to evaluate each idea presented against your specific needs and only use those that will work for you (but also, feel free to remix as needed). Additionally, please note that while those who are new to creating online courses might want to read the chapters in order, we tried our best to also design the flow so that you can move around the text in a non-linear fashion as well. Our goal with the structure was to have a flow that works for those that read the chapters in order, while giving the various sections and chapters a sense of independence for those that want to pick and choose (or for those that use this book more as a reference). If you find something we missed in this goal, please let us know.
Matt Crosslin is currently a learning innovation researcher with the UTA LINK Research Lab. Matt holds a Ph.D. in Learning Technologies from the University of North Texas, a Master of Education in Educational Technology from UT Brownsville, and a Bachelors of Science in Education from Baylor University. His research interests include instructional design, learning pathways, games in learning, sociocultural theory, heutagogy, virtual reality, and open networked learning. He has a background in instructional design and teaching at both the secondary and university levels and has been an active blogger and conference presenter. He also enjoys networking and collaborative efforts involving faculty, students, administration, and anyone involved in the education process.
The Lead Author wishes to first thank George Siemens, Laurel Mayo, Lisa Berry, and Justin T. Dellinger – directors past and present at the LINK Research Lab that mentored this project, gave me the go-ahead to do it in the first place, and continue to push the boundaries of learning research. This book also wouldn’t have reached publication without Michelle Reed of the UTA Libraries opening doors for it – thank you for answering my questions and fixing many things I got wrong (I promise no “s” on OER ever again). Thank you also to the authors, editors, and reviewers listed below – your time and contributions really took this book to the next level. Thank you for the awesome work – there was not a single “Reviewer #2” in the whole lot! To my current and former co-workers, colleagues, conference co-conspirators, faithful instigators on Twitter, consistent or occasional blog readers, and all the academics and professionals out there I follow (many I have never met in person) – thank you for providing deep insight and inspirational thoughts along our journey. You didn’t know that I was taking notes to make a book did you? I hope I did your ideas justice where I reference them here. If not – then come fix it in the 2nd edition! To my instructors at the University of North Texas, the University of Texas at Brownsville, and Baylor University – thank you for imparting to me a passion for education. Hopefully you see a lot of what you taught me in these pages. Of course, thank you to my Mom, Dad, and Brother for your love, support, and encouragement for my whole life. And finally, but most importantly, thank you to my wife Katie and son Riley – you both constantly inspire me to be a better person and care more about the world around us. I’m a lucky man to be around your support, love, and laughter every day!
Matt Crosslin, Ph.D. – Researcher, Learning Innovation and Networked Knowledge Research Lab, University of Texas at Arlington
Brett Benham, Ph.D. – Retired, former Technical Media Coordinator, Learning Innovation and Networked Knowledge Research Lab, University of Texas at Arlington
Justin T. Dellinger, M.A. – Associate Director, Learning Innovation and Networked Knowledge Research Lab, University of Texas at Arlington
Amber Patterson, M.A. – Marketing Coordinator, City of Mesquite, Texas
Peggy Semingson, Ph.D. – Associate Professor, Literacy Studies, College of Education, Curriculum & Instruction, The University of Texas at Arlington
Catherine A. Spann, Ph.D. – Postdoctoral Researcher, University of Colorado
Brittany Usman, M.S. – Instructional Designer, University of Texas at Arlington
Harriet Watkins, Ed.D. – Chief Academic Officer, Instructional Connections
Justin T. Dellinger, M.A. – Associate Director, Learning Innovation and Networked Knowledge Research Lab, University of Texas at Arlington
Rebecca Heiser, M.A. – Instructional Designer, Penn State University
Katerina Riviou – Ph.D. Candidate, Ellinogermaniki Agogi, Greece & Open University of Netherlands
Brittany Usman, M.S. – Instructional Designer, University of Texas at Arlington
Maha Al-Freih, Ph.D. – Assistant Professor, Princess Norah Bint Abdulrahman University
Maha Bali, Ph.D. – Associate Professor of Practice at the Center for Learning & Teaching at the American University in Cairo (AUC)
Autumm Caines, M.A. – Instructional Designer, St. Norbert College
Chris Gilliard, Ph.D. – Instructor, Macomb Community College
Rebecca J. Hogue, Ph.D. – Associate Lecturer, UMass-Boston
Whitney Kilgore, Ph.D. – Co-Founder & Chief Academic Officer, iDesign
Michelle Reed, M.S., M.F.A., M.A. – Open Education Librarian, University of Texas at Arlington Libraries
Sarah Saraj, M.Ed. – Instructional Design Manager, University of Texas at Arlington
George Siemens, Ph.D. – Director, Learning Innovation and Networked Knowledge Research Lab, University of Texas at Arlington
Harriet Watkins, Ed.D. – Chief Academic Officer, Instructional Connections
Thomas Perappadan, UTA Libraries’ OER Publishing Assistant, for assisting in the publication of this resource, and Kyle Pinkos, UTA Libraries’ Marketing Coordinator, for designing the cover.
The purpose of this book is to provide guidance and advice for instructors who would like to develop an online course. The overall goal is to provide some clarity about many of the steps required to propose and design a course, to describe the resources needed, and to explain the roles of the stakeholders. Online courses generally take much longer to develop than most people realize. The information in this book is very important in that it is based on practical experience gleaned from those that have designed and offered successful courses.
But why “learning experiences”? Most people think of learning in an official capacity as a course. The design of a course is often referred to as instructional design. Sometimes courses are designed by the instructor, but in other instances specific people other than the instructor provide the role of instructional designer. Over the past decade, changes to the online world have resulted in newer ways of thinking about learning that go beyond instruction and courses to learning experiences. Our hope is that, if you have already not begun to think in terms of learning experiences, that this book will help you transition your thinking in that direction(or continue to evolve it for those that have already started).
For many, the arrival of Massive Open Online Courses (MOOCs) created a new paradigm of learning where some courses could be massive and open to anyone in the world (even though that had been happening in several places long before MOOCs were a thing). The other end of the spectrum from MOOCs would be small online courses with limited enrollment – which many think of as traditional online courses. Then there are many courses that fall in the middle of these two points: massive limited enrollment courses, small open courses, and so on. This book will cover as many issues common to all of those options as possible.
Good luck as you embark on or return into the world of online learning!

Modern online courses are an extension of older forms of distance learning, going back to mail and correspondence courses of the 1700s (Harting & Erthal, 2005). These courses were followed in the 1900s by radio, telephone, and television-based educational efforts (Harting & Erthal, 2005). Computers were used to deliver educational programs as early as the 1970s, even though the technology was often a hindrance. However, with the rise of personal computers, better Internet connections, and digital video technology in the 1990s, many universities began offering more courses online (Harting & Erthal, 2005). While this shift meant that online learning became more available to anyone with an Internet connection, these courses were often offered to select groups of learners. Starting in the 1970s and 1980s, various groups and universities began creating open learning or learning for all initiatives with the aim of taking learning beyond the silos it was often contained within (Harting & Erthal, 2005).
The first course to be called a “MOOC” was taught by George Siemens and Stephen Downes in 2008 (Kovanović, Joksimović, Gašević, Siemens, & Hatala, 2015). This course, Connectivism and Connective Knowledge (CCK08), was labeled a “Massive Open Online Course” after the fact by Dave Cormier. Attracting over 2200 students, CCK08 was really meant as an experiment in connectivism rather than massive learning. In 2011, Stanford University created their own MOOC – Introduction to AI, taught by Sebastian Thrun and Peter Norvig. This course attracted over 160,000 students, along with massive media attention as well. The New York Times called 2012 the “Year of the MOOC” because several well-financed MOOC providers came into existence, most notably Coursera, Udacity, and edX (Kovanović, Joksimović, Gašević, Siemens, & Hatala, 2015). Hype for MOOCs has died down since then, but there is still considerable interest in what they mean for education now and in the future. Despite the insistence of some, MOOCs will not destroy or disrupt universities, but they have already begun to make many examine exactly what teaching at scale means.
As MOOCs grew in popularity, different terms were created to label these different versions. The most useful were “xMOOC” – used to describe teacher-centric courses as “eXtension” of a traditional course – and “cMOOC” – used to describe more student-centered connectivist courses (Downes, 2013). Many other terms such as MOOC2.0, MOOC3.0, etc have been proposed, but these ideas have found little usage in most contexts. Another term that has been proposed is SPOC – short for “small private online course” (Fox, 2013). This term was first used for a more business-oriented approach of creating and licensing courses rather than what some refer to as “traditional” online courses that are also typically smaller and private (but not always).
Traditional online courses come in many varieties, from small cohort models to large “lecture hall” courses of hundreds. Some of them are also considered “blended” or “flipped” in that they meet partially in person and partially online. Some traditional online courses even integrate open features like Open Educational Resources (OER), social networking tools like Twitter, and collaborative learning. For the sake of clarity, in this handbook the term “online courses” will refer to any course that is offered partially or fully online to a specific set of learners (like enrolled learners at a University or company), while the term “MOOC” will refer only to those courses that are considered MOOCs. There are many places that regular online courses and MOOCs overlap, and many places that they differ. This book will explore both in the upcoming chapters, focusing mainly on regular online courses while highlighting any unique considerations for MOOCs as needed.
References
Downes, S. (2013, April 9). What the ‘x’ in ‘xMOOC’ stands for [Google+ post]. Retrieved from https://plus.google.com/+StephenDownes/posts/LEwaKxL2MaM
Fox, A. (2013). From moocs to spocs. Communications of the ACM, 56(12), 38-40.
Harting, K., & Erthal, M. J. (2005). History of distance learning. Information technology, learning, and performance journal, 23(1), 35.
Kovanović, V., Joksimović, S., Gašević, D., Siemens, G., & Hatala, M. (2015). What public media reveals about MOOCs: A systematic analysis of news reports. British Journal of Educational Technology. 46(3), 510–527.
Most (but not all) courses tend to be either focused on the instructor as dispenser of knowledge, or the learner as self-guided constructor of knowledge. Many courses are a mixture of both, but gravitate towards one side or the other regardless. Courses of any size can be either student-centered or instructor-centered, so you will first need to decide which direction your course will (generally) take.
The more the instructor focuses on themselves as the center of the course (some refer to this as “sage on the stage”), the more students will rely on them as the one to tell them everything… and to fix everything. This can be overwhelming in MOOCs with thousands of learners, but acceptable in smaller online courses with manageable numbers (although many topics in any course can still work well in student-centered approaches). The goal of any course should be to push learners into a place of learning how to learn about the course topic, so they can become self-directed learners (Kop & Fournier, 2011). This can also pose challenges for learners who were taught to focus on the instructor as the center of the class, or as the person to answer all questions. Instructors might also find it difficult to release the control over the class by letting learners take control (also sometimes referred to as “guide on the side”). However, we encourage you to keep self-directed learning in mind and work to move your course or your learners in that direction as much as possible.
Additionally, the massive nature of MOOCs and some larger online courses dictates that instructors will not have time to be the core of the course. Therefore, the design of the course will need to focus (as much as possible) on how to create self-determined learners simply out of practicality. Learners will need to begin to see other learners and the Internet as communities that are a source of answers and support (Hew & Cheung, 2014). For example, some courses have had success with creating voting systems that allow learners to post questions in the discussion forums and then allow other learners to “upvote” the ones that are most important. The instructor then answers the top questions each week. Other courses have encouraged learners to ask questions through social media outlets such as Twitter or Facebook, allowing instructors and other learners to answer as they can. Both methods have pros and cons depending on instructor’s available time as well as personal viewpoints of each method (various strategies to support each method are covered in this book).
The main concept to keep in mind is that MOOCs and larger courses can quickly become very student-centered in nature due to their massive size, and this often represents a major shift in power and control dynamics for many instructors. Be prepared for this shift. Also keep in mind that when teaching at this scale, learners don’t need you to just convey a bunch of factoids that they can look up online or in a book. They will want you to show them how to take control of the overall direction of their learning, something that is often referred to as “self-directed learning.” This is yet another large shift for some instructors. If these shifts are new for you, you might want to look into a field called heutagogy, which is this the study of self-directed learning (Blaschke, 2012).
Another major factor about your course that will affect many decisions is whether or not learners will be interacting with each other and/or the course synchronously or asynchronously. Synchronous courses are basically those courses that have learners meeting with each other and the instructor(s) in real time in the same space. That space may be a physical classroom, a video conference tool, or even a text-based chat tool – but the key is that learning experience for each participant is synchronized with the other participants. Typical on-campus college courses are often seen as synchronous – learners consume the materials (lectures) at the same time and place, discuss course topics during class time, and complete assignments like tests in class. Asynchronous courses are those that do not require learners to meet in the same space at the same time. Typical online courses are often seen as asynchronous – learners consume the materials at different times, post to discussion boards at the different times, and complete assignments at different times.
However, these are often not completely separate constructs. On campus courses can have online asynchronous components added for after class work. Online courses can have synchronous video chat sessions or live lectures mixed in with asynchronous discussion boards. Sometimes these mixtures are determined by company or institutional policy, other times they are left up to the instructor. If these decisions are left to you, you will need to decide what mixture is right for your course and your learners (keep in mind that sometimes the ideal solution for the course is not ideal for specific learners – in this case, try as much as possible to go with what is best for the learners).
Much of what you read for the rest of this book will also need to be filtered through how much of your course is synchronous and how much is asynchronous. For example, if your students are working adults that need maximum flexibility, you might decide to make your course entirely asynchronous. This would probably mean that you would not spend much time on tools that enable video conferencing. However, no matter what the mix of synchronous/asynchronous ends up being, you should keep in mind you are still dealing with humans. Your course designs will need to keep the human element in your course in mind while designing for either modality. One good resource to read about this topic is an article called “Bringing out the Human in Synchronous and Asynchronous Media for Learning” by Maha Bali.
Much can be said about the underlying theoretical foundations of learning. Many, many books and articles have been written on the topic, so this is not an area that can easily be skimmed lightly. However, it can be of benefit to your course for you to think through what your theoretical goals/desires/requirements are for your course, and then to design appropriately after clearly setting your expectations. Therefore, a basic overview is presented here.
Looking at learning as either instructor-centered or students-centered is a good place to start, but it can get much more complex than that. For the sake of space, we will expand this list to three possibilities:
Each is actually more complex than the provided definitions, and there are various other areas that fit in between, beside, and outside of these. These terms could also be considered basic power dynamics that describe who is in control of learning in your course.
Intersecting and sometimes paralleling these power dynamics are teaching methodologies for designing the course itself. Again, there are many of these that could be listed, but we will stick with a simplified list:
Again, these are simplified definitions rather that specific descriptions that cover every aspect of these terms. The power dynamics and methodologies mentioned also tend to blend into each other as well. They can also be combined and arranged in a grid-like pattern to help you get even more specific about the design of your course:
Instructivist Pedagogy Formal learning that depends on the instructor to dispense knowledge that is new to learners. Focused on content, video, standardized tests, papers, and instructor-guided discussions. | Instructivist Andragogy Experienced learners are heavily guided through discussion activities to add to existing knowledge. Instructors guide learners through lessons learned by other experienced people in the field. | Instructivist Heutagogy Probably a very unlikely design to attempt, but this would basically be an expert sharing information about where to learn about a topic. Contains mostly lists of resources and professional communities that learners can join into to learn more, as well as instructions on how to best interact with resources and communities. |
Constructivist Pedagogy Learners build upon existing knowledge and experiences by formally learning from more experienced others individually or as a group. Instructors create scenarios and activities for learners to reflect on what they know and construct new knowledge in their own ways. Writing, blogging, and reflective activities of all types are most common. | Constructivist Andragogy Learners build upon existing knowledge and experiences to construct new knowledge either individually or as a group. Group work, open-ended reflection or discussions, and project-based learning are common types of activities. | Constructivist Heutagogy Learners constructing a way to learn about a topic either individually or collectively as a group. Ill-structured problem-based learning, open ended group activities, and web searches focused on how to learn more than what facts to learn about a topic are possible activity types. |
Connectivist Pedagogy Learners working in a network in a formal sense to accomplish an ill-defined competency as created by the instructor. The instructor’s knowledge would be the main focus and driving force behind this design. | Connectivist Andragogy The goal of learning is to work as a network in an informal sense to accomplish a competency that might be somewhat suggested by the course or instructor, but is ultimately determined by the group and based up expanding upon life experiences. | Connectivist Heutagogy Learners working as a network to figure out how to become a learner about a topic. The instructor might create the avenue for connections and then become one equal part of the network. See the rhizomatic model of education as a possible example, where curriculum is constructed by the engaged learning community (Chapter 13). |
This section and the above chart are adapted from a book chapter entitled “From Instructivism to Connectivism: Theoretical Underpinnings of MOOCs” (about MOOCs, but could apply to any online course as well – see list below), which would serve as a good resource to explore the overall idea in more depth. Keep this section in mind when looking at the section on “Clear Communication” and “Types of Communication” later in this manual, as it will continue this look at theory as applied to communication. For more resources on some of the theories touched on here, see:
All courses set out to have learners learn something through a transfer of knowledge and/or skills. However, different teachers at different institutions will have different methods for how they teach that something. Once you know what you want your learners to learn, you need to start planning how you are going to teach it or how your learners are going to learn it, depending on where the focus of your course is. Creating well-written statements on how learning occurs will not only help you design your course, but also will help your learners understand what is going to happen in the course of learning.
Many words are used for these statements: goals, objectives, outcomes, strategies, competencies, etc. Some see many of these words as interchangeable. For the sake of this manual, we will focus on three:
As an instructor, you may already have a good idea of the goals, objectives, or competencies you will use in your course. They may have been given to you by your institution or company. Or you may have never thought about any of them. Generally, you will want to have at least a draft of these written out before you design your course (they can, and probably will, change during the design process). On the other hand, you may want to let your learners determine the goals and objectives for the course (or even to map their own competencies as the course progresses). Even if that is the case, you will still want to be familiar with how to create goals, objectives, and competencies in order to lead your learners through the process. Much has been written on how to write effective goals, objectives, and competencies. We will only cover the basics here, but if you need to go more in depth, there are many resources online to look into.
The important thing to remember in writing goals is to not confuse them with objectives and competencies. Remember to keep them general and overarching for the course, but not so general that they basically just say “Students will learn _______ [topic of the course]”. Try to think of what students will learn rather than a list of topics. You can do this by looking at your course backwards – what will learners have accomplished by the end of your course? Focus on what learners will be doing rather than the topic. Make sure that learners can understand them (aka avoid jargon). For more details, see:
There are many different ways to structure objectives, but we recommend a good starting place is with the Behavior/Conditions/Criteria structure. In this structure, objectives should start with the behavior – what students will be able to do (“create a timeline of historical events that led to World War I”). Then add a condition – how they will be able to do it, usually added before the behavior in a written objective (“After reading the chapters on World War 1”). Finally, follow all of this with the criteria – the method for determining how they demonstrated mastery of the objective (“by correctly answering 70% or more of the questions on the World War 1 test”). Be sure to avoid unmeasurable words like “understand,” “know,” or “appreciation for” in the behavior; make sure that each objective feeds into the goal; and ensure that every goal has a good number of objectives to support it. If not, revise your goals and/or objectives. For more details, see:
Just like objectives, competencies can be approached and structured in many different ways. They are sometimes utilized in more standard learning situations, or can become the central structural feature of learning in competency-based learning. There are typically three concepts to keep in mind when creating competencies. First, competencies should be focused on the learner, rather than on the content or you as the instructor. Make sure that you are creating a way for learners to focus on their individual needs as they collaborate or work with others. Second, competencies should focus on outcomes over course structure. Many courses start with a “topic per week” approach and build out from there, but competencies may take more or less time than a week to complete. Third, competencies should be able to adjust and flex with the different individual needs of individual learners. Objectives tend to create one set of standards for all learners to attain in the same manner, whereas competencies tend to provide flexible structure for learners to personalize the learning experience to their needs and contexts. For more details, see:
Competencies tend to work best when situated in an overall context of competency-based learning. While there is disagreement over some of the specifics of competency-based learning, there are a few key concepts that generally tend to differentiate it from more traditional course structures. The biggest key concept is flexibility. Competency-based learning tends to allow learners to determine what exactly they are going to learn about a particular topic, how long they need to learn it, and how they will demonstrate that they have mastered the topic. Learners also typically do not advance until they have proven mastery, unlike traditional learning scenarios where all learners advance based on the calendar regardless of mastery. Additionally, class structures and organization as well as content or activities can be adjusted by individual learners to fit their specific social, cultural, and learning contexts and needs. For more details, see:
Once you have created your goals, objectives, and/or competencies, keep these at the forefront during the entire course development. Everything that goes into the course needs to relate back to these.
When all of these items (course content, learning activities, and assessments) are aligned with the goals, objectives, and/or competencies, they will work to reinforce one another. Conversely, if any of these items are misaligned, it can lead to learner frustration. This may be realized if a learner says “The readings did not prepare me for the test.” What may have gone wrong if a learner says this? Consider this quote: “If you design assessments as an afterthought at the end of designing the instruction (a common but unfortunate mistake), you are likely to design the wrong content and the course activities and the assessments are likely to be far less meaningful or appropriate” (Shank, 2006). This is exactly what courses that are not aligned look like. You are giving learners puzzle pieces that don’t line up. It may be that the instructor created learning objectives but then chose content that they found interesting, but that was irrelevant to the objective. Then, they designed an assessment based on that misaligned content. Since the content was irrelevant to the objective, the assessment, in turn, is not going to evaluate whether the learner mastered the objective.
A good practice to ensure you are aligning your content is to create a course map. A simple table to show how each objective or competency is aligned with goals, content, technology, learning activities, and assessments will help visualize the alignment. An example table is provided below.
| Specific objective or competency | Course goal | Content | Technology | Learning Activity | Assessment |
| Enter one objective or competency per row. | List the broad course goal(s) that the specific objective or competency relates to. | List all content (text, video, etc.) that learners will use for this specific objective or competency. | List any technology required for the course content that was listed. | List any practice activities. For example, reading or watching the course content, or completing practice questions. | List any assessments where learners will demonstrate their mastery of the specific objective or competency. |
As you work through theory, goals, etc., one idea to also consider with your course is openness. Openness is often connected with MOOCs today, but the truth is that any course can be open or even have open elements. Even though the second “O” in MOOC is “Openness,” many don’t realize that it means more than “free” or “anyone can sign up.” Traditional online courses can also incorporate many aspects of openness even if the course itself is not considered “open.” In fact, many instructors like to include aspects of openness in their traditional online courses.
A course that is completely “open” means many things, including that the content is freely accessible for all (Rodriguez, 2013). What that statement means is that videos can be downloaded, PowerPoints used in videos can be downloaded, all learning materials to be used are available for free, all content is available from the beginning of the course, and learners still have access to the course indefinitely after the last course day. This can be a major paradigm shift for those that are used to teaching in a closed course online or face-to-face. The expectation is that anyone can access any part of the course at any time, and even in some cases re-use or remix the content in their courses. This would limit using expensive textbooks, tools, or websites that have commonly been used for years in education. This may also mean using open-source solutions outside of the ones offered officially on campus. The main idea to keep in mind is that if a course is considered to be “open,” there would be few restrictions on who can access any portion of it. This leads to certain freedoms and certain problems, as will be discussed in later sections.
However, if certain institutional limitations prevent complete openness, many courses can implement some aspects of openness as desired or allowed. This is up to the instructor (or course designer if there is someone designated for that role specifically), but just keep in mind to keep the course completely open if referring to it as a MOOC.
The major issue to consider in relation to openness is licensing and permissions. Certain forms of copyright are very restrictive, and therefore not completely “open.” For many, your institution or company will already have made decisions on how the content and activities (text, image, video, etc.) you have created will be licensed. For others, you may have some or total freedom to license the content and activities that you create as you like. If you decide to use any type of open license for your content and activities, this could increase the impact and spread of your content outside of the course, as well as make it accessible to more learners. Just keep in mind that materials put into closed LMS systems under “fair use” cannot be turned into open content without permission from the copyright holder of that material. For more information on open licensing, see the section in Chapter 8 on Open Educational Resources.
One aspect of openness that all courses must take into consideration, regardless of size or theory or where/how the course is offered, is accessibility. Certain learners have various considerations when interacting with online courses due to disability, socioeconomic situations, or any number of other factors. You may work at an institution or company that has staff to ensure your courses are as accessible as possible. If that is the case, then you must listen to everything they tell you to do with your course. Accessibility design is not only a good idea, it is usually also the law.
If your institution or company does not have a person or department to ensure that your course is fully accessible, it will be up to you to do so. Even if you have someone else to review your course, designing with accessibility in mind can typically save a lot of time in the long run. You will find that it is better to design your course right the first time than to spend a lot of extra time correcting accessibility issues later on.
Different tools have different accessibility standards that often evolve as technology changes. The best thing you can do is search for accessibility guidelines for the tool you wish to use (“accessibility standards for Word docs,” “accessibility standards for online videos,” etc). Also keep in mind the tools that your learners might use, such as screen readers. A screen reader is an assistive device that attempts to convey what is on screen to people with various sight and reading issues. Different screen reading devices have different abilities to convey what is on the screen, so try to keep tools like that in mind when designing course materials. Here are some general guidelines to keep in mind about accessibility (others will be covered in later chapters as well):
Depending on where you want to teach the course, or what tools you use, there may be other accessibility issues you need to look into. The list above is not an exhaustive or complete list, so be sure to do some research and check to make sure you are up to date on all accessibility issues that apply to your course. Here are a few places to start learning about accessibility:
MOOCs are can sometimes be very different from regular online courses, which in themselves are different from on campus face-to-face courses. You should have at least several years’ worth of experience designing and offering traditional online courses before offering a MOOC. However, even extremely experienced online instructors will find many new challenges to face in their first MOOC. Some basic differences include:
With this in mind, there are several questions that you as an instructor should ask yourself before deciding to offer a MOOC. What goals do you have as an instructor that led you to choose a MOOC over other course formats? Is a MOOC the best option given those goals? What are your motivations for using a MOOC? Will a MOOC help or hinder those goals? With those questions in mind, consider what can and can’t be accomplished with a MOOC:
Many of these issues and differences stem from the openness of MOOCs. Open means much more than just being “free to anyone that wants to sign up,” as was examined in the previous section on Openness.
References
Blaschke, L. M. (2012). Heutagogy and lifelong learning: A review of heutagogical practice and self-determined learning. The International Review of Research in Open and Distributed Learning, 13(1), 56-71.
Hew, K. F., & Cheung, W. S. (2014). Students’ and instructors’ use of massive open online courses (MOOCs): Motivations and challenges. Educational Research Review, 12, 45-58.
Kop, R., & Fournier, H. (2011). New dimensions to self-directed learning in an open networked learning environment. International Journal of Self-Directed Learning, 7(2), 2-20.
McAuley, A., Stewart, B., Siemens, G., & Cormier, D. (2010). The MOOC model for digital practice. Retrieved from http://www.davecormier.com/edblog/wp-content/uploads/MOOC_Final.pdf
Milligan, C., Littlejohn, A., & Margaryan, A. (2013). Patterns of engagement in connectivist MOOCs. MERLOT Journal of Online Learning and Teaching, 9(2), 149-159.
Rodriguez, O. (2013). The concept of openness behind c and x-MOOCs (Massive Open Online Courses). Open Praxis, 5(1), 67-73.
Shank, P. (2006). To plan good instruction, teach to the test. Online Course Design: 13 Strategies for Teaching in a Web-based Distance Learning Environment, 8-9. Retrieved from http://hilo.hawaii.edu/academics/dl/documents/13StrategiesforTeaching.pdf
While online courses could potentially cover any topic, your institution or company may have a specific niche within the online learning world that they focus on. Or you may have the freedom to cover any topic you like. Either way, there are several areas related to online course design that you should be familiar with before you propose and create a new course.
Both regular online courses and MOOCs should be expected to be held to the same high quality standards as traditional in-person courses. This means that time and resources should be allocated to create the best possible course experience for learners. This includes, but is not limited to:
A note on MOOCs: even though MOOCs are offered for free, you cannot skimp on quality. These courses are broadcast to anyone in the world, and therefore serve as the visible face of your institution or organization for many that have never heard of it. Please ensure that all parts of the course are of the highest quality possible.
An important step in any creation process is the evaluation of the final product, or quality assurance; and this is true for course design as well. All online courses are generally expected to be held to the same high quality standard of traditional in person courses, especially at institutions that are accredited by any external accreditation group or board. This means that time and resources should be allocated to create the best possible course experience for learners.
What, or who, determines elements of a quality course? Rather than reinvent the wheel, a popular option is to utilize quality standards that have been developed by nationally recognized organizations, such as the Quality Matters Rubric or the Online Learning Consortium (OLC) Quality Course Teaching and Instructional Practice Scorecard. Once you have decided which standards you would like to follow, it is important to implement them during course design, rather than checking for them at the end of course design.
Implementing quality standards into a course can yield benefits for both the instructor and student. For example, in regards to course design (layout, organization, and navigation), participants rated courses with high findability as a better overall experience. Students reported lower levels of self-efficacy and motivation after interacting with courses rated low in findability (Simunich, Robins, & Kelly, 2015). When it is clear to learners how to navigate the course, where to find materials, and how to submit assignments, learners have to ask fewer procedural questions and the course is easier to manage for the instructor. The instructor could even have more time to provide quality feedback to learners (of which learners crave) versus spending time answering procedural questions.
Some questions you will see addressed in popular quality standards are listed below. This list is a very high-level summary – there are many more details to consider within these topics. For example, the Quality Matters rubric has 43 standards and the OLC Scorecard has 97 standards.
Course Design
Course Objectives
Clarity
As a note, clarity is an important component of online course design which will be covered more in Chapter 5. In contrast with in-person courses, online learners cannot seek immediate clarification for instructions that are not understood. A delay in clarity can cost online learners valuable time. Therefore, you will see many standards that reference being “clear” or “clearly stated”.
Engagement
Student Support
Accessibility
All online courses offered through any institution or company will be required to adhere to all applicable institutional or corporate course policies and requirements. There may also be a specific group in charge of regulating online course quality at your institution or corporation. But even if there is not one specific group in charge of regulating course quality for you, you are highly encourage to follow all suggestions in this manual and to seek out feedback from trained instructional designers. Additionally, you will be expected to know and adhere to all policies and requirements of any service that you utilize in your course (Blackboard, edX, Google, Facebook, WordPress, etc.). Please be sure to familiarize yourself with any service you wish to use before using them.
Creating an online course can be a major undertaking that will require a large team of people. Unless your institution currently has anyone working on course design full time, your team will consist of people who are working on your course in addition to other duties. If your institution or company does not provide team members for you, you should consider recruiting from people whose normal job duties cover various aspects of online course creation (as their workloads allow). This team will include, but is not limited to:
Your institution or company may already have a platform (sometimes called “LMS” for “learning management system” or “CMS” for “course/content management system”) for hosting courses that you are required to use. For a traditional online course, these could be something like Canvas, Blackboard, or Moodle. For a MOOC, that could be something like EdX or Coursera. Additionally, there are other options out there, including using open source platforms such as WordPress to host content. If you do not have one of these services as an option, there are a few possibilities to host content:
Please note that you will need to choose a platform that matches the openness of your course. If you want to run a MOOC or have open material in any online course, the closed nature of many LMS tools like Blackboard may not make them a good tool for offering open content or courses. On the other hand, if there are reasons you are choosing to limit access to your course to only those that register for it (like sensitive course content or institutional requirements), the open nature of services like EdX may not make them a good choice for your course.
One growing trend in education is the exploration of data that online learning tools generate in an analytical way. Whether you or your users realize it or not, everything that you do online is usually recorded in a database somewhere. This data has typically been locked away from everyone (except for the company that collected it), but that is starting to change.
Most of the tools that you can use in online learning – from WordPress to EdX to Canvas to Blackboard – will offer you the ability to see some kind of analysis of the data activity in your course/website account/etc. If you use that analysis to improve your course or influence your learners, those actions move into the realm of Learning Analytics. Your institution or company may require that you use analytics, and even provide deeper results from companies like Civitas. On the other hand, your institution or company may not even know this data exists.
The study of learning analytics is still a newer field with many unknowns. However, there is interesting work occurring in the field as it grows. For a good overview of the field, we recommend The Handbook of Learning Analytics edited by Charles Lang, George Siemens, Alyssa Wise, and Dragan Gašević. This handbook “is designed to meet the needs of a new and growing field. It aims to balance rigor, quality, open access and breadth of appeal and was devised to be an introduction to the current state of research.”
The most important concept to keep in mind about learning analytics is that the data being analyzed contains sensitive personal information covered by many legal guidelines. Ideally, you and your learners will be fully informed about what is collected, how it is collected, what is done with it after it is collected, and so on. Additionally, the ideal legal scenario is that you and your learners would choose to “opt in” to allowing this collection if you agree with having your data utilized in this manner.
However, the more likely typical scenario is that little clear information is given to end users about data collection, with users being put in the position of having to opt out of data collection (or even worse, have no way of opting out if they want to get into a course). If this is the case with the tools you use, we would suggest that you take the initiative to clearly communicate with learners everything you can discover about data collection in every tool you use, including how to opt out if they so choose. Data collection in education is a controversial topic, so it is best to be open and clear as much as it is possible within your context.
Many reasons exist for considering the ethical dilemmas within learning analytics. For example, looking at the data the wrong way could lead to profiling learners unfairly. Additionally, the algorithms used to create the analytics will carry with them the bias of those that created them. Learners are always unique individuals that can defy the classification systems that analytics utilize. For more information on these issues, as well as ways to ethically use learning analytics, see this article:
Many tend to think of technology, algorithms, and analytics as neutral entities that do not have programmed assumptions, contexts, and biases in them. However, this is not the case. All software has been found to reflect, in small and large ways, the biases and assumptions of those that created it (VanderLeest, 2004). This does not necessarily mean that you should never use these tools, but you should think through what these programmed biases are and what they mean for how you use them in a course (as well as how and what you communicate about those tools to learners).
For example, “personalized learning” is a current buzzword in online learning circles, with many organizations putting large amounts of money into the concept. Those organizations have goals behind the money they put into their products, and biases for and against certain philosophical schools of thought. For instance, see this brief examination of some the ideas shaping personalized learning in some of the largest donors to the concept:
The way that personalized learning is being shaped may or may not disagree with your vision of learning, however, you should know how it is being shaped before using any tools connected to these organizations. You should also take those influences into account when utilizing tools and communicating about those tools to learners.
An even deeper ethical consideration to explore is how inequalities are part of the very fabric of the Internet itself. Some think of this in terms of a digital divide. A better concept to examine would be digital redlining: “the creation and maintenance of technological policies, practices, pedagogy, and investment decisions that enforce class boundaries and discriminate against specific groups.” This definition comes from this article that looks deeper into problems inherent in the Internet itself:
Since this is an ever-evolving issue in education across hundreds of technologies, resources, websites, concepts, hardware, etc, you will need to do some searching for the specific tools and ideas you want to use in your course, or that pertain to your context. For instance, if you work in “for profit education,” you probably should familiarize yourself with the work of Tressie McMillan Cottom in LowerEd (although she also covers many other topics you should be aware of). The work of Audrey Watters at Hack Education covers multiple ideas and technologies in education from a historical critical lens. Chris Gilliard’s work in Digital Redlining and Student Framing is also a good place to start. For international views on technology issues, Maha Bali covers a wide range of issues that many in the West often fail to consider. Many others are out there, start following these four on Twitter and see who they quote there as well. Additionally, for a deeper dive into how biases are built into algorithms, see Algorithms of Oppression by Safiya Umoja Noble.
References
Lang, C., Siemens, G., Wise, A., & Gašević, D. (Eds.). (2017). The Handbook of Learning Analytics. Society for Learning Analytics Research (SoLAR).
Simunich, B., Robins, D. B., & Kelly, V. (2015) The impact of findability on student motivation, self-efficacy, and perceptions of online course quality, American Journal of Distance Education, 29(3). 174-185, DOI: 10.1080/08923647.2015.1058604
VanderLeest, S. H. (2004, June). The Built-in Bias of Technology. In Proceedings of the 2004 American Society for Engineering Education (ASEE) Conference (pp. 1417-1427).
Once you are familiar with online learning in general and the tools you will need, you will need to decide if a MOOC or a regular online course is the right choice for you. Once you have decided which the best choice is, the next step is to begin the official proposal process.
All proposed online courses will probably need to have the approval of someone before offering the course: a Director, a Dean, and/or a department head of the College or department to be offering the course. Online courses require extensive resources that must be covered by the instructor’s organizational oversight. Please have the proposal approved as you would any other courses through your department or company.
Ideally, a proposal for a new course will need to be submitted as soon as possible, at least one year before the course is offered. Minimum proposal lead time for shorter courses that are focused more on interaction (and therefore require less media production) could shorten the due date for proposals to six months.
Additionally, you will need to have already recruited a course design team as well as decided on which platform(s) to utilize in your course. If your institution or company does not offer these services for you, you should recruit from people you work with whose normal job duties cover various aspects of course creation (as their workloads allow). You may also seek out grants and teaching assistants to assist you as your department or college allows. The course design team should be noted on the proposal form.
Also note that a timeline for the creation of the course should be submitted with the proposal. In your proposal, you may also wish to include a reference to any quality standards you will utilize to evaluate the course. Online courses are generally expected to be completely ready to go by the first day the course is offered, so please plan to finish your design and pre-planned content and activities well before the first day of course (be sure to build in a few weeks at the end of the development process for quality review as well, depending on your review process). An orientation week before the course starts is a good idea for working out any kinks with your learners.
Once a course has been approved, the creation process should begin immediately – within one week of the approval or less. This will include:
Within one month of approval, you should have at least one full module or week completed (including videos and graphics). This should be submitted to your departmental/organizational oversight or an instructional designer for review.
Within half the time between approval and when the course starts (ideally six months before the course begins), you should have at least half of the course completed (including videos and graphics). This will be submitted to your departmental/organizational oversight or an instructional designer for review. However, your departmental/organizational oversight or instructional designer may request more frequent updates for more complex courses.
One month before the course begins, everything for the course should be complete and ready to go. This should be submitted to your content and design reviewers for full review.
Any issues identified in the full review should be addressed by one week before the course begins.
Additionally, we recommend that sometime within one week before the course begins that you open the course for a test run with any interested learners to ensure there are no final issues.
The course development plan should include assessment and review of your course design. Your instructional designer should include this in the course design, but it may also require additional resources from you as the instructor. If you do not have internal quality standards to follow, you can utilize national quality standards, as referenced in the “Quality Review” section of Chapter 3, during both formative and summative assessments.
Formative Assessment is basically a review of the course content and design as the course is being designed. You should probably have at least one colleague review the content of your course several times to give you feedback on issues such as clarity, ease of navigation, content alignment, workload balance, and technical concerns. Additionally, the instructional designer will need to have at least one other instructional designer review the design of the course several times to provide feedback on the overall course design. One helpful suggestion for quality assessment is to first develop only one module or week of content and submit it for a formative review. This initial review should provide feedback in regards to the quality standards you have selected to follow. Then, take the feedback received and implement it as you continue the design of the course.
Summative Assessment is basically review of the course after it has been offered. This could consist of grades, participant feedback, or course data. Most of this will not magically appear, so you will need to plan for feedback as part of the design process. Course participant assessment techniques will be covered later in this book. Participant feedback can be gained from several sources, including Twitter feeds, pre- and post-course surveys, and forum posts. Course data can include all types of electronically collected information, from clicks on content links, to time spent on specific pages, to profile information. You will need to contact the course platform you use for specific details on what data is collected and how you access it.
Not only is course design assessment a good source for data in published papers, but it is also a good place to gain insight into how to update your course before offering it again. For example, you can review how well your student activities and assessments reflected the quality of the learning objectives based on what the results of summative assessment tell you. No course is perfect the first time it is offered, so updates and changes are expected after each offering.
In general, there are many different ways to design online courses that work in different contexts, and many ways to design online courses that do not work in various other contexts. We are avoiding the term “best practices” here because online teaching and learning can vary in different contexts, making “best” a problematic term. We can offer a list of some things that we know will usually work better in most online courses:
Speaking of clear communication, we should take a minute to highlight that clear communication is important for all aspects of education. Communication is a foundational element of educational theory (Warren & Wakefield, 2012); without clear communication, learners can feel confused and discouraged. Many different theories of communication exist; the important thing is to pick one that works and stick with it. For those that need some guidance, one suggestion is the Learning and Teaching as Communicative Actions (LTCA) theory developed by Dr. Scott Warren from the works of Jurgen Habermas. LTCA theory basically breaks educational communications down into four communicative types:
The important aspect of LTCA theory (or any other theory you choose to use) is to evaluate what you are trying to communicate in various parts of the course and then make sure to communicate effectively without confusing communication styles. For example, don’t set up a blogging assignment that would require students to use dramaturgical communicative actions and then create long, detailed instructions requiring learners to use strategic communicative actions.
For more information on LTCA theory, see the theoretical framework sections of the following articles:
Communication is an aspect of teaching that we all know happens, but many do not think fully through what that means. The types of clear communication you will want in your course will most likely flow from the underlying theories you subscribe to for the power dynamics and methodology of your course (see the previous “Theoretical Foundations of Learning” section). Looking across the literature, various researchers (Moore, 1989; Hillman, Willis, & Gunawardena, 1994; Anderson & Garrison, 1998; Dron, 2007; Wang, Chen, & Anderson, 2014) have identified at least 12 types of communication types that can happen in education:
Some courses will have one communication type for the entire class. Others will have a few types, while still others will have different types for each activity. Also, while some types of communication like “student-teacher” may lean towards certain power dynamics like instructivism, that does not have to be the only possibility. For example, student-teacher interactions could be constructivist if the student is teaching the instructor, or possibly even connectivist if a learner is bringing their instructor into a networked learning experience.
The important issue to think through is what kind of communication types you will need to accomplish clear communication in the power dynamics or methodologies you desire for your course, and then which communication types will you need for individual assignments in your course. For a discussion on applying power dynamics, methodologies, clear communication, and communication types to specific assignments, see the later section on “Connecting Activities to Theory and Communication”. Additionally, for a deeper discussion of the communication issues touched on here, see the communication sections of “From Instructivism to Connectivism: Theoretical Underpinnings of MOOCs” by Matt Crosslin.
Many instructors like to have a well-structured and planned out course, while others prefer varying levels of flexibility to change the course content, structure, and/or activities based on many factors (such as current events, flexible lesson schedules, learner interest, etc). When we refer to having a course completely designed and reviewed by the first day of class, this refers to all of the content and activities that you already know will be a part of the course. For some courses, this will be all of the content and activities. For other courses, this is more of a “plan” or “outline” of what could happen depending on various factors.
Planning for flexibility in your course can be challenging, but the benefits will often make up for the difficult parts. Mia Zamora and Alan Levine refer to this as building a “Course Spine” that outlines the major course elements, but leaves room to fill in details as the course progresses (Levine, 2018). Other ways of looking at this concept include “student-centered learning” and “problem based learning” depending on how the course is structured. Various ways to design your course to utilize these ideas will be explored throughout this book. Additionally, Chapter 13 is dedicated to more advanced course design methods that fall into these categories, such as Self-Mapped Learning Pathways and Rhizomatic Learning.
One thing to keep in mind: there is a difference between “planning for flexibility” and “I ran out of time, so let’s make this up at the last minute.” Flexibility should flow from what you want your learners to accomplish in the course, not from your lack of planning ahead. In many cases, planning a well-designed, flexible course design could take as much time (or more) as writing out traditional instructor-focused content and activities.
A larger concept to keep in mind is the isolation that can occur to learners in online learning, away from the immediate contact created by being in the same physical location as other learners. Some learners may prefer this distance, while others may feel the effects of the isolation. The idea of “Humanizing” an online course is basically the process or creating ways to connect learners with each other and the instructors across the distance of online learning.
One helpful way to organize and think about humanizing online learning is through the Community of Inquiry (CoI) framework (Arbaugh, Bangert, & Cleveland-Innes, 2010). CoI basically focuses on increasing three “presences” to help learners construct personal meaning in learning as well as to collectively confirm mutual understandings: teaching presence, social presence, and cognitive presence.
Teaching presence is a large portion of what this manual is covering: designing and facilitating a course in ways that clearly communicates how learning will occur, effectively humanizing or increasing the presence of the instructor. Examples would include clearly defining expectations, creating avenues to encourage learner agency, and timely feedback to learners. One good way to make sure this happens is create a schedule for you to communicate with your learners, via email or other methods, and then make sure you stick to that schedule.
Social presence focuses on the learners in the course, helping them to see themselves as an individual “real person” that can actively and safely participate in the course. Many of these concepts are also covered in this manual. Examples would include drawing in participants, creating low-risk ways for them to express themselves, and establishing Codes of Conduct (see the chapter on “Utilizing Social Learning”).
Cognitive presence is a bit more abstract of a concept, but it basically covers looking at the entire learning process for ways to encourage students to think about their learning, reflect on that learning, and sharing their learning process with others. Examples would include encouraging learners to take ownership of their learning, building in reflection activities, and creating avenues for learners to share and interact with those reflections (for instance, by blogging).
For more information on CoI and Humanizing online learning, see these resources:
One possible way to foster teaching presence is to schedule time for synchronous interactive sessions during your course. This could include virtual office hours, live sessions, unhangouts, or other ways for you to connect with your learners virtually “in person.”
The basic idea behind these sessions is that you choose a time to meet, a synchronous service to utilize (usually one that is free to use and allows flexibility to use video and audio if you choose), and set some parameters for what will happen at the session. Will it be a teaching session where learners listen to what you have to share? Will it be a Q&A/Office Hours type of session? Will it be a group work/discussion session where learners interact with each other? Depending on how you want to structure the session, make sure your tool can handle the service you want to utilize.
Virtual Office Hours will typically be a time for learners to ask questions. This will typically involve scheduling a recurring time each week for people to come ask questions online. If you are teaching an online course, we strongly suggest you set virtual office hours. Most online chat or video tools will have a set of options that can handle the “one-on-one office hours” format, but if you want to have more of a group Q&A, you might want to use a tool that can handle multiple users at once. Also consider recording the sessions for those that can’t make it.
Live Sessions can be used for anything, from group discussions to online lecture sessions. If you are intending to broadcast information, you can use a tool that allows learners to watch more than interact (screen sharing is also a good option to make sure is available in the tool you utilize as well). If you want to field questions, be sure the tool you use has an option for that functionality (look for text chat, polling, and other interactive options). Again, consider recording the sessions for those that can’t make it.
Unhangouts are less structured sessions that allow learners to connect with each other as they like. This is more learner-centered that other sessions, but allows for more self-determined learning designs.
Online gaming and virtual reality are two emerging ideas for online interaction. Many have heard of Second Life, which in the past was used for more nuanced online interaction. Tools like Second Life are still around, and are sometimes used in online learning. These tools are not for every course or topic, but if you have a compelling educational idea for using them, you should explore the possibilities.
Some issues to keep in mind:
Some possible tools to use:
Finally, we offer a list of some things that we generally know will not usually work well in most online courses, also known as “pitfalls to avoid”:
Please realize that no course is perfect. You will probably not do everything that works and avoid everything that does not work in every course offering. The ideal is to look at the items on these lists as goals to strive for. For instance, your course is not going to fall apart if two of the videos go over 8 minutes long. We have just learned from experience that forgetting too many of the things that work or doing too many of the things that don’t work will cause more learners to drop out or even complain on social media or course evaluations.
At some point in your course, you are going to run into learners that have some type of problem: they may not understand something, or have gotten behind, or any other common student issues. You should probably decide now how to react to issues. Some instructors tend to take an approach of catching and shaming learners that have issues. You may have read an article or blog post lamenting how many have grandmothers that pass away each semester, or how learners try weird excuses to get out of due dates, or how various life issues bleed into the class. These instructors usually take a very hard line stance that involves not believing learners.
Certainly some learners will lie at some point about something. However, creating an atmosphere that assumes this from the beginning will tend to add more tension than is needed in a course. We would generally encourage you to take a stance that gives learners the benefit of the doubt, showing compassion instead of suspicion.
A lot of this boils down to how you handle course assignments and deadlines. There may be some required assignments or assessments that are given to you by the institution. Others will be under your control. One way to deal with late work and excuses is to look at assignment grading as more of a conversation than a one-time “gotcha!” event. For example, allow learners to turn assignments in for early feedback before deadlines. Create avenues for learners that genuinely get behind to be able to catch up. Ask yourself: Are you more concerned with them learning the content, or learning a calendar?
Of course, many student issues arise from various aspects of grading or assessment in courses. Many people work in institutions or companies that require grades. However, not everyone does, and even many places that require grades leave it up to the instructor on how to calculate those grades.
For several decades, many educators have been questioning the practice of grading (Kohn, 2011; Sackstein, 2015). Sometimes this is because the grades have to include things that have nothing to do with what the learner actually learned. A student that completely understands the concept of a lesson, but runs a few days late can potentially earn the same grade as the person that really doesn’t get the concept but follows all the technical instructions perfectly. Other educators object to how grades are a reflection of how well learners can game the grading system rather than learn the content. Still others object to the unnecessary competition that society creates around the highest grades, and the pressure that puts on learners. There are many reasons to find grades problematic.
But is it possible to have a meaningful class without grades? There are many different ways to look at this. Some instructors will allow learners to create the grading system for the class. Others will allow learners to grade themselves. Still others will abolish grades altogether and replace them with things like badges, certificates, and other forms of alternative certification (see the section on “Certification and Badges” for more information on that). There is a range of responses to the problems that many see with grades. If you are thinking of taking a different path with grading in your course, here are some resources to consider reading:
Whether or not you are going to grade your students, have them grade themselves, or go grade-less in your course, you will still need to take several issues concerning how you design your assessment (or your learners’ self-assessments) into consideration. See the Chapter on “Assessment and Grading Issues” for more details on those considerations.
References
Anderson, T., & Garrison, D. R. (1998). Learning in a networked world: New roles and responsibilities. In C. Gibson (Ed.), Distance learners in higher education (pp. 97-112). Madison, WI.: Atwood Publishing.
Arbaugh, J. B., Bangert, A., & Cleveland-Innes, M. (2010). Subject matter effects and the community of inquiry (CoI) framework: An exploratory study. The Internet and Higher Education, 13(1), 37-44.
Cercone, K. (2008). Characteristics of adult learners with implications for online learning design. AACE journal, 16(2), 137-159.
DiCarlo, S. E. (2009). Too much content, not enough thinking, and too little FUN! Advances in Physiology Education, 33(4), 257-264.
Dick, W., Carey, L., & Carey, J. O. (2001). The systematic design of instruction (Vol. 5). New York: Longman.
Dron, J. (2007). Control and constraint in e-learning: Choosing when to choose. Hershey, PA: IGI Global. doi:10.4018/978-1-59904-390-6
Groundwater-Smith, S. (2008). Listening to students. The EBE Journal, 2, 18-20.
Guo, P. J., Kim, J., & Rubin, R. (2014, March). How video production affects student engagement: An empirical study of mooc videos. In Proceedings of the first ACM conference on Learning@ scale conference (pp. 41-50). ACM.
Hayes, S. (2015). MOOCs and Quality: A review of the recent literature. Retrieved from http://eprints.aston.ac.uk/26604/1/MOOCs_and_quality_a_review_of_the_recent_literature.pdf
Hillman, D. C. A., Willis, D. J., & Gunawardena, C. N. (1994). Learner-interface interaction in distance education: An extension of contemporary models and strategies for practitioners. American Journal of Distance Education, 8(2), 30-42.
Jordan, K. (2015). Massive open online course completion rates revisited: Assessment, length and attrition. The International Review of Research in Open and Distributed Learning, 16(3), 341-358.
Khalil, H., & Ebner, M. (2014, June). MOOCs completion rates and possible methods to improve retention-A literature review. In World Conference on Educational Multimedia, Hypermedia and Telecommunications (No. 1, pp. 1305-1313).
Kohn, A. (2011). The case against grades. Educational Leadership, 69(3), 28-33.
Levine, A. (2018, May 27). My #netnarr reflection [Blog post]. Retrieved from http://cogdogblog.com/2018/05/netnarr-reflection/
Lorenzo, G., & Moore, J. (2002). Five pillars of quality online education. The Sloan consortium report to the nation, 15-09.
Mathieson, K., & Leafman, J. S. (2014). Comparison of Student and Instructor Perceptions of Social Presence. Journal of Educators Online, 11(2).
Milligan, C., Littlejohn, A., & Margaryan, A. (2013). Patterns of engagement in connectivist MOOCs. MERLOT Journal of Online Learning and Teaching, 9(2), 149-159.
Moore, M. (1989). Three types of interaction. American Journal of Distance Education, 3(2), 1-6.
Siemens, G. (2005). Connectivism: A learning theory for the digital age. International Journal of Instructional Technology and Distance Learning, 2(1), 3-10.
Sackstein, S. (2015). Hacking assessment: 10 ways to go gradeless in a traditional grades school (Hack learning series volume 3). Times 10 Publications.
Wang, Z., Chen, L., & Anderson, T. (2014). A framework for interaction and cognitive engagement in connectivist learning contexts. The International Review of Research in Open and Distance Learning, 15(2). 121-141.
Warren, S. J., & Wakefield, J. S. (2012). Learning and teaching as communicative actions: social media as educational tool. In K. Seo (Ed.), Using social media effectively in the classroom: Blogs, wikis, Twitter, and more (pp. 98-113). Routledge: Francis & Taylor, Inc.
Zheng, S., Han, K., Rosson, M. B., & Carroll, J. M. (2016, April). The Role of Social Media in MOOCs: How to Use Social Media to Enhance Student Retention. In Proceedings of the Third (2016) ACM Conference on Learning@ Scale (pp. 419-428). ACM.
In order to cross over from passive content consumption into active learning, you will need to make real-life activities the focus of your course content (Hayes, 2015). Activities can be discussions, interactive assignments, blogging, and social media participation – or could even involve learners themselves creating content and activities.
Most course platforms have several categories of activities that range from standard online activities to innovative technology-driven interaction. The exact tools you have access to will vary based on the one you are using, but there are some that tend to be universal. Becoming familiar with these activities before you design will help you actively imagine where they could be utilized in your class.
Of course, you are also free to use blogs and other external sources in your course as either the main focus of connectivist learning or as a supplement to the content you create. See the chapter on “Social Learning” for more details on how create these types of activities. Your instructional designer should also be familiar with using these tools in an online course.
[Adopted from “The Confusion Over a Little Thing Called Blog” by Matt Crosslin, published in the former MoodleZine Online Journal, July 2006]
When looking at the various tools that are available to you in a course, you will notice that there are many similarities between various tools. How exactly are blogs different from online journal tools or even discussion boards? When it comes down to it, many tools like blogs, journals, and discussion boards are all forms of personal publication that have similar core components:
Of course, we still tend to see blogs, journals, discussion boards, and other tools as totally separate entities. This is because each one of them have a totally different focus. That focus determines how all of the above listed components end up functioning. Let’s look at a few examples:
For blogs, the focus is on the most recent input in a string of inputs. This means that the interface is going to display the entries reverse chronologically. This also means that the input device is going to allow for several entries. The feedback mechanism usually will only allow for comments on one specific input at a time, and related discussions will sometimes be confusing to follow because of that.
For journal tools, the focus is on the overall insight of the entry (or entries). This means that the instructor is usually the only one to be able to return feedback. Many times, the input and interface features are minimal or even non-existent (“just e-mail me a Word doc”), even though they can be well-developed in some tools like Blackboard.
For discussion boards, the focus is on the feedback to the initial question or comment (the genesis). This means that the interface will focus on how to display these responses in an easy to read format. Some discussion board tools obviously don’t spend very much time on developing this, but others do.
Ultimately, the differences between various tools may not matter for your desired assignment, or it may mean the difference between a confusing activity and a successful activity. The important take away from this section is to think through exactly what you want to accomplish with any given activity, and then find a tool to match your intended goals.
The problem with many assignments and activities is that they are often locked away in password protected learning management systems. This can be good for privacy and safety reasons, but many learners want to have ways to show off the work that they do in class to others (including potential or current employers). While some portfolio systems exist to assist with getting content out of the “walled garden” effect of learning management systems, many of these are still more closed off than some learners would like. Some refer to these kinds of assignments as “disposable,” because they get turned in for class and then deleted once the course is removed or archived off of the system they were submitted to.
One way to deal with this issue is by creating open assignments or activities. These are activities that take place somewhere online, either on a public website or on a website that the learners control. Because of this distributed structure, finding learner’s work can be difficult unless a system is created for collecting these responses and resources. They are often referred to as “renewable” assignments or activities, in contrast to “disposable” assignments that often occur within the LMS. Some examples include having learners edit Wikipedia articles for accuracy, or blogging about their learning process. For more information and some ideas, see these resources:
The main focus of renewable assignments would be to create assignments for learners that allows them to add value to the world in some way. Since this value may look different to different learners in different contexts, one way to facilitate renewability is by creating assignment banks, the focus of the next section.
Due to the fact that online courses will draw in participants from different learning contexts, one idea to accommodate differing contexts is to create a flexible assignment bank for learners to choose from various assignment options. One innovative pedagogical approach that has the potential to work well in both MOOCs and traditional online courses is the utilization of assignment banks. Jim Groom’s ds106 (Digital Storytelling) course at the University of Mary Washington (UMW) serves as an early example of effectively implementing assignment banks into both types of courses. DS106 is free and open to participants across the globe while simultaneously functioning as a for-credit course at UMW.
One of the key features of this course, the assignment bank, allows students flexibility in their submission types by promoting learner choice through ten unique classifications (e.g. video, 3D printed, written, etc.) (DS106 Assignment Bank, 2016) and use of personal web domains (Groom, 2015). This lack of rigidity has the potential to stimulate creativity when compared to traditional, formulaic assignments. Another strength of the ds106 assignment bank is that the course compiles submissions in an open environment that is also available to future students. This can help develop online community over time and encourage investment in the course by students, both of which have the potential to increase engagement and retention (Groom, 2013).
Evaluating submissions through assignment banks can take place in a number of ways. For example, DS106 utilizes a public difficulty rating system of one to five stars, which students accrue when they complete a submission. Other courses might implement a cumulative point system. In this case, students could complete a number of assignments with different values to earn credit. The types could vary by depth of knowledge, length of time to complete, level of collaboration with peers, or a number of other factors.
In previous sections “Theoretical Foundations of Learning,” “Clear Communication,” and “Types of Communication,” we looked at how to determine power dynamics, methodology, and communication types for your course and course activities. This chapter has introduced various tools and ideas for activities in courses. It is now time to bring this all together to look at how to choose assignments for your course. This is not a very complex concept once you have examined all of the foundations, but many people will create online courses without putting much thought at all into it, and then wonder why they do not even come close to getting the results they desire from their courses. There are really four basic steps:
As you can see, this process requires a lot of looking at different parts and revising as analysis reveals missing elements or incorrect identifications. For example, a list of assignments may reveal that you desire to have mostly heutagogical networked activities where you previously identified instructivist pedagogical student-teacher strategic communication as your course structure. This should lead you to reconsider the overall structure of the course (or to redesign the activities to match the existing structure).
For a more detailed look at this process, as well as a helpful worksheet for the steps listed above, see “From Instructivism to Connectivism: Theoretical Underpinnings of MOOCs”
References
DS106. (2016). Assignment Bank. Retrieved from http://assignments.ds106.us
Groom, Jim. (2013, October 12). DS106 Assignment Bank 2.0 [Web log post]. Retrieved from http://bavatuesdays.com/ds106-assignment-bank-2-0/
Groom, Jim. (2015, August 13). Digital Pedagogy as Empowered Choice [Web log post]. Retrieved from http://bavatuesdays.com/digital-pedagogy-as-empowered-choice/
Hayes, S. (2015). MOOCs and Quality: A review of the recent literature. Retrieved from http://eprints.aston.ac.uk/26604/1/MOOCs_and_quality_a_review_of_the_recent_literature.pdf
In addition to activities, online courses also usually contain content. Content can be videos, text, webpages, and textbooks. While MOOCs are typically lighter in these areas than a typical online course, traditional online courses can also be light on content, while MOOCs can be heavy on content. This content can be external to the LMS platform, or hosted inside of it. Since we encourage a focus on active learning over passive consumption of content in courses, we also encourage you to consider the activities first and then add content to support those activities. However, whatever format your content takes, please realize that online course participants have come to expect high quality learning experiences (Hayes, 2015). Please make plans to have all pre-determined content completed and available to participants well before the first day of class.
Microlearning (or short bits of learning) is one type of instruction that works very well with online learning (Hug, 2010), especially with large informal online classes. Theo Hug (2010, 2012) defines microlearning as, “… [A]n abbreviated manner of expression for all sorts of short-time learning activities with microcontent” (p. 2268). Learners benefit from these shorter bursts of information rather than facing a wall of text while taking an online course. The advantage of microlearning is that students can decide what content they want to learn and just focus on that bit of information. This works well for students who are just interested in part of the content of the course, but may not be involved with the course as a whole.
To avoid cognitive load (Sweller, 1988), or loading students down with too much information all at once, consider breaking up curricular content into shorter chunks of content, or microcontent. Microlearning is the idea of taking your curriculum and grouping it in too much briefer units. Think about curriculum in terms of two main categories: text based content and multimedia based content. Multi-modal information might take the shape of audio or video, for instance, or a brief infographic or concept map (Semingson, Crosslin, & Dellinger, 2015). For instance, for audio-based learning, you can create and share micro podcasts that are one to five minutes in length. You might also consider making microcontent in the form of videos that are one to five minutes in length. The main recommendation here is to keep microlearning under five minutes in length, as described in other parts of this handbook.
For an example,see micro podcasts from Dr. Peggy Semingson on the audio platform SoundCloud.
Notice that these micro podcasts linked above are accompanied by a verbatim transcript for each micro podcast. We highly suggest that you write the transcript first and then do the recording of the micro podcast so as to avoid filler words when doing the recording. You can record micro podcasts using your mobile device with the built-in voice memo feature. Suggested platforms include SoundCloud, Audioboom, or Mixcloud. More details on this can be found in the “Creating Quality Videos” chapter later in this handbook.
Some ideas for using microlearning with assessment might include a two to three question quiz, following a bit of content such as a short video. You might also send students on a very brief web-based expedition to look for web-based content or information to share on a discussion board. The goal in this type of task is to keep time spent on learning short and brief; again, under 5 minutes is ideal.
To keep students active in their own learning, you might also consider having students create a short text-based response to a discussion prompt, or have students create a short podcast or video that is one to five minutes in length. This type of task give students agency over their own learning, yet is low stakes enough that it won’t take a lot of time to complete (in theory!). Encourage students to use their mobile device, such as a smartphone or tablet, as a way to engage with microlearning and microlearning based tasks.
Other ideas to use microlearning and create professor-authored content for a course:
Most LMS and CMS platform have very robust tools for creating content. You can also link to external websites for content, or designate an electronic or physical textbooks. We recommend choosing websites and books that are free to use, in keeping with the general idea of openness. There are many open educational resource services that offer a wide range of books and other open materials. We highly encourage you to use these resources for your course. See the chapter on Open Educational Resources for more information.
Most online content delivery platforms are linear in their presentation of content, so keep that in mind when designing content. Leaving the flow of content to skip around to another section can be difficult for some learners, so plan to keep all content and activities in a linear path as much as possible. This will come in handy when breaking large sections of content into manageable chunks. While you can have all content on one long page, scrolling down through that content can introduce scroll fatigue, causing your participants to lose focus (Gobet et al, 2001). Take advantage of the linear paradigm to create several smaller chunks of text intermingled with activities to help your participants engage more with the material.
However, don’t forget that you have the entire World Wide Web at your disposal, full of information and ideas. Why not send your participants out there to find the content for themselves and share it with one another through discussion forums or blog posts? Or you could even create more advanced learner-centered course structures to allow learners to map their own learning pathway. See the chapter on “Advanced Course Design” for more ideas in this area. Even though it can be helpful to many learners to keep your course linear, you can always encourage some learners to take a non-linear approach to learning if they find that helpful.
Most online courses contain some portion of video content. Some even deliver all content though videos. We recommend having at least a few videos in your course. This will help your learners connect with you in ways they can’t through text alone. We have a few recommendations for video content in courses:
Some LMS and CMS platforms will have options for hosting video content. Some will even have very specific requirements for offering video content. Others will not actually host videos, so you will need to use other services for hosting any videos you create. A few general tips on hosting videos:
Keep in mind that all content in video or text format will express a point of view that is based in the context of the people that created the content. This is not necessarily a bad thing, but it may cause some confusion for those that come from a different social or cultural context (often referred to as “sociocultural”). Everything from our ethnicity to educational level to history to geographic location to personal interests to political views and so on combine to create unique sociocultural contexts. We all exist with these various circles, and those circles have their unique norms, social cues, etc.
Because of this, it is good to keep in mind the diversity of your learners when creating content. Don’t do anything outrageous or culturally insensitive, but take the time to explain things that others may not understand. Think through issues like:
Also be aware of the external content you are choosing. Does it primarily represent one or two sociocultural contexts? How could you change that? Are there ways you can involve your learners in content creation to expand diversity? See the later section on “Diversity in Online Courses” for more information and resources on examining sociocultural influences in your course overall, including the content.
Before diving into creating course content yourself, consider looking for content that has been created by others and shared openly for others to re-use. This type of content – whether it is text, images, videos, audio, books, or any kind of media – is commonly called “Open Educational Resources” (OER). The creator of that media has shared that media via permissions that allow you to use them in your course. In many cases, you are even free to re-mix and modify these resources as you see fit. Not finding the perfect text or video for a particular topic? Look into OER to see if you can mix together something that is a better fix.
Where do you find OER? You can usually search typical websites like Google, Flickr, YouTube, and other websites for open content (typically licensed under a Creative Commons license rather than traditional copyright). For a more in depth look at how to search for open text images, video, and audio content, see this guide:
Interested in creating your own OER? See the next chapter on Open Educational Resources for more details on licensing and open options.
References
Gobet, F., Lane, P. C., Croker, S., Cheng, P. C., Jones, G., Oliver, I., & Pine, J. M. (2001). Chunking mechanisms in human learning. Trends in cognitive sciences, 5(6), 236-243.
Guo, P. J., Kim, J., & Rubin, R. (2014, March). How video production affects student engagement: An empirical study of mooc videos. In Proceedings of the first ACM conference on Learning@ scale conference (pp. 41-50). ACM.
Hayes, S. (2015). MOOCs and Quality: A review of the recent literature. Retrieved from http://eprints.aston.ac.uk/26604/1/MOOCs_and_quality_a_review_of_the_recent_literature.pdf
Hug, T. (2010). Mobile learning as ‘Microlearning’: Conceptual considerations towards enhancements of didactic thinking. International Journal of Mobile and Blended Learning,2(4), 47-57
Hug, T. (2012): Microlearning. In Seel, Norbert M. (Ed.): Encyclopedia of the sciences of learning (Vol. 5, pp. 2268-2271), New York, NY: Springer.
Semingson, P., Crosslin, M. & Dellinger, J. (2015). Microlearning as a tool to engage students in online and blended learning. In D. Rutledge & D. Slykhuis (Eds.), Proceedings of Society for Information Technology & Teacher Education International Conference 2015 (pp. 474-479). Chesapeake, VA: Association for the Advancement of Computing in Education (AACE).
Sweller, J., Cognitive load during problem solving: Effects on learning, Cognitive Science, 12, 257-285 (1988).
The section on openness in the previous chapter touched on the concept of “open” as being more complex than just “free.” In a more formal sense, educational resources that are released openly are often called “open educational resources” (OER). But there is often more to OER being considered “open” than just price. The OER Commons define OER as “teaching and learning materials that you may freely use and reuse, without charge…. OER often have a Creative Commons or GNU license that state specifically how the material may be used, reused, adapted, and shared.” Other organizations have slightly similar or different definitions than this – you can see a list of some here.
Many institutions and companies are pushing for an increased usage of open resources in their courses as this practice can help learners save on the costs of materials. This is usually accompanied by a push for instructors to create open resources as well. If you have the option to release your content as an open resource, there are also other benefits to doing so in addition to the savings for your learners. Your work and/or research as a professional would be available to a wider audience, gaining you increased recognition among colleagues. This wider audience could give you more people looking at your work to review and give feedback, improving quality and accessibility. This could also help spread the reputation of your institution or company to new areas or contexts. All of this helps you participate in the often-forgotten social responsibility of providing education for all. Open resources are a great chance to help your learners and many others in many ways.
OER are typically created using the same tools as anything else – word processors, graphic editor programs, etc. No special new skills or tools are necessarily to create OER beyond what you already have been using to create course content or activities. Anything that you create in a course could become an OER: text, articles, books, graphics, videos, activities, assignments, assessments, games, etc. The difference between OER and typical resources are the permissions that you assign to the works you create. One popular way to look at these permissions is the 5R Open Course Design Framework by Lumen Learning:
Of course, many people can already do this with many resources online. The difference with OER is that you give permission to do these through a specific open license.
Most people are familiar with copyright, although probably not the details of copyright law. The main point of copyright is to protect the usage and distribution of original works of authorship, usually in favor of the creator of the work. Anything under copyright is designated as “all rights reserved.”
On the other end of the spectrum is public domain, where either the owner has released all rights, or the rights have expired. This is typically referred to as “no rights reserved.” Different countries, and even different states within various countries, will have varying copyright laws that address rights and public domain. Click here for an example of the differences with in the United States.
Between these two options resides the bulk of open licensing that is often referred to as “some rights reserved.” One of the most popular ways to license these works is through a Creative Commons (CC) license. These are a set of licenses that designate how you would like your work to be attributed, shared, and used (or not used) for commercial purposes. CC licenses are open, free to use, and popular with millions around the world. Also, it is important to note that CC works in parallel with copyright – you can still retain copyright while using CC.
Utilizing a CC license can help get your work out to more people. A brief review of the different CC licenses:
Please note that the last two licenses (CC BY ND and CC BY NC ND) are not considered OER compliant because they do not allow works to be revised or remixed. If you are not sure which license to choose, or want help in choosing a license, see the CC License Chooser page for help:
Keep in mind that licensing does not just apply to text content. Images, videos, animations, and other creative works can also be offered through an open license. With all forms of media – especially video content – just remember to keep track of everything you use when creating the media. Not everything you use may be free to include in an open license. For example, if you use a famous song for background music in your videos, you won’t be able to release those videos as OER. Keep this is mind with graphics, music, sound effects, and other parts you utilize when creating video or media. There are vast libraries of license-free media that you can use if needed – just search for the type of license-free media you need. You may have to look at multiple websites to find exactly what you are looking for.
Once you create your resource, you will obviously share it within your course. But if that was your end goal with sharing, you probably didn’t need to go the OER route. The next step is to consider how to get that resource out beyond your course.
The main issues you will want to consider are accessibility and platform. You will want to make sure that your OER meets accessibility standards, as well as working with the platform you want to share it on. For media-type works, you will probably consider media sharing websites like YouTube, Flickr, Vimeo, and others. Make sure to do some research to make sure there isn’t some less popular service that might be a better fit for your media type (for example, YouTube doesn’t allow users to download videos, so you will need to take that into consideration).
For some OER, you might want to upload your resources to your own website, or create a blog to publish them on. You may even want to host your videos on your own website. These topics are covered in the Creating Content chapter.
Of course, in an educational context, the focus of OER creation will be more on creating educational tools, modules, etc. rather than on individual media files. Some resources like the OER Commons can be better suited for building education specific resources in addition to just content. You can see a list of other resource options with an educational or multi-media focus on this page.
Building an online course entirely using OER is a challenging process, although there is a great wealth of different resources and textbooks available. Some of these resources, as stated previously, allow you to use or remix the chapters, assessments, etc., as necessary to create your course. Not every academic field or subject area has available OER. Sometimes you will want to (or out of necessity: need to) author your own OER. However, if you truly want to design your entire course using OER and not use a ready-made OER textbook with its accompanying materials, this can be challenging as well.
Additionally, if you are a proponent of a particular instructional design model, then outlining your course (which most models advocate) will be an important initial step that will guide the OER decisions that you will need to make. Decisions about what materials best serve students will be dictated by that outline. Also, deciding how you want to provide those materials, either embedded in the course, or through hyperlinks, etc., will also be important (see chapter 5 – Effective Practices).
One of the benefits of OER is the versatility of formats available; one downside is that using OER materials unlocks the possibility of change. Consider what would happen if you link to materials that become outdated… or even removed from the web. Because of this, you will need to review materials regularly to make sure links to materials aren’t broken. You will also need to consider what method of adding the material to your course will best benefit your learners:
No matter which method you utilize, any/all OER material should be reviewed regularly for outdated information and appropriate permissions.
When building a course using OER, here are some main considerations you should keep in mind:
Grading and assessment in learning is a complex subject that can (and often does) fill an entire book alone. It is also an area that all instructors with any experience in teaching know well. Grading can run the gamut from informal off the cuff questions thrown out spontaneously in class to gauge understanding, all the way to extensively controlled, proctored high stake tests.
To add to this complexity, every LMS and CMS system has slightly or majorly different ways to create and administer assessments. Your options may be limited to a few tools, or overwhelmingly complex in options. It is outside the scope of this manual to cover every single option of every tool, as there are too many to realistically cover, and they will change immediately after any list is completed. Instead, we will cover some issues concerning assessment and grading in general, giving a few ideas for better ways of approaching the concept of assessment. You may be teaching as part of program or company that has required tests or certifications that are beyond your scope to control. Therefore, this will be a brief examination of those scenarios that you can control.
Keep in mind that grading and assessment online is very different from grading and assessing in face to face classrooms. In face to face classrooms, there is much that you can do to tell if your learners are learning without giving a formal assignment or test. The immediacy of being in the same room with your learners allows you to gauge non-verbal clues, as well as allowing learners to ask questions in the moment. But when teaching online, you will need to find some way of determining what was actually learned by your learners. These are often referred to as “traces” or “artifacts.” Limitations and affordances of the platform you utilize will affect what these traces or artifacts look like. For instance, learners that are online will have access to the entire Internet while learning, making high stakes standardized testing problematic. Learners can just look up answers on the web (and proctoring tools that promise security are often easy to get around). Therefore, you might want to consider moving away from multiple choice tests and consider other more authentic ways of assessing what was learned.
Another aspect to consider when grading is the context of your course itself. For example, MOOCs will be assessed differently than smaller closed online courses. There would really be no way for an instructor to grade hundreds or thousands of papers in a MOOC, so if you are teaching a MOOC you would need to think of other ways to assess learning. Maybe multiple choice quizzes can be more of a “self-check” than a grade? Can those students that want to do projects utilize peer review if you give them a rubric to guide them? See the later section on “Testing Issues Specific to MOOCs” for more on this topic.
Also keep in mind that there could be other differences in how you create graded assignments – such as the difference between undergraduate and graduate courses, or the difference between training new employees versus re-training existing employees that need skills upgrades. In general, the more experience your learners will bring to your course (like in graduate courses, continuing education seminars, labor force re-skilling programs, etc), the more you will want to build on that existing knowledge and skills with more authentic projects than to transmit new information that needs to be memorized.
Earlier in this book, we discussed the decision to grade or not grade. Much of this chapter will be focused on those courses that have decided to grade. However, even in courses where the grade is more of a conversation, or students are grading themselves, the concepts covered here can still guide the creation of assessments in those scenarios. Additionally, even when you have your learners creating their own assignments, this section can help give you tips for how to guide your learners in that process.
The first step in effective assessment is to take a good look at how you are framing your students. Does the way you design your tests frame them positively as co-learners or apprentices with you, or negatively as possible cheaters? Are you designing assessments that genuinely help with the learning process, or serve as a “gotcha!” for weeding out “weaker” students or those “not doing the work”? We would suggest taking a more positive look at your learners and their learning process, and designing your assessment strategy from that viewpoint.
Of course, there are students that are going to cheat. This happens in face-to-face courses, so of course it will happen in online courses. You will need to assume that learners can Google a lot of things while taking assessments. There are many companies selling monitoring devices or systems aimed at cutting down on cheating. Keep in mind these are not perfect – most students know how to fool them. Just do a search online if you don’t believe me: as soon as any company releases a new proctoring solution, there are soon videos online how to fool that new system. Some further thoughts on proctoring tools and student framing:
Something to keep in mind is that learners who cheat do so because they have been given an assessment that is cheatable. In many ways, they are treating the test as a game to beat. This is the problem with standardized testing based on rote memorization: the answers are the same for everyone – and typically already on WikiPedia or some other website somewhere – so why do I need to memorize them in the first place? That is a good question to filter all of our course activities thorough: are students learning a skill and then just being tested on factoids about that skill? Is that really a good way to help them learn?
As previously mentioned, there is a long and ever-changing list of assessment tools and options. You are probably already familiar with many of them. While not an exhaustive list, here are some of the more common types of assessments you will see utilized in courses:
Due to the large number of assessment options, it would take several books to cover them all. What we suggest is to determine what assessment plan would work best for your course, and then search for effective practices and tips on those specific options and tools. There are a few ideas we would suggest you take in to consideration before making decisions:
Rubrics are a popular tool to use in grading online assignments. Some think they are a great way to standardize the grading process, while others think they are a way to stifle individual thinking in learners. This difference in opinion probably stems from the fact that some courses may need a more standardized approach, while others may need a more open-ended approach. Standardized rubrics can be seen as a more fair approach to grading by some learners that gives them a specific road-map for every part of an assignment. On the other hand, more open rubrics can save time and headaches, while allowing your learners to have some freedom and flexibility in their learning.
The most common way to design standardized rubrics is to have extensive details on each line of the rubric explaining what each point counts for, with several rows of criteria covering every aspect of each assignment:
| Introduction / Topic | 10 points: Student properly generates questions around a topic and introduces them fully. | 5 points: Student generates questions and has a partial introduction. | 2 points: Student is missing either introduction or topical questions. | 0 points: Student has no questions or topical questions. |
This method creates a strict roadmap that helps many learners. However, it also rarely allows learners to wrestle with what they want to do for an assignment. Additionally, there are many gaps that learners could fall into between point values or descriptions. These issues may not apply to all assignments, so you may find that a standardized rubric works best for your course design. Just keep in mind that these can be more time consuming to create and utilize from the instructor viewpoint.
Another way to approach grading issues is to take a more flexible, open-ended approach to creating rubrics. For example, try to have fewer rows that focus more on learners showing their knowledge than focusing on various assignment details like word count or assignment formats. Simply give the general area that will be graded, the parameters that you will look for, and a total number of points possible. Then leave an open slot for you to enter the points they earn in that area and a place for you to explain why you gave those points. For example:
| Subject Knowledge | Subject knowledge is evident throughout the project. All information is clear, appropriate, and correct. | 20 | (comment) | (points earned) |
This format can help you look at grading as more of a conversation than a final decree, especially if you allow learners to turn in early versions of assignments for formative feedback. However, keep in mind that learners may not be accustomed to this more open-ended approach, so you may cause anxiety if you do not scaffold them into this less structured approach.
Testing in a MOOC environment offers many unique challenges. The large number of students means that grading individual assignments is nearly impossible for most instructors. Some MOOC platforms will provide a number of self-grading options that can help in these situations. Additionally, you can create self- and peer-reviewed rubrics if that method will fit your design. There are also developments in the area of auto-graded papers that will analyze how you grade 100 papers, and then apply that logic to the rest of the papers. However, this feature is still in the testing phase.
The main concept to keep in mind is that MOOCs are open, and all participants will have access to the entire Internet when taking tests. This means that you do not want to design your tests as a big “gotcha” to catch learners that didn’t memorize the content. You will want to design the tests as a means to see if students can find the correct answer using whatever resources they can, and then indicate the correct answer on a test. Or, you may wish to design peer-reviewed assignments that aren’t based as much on correct answers as much as evaluating how well content has been applied. Finally, you can also create self-review rubrics that allow participants to reflect on their own learning in a deeper manner.
The main idea to keep in mind is that MOOC culture does not require an instructor to grade thousands of tests, papers, and forum posts every week. That would be unthinkable. So design your courses accordingly.
Many MOOC providers will offer certificates and / or badges to participants that complete their courses. Certificates and badges can be part of regular online courses as well. Typically these forms of reward are optional, meaning learners can still participate in a course even if they do not want to seek a badge or certificate. However, in many cases, badge or certificates are part of the official requirement to complete the course.
When badges or certificates are optional, keep in mind that some participants will want the certificates, and some will just want to learn the content for personal reasons. So you might want to have a certain set of activities for all participants, and then a special set of activities and / or assessments for those participants that are seeking certification.
In theory, anyone can use any tool to make a badge or certificate and send it to those that earn them. However, this could quickly lead to learners sharing these images with others that have not completed the work. Therefore, it is recommended to use a system that credentials secure badges and / or certificates in some ways. Usually, these are centralized spaces that allows you to create the credential and then serve as the gatekeeper to handing them out. Learners often have to create an account on the service to display their badges or certificates earned. If you are interested, here are some credentialing resources:
Video production is a time-intensive process that requires extensive planning and preparation. Please review the following sections to ensure that you have allotted enough time and resources to create the desired amount of video you would like for your course.
In order to meet most online accessibility guidelines, you will need to have transcriptions (timed if possible) for every video you produce. Some video hosting systems require a specific type of transcript format for their system (such as SRT – a timed format that allows specific words to appear on the screen as they are being spoken in the video), while others will accept many different formats. Make sure to check with your video hosting service. You can always pay a transcription service to create transcription files from completed videos, but just keep in mind this can get expensive. One way to save time and money on transcriptions is to create your videos using the recommended guidelines below. These guidelines will help you create a professional video with a transcript already in hand to be quickly converted to any transcription format.
| Pre-prep* | Filming | Processing † | |
| Up to 10 minutes with no slides, graphics, etc. | 5 hours | 0.5 hours | 1 hour § |
| Up to 10 minutes with 25% slides, no moving parts ‡ | 5.5 hours | 0.5 hours | 2 hours |
| Up to 10 minutes with 50% slides, no moving parts ‡ | 6 hours | 0.5 hours | 5 hours |
| Up to 10 minutes with 75% slides, no moving parts ‡ | 6.5 hours | 0.5 hours | 8 hours |
| Up to 10 minutes with 25% moving parts* | 8 hours | 0.5 hours | 8 hours |
| Up to 10 minutes with 50% moving parts* | 9 hours | 0.5 hours | 16 hours |
| Up to 10 minutes with 75% moving parts* | 10 hours | 0.5 hours | 25 hours |
* includes creating scripts, gathering slides, providing documentation and content for moving parts, etc. All materials are required to be submitted in native digital format (i.e. no scans of handwritten content). Please see Script Creation Process below.
† processing time will vary depending on the quality of content provided from the prep stage. Estimates given are for high quality native digital formats.
‡ moving parts refers to self-revealing equations, animations, moving graphics, or anything beyond a static PowerPoint slide. There are no estimates for 100% because all videos need to contain some video of the speaker.
§ includes 0.5 hour for audio processing and 0.5 hours for video processing, this amount included in all estimates in this column.
The most time-intensive process for presenters is creating a script. But also the single most important prep is to prepare a script. This heavily impacts editing time for the final media. It also impacts how the students digest the material. It also impacts government-mandated needs for closed-captioning.
Impact on students: Research has shown that there is only a short duration of time (about 4.5 minutes), before students start to lose interest in the media and stop paying attention (Guo, Kim, & Rubin, 2014). If this is true, why not capitalize on the value of a well-performed efficient presentation (devoid of digressions, mis-cues, fumbling over mis-placed slides, and tons of fillers like “Ummmm”)? All of these issues can be avoided if the presenter has a script, and performs the script with a degree of enthusiasm and engagement. With a script, it takes far less air-time to get a point across, than if the idea was presented ad-lib.
Impact on delivery: Often, the delivery of online media (especially when prepared using tax-payer dollars at state institutions) is required to be multi-channel, ie, close-captioning is often mandated for all audio tracks. If your subject matter is highly technical, it is far better that you (as the expert) provide a transcript of what is said, rather than having a transcript prepared by a third-party (who probably does not know your subject matter or your specialized terminology).
Impact on Editing: There are two extremes in editing the audio track of a presentation.
In terms of production schedule, there is a trade-off in pre-production workload and post-production workload. Usually, the presenter is responsible for most of the pre-production workload, and the editor is responsible for the bulk of the post-production workload.
One highly recommended method for script creation is to pre-record the presenter delivering the material live (in class or into a Dictaphone device) to serve as raw content. This pre-recording is then transcribed, and then edited, to improve rhetorical organization (eliminate digressions and back-tracking or combine clarification question answers with original statements), to correct improper vocabulary issues, and to adjust the information density to match the requirements of potential on-screen video effects (this usually involves replacing minimal grammatical phrases (like pronouns or generic verbs like “do”, ie replace “if you do this” with “If you perform this calculation”)).
Please note that parts of the script preparation can be performed by persons other than the presenter. The presenter delivers a live-performance of the presentation, but can then hand off that recording to a GTA or transcription service to get a transcription, and then the GTA or the presenter can edit the script. The edited script is then given back to the presenter for review and practice. Therefore, it is possible that the presenter only be involved in about 2 hours of the 5-hour script-prep activity.
The rule of thumb is that live lectures usually distill down by 2/3 when converted to professional audio. Therefore, in order to create a video segment of up to 10 minutes, the following table will describe minimum estimates for pre-pre work:
| Live performance raw content capture (lecture, etc) | 0.5 hours |
| Transcription of raw content (can be sent to transcription service) | 2.0 hours |
| Presenter edits transcription | 2.0 hours |
| Presenter reads through edited transcription for practice | 0.5 hours |
| Minimum Script Generation Time | 5.0 hours |
Also, as noted earlier, a complete script is much easier to convert to the required SRT format. For instructions on how to create SRT files yourself, please see this guide:
In some cases, you may not have the ability to go through this entire process. In those cases, focus on what you can accomplish. Start by writing your script out in a conversational tone. Then read it out loud to time it and see who it sounds to you. Edit your script and read aloud until you feel you get it correct. Remove extra parts and rabbit trails that aren’t needed as you perfect it. Then practice with the final version a few times before recording it. Even if you think you are good at “winging it,” preparation and practice will make you sound more professional. Finally, look at suggestions for how to make good marketing or branding videos – these contain tips that will help any video script writing process. For one example, see:
At a minimum, the audio editor must listen to the full length of the recording. If the recording is absolutely clean, with zero edits required, then the audio editor spent 10 minutes “editing.” However, the typical scripted session will involve a small number of edits to correct for mis-pronunciations, stumbles, and page-turning, etc. As such, typically, 20% of the recorded scripted session is discarded. If the session is scripted, it is fairly easy to make splices that are “undetectable” in the final cut.
In contrast, if the session is unscripted (for example, lecture capture), typically, a very large number of edits have to be made to generate a final cut that is devoid of information errors, organization errors, speech errors, etc. As a result, typically, two-thirds of the unscripted studio session is discarded.
Therefore, to create up to 10 minutes of quality video, a minimum of 6.5 hours is required if no problems are encountered. However, the chance that there will be no issues is very, very small. Additionally, this is the estimate for straight video with no graphics, animations, self-revealing equations, etc. (see “Graphics and Video Preparation” below)
To put this into perspective, let’s compare to full in-person lecture capture. Consider a presenter going to class 3 times per week for one hour presentation for 15 weeks (a standard MWF one-hour lecture format). Let’s consider that it takes these 45 hours of unscripted sessions (contact hours) to deliver a course-load of information. That will require a total of about 540 man-hours to produce, and will yield only 15 hours of finished audio tracks.
On the other hand, if the presenter were to take those 45 hours of live-presentation time, and re-allocated them to 30 hours of script prep (enhanced by additional hours of GTA/transcription service involvement) and 15 hours of studio presentation, then this will require only 135 total man-hours to process, and will yield 12 hours of finished audio tracks (and these audio tracks will be higher quality – the presenter will appear to be better-informed, more authoritative, and better-prepared – that is, more professional, with higher credibility).
Thus, with scripted studio performances for audio of a standard course, there is approximately 400 man-hour savings. This block of 400 man-hours can be re-directed to providing more elaborate graphics for this course (or providing audio editing for 2 additional courses, or providing the audio editing for this course for 1/3 of the price…)
The graphics/moving parts portion of video creation is much more time-consuming, but typically, requires less presenter time. The presenter provides a bunch of raw materials to the media editor, and the media editor spends weeks and weeks building media. This impacts monetary budgeting and time-budgeting (to ensure the finished media is deployed on time). The chart at the beginning of this section demonstrates how the overall production time increases quickly with the addition of slides, animations, self-revealing equations, etc. However these graphics are important for illustrating points and examples and should not be left out just because of time considerations.
The difficulty in estimating time requirements for these additions is that complexity can vary greatly. For example, self-revealing equations look very simple when comparing the final product to computer animated graphics, but can take much longer to create due to the extensive needs of proper placement, spacing, and readability of each individual character. This process can also be slowed down by inferior raw material provided by instructors (for example, handwritten notes that are hard to read and not properly written out).
In order to ensure the best possible delivery of content with the least amount of wasted time, we recommend all materials to be created digitally in a native digital format (for example, graphics created in a graphics editor and not just a scan of a textbook page). If the media specialist can copy and paste high quality content right into the video editor program, this can save them and the presenter enormous amounts of time. It may seem like it is faster to write out a formula on paper than take the time to enter it in an equation editor, but if the media specialist has to call you and set up a meeting to clarify what doesn’t look right and then meet for an hour or more to clear up one equation and so on and so forth, you might actually cause more time in the long run by trying to save time up front.
Therefore, please sit down with your technical media consultant to go through all graphical needs to ensure you are using the highest quality creation method from the beginning. Even if it does turn out that they need to do a hand sketch to create a completely new animation from scratch (which is rare), at least they will have created their own hand sketch that they will understand from the beginning.
Another issue to consider when creating your videos is how they will be licensed. For many people, your institution or company will already have made decisions on how the videos you have created will be licensed. For others, you may have some or total freedom to license the videos that you create as you like. If you decide to use any type of open license for your video, this could increase the impact and spread of your content outside of the course. For more details on open licensing (and licensing in general), see the chapter on Open Educational Resources.
References
Guo, P. J., Kim, J., & Rubin, R. (2014, March). How video production affects student engagement: An empirical study of mooc videos. In Proceedings of the first ACM conference on Learning@ scale conference (pp. 41-50). ACM.
You may have noticed that many online courses utilize social media outlets such as Facebook and Twitter. While there really is no one right way to utilize social media in a course, there are concepts and designs that work better than others. This section will cover some ideas and suggestions for social media usage in your course.
While there are many different ways to use social media in an online course, they generally fall into two different categories:
Additionally, some courses encourage participants to work on social media sites (such as blogs) to create content for the courses that is then submitted to other participants for peer feedback. Some courses (usually MOOCs, but not always) exist completely on social media outlets outside of an official Learning Management System. This form of learning is called connectivism, and MOOCs that are designed with this structure are referred to as cMOOCs (Siemens, 2005). For more details on this topic, see the section on Personal Learning Networks later on in this manual.
The key for designing for social media is to have a clear purpose for what you want to do and then to make sure that you stick with that method. If you are using certain social media outlets for official communication, then make sure this is clearly communicated in the design. If you want participants to use social media for interaction with other participants, then also make that clear. However, creating a long list of rules for using these social media outlets will usually have a chilling effect on informal usage, so avoid placing a large number of rules.
Please keep in mind that social media is not a safe place for everyone. Bullying and harassment are a major issue on all social networking sites, with most failing to do anything to curb any of it. Make sure to allow alternatives to social networking for your learners, including everything from using pseudonyms to using alternative, lesser-known services to not using any social networking websites at all. Additionally, if you are creating a course for a government owned entity such as a public university, you will need to carefully follow government guidelines for student privacy. For example, in the United States, state universities have to follow FERPA (Family Educational Rights and Privacy Act) guidelines in relation to utilizing social networking websites:
The instructional designer you choose for your course should have a background in all learning design philosophies, including social learning. Be sure to seek their advice for how to design for social learning within your specific course.
Here are specific suggestions for using various popular social networking sites.
First of all, you will want to find a short, but easy to remember code name for your course that is available across all of the social media sites that you want to utilize in order to help participants find your outlets more easily. It could be something related to the course number, ie “econ101mooc.” Space is a premium on some sites like Twitter, so be sure to keep it as short as possible.
Twitter can be a good site to broadcast quick announcements, ideas, relevant news articles, and links to full updates. Make sure your Twitter username is available, and make it match your course hashtag (i.e. “http://twitter.com/econ101mooc”). You can add a fuller course name in the settings. Also, make sure to update the avatar to match your institutional or company logos, and have a graphic designer create a header image that matches any other graphic art used for the course.
Conversations on Twitter usually revolve around hashtags. You can’t own these, but you do want to pick one that few people use in order to help keep the conversation focused on your course. Participants often search Twitter for course hashtags, so creating one that matches your courses Twitter ID (if you have one) will help put your official tweets in the search result. For example, you would check to see if “#econ101mooc” is used much, and if not – AND it is available as a username – use both of those.
A Facebook Page (not group) can serve as another official channel for announcements, relevant web links, and other course communications. Your social media coordinator will need to create a Facebook Page with their account and then upgrade you and all other course instructors to group admins. You will want to use the same Page ID that you use for your Twitter username (i.e. “http://facebook.com/pages/econ101mooc”) for consistency. You can always make the display name more descriptive.
While Facebook Pages tend to be more formal communication spaces, Facebook Groups are more focused on the members and therefore are more interactive. You can create a group in addition to the Facebook Page – some participants tend to favor one over the other for a range of reasons. As with Facebook Pages, you will also want to use the same Group ID that you use for your Twitter username (i.e. “http://facebook.com/group/econ101mooc”) for consistency. You can always make the display name more descriptive.
As discussed previously, you may need a YouTube account and channel to host your course videos. It is usually a good idea to use the entire Google account that comes along with this. A Gmail account that matches your other social networks (i.e. “econg101mooc@gmail.com”) could serve as a great centralized email for the course (especially in MOOCs). Creating a Google+ page for your course can also serve as an alternative for users that are not fans of Facebook or Twitter. All of these accounts connect and interact smoothly. They also interact with Google Hangouts.
If you wish to have a live online session with at least one or more people in your course, Google Hangouts or YouTube Live are good options. A Google Hangout will allow up to ten instructors or guests to interact online, while YouTube Live will allow unlimited numbers of people to watch a streaming session live. These are then archived on your YouTube channel. Just make sure to do a test run before really using Google Hangouts or YouTube Live as the settings can be tricky. Also be sure to set up the Google Hangout or YouTube Live through your course Google+ page or YouTube account in order to keep everything connected.
As you can see, there are many social media outlets to keep track of. One way to connect with all of them is to create content on a WordPress blog. Content created on a blog can automatically be posted to Facebook and Twitter through behind-the-scenes connections (see the “Jetpack” extension for more on this feature). This would be a good way to post announcements – create them in WordPress, automatically post them to social media outlets, and then copy and paste the message into an announcement in your course platform.
There are also several other sites that can help you manage multiple social media outlets. Hootsuite and Known are two of the more popular ones. Other services can also work well. There are also several mobile apps that can help – for example, the iPad Twitter app lets you connect several Twitter accounts in one app. Additionally, Facebook has a mobile app specifically for running pages.
Slack is a newer messaging system that has been growing in popularity recently. It is a good tool for group collaborations that need to be asynchronous in nature. Groups can also share files, videos, images, and other documents within Slack easily. Additionally, Slack can integrate with many other tools like calendars and messaging systems. Slack groups can be organized by channels that are designated for specific topics, groups, or other configuration.
Some or even many of your learners may object to using certain social media tools for many reasons. Some may feel it is not safe for them to have an online presence (often due to real life threats or other issues). Some may object to the ads in various services. Some may not like their personal data being sold to advertisers. These concerns are valid, and you will need to explain these issues clearly to all learners. Additionally, you will need to embrace alternatives for those that have concerns. There are different ways to address concerns:
Wikipedia describes a Personal Learning Network (PLN) as “an informal learning network that consists of the people a learner interacts with and derives knowledge from…. in a PLN, a person makes a connection with another person with the specific intent that some type of learning will occur because of that connection”. Connectivist MOOCs utilize PLNs as the main mode of course interaction, but they can also be utilized in any course. One of the benefits of connectivist learning is that participants retain control over their course work and can therefore display their accomplishments to anyone that they choose.
Many of the social learning tools mentioned above are typically used in PLNs. However, instructors should never assume that just telling participants to use these tools will encourage their usage. Lessons will need to be designed to specifically incorporate PLNs into the activities. Activities will need to encourage learners to post work to their social media sites, and then share the link with the course inside of the LMS/CMS platform. Additionally, instructors that are actively using the Twitter Hashtag as well as blogging about the course content will need to encourage participants to join in.
Additionally, a course hub of some type that pulls together participant blog posts, tweets, videos, images, and other work can help encourage learners to participant in social learning. A self-hosted WordPress blog with certain tools installed (see the “FeedWordPress” extension) can be one tool to create a course hub.
If you are interested in exploring these options for your course, be sure to find an instructional designer for your team that is familiar with connectivism and social learning. Further details on these topics are outside of the scope of this manual, but if you are interested in these topics, see the links below:
One of the benefits of moving into online learning is the ability to connect with a more diverse audience of learners that many face-to-face learning experiences tend to lack. When adding on top of that a layer of openness or social learning, the diversity can increase even more. However, even within smaller groups that may share ethnicity or location, there are still many sociocultural factors such as religious beliefs, socioeconomic status, political affiliation, and geographic location that will bring in different viewpoints, opinions, and life experiences.
The first step in embracing diversity in online leaning is for instructors and course designers to become aware of the influence that their own unique social and cultural contexts have had on their views. No matter who you are, your unique social and cultural contexts have influenced what you know, how you learned what you know, and how you want to teach what you know. This also means that those unique sociocultural factors place a filter or worldview on your teaching and communication that could be confusing to others from different sociocultural contexts.
We all believe that respect is a major foundation for teaching. Before we ask our students to respect each other’s unique worldviews, we should consider evaluating our worldview to see how it influences our teaching and interactions. There are many ways to evaluate your worldview to develop a sense of cultural awareness. If you need a place to start, one option is the Cultural Awareness Online Continuing Education Course. The audience for this self-paced lesson is nurses, but the awareness it fosters can help people in any field.
Once you have a good idea of how your worldview affects your course, it might be a good idea to review your content and activities for possible issues. Then you will need to develop a system to communicate your expectations of respect and interaction with the learners in the course. Analysis into the Bystander Effect (see “Social Media: The Modern Stage for the Bystander Effect?”) as well as the concept of “the wisdom of the crowds” (see “The Madness of the Crowds” by Tim Hwang) has found that people will generally stand by when they see disrespect or attacks happening online (or maybe even join in the attack where they might not have said anything if they were the only one). Therefore, course designers need to implement guidelines for respect for diversity in their courses. The next section covers this issue.
Courses offered through institutions or companies often are required to adhere to various honor codes or codes of conduct at all times. However, not all codes are enough to deal with safety issues in all courses, and some institutions do not have them. Additionally, MOOCs will attract many participants that are not officially bound by institutional codes because they are not under the authority of the institution. This can possibly create unique situations when dealing with harassment and bullying that happens online. As an instructor, your top priority should be to create a learning environment that is safe as possible for all learners. Several years of social networking has basically taught us that the community does not always necessarily rise up and expel abusers or defend victims (Brody & Vangelisti, 2016). You will need to develop a Code of Conduct to spell out how you expect participants to act in your course as well as what will happen if they violate the Code. Even though many online courses seem to be fairly safe for most learners, please be prepared to point out the Code of Conduct and enforce it if necessary.
A Code of Conduct should include at least the following components:
For more rationale, details, and examples of Course Codes of Conduct, please see the following resources:
References
Brody, N., & Vangelisti, A. L. (2016). Bystander intervention in cyberbullying. Communication Monographs, 83(1), 94-119.
Siemens, G. (2005). Connectivism: A learning theory for the digital age. International Journal of Instructional Technology and Distance Learning, 2(1), 3-10.
Online courses have given learners across the globe a unique opportunity to learn outside of formal educational settings and in less supervised environments. The independent nature of this form of learning heightens the need for learners to have the tools to both initiate and manage their own learning. Moreover, as individuals engage with content, instructors, and fellow students exclusively online, an explicit focus on techniques meant to deepen the learning experience becomes increasingly important. All learners in both in-person and online courses are in need of effective skills and strategies to become aware of and self-regulate their thoughts, emotions, and behaviors. Within physical classrooms, and even within smaller fully online courses, instructors can somewhat easily incorporate activities such as journaling and peer discussion intended to promote states of mind that foster deep reflection and perspective taking. As some courses grow to a massive scale, the task of promoting these qualities becomes much more difficult. One way of fostering these skills is by incorporating contemplation in your course.
Contemplation is the central focus of contemplative science — a growing multidisciplinary field aimed at understanding the mind-body systems through contemplative practices (Roeser & Zelazo, 2012). Mindfulness, a term quite popular among educators at the moment, is one construct that falls under the umbrella of contemplative science. Contemporary researchers define mindfulness as paying attention to the present moment, including thoughts and emotions, with acceptance, curiosity, and kindness (Brown & Ryan, 2003; Kabat-Zinn, 1994). Mindfulness is an ancient idea with roots in different philosophies and religious traditions. Over the last century, mindfulness has been adopted globally and is now a widely used contemplative exercise.
Mindfulness meditation trains skills by applying restraint on ordinarily uncontrolled mental or physical activities (Mind and Life Education Research Network [MLERN], 2012), encouraging the use of voluntary control in order to focus attention on certain objects (e.g., the breath) or thoughts (e.g., kindness to others). Schools throughout the United States are incorporating mindfulness meditation into educational curricula with the goal of enhancing self-awareness and self-regulation of attention, emotions, and behavior (Greenberg & Harris, 2012; MLERN, 2012). While mindfulness is readily criticized, the science supporting it is quite persuasive. Individuals who engage in mindfulness practice demonstrate reduced anxiety and depression (Hofmann, Sawyer, Witt, & Oh, 2010; Holzel et al., 2013), lower stress (Baer, 2003; Creswell et al., 2016), improved attention skills (Becerra, Dandrade, & Harms, 2016; Jha, Krompinger, & Baime, 2007; Sedlmeier et al., 2012), increased self-regulation (Tang et al., 2007), and richer and more positive personal relationships (Carson, Carson, Gil, & Baucom, 2004; Coatsworth, Duncan, Greenberg, & Nix, 2010). Recently, researchers have shown that students who engage in mindfulness activities perform better academically, even in mathematics (Schonert-Reichl et al., 2015).
Mindfulness and contemplative science more broadly has been applied to the learning sciences in what is termed contemplative education. Roeser and Peck (2009) defined contemplative education as “a set of pedagogical practices designed to cultivate the potentials of mindful awareness and volition in an ethical-relational context in which the values of personal growth, learning, moral living, and caring for others are also nurtured” (p. 127). Contemplative education provides a specific set of practices designed to nurture mindfulness and intentional forms of being and learning. What’s necessary for contemplative education is a competent teacher (either a person or a set of teachings) and pedagogical practices embedded in experiential learning aimed at cultivating relaxed and concentrated states of awareness within learners. These practices are placed in a larger context of ethics and values such as open-mindedness, curiosity, and respect for others. Learning practices that fall under contemplative education include activities such as meditation, reflecting upon existential questions, being in nature, physical activities such as yoga or tai chi, and doing art (Roeser & Peck, 2009).
One exemplary MOOC that focuses on contemplative education through mindfulness at scale is the edX course “Transforming Business, Society, and Self with U.Lab.” The lead instructor is Otto Scharmer out of MIT. Adam Yukelson is the co-instructor and lead designer for the course who has shared information and experiences of their students with me. The course began in January 2015 and ran for eight weeks, during which they had approximately 42,000 registered participants. During the first run of their course, which may or may not be due to their focus on mindfulness, they had the fourth-highest completion rate on edX. The majority of learners in their course have no previous experience with mindfulness.
The purpose of the course, as Mr. Yukelson stated, is “designed to help leaders at all levels in business, government, and civil society identify and shift the deeper patterns of thought that, when left unexamined, keep us re-enacting results in social systems that almost nobody wants.” This is where mindfulness and contemplative practices become crucial. Dr. Scharmer and Mr. Yukelson view mindfulness as one helpful method for suspending and letting go of patterns of thought. This suspension of typical habits of thinking opens up new possibilities of being.
The instructors begin by introducing the principles behind mindfulness primarily by focusing on the different ways one can pay attention. This serves as the basis for what many participants referred to as the most crucial element of the course—coaching circles. Coaching circles are peer-led, and use a seven-step process “case clinic” process. They teach the process through two instructional videos, then give participants a mechanism outside of edX to self-select into groups of 5-6. The coaching circles meet one hour per week, with each meeting focusing on one of the members. In some instances, a coaching circle consists of friends and colleagues and they meet in person, but many of the circles only meet virtually. The individuals in these groups typically do not know each other prior to entering the course and will set up their weekly meetings using Google Hangouts or Skype. Mr. Yukelson shared feedback from two learners from the MOOC.
“The connection with other circle members was personally transformative. Although I missed the first coaching circle call, I felt as though I had known the others my entire life…. My skepticism around the ability to connect in such a way melted. I realized it was not the medium [through which] I communicated, but how I showed up internally that made all the difference! This paradigm shift will stick with me for the rest of my life. After endless in-person and online ‘downloading’ sessions that went nowhere, this was as though a portal I never knew existed was opened completely. All I had to do was walk through it with the love and support of the others. I was so struck with ‘I am them’ and ‘they are me’.”
“I’ve never spoken to someone I don’t know on video as a first means of contact before, and after I overcame my initial shyness I found the experience empowering… Within an hour and a half our circle reached such a deep level of connectedness and trust, it was as if we knew each other since ages.”
In addition to coaching circles, the course also includes live sessions, conducted in livestream with a twitter feed on the side. The live sessions include a variety of contemplative practices including guided journaling and meditation. The full live sessions are 1.5 hours. The maximum number of unique viewers the instructors have had for a session is approximately 20,000. Many learners view the live sessions together in self-organized “hubs.”
In addition to the techniques utilized in the particular MOOC described above, there are various contemplative practices that can be incorporated into your course, whether it is a MOOC or a regular online course. The practices outlined below have been used in online classes which may be useful for any instructor. The activities outlined below draw from Mindfulness-Based Stress Reduction developed by Jon Kabat-Zinn, Mindful Tech by David M. Levy, and Contemplative Practices in Higher Education by Daniel Barbezat and Mirabai Bush.
This activity serves as the building blocks for establishing present moment awareness. The practice is simple, but not easy. The focus of attention turns to the feeling of the breath moving in and out of the body. The mind will wander, but the practice comes in bringing attention back to the breath again and again. By doing this simple practice daily, students are strengthening their ability to pay attention. There are many smartphone applications and resources online that offer guided breathing practices. One that is available both on your phone and online is Stop, Breathe, and Think, which has been used in research studies involving the effects of mindfulness meditation on learning.
An example of the instructions:
“Adopt a posture that is both relaxed and alert. (Example: Sit upright in a chair, feet on the ground, hands folded in your lap, eyes either closed or slightly open). Begin attending to the sensations of your breathing. Identify a place in your body (stomach, chest, tip of your nose) where you can feel the physical sensations that arise as you breathe in and out. Notice when your mind wanders away from the sensations of the breath. Bring your attention back to the breath whenever your mind wanders.”
This activity is designed to bring in deep listening to daily life. In this activity, everyone finds a partner in the course. Then, one person speaks and the other listens in complete silence. The listener listens as carefully as possible, letting go of interpretations, judgments, and reactions, as well as irrelevant thoughts, memories, and plans. When the speaker finishes, the listener repeats as closely as possible what the speaker said. The original speaker sits in silence while the listener repeats this back to them.
Instructions: Find a partner. You are encouraged to connect with someone in your course, but you can do this with a family member or friend if you cannot find a class partner. In this exercise, you will take turns listening and speaking.
- One partner will spend 3 minutes speaking about a course topic or an aspect of his or her life. Set a timer that will make a noise when the 3 minutes is up, avoiding looking at the time.
- This 3 minutes is devoted to the speaker. The listener sits in silence. If the speaker runs out of things to say, sit in silence. Whenever you have something to say, you may continue speaking again.
- The listener should listen in silence. When you listen, give your full attention to the speaker. Be curious, but don’t ask questions while listening. You may acknowledge with facial expressions or by nodding your head. Try not to over acknowledge. You may feel an urge to coach, identify, chime in, or interrupt. This is normal. Just notice when this occurs and resist the temptation to act. Listen with kindness. When thoughts or emotions come into your mind, simply notice them and gently return your full attention to the speaker. If the speaker runs out of things to say, give him or her the space for silence, and then be available to listen when he or she speaks again.
- After the alarm sounds, set the alarm for 1 minute.
- Repeat what you have heard from the speaker. Simply paraphrase, don’t memorize.
- After the alarm sounds, the speaker should take 1 more minute to clarify anything she feels was misunderstood by the listener. Again, one person speaks at a time in a kind and respectful manner.
- Switch turns. Repeat steps one through five. Now the speaker is the listener and the listener the speaker.
- Reflect on how it feels to be listened to so closely and what it felt like to listen deeply to another person. This can be a conversation lasting however long you prefer.
- End by thanking the other person for listening.
This activity is designed to remind students to actually experience what is happening in the moment, rather than simply achieving goals and marking off to-do lists. Often there is too much emphasis on going through the motions rather than noticing what is going on with your mind and body. The exercise asks students to explore the breath and body, emotional states, and the quality of attention.
Instructions: Take a few minutes to answer the following questions.
What is the quality of your attention?
Are you focused or distracted? Take time to think about how you are attending to what is happening in the current moment.
What is the quality of your breathing?
Take a moment to notice the current rhythm and pattern of your breathing, but don’t attempt to change it. Is your breathing fast, slow? Are you holding your breath?
What is going on in and with your body?
Notice your heart rate and posture. How are you sitting, standing, or lying down? Are you comfortable? Notice any places of tension and any place you feel you can relax. It may be your cheeks, your shoulders, your eyebrows, or your chest.
What is your current emotional state?
Try to find a word to describe your current emotional state. Try to sense how you are feeling in this moment. Don’t place judgment on this feeling, just notice.
After you have gained familiarity with the asking yourself these questions, you can take time during your day to ask, “How am I feeling right now?”.
Use this exercise to pay attention to what you’re doing online. Notice your multitasking strategy. For example, when do you decide to switch from one task to another? Some of us respond to every interruption immediately, while others carefully limit the number of interruptions and respond selectively. By observing how you multitask, you will have the chance to see your strategy and make changes if you would like.
Writing in a journal is one of the oldest methods of self-exploration and introspection. A journal can help you live in the present moment, to cultivate awareness, and to bring in gratitude. Students are instructed to write about their experiences in the first person, without thought of another reader besides themselves. Students can write with pen and paper or on computer or tablet. Journaling differs from a keeping a diary, as a diary records daily events. Journal entries foster reflection of mental and emotional activities of the individual.
Instructions: Keep a daily journal (either handwritten or electronic). Each entry should be about a paragraph. Record your feelings, thoughts, sensations, and any related experiences. This is not an exercise to record what you’ve done. Think of it as a conversation partner to reflect on reactions to daily life. Some questions to consider asking yourself in your reflection: What troubled you today? What made you happy today? What is one thing you are grateful for today? What are you enjoying about your work? What are you enjoying about your family?
This activity aims to give students silence while they deeply reflect on their goals and how they are spending their time. Students are encouraged to freely write answers to the following questions.
The ability to sustain attention and self-regulate with qualities of openness, curiosity, and respect are important for academic success and critical for getting and maintaining employment. The techniques designed to improve these abilities are only beginning to gain momentum in the classroom and, in addition, the scientific evidence supporting these practices continues to grow through educational research. What may work effectively in the physical classroom will require thoughtful adaptation and creativity by instructors in order to be deployed at scale. Some instructors like Dr. Scharmer and Mr. Yukelson are leading the way. It is clear that to explicitly focus on these qualities of being requires courage and humility from instructors. Contemplative practices, to the extent they have positive effects on learners, may also cause reciprocal effects between learners and instructors. To whatever extent learners grow in their awareness, reflection, curiosity, and respect for others, instructors stand to benefit greatly from this approach.
References
Baer, R. A. (2003). Mindfulness training as a clinical intervention: A conceptual and empirical review. Clinical Psychology: Science and Practice, 10(2), 125–143. https://doi.org/10.1093/clipsy/bpg015
Becerra, R., Dandrade, C., & Harms, C. (2016). Can specific attentional skills be modified with mindfulness training for novice practitioners? Current Psychology. https://doi.org/10.1007/s12144-016-9454-y
Brown, K. W., & Ryan, R. M. (2003). The benefits of being present: Mindfulness and its role in psychological well-being. Journal of Personality and Social Psychology, 84(4), 822–848. https://doi.org/10.1037/0022-3514.84.4.822
Carson, J. W., Carson, K. M., Gil, K. M., & Baucom, D. H. (2004). Mindfulness-based relationship enhancement. Behavior Therapy, 35(3), 471-494.
Coatsworth, J. D., Duncan, L. G., Greenberg, M. T., & Nix, R. L. (2010). Changing parent’s mindfulness, child management skills and relationship quality with their youth: Results from a randomized pilot intervention trial. Journal of Child and Family Studies, 19(2), 203–217. https://doi.org/10.1007/s10826-009-9304-8
Creswell, J. D., Taren, A. A., Lindsay, E. K., Greco, C. M., Gianaros, P. J., Fairgrieve, A., … & Ferris, J. L. (2016). Alterations in resting-state functional connectivity link mindfulness meditation with reduced interleukin-6: a randomized controlled trial. Biological Psychiatry, 80(1), 53-61.
Greenberg, M. T., & Harris, A. R. (2012). Nurturing mindfulness in children and youth: Current state of research: Nurturing mindfulness in children and youth. Child Development Perspectives, 6(2), 161–166. https://doi.org/10.1111/j.1750-8606.2011.00215.x
Hofmann, S. G., Sawyer, A. T., Witt, A. A., & Oh, D. (2010). The effect of mindfulness-based therapy on anxiety and depression: A meta-analytic review. Journal of Consulting and Clinical Psychology, 78(2), 169–183. https://doi.org/10.1037/a0018555
Hölzel, B. K., Hoge, E. A., Greve, D. N., Gard, T., Creswell, J. D., Brown, K. W., … Lazar, S. W. (2013). Neural mechanisms of symptom improvements in generalized anxiety disorder following mindfulness training. NeuroImage: Clinical, 2, 448–458. https://doi.org/10.1016/j.nicl.2013.03.011
Jha, A. P., Krompinger, J., & Baime, M. J. (2007). Mindfulness training modifies subsystems of attention. Cognitive, Affective, & Behavioral Neuroscience, 7(2), 109–119.
Kabat-Zinn, J. (1994). Wherever you go, there you are: Mindfulness meditation in everyday life. New York: Hyperion.
Mind and Life Education Research Network (MLERN): J. Davidson, R., Dunne, J., Eccles, J. S., Engle, A., Greenberg, M., Jennings, P., Jha, A., Jinpa, T., Lantieri, L., Meyer, D., Roeser, R.W., & Vago, D. (2012). Contemplative practices and mental training: Prospects for American education. Child Development Perspectives, 6(2), 146–153. https://doi.org/10.1111/j.1750-8606.2012.00240.x
Roeser, R. W., & Peck, S. C. (2009). An education in awareness: Self, motivation, and self-regulated learning in contemplative perspective. Educational Psychologist, 44(2), 119–136. https://doi.org/10.1080/00461520902832376
Roeser, R., & Zelazo, P. D. (2012). Contemplative Science, Education and Child Development: Introduction to the Special Section. Child Development Perspectives, 6(2), 143–145. https://doi.org/10.1111/j.1750-8606.2012.00242.x
Schonert-Reichl, K. A., Oberle, E., Lawlor, M. S., Abbott, D., Thomson, K., Oberlander, T. F., & Diamond, A. (2015). Enhancing cognitive and social–emotional development through a simple-to-administer mindfulness-based school program for elementary school children: A randomized controlled trial. Developmental Psychology, 51(1), 52–66. https://doi.org/10.1037/a0038454
Sedlmeier, P., Eberth, J., Schwarz, M., Zimmermann, D., Haarig, F., Jaeger, S., & Kunze, S. (2012). The psychological effects of meditation: A meta-analysis. Psychological Bulletin, 138(6), 1139–1171. https://doi.org/10.1037/a0028168
Tang, Y.Y., Ma, Y., Wang, J., Fan, Y., Feng, S., Lu, Q., Sui, D., Rothbart, M.K., Fan M, & Posner, M.I. (2007). Short-term meditation training improves attention and self-regulation. Proceedings of the National Academy of Sciences, 104(43), 17152–17156.
Much of what this manual covers so far would still fall under the category of traditional or standard online learning. Of course, don’t let terms like “traditional” or “standard” fool you – online learning is still relatively new in the larger picture of learning, and there is a lot we don’t know about it.
While there is no standard or threshold for what makes something “standard” or “advanced” course design, there are many ideas and structures (or lack of structure) that would be considered “cutting edge” or “experimental” by many. This chapter will briefly touch on a few of these that you can try in your courses. There are many others beyond these. If you can think of something that is outside of what is covered in this manual, but would be a good idea for your course – then search online to see if someone has already tried it. You might be surprised at what you find. For now, let’s take a brief look at several different ways to think outside of the standard course structure.
This guide has covered many different ways of looking at learning, as well as many different philosophical ways of designing courses. You may be teaching a topic that clearly lends itself to one type of design or learning theory. If that is the case, then you have a clear path before you. However, you may be looking at the different options and thinking that there are several that may or may not apply, or that you have some learners that would appreciate different ways of approaching course content, or even learners with vastly different contexts that have vastly different educational needs. If that is you, then you may be wondering if it is even possible to accommodate such flexibility in your course without designing several different parallel courses.
One possible way to approach this is through a design method called Self-Mapped Learning Pathways (Crosslin, 2018; Crosslin & Wakefield, 2016). The basic idea was initially called a dual-layer approach, because it entailed having two layers to a course (Crosslin & Dellinger, 2015; Kilgore & Al-Freih, 2017). One was an instructor-led layer that followed a defined pathway through course content. The other layer was a student-centered layer that allowed learners to create their own pathway through the course content. Because “layers” implies a hierarchy, the concept of layers was changed over to “modalities” (Instructor Centered or Student Centered) that are both equally valid (Crosslin, Dellinger, Joksimovic, Kovanovic, & Gaševic, 2018). Learners can choose either modality or both at any point in the course, and then change that mix as needed at any time (figure 1). Thus, the learners map their own pathway through the course structure and content.
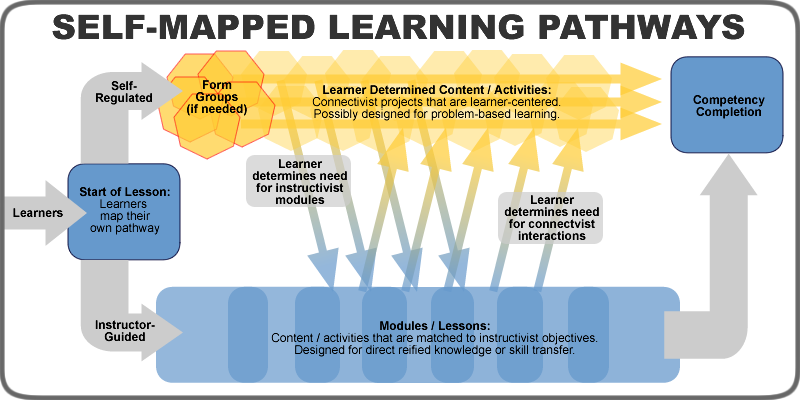
Figure 1: Theoretical Design of a Self-Mapped Learning Pathways Course
For example, a learner may come into a course, look at the instructor content and decide they are already familiar with it. They then decide to look at the content from their specific sociocultural lens by finding resources online. However, at some point, they run into something they aren’t familiar with, so they jump over to the instructor-centered content to find what they need to know. They see that there is an interesting discussion with the learners that are following the instructor-led path, so they also decide to participate in that, while blogging their own experiences on their website.Keep in mind that while this structure sounds like a fairly straight forward design process (left side of figure 2), the reality is that courses designed with this structure can (and often do) take on much more complex structures – full of different choices on the instructor-focused side as well as meandering options on the learner-focused side (right side of figure 2). On the right side of figure 2 below, the blue lines represent how the instructor-focused modality can still have different options and non-linear lessons. The red area represents the organically forming official options for learner-focused pathways, surrounded by the gray areas that represent the unofficial options that learners could choose to add to their pathway as they create and follow their learning map.
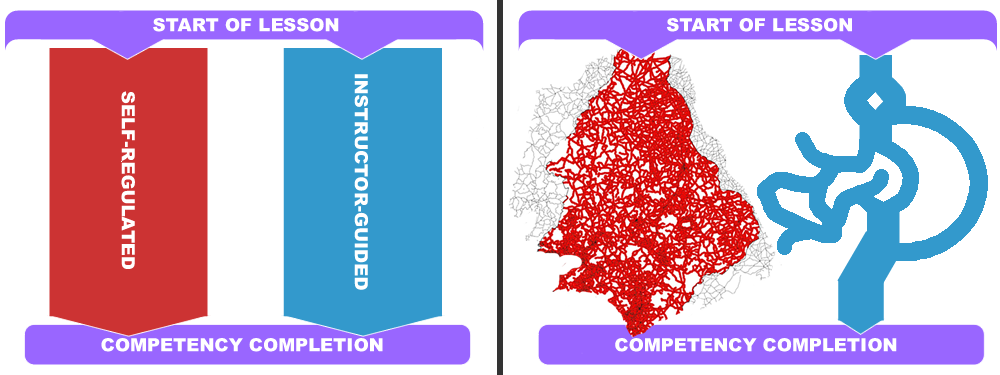
Figure 2: Theory Versus Reality of Self-Mapped Learning Pathways Design
Also consider how learners may take different pathways through the course design that are not straight (or even non-linear). For example, the left side of figure 3 showcases a meandering learning pathway, while the right side showcases how a learner might pick and choose various parts at different times. Your learning context may not allow for this much flexibility, but keep in mind these possibilities if you have that option.
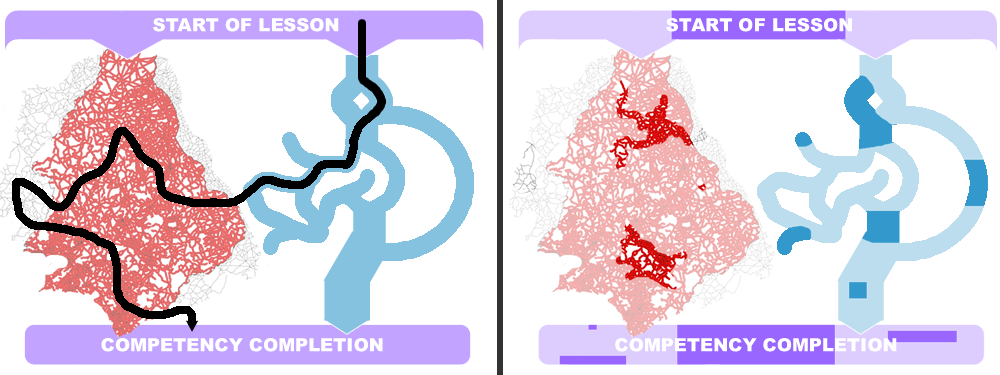
Figure 3: Meandering and Non-Linear Learner Possibilities
The interesting flexibility behind this design is that it has options for beginners that just want to follow instructors, as well as options for experts that want to go deeper (and for those that fall somewhere in between the two). For more information on the structure, see these blog posts (mostly about MOOCs that implemented this design, but still applicable to any online courses in many ways):
Various research projects have looked into the pathway options learners have chosen in this model (Crosslin, 2016; Crosslin, Dellinger, Joksimovic, Kovanovic, & Gaševic, 2018), how learners have navigated autonomy in this model (Dawson, Joksimovic, Kovanovic, Gaševic, & Siemens, 2015), and the issues that various technologies utilized in designing for this model have cause learners (Rose, et al., 2015).
While at first glance, it might seem that this design methodology requires creating two completely different versions of the same course. However, the best way to look at the design process is not as two separate courses, but as one way to truly accomplish learner-centered self-determined learning. There are three overall steps to the process:
The biggest thing to remember is that the key to this form of design, as with any learner-centered design methodology, is for you as the instructor to release control. This will mean that learners will need more time to adjust and map their own pathway. It also means you will need to not overwhelm yourself with grading on the instructor-focused modality. You will be answering a lot of questions and providing a lot of guidance, so make sure to build time in for that. Also keep in mind that this design methodology is not an “all or nothing” idea. You can take the parts of it that make sense for your course, or slowly ease yourself into it over several courses. Learning gets messier the more it moves away from centralized control, so get ready for flexibility if you decide to go down this path. Leigh A. Hall has written a series of blog posts on how she wrestles through these issues – a few sample ones are listed here:
Both objectives and competencies have been covered in this manual already. You could actually switch numbers 1 and 2 in the previous three step process if you already have objectives and a full course. Just start with the objectives you have for a course and start converting those into competencies. A quick and imperfect way to start that is to remove the conditions and criteria from your objectives, just leaving the behavior to form the foundation of the competency. The main idea to keep in mind is that your competencies will still need to cover your topic well enough to still accomplish the overall goal of the course, but flexible enough to allow for alternate pathways (you might even consider letting your learners remix or rethink your competencies as their own). For a bit more detail on creating competencies out of objectives, please see:
The main thing to keep in mind when designing the instructor-focused modality is to keep it focused on the instructor. This doesn’t mean that you leave out any student group work or social interactive activities. Far from it – you need to make sure that this modality is a well-designed instructional pathway. Think of what you would do for learners that are completely new to the topic you are covering, and guide them down that path. Just remember that some learners may be coming in and out of this modality as needed, so be sure to avoid any long term repeating group work that could suffer from learners changing modalities. Of course, on the other hand, it can also be helpful to have groups step out into their own learning pathway together, depending on the course topic. Just remember that you don’t want to force learners into learner-centered or connectivist activities – they need to choose those options for themselves.
A quick note about assessment: grading projects and activities does become difficult when learners are creating their own pathway. Many of the suggestions of effective assessment covered in Chapter 9 would help here. Open rubrics can be one way to grade across modalities, especially if you focus on what the learners actually learned and not the format of how they proved their accomplishments. In this design modality, it is up to the learner to demonstrate what they have learned. They can do so by following your suggestions in the instructor-focused modality, or by creating a different artifact in the student-centered modality. So instead of focusing on page numbers and word counts, look at the competency itself and evaluate solely on that.
Most learners are used to following the instructor, so they might need help transitioning into mapping their own pathway. Learners will need to develop higher levels of self-direction and drive to be successful in a course designed like this. You will probably need to constantly remind them that they can take this level of control over their learning pathway, as well as answer questions about what you think about their ideas. Therefore, you should approach this design methodology as more of a conversation that opens up over time. You can help learners think through some of these issues by providing scaffolding and example ideas throughout the course. One example of this has already been covered in Chapter 6 in the section on Assignment Banks. Whenever you create an assignment in the instructor-centered modality, you can also list some alternative assignment ideas or artifacts to draw learners to the self-mapped pathway. Others have tried to add an element of games to their assignment banks by adding point values to assignments in the bank (see the next section on gamification). You can also create guides for other tools that learners could use, or even interactive maps of their options (click here for an example in one MOOC). Or, the platform you use might have learning analytics tools that can help you and your learners with scaffolding. For more details on scaffolding in this design scenario, see:
The biggest question with this design methodology is how does a learner create a learning pathway? There are probably many different ways to look at this issue, but one example is documented here:
Using games in learning is not a new concept. Most of us have played learning games at least a few times in our education. However, many are not aware how diverse or developed the idea of games in learning is. From adding game elements to role playing to video games to simulations to virtual reality to text-based scenarios and on and on, there are many options for combining games and learning. However, as you read through this brief overview, please keep in mind things like accessibility and access. Not all learners have access to high level computing equipment, and others have accessibility issues with their eyesight or hearing or other issues that limit how they can experience some of these ideas. Please keep in mind those students when considering games in education, and make sure to keep your course activities accessible to all.
The intersection of games and learning is a large area that could fill its own book (and already has several times over). There are also differences between gamification, educational gaming, game-based education, and other terms. We will cover a brief overview here with links to more information if you would like to explore these ideas for your courses.
In an education setting, gamification is the addition of game-design elements to an overall educational context. This could be anything from using stars or level-up game elements in place of grades, to educational quests, to game-based rewards systems in courses. This can be a simple and inexpensive addition to a course, or a complex and expensive design process. If you have ever experienced an element of a game that you thought might make your course more interesting, this is a great way to add it. For more ideas, see these articles:
Game-Based Learning is exactly what its name states: basing education on one or more games that were either designed for education, or that have some kind of educational value (even if not designed specifically for education). Many people think “video games” when they hear of this, and while video games are a big part of game-based learning, it could also include simulations, problem-based learning, board games, re-enactments, or other non-digital means. Some teachers find and purchase games that are already designed for the purpose that they desire, while others attempt to build the games themselves or have groups of learners create games. This takes an extensive amount of planning (and possibly funding as well), but the rewards are typically very rich. If you are interested in this idea, see these articles:
The concepts of augmented reality (AR) and virtual reality (VR) have been gaining a fair amount of attention recently. However, it is too early to see if they will become trends or footnotes in education. Historically they have both tended to require expensive equipment and design to create, but recent advancements in technology have turned most smart phones into AR/VR machines – sometimes with no added equipment, and other times with a cheap $10 headset. The basic idea of augmented reality is that it is a technology that layers or augments digital content onto live video of the real world around us. Think of games like PokemonGo! or mobile apps that layer driving directions over live video on your phone. Virtual reality is usually a more immersive experience, typically cutting the user off from experiencing the real world while they are immersed into a video/audio 3-dimensional realistic simulation. Much of the work in the VR field seems to center on either simulation of experiences (virtual field trips to historical sites, nursing process simulations, etc) or more immersive passive experiences (go inside a working heart, watch gorillas in their native habitat, etc). More experimental ideas allow learners to create art in 3-D spaces, create their own AR apps, or build their own games in VR. This area is still new (and often inaccessible to many), but if you are interested, here is more to read:
Game-based Education and Gamification can seem overwhelming at first. If you are interested in games, but not sure where to start, one place to consider is the eXperience Play professional development website. Created by two educational gamers that you might have met showing off their games at various Ed-Tech conferences (Keegan Long-Wheeler and John Stewart), eXperience Play is “meant for anyone interested in building games to use in the classroom or wanting to facilitate student game development as part of their courses.” You can read through the lessons online, and begin experimenting yourself. These lessons teach you about text-based games in a free and easy to use program called Twine. This approach leads you through a method that is easy for even the newest of beginners to try, but creates games that are highly accessible to most learners. Take a look for yourself to start learning:
Mobile devices have gone from novelty to near necessity in a relatively short amount of time. Because of this, many have started to look into the educational opportunities these devices could afford. From consuming educational content anywhere that a learner goes, to designing learning activities that get learners to interact with the world around them using their phone as part of the exercise, there are many uses for mobile devices in learning (sometimes referred to as m-learning or mobile learning). However, please keep in mind that not all phones are the same, and not everyone even has a phone (no matter what you think you might observe around you). The first thing to keep in mind when considering mobile learning is what you will do for learners that don’t have access to phones, or phones with advanced features, or even phones without Internet access. Make sure to include options (or allow learners to create their own options) that are flexible for various levels of phone ownership. Also keep in mind that accessibility issues also apply to mobile content and activities as well – you will have students that have sight or hearing or other accessibility issues that will need to be considered in this area.
One form of mobile learning is the creation or scaling of content or activities with the intent of having learners utilize it on mobile devices. This can be anything from creating mobile friendly versions of content or activities to creating specific smartphone applications (apps) that work natively on mobile devices. This is an area that most online instructors should be aware of, as in some parts of the world, mobile devices are much more common than laptops or desktop computers. With this in mind, the important questions to ask yourself are: does my content adjust to mobile devices? Do the video or audio files in my courses work on smartphones (and can they be downloaded to view in places that have poor network connection)? Are the activities you have in your course mobile friendly (some discussion forums, for example, don’t adjust to mobile devices very well)? Some LMS providers (as well as tools like WordPress) have been offering mobile friendly options – or even dedicated apps – for a long time. Your learners will benefit greatly if you know how those work, and how you might need to adjust content and/or activities for apps or mobile devices.
Another way of looking at mobile learning is to utilize the capabilities of mobile devices within the context of learners’ everyday lives. For example, are they learning about architecture, and could take pictures of examples of architecture in the world around them? Are you studying weather patterns, and they could capture videos of weather examples? Can learners go on a museum tour and take notes on their phone as they walk through exhibits? Maybe they can meet with an expert in your field and record the interview on their phone? There are many possibilities, but the idea is for learners to use their devices to interact with the world around them as they go throughout life. You or your students could even venture into mobile app creation in a more self-determined learning method, as well.
There are a large number of possibilities when it comes to mobile learning. If you are interested in learning more about this area, here are some ideas for articles to look into:
Rhizomatic learning is a learner-focused design methodology based on the guiding principle of “the community is the curriculum” (Cormier, 2008). Many educational models and contexts have been created through the years that allow learners to design and determine their own learning; however, many of these still contain some type of directive or oversight from the instructor. Others will focus on having some type of class voting system that will give learners some control to determine the course structure at the beginning, but then solidifies this design early on without allowance for change or individual variations for personal needs.
Rhizomatic learning is different from these other forms of learner-centered design in that learning is mapped by the learning community throughout the whole process, always with the ability to change or encompass variations for individual learners. As Cormier (2008) states, the “community acts as the curriculum, spontaneously shaping, constructing, and reconstructing itself and the subject of its learning in the same way that the rhizome responds to changing environmental conditions” (para 13). This way of approaching education uses the rhizome as a metaphor because “a rhizomatic plant has no center and no defined boundary; rather, it is made up of a number of semi-independent nodes, each of which is capable of growing and spreading on its own, bounded only by the limits of its habitat” (Cormier, 2008, para 4).
In some ways, this may seem to be a way to create a course without planning. However, keep in mind that many learners may not be ready for this form of shifting-structure learning, so you may have to spend some time scaffolding learners into this model, possibly by utilizing self-regulated, self-directed, and then self-determined learning as stepping stones into rhizomatic learning. Sometimes it helps to have learners look at course goals and learning objectives as something more like “learning subjectives” that are their own self-determined goals.
A special note here: this way of learning may not work in all contexts for all topics. However, if you are interested in trying this idea out with your course, here are some suggested resources to help out:
References
Cormier, D. (2008). Rhizomatic education: Community as curriculum. Innovate 4(5).
Crosslin, M. (2018). Exploring self-regulated learning choices in a customisable learning pathway MOOC. Australasian Journal of Educational Technology, 34(1), 131-144. https://doi.org/10.14742/ajet.3758
Crosslin, M. (2016). Customizable modality pathway learning design: Exploring personalized learning choices through a lens of self-regulated learning (Doctoral dissertation). University of North Texas, Denton, TX.
Crosslin, M., & Dellinger, J. T. (2015). Lessons learned while designing and implementing a multiple pathways xMOOC + cMOOC. In D. Slykhuis, & G. Marks (Eds.), Proceedings of Society for Information Technology & Teacher Education International Conference 2015 (pp. 250-255). Chesapeake, VA: Association for the Advancement of Computing in Education.
Crosslin, M., Dellinger, J. T., Joksimovic, S., Kovanovic, V., & Gaševic, D. (2018). Customizable modalities for individualized learning: Examining patterns of engagement in dual-layer MOOCs. Online Learning Journal, 22 (1). 19-38. http://dx.doi.org/10.24059/olj.v22i1.1080
Crosslin, M., & Wakefield, J. S. (2016). What’s cooking in the MOOC kitchen: Layered MOOCs. TechTrends, 60(2), 98-101. https://doi.org/10.1007/s11528-016-0036-5
Dawson, S., Joksimovic, S., Kovanovic, V., Gaševic, D., & Siemens, G. (2015). Recognising learner autonomy: Lessons and reflections from a joint x/c MOOC. Proceedings of Higher Education Research and Development Society of Australasia 2015, Melbourne, 117-129.
Kilgore, W., & Al-Freih, M. (2017). MOOCs as an innovative pedagogical design laboratory. International Journal on Innovations in Online Education, 1(1). http://doi.org/10.1615/IntJInnovOnlineEdu.2016015210
Rose, C. P., Ferschke, O., Tomar, G., Yang, D., Howley, I., Aleven, V., Siemens, G., Crosslin, M., Gasevic, D., & Baker, R. (2015). Challenges and opportunities of dual-layer MOOCs: Reflections from an edX deployment study. Proceedings of the 11th International Conference on Computer Supported Collaborative Learning (CSCL 2015). Gothenburg, Sweden.
Now that you have successfully planned your course it is time to tell the world about it and get those enrollment numbers moving. For those in more traditional institutions and companies, this may just mean getting your course listed in the course catalog or company newsletter. However, for other courses (especially MOOCs), you might need to do a lot of the promotion yourself. For those that need to self-promote their course, here are some tips.
Marketing an online course is a delicate blend of two common marketing strategies:
Grassroots marketing is targeting your marketing efforts to a small group in the hopes that the group will spread your message to a much larger audience. Grassroots marketing of your course involves identifying your target audience, the individuals that are more likely to want to enroll in your course. For example, a course on web development would target individuals obtaining degrees or work in the fields of marketing, computer science or advertising. Additionally, you would send announcements or post on the message boards for publications that share your target audience. For the example web development course, it would be best to reach out to publications such as Smashing Magazine, Net Magazine, Computer Arts, and many others that can be found with a simple Google search.
Mass marketing is an attempt to appeal to an entire market with one basic marketing strategy. Mass marketing of your course is best described as casting a wide net to find those individuals that are not in the areas where your target audience is typically found. Using the previous web development course example, mass marketing is appropriate to reach those individuals that are interested in web development, but are in the psychology department or in the health sciences field that would never hear about your course through your targeted grassroots marketing efforts. Sending an announcement to university or company newsletters and purchasing advertising space in student newspapers to reach a diverse audience are a few ideas. Also, utilizing the institution or company that your course is connected to could yield satisfactory enrollment results as well. Work with your institution or company to help promote the course through the alumni office, university communications channels, and to the employee community through HR learning and training channels. Homepages, newsletters, bulletins, and alumni magazines can also reach those individuals that are hard to reach.
If you are hosting your course through channels like Coursera or edX, USE THEM! Many course providers – especially those that offer MOOCS – have blogs that instructors can contribute to and publicize the benefits of their course to participants. Providers have the same goal that you do when it comes to your enrollment numbers and the quality of your course. With this common goal in mind, they can provide tips and information on how to market your course through your institution and other channels – as long as you look for them.
Social media is a great marketing tool when it comes to spreading the news about products, services, and (now) MOOCS and other online courses. If you do not have a social media presence, then it is time to get one and build your network. Additionally, utilize the social media presence of your institution or company, along with the social media presence of your course provider.
If you have any connections to additional media outlets or other institutions, make sure to inform them about your course and include the links to your course wherever your biography appears: personal websites, departmental websites, social media profiles, and speaker agencies.
There are still many other issues that have not yet been covered. You might have noticed that this manual does not go much into overall processes to follow to create courses. While there are many out there (Dick, Carey, & Carey, 2001; Smith & Ragan, 2004), most of them that are some variation of the ADDIE method. ADDIE stands for the five steps that most course design processes typically go through: Analyze the need for a course, Develop the content and activity ideas, Design the actual content and activities, Implement the course (i.e. teach it), and Evaluate how well the course goes. Of course, just by reading through that list you can begin to see that design models can never be fully linear. Reliance on linear processes remains the problem of most design methods: design is messy and not linear. It also doesn’t stop because the course is being taught. However, many other resources have covered the design process very well, so if you need a general guide, those sources can be helpful.
At the end of the day, you will probably be the best person to lay out your own process for creating a course. Take the ideas you have learned here (or maybe refreshed your memory about) and just start somewhere. This manual follows the way that some generally follow when they create a course, but you may want to remix or reorder to fit your needs. Just keep your learners and their needs central to whatever process you decide to follow.
References
Dick, W., Carey, L., & Carey, J. O. (2001). The systematic design of instruction (Vol. 5). New York: Longman.
Smith, P. L., & Ragan, T. J. (2004). Instructional design (3rd Ed.). Wiley.
Anderson, T., & Garrison, D. R. (1998). Learning in a networked world: New roles and responsibilities. In C. Gibson (Ed.), Distance learners in higher education (pp. 97-112). Madison, WI.: Atwood Publishing.
Arbaugh, J. B., Bangert, A., & Cleveland-Innes, M. (2010). Subject matter effects and the community of inquiry (CoI) framework: An exploratory study. The Internet and Higher Education, 13(1), 37-44.
Baer, R. A. (2003). Mindfulness training as a clinical intervention: A conceptual and empirical review. Clinical Psychology: Science and Practice, 10(2), 125–143. https://doi.org/10.1093/clipsy/bpg015
Becerra, R., Dandrade, C., & Harms, C. (2016). Can specific attentional skills be modified with mindfulness training for novice practitioners? Current Psychology. https://doi.org/10.1007/s12144-016-9454-y
Blaschke, L. M. (2012). Heutagogy and lifelong learning: A review of heutagogical practice and self-determined learning. The International Review of Research in Open and Distributed Learning, 13(1), 56-71.
Brody, N., & Vangelisti, A. L. (2016). Bystander intervention in cyberbullying. Communication Monographs, 83(1), 94-119.
Brown, K. W., & Ryan, R. M. (2003). The benefits of being present: Mindfulness and its role in psychological well-being. Journal of Personality and Social Psychology, 84(4), 822–848. https://doi.org/10.1037/0022-3514.84.4.822
Carson, J. W., Carson, K. M., Gil, K. M., & Baucom, D. H. (2004). Mindfulness-based relationship enhancement. Behavior Therapy, 35(3), 471-494.
Cercone, K. (2008). Characteristics of adult learners with implications for online learning design. AACE journal, 16(2), 137-159.
Coatsworth, J. D., Duncan, L. G., Greenberg, M. T., & Nix, R. L. (2010). Changing parent’s mindfulness, child management skills and relationship quality with their youth: Results from a randomized pilot intervention trial. Journal of Child and Family Studies, 19(2), 203–217. https://doi.org/10.1007/s10826-009-9304-8
Cormier, D. (2008). Rhizomatic education: Community as curriculum. Innovate 4(5).
Creswell, J. D., Taren, A. A., Lindsay, E. K., Greco, C. M., Gianaros, P. J., Fairgrieve, A., … & Ferris, J. L. (2016). Alterations in resting-state functional connectivity link mindfulness meditation with reduced interleukin-6: a randomized controlled trial. Biological Psychiatry, 80(1), 53-61.
Crosslin, M. (2018). Exploring self-regulated learning choices in a customisable learning pathway MOOC. Australasian Journal of Educational Technology, 34(1), 131-144. https://doi.org/10.14742/ajet.3758
Crosslin, M. (2016). Customizable modality pathway learning design: Exploring personalized learning choices through a lens of self-regulated learning (Doctoral dissertation). University of North Texas, Denton, TX.
Crosslin, M., & Dellinger, J. T. (2015). Lessons learned while designing and implementing a multiple pathways xMOOC + cMOOC. In D. Slykhuis, & G. Marks (Eds.), Proceedings of Society for Information Technology & Teacher Education International Conference 2015 (pp. 250-255). Chesapeake, VA: Association for the Advancement of Computing in Education.
Crosslin, M., Dellinger, J. T., Joksimovic, S., Kovanovic, V., & Gaševic, D. (2018). Customizable modalities for individualized learning: Examining patterns of engagement in dual-layer MOOCs. Online Learning Journal, 22 (1). 19-38. http://dx.doi.org/10.24059/olj.v22i1.1080
Crosslin, M., & Wakefield, J. S. (2016). What’s cooking in the MOOC kitchen: Layered MOOCs. TechTrends, 60(2), 98-101. https://doi.org/10.1007/s11528-016-0036-5
Dawson, S., Joksimovic, S., Kovanovic, V., Gaševic, D., & Siemens, G. (2015). Recognising learner autonomy: Lessons and reflections from a joint x/c MOOC. Proceedings of Higher Education Research and Development Society of Australasia 2015, Melbourne, 117-129.
DiCarlo, S. E. (2009). Too much content, not enough thinking, and too little FUN! Advances in Physiology Education, 33(4), 257-264.
Dick, W., Carey, L., & Carey, J. O. (2001). The systematic design of instruction (Vol. 5). New York: Longman.
Downes, S. (2013, April 9). What the ‘x’ in ‘xMOOC’ stands for [Google+ post]. Retrieved from https://plus.google.com/+StephenDownes/posts/LEwaKxL2MaM
Dron, J. (2007). Control and constraint in e-learning: Choosing when to choose. Hershey, PA: IGI Global. doi:10.4018/978-1-59904-390-6
DS106. (2016). Assignment Bank. Retrieved from http://assignments.ds106.us
Fox, A. (2013). From moocs to spocs. Communications of the ACM, 56(12), 38-40.
Gobet, F., Lane, P. C., Croker, S., Cheng, P. C., Jones, G., Oliver, I., & Pine, J. M. (2001). Chunking mechanisms in human learning. Trends in cognitive sciences, 5(6), 236-243.
Greenberg, M. T., & Harris, A. R. (2012). Nurturing mindfulness in children and youth: Current state of research: Nurturing mindfulness in children and youth. Child Development Perspectives, 6(2), 161–166. https://doi.org/10.1111/j.1750-8606.2011.00215.x
Groom, Jim. (2013, October 12). DS106 Assignment Bank 2.0 [Web log post]. Retrieved from http://bavatuesdays.com/ds106-assignment-bank-2-0/
Groom, Jim. (2015, August 13). Digital Pedagogy as Empowered Choice [Web log post]. Retrieved from http://bavatuesdays.com/digital-pedagogy-as-empowered-choice/
Groundwater-Smith, S. (2008). Listening to students. The EBE Journal, 2, 18-20.
Guo, P. J., Kim, J., & Rubin, R. (2014, March). How video production affects student engagement: An empirical study of mooc videos. In Proceedings of the first ACM conference on Learning@ scale conference (pp. 41-50). ACM.
Harting, K., & Erthal, M. J. (2005). History of distance learning. Information technology, learning, and performance journal, 23(1), 35.
Hayes, S. (2015). MOOCs and Quality: A review of the recent literature. Retrieved from http://eprints.aston.ac.uk/26604/1/MOOCs_and_quality_a_review_of_the_recent_literature.pdf
Hew, K. F., & Cheung, W. S. (2014). Students’ and instructors’ use of massive open online courses (MOOCs): Motivations and challenges. Educational Research Review, 12, 45-58.
Hillman, D. C. A., Willis, D. J., & Gunawardena, C. N. (1994). Learner-interface interaction in distance education: An extension of contemporary models and strategies for practitioners. American Journal of Distance Education, 8(2), 30-42.
Hofmann, S. G., Sawyer, A. T., Witt, A. A., & Oh, D. (2010). The effect of mindfulness-based therapy on anxiety and depression: A meta-analytic review. Journal of Consulting and Clinical Psychology, 78(2), 169–183. https://doi.org/10.1037/a0018555
Hölzel, B. K., Hoge, E. A., Greve, D. N., Gard, T., Creswell, J. D., Brown, K. W., … Lazar, S. W. (2013). Neural mechanisms of symptom improvements in generalized anxiety disorder following mindfulness training. NeuroImage: Clinical, 2, 448–458. https://doi.org/10.1016/j.nicl.2013.03.011
Hug, T. (2010). Mobile learning as ‘Microlearning’: Conceptual considerations towards enhancements of didactic thinking. International Journal of Mobile and Blended Learning,2(4), 47-57
Hug, T. (2012): Microlearning. In Seel, Norbert M. (Ed.): Encyclopedia of the sciences of learning (Vol. 5, pp. 2268-2271), New York, NY: Springer.
Jha, A. P., Krompinger, J., & Baime, M. J. (2007). Mindfulness training modifies subsystems of attention. Cognitive, Affective, & Behavioral Neuroscience, 7(2), 109–119.
Jordan, K. (2015). Massive open online course completion rates revisited: Assessment, length and attrition. The International Review of Research in Open and Distributed Learning, 16(3), 341-358.
Kabat-Zinn, J. (1994). Wherever you go, there you are: Mindfulness meditation in everyday life. New York: Hyperion.
Khalil, H., & Ebner, M. (2014, June). MOOCs completion rates and possible methods to improve retention-A literature review. In World Conference on Educational Multimedia, Hypermedia and Telecommunications (No. 1, pp. 1305-1313).
Kilgore, W., & Al-Freih, M. (2017). MOOCs as an innovative pedagogical design laboratory. International Journal on Innovations in Online Education, 1(1). http://doi.org/10.1615/IntJInnovOnlineEdu.2016015210
Kohn, A. (2011). The case against grades. Educational Leadership, 69(3), 28-33.
Kop, R., & Fournier, H. (2011). New dimensions to self-directed learning in an open networked learning environment. International Journal of Self-Directed Learning, 7(2), 2-20.
Kovanović, V., Joksimović, S., Gašević, D., Siemens, G., & Hatala, M. (2015). What public media reveals about MOOCs: A systematic analysis of news reports. British Journal of Educational Technology. 46(3), 510–527.
Lang, C., Siemens, G., Wise, A., & Gašević, D. (Eds.). (2017). The Handbook of Learning Analytics. Society for Learning Analytics Research (SoLAR).
Levine, A. (2018, May 27). My #netnarr reflection [Blog post]. Retrieved from http://cogdogblog.com/2018/05/netnarr-reflection/
Lorenzo, G., & Moore, J. (2002). Five pillars of quality online education. The Sloan consortium report to the nation, 15-09.
Mathieson, K., & Leafman, J. S. (2014). Comparison of Student and Instructor Perceptions of Social Presence. Journal of Educators Online, 11(2).
McAuley, A., Stewart, B., Siemens, G., & Cormier, D. (2010). The MOOC model for digital practice. Retrieved from http://www.davecormier.com/edblog/wp-content/uploads/MOOC_Final.pdf
Milligan, C., Littlejohn, A., & Margaryan, A. (2013). Patterns of engagement in connectivist MOOCs. MERLOT Journal of Online Learning and Teaching, 9(2), 149-159.
Mind and Life Education Research Network (MLERN): J. Davidson, R., Dunne, J., Eccles, J. S., Engle, A., Greenberg, M., Jennings, P., Jha, A., Jinpa, T., Lantieri, L., Meyer, D., Roeser, R.W., & Vago, D. (2012). Contemplative practices and mental training: Prospects for American education. Child Development Perspectives, 6(2), 146–153. https://doi.org/10.1111/j.1750-8606.2012.00240.x
Moore, M. (1989). Three types of interaction. American Journal of Distance Education, 3(2), 1-6.
Rodriguez, O. (2013). The concept of openness behind c and x-MOOCs (Massive Open Online Courses). Open Praxis, 5(1), 67-73.
Roeser, R. W., & Peck, S. C. (2009). An education in awareness: Self, motivation, and self-regulated learning in contemplative perspective. Educational Psychologist, 44(2), 119–136. https://doi.org/10.1080/00461520902832376
Roeser, R., & Zelazo, P. D. (2012). Contemplative Science, Education and Child Development: Introduction to the Special Section. Child Development Perspectives, 6(2), 143–145. https://doi.org/10.1111/j.1750-8606.2012.00242.x
Rose, C. P., Ferschke, O., Tomar, G., Yang, D., Howley, I., Aleven, V., Siemens, G., Crosslin, M., Gasevic, D., & Baker, R. (2015). Challenges and opportunities of dual-layer MOOCs: Reflections from an edX deployment study. Proceedings of the 11th International Conference on Computer Supported Collaborative Learning (CSCL 2015). Gothenburg, Sweden.
Sackstein, S. (2015). Hacking assessment: 10 ways to go gradeless in a traditional grades school (Hack learning series volume 3). Times 10 Publications.
Schonert-Reichl, K. A., Oberle, E., Lawlor, M. S., Abbott, D., Thomson, K., Oberlander, T. F., & Diamond, A. (2015). Enhancing cognitive and social–emotional development through a simple-to-administer mindfulness-based school program for elementary school children: A randomized controlled trial. Developmental Psychology, 51(1), 52–66. https://doi.org/10.1037/a0038454
Sedlmeier, P., Eberth, J., Schwarz, M., Zimmermann, D., Haarig, F., Jaeger, S., & Kunze, S. (2012). The psychological effects of meditation: A meta-analysis. Psychological Bulletin, 138(6), 1139–1171. https://doi.org/10.1037/a0028168
Semingson, P., Crosslin, M. & Dellinger, J. (2015). Microlearning as a tool to engage students in online and blended learning. In D. Rutledge & D. Slykhuis (Eds.), Proceedings of Society for Information Technology & Teacher Education International Conference 2015 (pp. 474-479). Chesapeake, VA: Association for the Advancement of Computing in Education (AACE).
Shank, P. (2006). To plan good instruction, teach to the test. Online Course Design: 13 Strategies for Teaching in a Web-based Distance Learning Environment, 8-9. Retrieved from http://hilo.hawaii.edu/academics/dl/documents/13StrategiesforTeaching.pdf
Siemens, G. (2005). Connectivism: A learning theory for the digital age. International Journal of Instructional Technology and Distance Learning, 2(1), 3-10.
Smith, P. L., & Ragan, T. J. (2004). Instructional design (3rd Ed.). Wiley.
Simunich, B., Robins, D. B., & Kelly, V. (2015) The impact of findability on student motivation, self-efficacy, and perceptions of online course quality. American Journal of Distance Education, 29(3). 174-185, DOI: 10.1080/08923647.2015.1058604
Sweller, J., Cognitive load during problem solving: Effects on learning, Cognitive Science, 12, 257-285 (1988).
Tang, Y.Y., Ma, Y., Wang, J., Fan, Y., Feng, S., Lu, Q., Sui, D., Rothbart, M.K., Fan M, & Posner, M.I. (2007). Short-term meditation training improves attention and self-regulation. Proceedings of the National Academy of Sciences, 104(43), 17152–17156.
VanderLeest, S. H. (2004, June). The Built-in Bias of Technology. In Proceedings of the 2004 American Society for Engineering Education (ASEE) Conference (pp. 1417-1427).
Wang, Z., Chen, L., & Anderson, T. (2014). A framework for interaction and cognitive engagement in connectivist learning contexts. The International Review of Research in Open and Distance Learning, 15(2). 121-141.
Warren, S. J., & Wakefield, J. S. (2012). Learning and teaching as communicative actions: social media as educational tool. In K. Seo (Ed.), Using social media effectively in the classroom: Blogs, wikis, Twitter, and more (pp. 98-113). Routledge: Francis & Taylor, Inc.
Zheng, S., Han, K., Rosson, M. B., & Carroll, J. M. (2016, April). The Role of Social Media in MOOCs: How to Use Social Media to Enhance Student Retention. In Proceedings of the Third (2016) ACM Conference on Learning@ Scale (pp. 419-428). ACM.
Mavs Open Press (https://library.uta.edu/scholcomm/mavs-open-press)
Creative Commons Licenses (https://creativecommons.org/licenses/)
UTA Libraries’ OER (https://library.uta.edu/scholcomm/open-education/oer)
Pressbooks Accessibility Policy (https://pressbooks.org/blog/2018/05/01/our-accessibility-policy-and-forthcoming-accessibility-improvements)
Open Education at UTA (http://libguides.uta.edu/utacares)
OER Adoption Form (https://uta.qualtrics.com/jfe/form/SV_8HTkgCym5Q6Mk7j)
BCcampus Open Education Resources (https://open.bccampus.ca/)
LINK Research Lab (http://linkresearchlab.org/)
Bringing out the Human in Synchronous and Asynchronous Media for Learning (https://humanmooc.pressbooks.com/chapter/bringing-out-the-human-in-synchronous-and-asynchronous-media-for-learning/)
From Instructivism to Connectivism: Theoretical Underpinnings of MOOCs” by Matt Crosslin (http://scholarworks.umb.edu/ciee/vol3/iss1/6/)
“Learning -agogy Overload” by Matt Crosslin ( http://www.edugeekjournal.com/2015/09/22/learning-agogy-overload/)
“The Difference Between Instructivism, Constructivism, and Connectivism” by Terry Heick (http://www.teachthought.com/learning/the-difference-between-instructivism-constructivism-and-connectivism/)
“Connectivism: A Learning Theory for the Digital Age” by George Siemens (http://www.itdl.org/journal/jan_05/article01.htm)
“Maker Education: Pedagogy, Andragogy, Heutagogy” by Jackie Gerstein (https://usergeneratededucation.wordpress.com/2016/06/14/maker-education-pedagogy-andragogy-heutagogy/)
“Heutagogy and Lifelong Learning: A Review of Heutagogical Practice and Self-Determined Learning” by Lisa Marie Blaschke (http://www.irrodl.org/index.php/irrodl/article/view/1076/2087)
“Rhizomatic Education: Community as Curriculum” by Dave Cormier (http://nsuworks.nova.edu/cgi/viewcontent.cgi?article=1045&context=innovate)
“A Primer on Writing Effective Learning-Centered Course Goals” by Robert K. Noyd (DFB) & The Staff of The Center for Educational Excellence (CEE) US Air Force Academy (http://www.designlearning.org/wp-content/uploads/2010/03/Writing-Good-Learning-Goals-by-Robert-Noyd-US-Air-Force-Academy.pdf)
How to Write Learning Objectives that Meet Demanding Behavioral Criteria” by Bob Kizlik (http://www.adprima.com/objectives.htm)
3 Key Characteristics of Competency Based Learning” by Deb Everhart (http://blog.blackboard.com/3-key-characteristics-of-competency-based-learning/)
What is Competency-Based Learning?” by TeachThought Staff (http://teachthought.com/learning/what-is-competency-based-learning/)
Contrast checker (http://webaim.org/resources/contrastchecker/)
MathML (https://www.w3.org/Math/)
WebAIM (https://webaim.org/)
Guide on captions (http://ncam.wgbh.org/experience_learn/educational_media/stemdx/exi)
WebAIM screen reader simulation (https://webaim.org/simulations/screenreader)
Quality Matters Rubric (https://www.qualitymatters.org/qa-resources/rubric-standards/higher-ed-rubric)
Online Learning Consortium (OLC) Quality Course Teaching and Instructional Practice Scorecard (https://onlinelearningconsortium.org/consult/olc-quality-course-teaching-instructional-practice/)
Canvas (https://www.instructure.com)
Blackboard (http://www.blackboard.com)
Moodle (https://moodle.org)
EdX (https://www.edx.org)
Coursera (https://www.coursera.org)
WordPress (https://wordpress.com)
WordPress as a classroom (https://wordpress.com/classrooms/)
Moodle (https://moodlecloud.com)
Reclaim Hosting (http://reclaimhosting.com)
Blackboard (https://www.coursesites.com)
Google Classroom (https://classroom.google.com)
The Handbook of Learning Analytics (https://solaresearch.org/hla-17/)
“7 Ethical Concerns With Learning Analytics” By Jim Yupangco (https://elearningindustry.com/7-ethical-concerns-with-learning-analytics)
“’Personalized Learning’ and the Power of the Gates Foundation to Shape Education Policy” by Audrey Watters (http://hackeducation.com/2017/07/18/personalization)
“Pedagogy and the Logic of Platforms” by Chris Gilliard (http://er.educause.edu/articles/2017/7/pedagogy-and-the-logic-of-platforms)
Tressie McMillan Cottom (https://tressiemc.com)
LowerEd (http://thenewpress.com/books/lower-ed)
The work of Audrey Watters (http://audreywatters.com)
Hack Education (http://hackeducation.com)
Chris Gilliard’s work (http://hypervisible.com)
Digital Redlining (http://digitalredlining.com)
Maha Bali (https://blog.mahabali.me)
Algorithms of Oppression by Safiya Umoja Noble (https://nyupress.org/books/9781479837243/)
“Learning and Teaching as Communicative Actions: A Mixed-Methods Twitter Study” by Jenny S. Wakefield, Scott J. Warren, and Metta Alsobrook (http://www.kmel-journal.org/ojs/index.php/online-publication/article/viewFile/145/115)
“Learning and Teaching as Communicative Actions: Improving Historical Knowledge and Cognition Through Second Life Avatar Role Play” by Jenny S. Wakefield, Scott J. Warren, Monica A. Rankin, Leila A. Mills, and Jonathan S. Gratch (http://www.kmel-journal.org/ojs/index.php/online-publication/article/viewFile/199/151)
Theoretical Underpinnings of MOOCs” by Matt Crosslin (http://scholarworks.umb.edu/ciee/vol3/iss1/6/).
The Community of Inquiry main website (https://coi.athabascau.ca)
“Humanizing Online Learning” 2 week course by Michelle Pacansky-Brock (http://brocansky.com/humanizing-online-learning)
Humanizing Online Learning and Teaching compilation edited by Whitney Kilgore (https://humanmooc.pressbooks.com)
Zoom (https://www.zoom.us)
Skype (https://www.skype.com)
MIT’s Unhangout (https://unhangout.media.mit.edu/about/)
YouTube Live (https://www.youtube.com/my_live_events)
“What’s the Problem with Grades?” by Alfie Kohn (http://blogs.ibo.org/blog/2017/05/11/whats-the-problem-with-grades/)
“Why I Don’t Grade” by Jesse Stommel (http://www.jessestommel.com/why-i-dont-grade/)
“12 Alternatives To Letter Grades In Education” by Terry Heick (https://www.teachthought.com/pedagogy/12-alternatives-to-letter-grades-in-education/)
“Ungrading My Class – Reflections on a Second Iteration” by Maha Bali (https://www.chronicle.com/blogs/profhacker/ungrading-my-class-reflections-on-a-second-iteration/65235)
“Toward Renewable Assessments” by David Wiley (https://opencontent.org/blog/archives/4691)
“Opting for Renewable Assessments” by Jason B. Jones (https://www.chronicle.com/blogs/profhacker/opting-for-renewable-assessments/62523)
“Renewable Assignments: Student Work Adding Value to the World” by Christina Hendricks (http://flexible.learning.ubc.ca/news-events/renewable-assignments-student-work-adding-value-to-the-world/)
Jim Groom’s ds106 (Digital Storytelling) course at the University of Mary Washington (UMW): assignment bank (http://assignments.ds106.us)
From Instructivism to Connectivism: Theoretical Underpinnings of MOOCs (http://scholarworks.umb.edu/ciee/vol3/iss1/6/)
micro podcasts from Dr. Peggy Semingson on the audio platform SoundCloud (https://soundcloud.com/peggy-semingson)
SoundCloud (https://soundcloud.com)
Audioboom (https://audioboom.com)
Mixcloud (https://www.mixcloud.com/)
Find OER (https://open4us.org/find-oer/)
List of OER definitions (https://wiki.creativecommons.org/wiki/What_is_OER%3F)
5R Open Course Design Framework by Lumen Learning (http://lumenlearning.com/about/whats-oer/)
Example of the differences with in the United States about copyright status of government documents (http://copyright.lib.harvard.edu/states/)
Creative Commons (CC) license (https://creativecommons.org/licenses/)
CC License Chooser help page (https://creativecommons.org/choose/)
OER Commons (https://www.oercommons.org/)
list of other resource options with an educational or multi-media focus (http://libguides.brooklyn.cuny.edu/research/oer/createoer)
“Shaming and Framing: Imagining Students at an Education Conference” by Chris Gilliard (http://hypervisible.com/post/shaming-and-framing-imagining-students-at-an-education-conference/)
Credly: free service for up to 500 badges: https://credly.com
OpenBadges: widely accepted open credentialing system: https://openbadges.org
Issuing OpenBadges: https://openbadges.org/get-started/issuing-badges/
Badgr: free, open-source credentialing system: https://info.badgr.io
“How to Create an SRT File” by Andrew Meer (http://www.ehow.com/how_6901846_create-srt-file.html)
“How to Write an Awesome Video Script in 8 Steps” by Jake Kilroy (https://www.columnfivemedia.com/how-to-write-a-video-script-like-video-agency)
Official FERPA Recap (https://www2.ed.gov/policy/gen/guid/fpco/ferpa/index.html)
Example of FERPA at a Glance for Faculty from one college (http://www.emich.edu/registrar/registration_info/FERPA/Faculty%20FERPA.pdf)
“15 Social Networking Safety Tips from Norton Security” by Emma Kavanagh (http://www.nortonsecurityonline.com/security-center/15-social-networking-safety-tips.html)
“5 Do’s and Don’ts for College Students Using Social Media” by Jeff Greer (https://www.usnews.com/education/articles/2010/05/12/5-dos-and-donts-for-college-students-using-social-media)
Hootsuite (https://hootsuite.com)
Known (https://withknown.com)
Slack (https://slack.com)
“Should You Podcast Under Your Real Name, or a Pseudonym?” by Daniel J. Lewis (https://theaudacitytopodcast.com/should-you-blog-podcast-youtube-under-your-real-name-or-a-pseudonym-tap183/)
What are the Best Alternatives to Facebook? (https://www.1and1.com/digitalguide/online-marketing/social-media/the-best-facebook-alternatives/)
Mastodon (https://mastodon.social/about)
Personal Learning Network (PLN) (https://en.wikipedia.org/wiki/Personal_learning_network).
Connectivism (http://en.wikipedia.org/wiki/Connectivism)
Sample Connectivist MOOC Handbook (http://ds106.us/handbook/)
“Creating a Course Hub” by Alan Levine (http://cogdogblog.com/2014/07/14/feed-wordpress-101/)
Cultural Awareness Online Continuing Education Course (http://www.culture-advantage.com/awarenesspage1.html)
Analysis into the Bystander Effect – “Social Media: The Modern Stage for the Bystander Effect?” (http://ron-sheese.wikidot.com/tutorial-6-2)
the wisdom of the crowds – “The Madness of the Crowds” by Tim Hwang (https://logicmag.io/01-the-madness-of-the-crowd/)
“Codes of Conduct 101 + FAQ” by Ashe Dryden (https://www.ashedryden.com/blog/codes-of-conduct-101-faq)
“MOOCs and Codes of Conduct” by Matt Crosslin (http://www.edugeekjournal.com/2014/10/24/moocs-and-codes-of-conduct/)
Example MOOC Code of Conduct (https://linkresearchlab.org/dalmooc/policies/)
Transforming Business, Society, and Self with U.Lab. (https://www.edx.org/course/u-lab-leading-emerging-future-mitx-15-671-1x-0#!)
Coaching circles(https://www.youtube.com/watch?time_continue=19&v=dJTrLUgI-qE)
coaching circles livestream (https://livestream.com)
Mindfulness-Based Stress Reduction developed by Jon Kabat-Zinn (https://www.umassmed.edu/cfm/mindfulness-based-programs/)
Mindful Tech by David M. Levy (http://www.davidmlevy.net/mindful-tech/)
Contemplative Practices in Higher Education by Daniel Barbezat and Mirabai Bush (http://www.contemplativemind.org/book)
Stop, Breathe, and Think (https://www.stopbreathethink.com/)
“Designing a Dual Layer cMOOC/xMOOC” by Matt Crosslin (http://www.edugeekjournal.com/2014/05/04/designing-a-dual-layer-cmoocxmooc/)
“Digging Into What “Choice” is in Customizable Modality/Dual-Layer” by Matt Crosslin (http://www.edugeekjournal.com/2015/10/01/digging-into-what-choice-is-in-customizable-modalitydual-layer/)
“Every Choice is Awesome. Every Path is Cool When You’re in #HumanMOOC” by Matt Crosslin (http://www.edugeekjournal.com/2015/12/28/every-choice-is-awesome-every-path-is-cool-when-youre-in-humanmooc/)
“Documenting Customizable Pathways” by Leigh A. Hall (http://teachingacademia.com/index.php/2017/04/10/documenting-customizable-pathways/)
“Dual Pathways in Online Learning” by Leigh A. Hall (http://teachingacademia.com/index.php/2017/04/03/dual-pathways-in-online-learning/)
“The Messiness of Online Teaching” by Leigh A. Hall (http://teachingacademia.com/index.php/2017/07/17/the-messiness-of-online-teaching/)
“Bridging Learners From Instructivism to Connectivism” by Matt Crosslin (http://www.edugeekjournal.com/2014/07/11/bridging-learners-from-instructivism-to-connectivism/)
Example of interactive map of options in one MOOC (http://mattcrosslin.com/humanmooc/syllabus/tools/)
“Visual Flow of Learner Tools in the Dual Layer MOOC” by Matt Crosslin (http://www.edugeekjournal.com/2014/09/26/visual-flow-of-learner-tools-in-the-dual-layer-mooc/)
“Creating a Self-Mapped Learning Pathway” by Matt Crosslin (http://www.edugeekjournal.com/2017/03/28/creating-a-self-mapped-learning-pathway/)
“4 Ways To Bring Gamification of Education To Your Classroom” by Suzanne Holloway (https://tophat.com/blog/gamification-education-class/)
“Gamification in Education” by Vicki Davis (https://www.edutopia.org/blog/gamification-in-education-vicki-davis)
Gamification of Learning (https://en.wikipedia.org/wiki/Gamification_of_learning)
“The Difference between Gamification and Game-Based Learning” by Steven Isaacs (http://inservice.ascd.org/the-difference-between-gamification-and-game-based-learning/)
“Game-Based Learning: What it is, Why it Works, and Where it’s Going” by Jessica Trybus (http://bit.ly/game-based-learning-trybus)
Educational Game (https://en.wikipedia.org/wiki/Educational_game)
Virtual Reality for Education (https://virtualrealityforeducation.com/)
“Real Uses of Virtual Reality in Education: How Schools are Using VR” by Kelly Walsh (http://www.emergingedtech.com/2017/06/real-uses-of-virtual-reality-in-education-how-schools-are-using-vr/)
“Virtual Reality And Augmented Reality In Education” by Leticia Lafuente López (https://elearningindustry.com/virtual-reality-augmented-reality-education)
“Augmented Reality Brings New Dimensions to Learning” by Todd Nesloney (https://www.edutopia.org/blog/augmented-reality-new-dimensions-learning-drew-minock)
eleVR (http://elevr.com/)
Twine (https://twinery.org/)
eXperience Play (https://experienceplay.education/)
M-Learning (https://en.wikipedia.org/wiki/M-learning)
12 Principles of Mobile Learning (http://www.teachthought.com/learning/12-principles-of-mobile-learning/)
“The Ultimate Teacher’s Guide To Creating Educational Apps” by Jeff Dunn (http://www.edudemic.com/the-ultimate-guide-to-creating-educational-apps/)
“5 Simple Tools For Teachers To Create And Publish Apps Of Their Own” (http://www.teachthought.com/technology/5-tools-teachers-create-publish-apps/)
“Rhizomatic Education: Community as Curriculum” by Dave Cormier (http://davecormier.com/edblog/2008/06/03/rhizomatic-education-community-as-curriculum/)
“Rhizomatic Learning” (https://www.heacademy.ac.uk/enhancement/starter-tools/rhizomatic-learning)
“A Practical Guide to Rhizo15” by Dave Cormier (http://davecormier.com/edblog/2015/04/10/a-practical-guide-to-rhizo15/)
“What is it Like to Learn and Participate in Rhizomatic MOOCs? A Collaborative Autoethnography of #RHIZO14” by Maha Bali, Sarah Honeychurch, Keith Hamon, Rebecca J. Hogue, Apostolos Koutropoulos, Scott Johnson, Ronald Leunissen, & Lenandlar Singh (http://scholarworks.umb.edu/ciee/vol3/iss1/4)
“How the Community Became More Than the Curriculum: Participant Experiences In #RHIZO14” by Sarah Honeychurch, Bonnie Stewart, Maha Bali, Rebecca J. Hogue, & Dave Cormier (http://scholarworks.umb.edu/ciee/vol3/iss1/3)