Technical Writing Essentials

Technical Writing Essentials

Introduction to Professional Communications in the Technical Fields

Suzan Last

Candice Neveu and Monika Smith

University of Victoria

Victoria, British Columbia

Contents

1

Acknowledgements

Suzan Last

This work, first and foremost, has been a student-driven endeavor. Over the years, numerous students have requested an open, online resource, and have presented compelling research supporting the benefits of such a work. So it is thanks to them that this work first came into being.

It would not have made it this far without the generous support, collaboration, and peer review of many colleagues in the Humanities, Engineering, and Science faculties at the University of Victoria. Thanks is also due to the funding provided by an Open Education Resource grant from the University of Victoria’s Office of Research Services and Learning and Teaching Support and Innovation Division.

Finally, I would like to acknowledge the invaluable help and guidance of Inba Kehoe and her colleagues at the Copyright and Scholarly Communications Office at the University of Victoria, whose sharp editorial eyes and diligent quality control helped ensure that this book will be a valuable resource for students.

2

Introduction

Suzan Last

In our increasingly technological and internationalized workplaces, communications skills are among the most sought-after competencies employers require of job candidates. Every job posting you see will almost certainly ask for candidates with excellent communications skills and the ability to work effectively in teams. The ability to communicate clearly and effectively in written, verbal, visual, and interpersonal contexts is vital for success and advancement in the workplace.

No matter how brilliant or innovative an idea may be, if it is not communicated clearly and promoted effectively to the right audience, it will not become a reality. For an innovative idea to move from concept to project to completion requires many stages in a design process (see Figure 1), almost all of which require clear communication and effective teamwork.

The four phases of a project and associated communications tasks. Image description available.
Figure 1 Phases of a project and some accompanying communications tasks.[Lightbulb image]. [Online]. Available: https://www.iconfinder.com/icons/667355/aha_brilliance_idea_think_thought_icon. Free for commercial use. [Image Description]

If the design and implementation teams cannot work and communicate effectively with each other, their final product will fail to meet its potential.

Technical Writing Essentials introduces the key elements of professional style, document design, collaboration, oral presentation, and research skills needed to design productive workplace documents and presentations for a variety of purposes and audiences.

Image Description

Figure 1 image description:

Once there is an idea, a project goes through a design process made up of four stages.

  1. Pre-project planning.
    • Problem Definition – identifying needs, goals, objectives, and constraints.
    • Define context and do research.
    • Identify potential projects.
    • Public engagement projects; Stakeholder consultation.
  2. Project Development.
    • Propose a project (budget, timeline, etc.).
    • Create or respond to a request for proposals, evaluate proposals.
    • Develop or design solution concepts.
    • Project management plan.
    • Feasibility Studies, Recommendation Reports).
  3. Project Implementation.
    • Write contracts and apply for permits for construction and building sites.
    • Progress reports, status updates.
    • Documentation of project.
    • Continued research and design improvements.
  4. Project completion.
    • Final reports and documentation.
    • Close contracts.
    • Ongoing Support: User Guides, Troubleshooting, FAQs.

[Return to Figure 1]

I

1. WHAT IS TECHNICAL COMMUNICATION?

Chapter 1 Learning Objectives

This chapter will help you

  1. Understand what technical writing is, why its important, and what it looks like
  2. Apply a “problem-solving” approach to communications tasks, starting by learning how to fully define the problem before looking for solutions
  3. Recognize the main conventions and characteristics of technical writing, and how they differ from other forms, such as academic and journalistic writing
  4. Understand the importance of defining the “rhetorical situation” in which you are communicating
  5. Apply what you have learned so far by examining “case studies” that demonstrate the costs of p/technicalwriting/chapter/1-2-understanding-the-rhetorical-situation//technicalwriting/chapter/understandingrhetoricalsituation/oor communication
  6. Appreciate the complexity and iterative nature of a writing process in determining what writing process works best for you.

When you hear the term “technical communication,” what comes to mind? Perhaps you think of scientific reports, specifications, instructions, software documentation, or technical manuals. And you would be correct. However, technical communication is so much more than that. Technical Writing is a genre of non-fiction writing that encompasses not only technical materials such as manuals, instructions, specifications, and software documentation, but it also includes writing produced in day-to-day business operations such as correspondence, proposals, internal communications, media releases, and many kinds of reports. It includes the communication of specialized technical information, whether relating to computers and scientific instruments, or the intricacies of meditation. And because oral and visual presentations are such an important part of professional life, technical communication also encompasses these as well.

Why are Technical Communication Skills Important?

In a recent presentation on the topic of Co-op Work Term Reports, S. McConkey, “Writing a work term report,” ENGR 120 Plenary Lecture, University of Victoria, March 3, 2017. the Engineering co-op coordinator for the University of Victoria presented the following statistics regarding the importance of communication skills in the professional world of engineering:

The Reality: Technical Writing and Communication

He added that engineers who are more advanced in their careers spend only 5-10% of their time engaged in problem solving of some kind and 90-95% of their time engaging in related communications tasks:  researching, writing and reading reports, proposals, emails, letters, memos; giving or attending presentations; discussing and meeting with colleagues, team mates, managers, clients, and so forth. In a recent survey of over 1000 professionals from various professions, over 70% of engineers and almost 50% of programmers rated the quality of their writing as either “very important” or “extremely important” to the performance of their jobs.J. Swartz, S. Pigg, J. Larsen, J. Helo Gonzalez, R. De Haas, and E. Wagner, "Communication in the workplace: What can NC State students expect?" Professional Writing Program, North Carolina State University, 2018 [Online]. Available: https://docs.google.com/document/d/1pMpVbDRWIN6HssQQQ4MeQ6U-oB-sGUrtRswD7feuRB0/edit  Clearly, as Barry Hyman asserts in Fundamentals of Engineering Design, “the stereotype that engineering is for inarticulate nerds is way off base.” B. Hyman, “Ch. 2: Problem formulation,” in Fundamentals of Engineering Design, Upper Saddle River, NJ: Prentice Hall, 2002, p. 42.

Technical communication is “transactional” – it entails a purposeful transaction between sender and receiver that provides specific information for practical and specific purposes (informing, instructing, persuading) and is usually geared towards the needs of a specific audience. Technical communicators produce a wide variety of documents and other products, such as

Thus, it is a highly “designed” form of communication that requires practitioners to have a heightened awareness of the conventions (rules and expectations) and rhetorical situations (audience, purpose, context) in which they are communicating.

This textbook aims to provide you with that heightened awareness – that is, to introduce you to the basic conventions of technical communications, and to train you to take a reader-centred or audience-centred approach to communications tasks, to find the tools and methods that will work best to communicate your ideas to your target audience, and to achieve the desired results.

What Does Technical Writing Look Like?

Technical communications can take many forms, depending on the purpose and intended audience.  Consider the following example of technical writing, which is an excerpt adapted from a book called Scientific Sailboat Racing by Ted Wells. T. Wells, Scientific Sailboat Racing, New York: Dodd, Mead, and Co., 1950, pp. 94-96. From the excerpt in the box below, what can you tell about the intended audience?

The most common question asked by skippers wanting to get to the windward mark faster than they have been doing is “How can I make my boat point higher?”  Getting to the windward mark first depends primarily on the skill and experience of the skipper; however, having a well-rigged boat will make a significant difference.  Look for the following, in order of importance:

  1. Sails: Have good quality sails, and use the appropriate sails for the wind conditions expected.  No one can win races with poor sails, so use the best you can afford.  Keep in mind that the leeches of all sails flutter a little, the jib will backwind the luff of the main on any full or medium sail, and in very light wind, even a perfectly cut sail will probably develop a wrinkle along the front of the battens.  If the sails are obviously no good, replace them.
  2. Mast and Centerboard: Ensure that the mast is far enough forward and the centerboard is far enough back so that there is little or no weather helm.  Make sure the stiffness of the mast suits the sails.
  3. Jib Fairleads: Ensure jib fairleads are properly located for the type of jib being used and the strength of wind expected.
  4. Cleats: Have cleats for both jib and mainsheet; place cleats so that crew can easily make small adjustments for varying wind velocities and hang on the to the jib sheet without having it pop out of the cleat.
  5. Traveler: Have a mainsheet traveler that allows the main to be pulled down without pulling the boom in too far; it should allow the sail to be pulled down tightly enough so that the leech does not fall off without pulling the boom in any further than it should be.
  6. Tiller: Have a flexible tiller extension that allows you to sit well forward, but can be adjusted so that it does not get in the way when coming about.
  7. Boat Weight: Keep the boat as close to minimum weight as possible.  Clearly, a lighter boat is easier to handle, but this is not as critical as other factors.  If choosing between a lighter crew member with less skill and experience, and a heavier crew member who has greater skill, the latter is usually preferable.

Once the boat is properly set up, a skilled and experienced skipper can point significantly higher than expected by understanding and using wind deflection from other boats.  Immediately to leeward of any boat and extending for a distance of about three mast lengths, there is a wind shadow where the wind velocity is greatly decreased.  To leeward of the bow of the boat there is a very small region where the direction of the wind is deflected opposite to the normal deflection and where the velocity is accelerated slightly (see Figure 34).  Except in the direct wind shadow, the deflection of the wind is more important than the decrease in wind velocity, as the decrease in velocity is very slight except in the immediate shadow of the sails of the windward boat.

Wind conditions surrounding a boat

Because of this wind deflection, a boat on the opposite tack cutting behind another boat will be able to point appreciably higher than it normally would.  Many skippers on port tacks who thought they could clear starboard tackers have been fooled by not realizing this fact.  The deflection of their wind in trying to cross in front of the starboard tacker will enable the starboard tacker to point higher without luffing than he normally would be able to do, and the port tacker who thought he could squeeze by suddenly finds that he cannot (See Figure 35).

EXERCISE 1.1 Draft some technical writing related to your interests

Reflect on the description and example of technical writing above in relation to your experience as an employee, as a student, or as a practitioner of a hobby. What kinds of documents have you written that could fall under the genre of Technical Writing?

Write a paragraph or two on a topic about which you have specialized knowledge, and can use specialized terminology to explain the idea or instruct the reader. For example, you might write about effective techniques for executing certain skateboard maneuvers or how to execute a yoga position such as a “downward facing dog.” Consider your audience when choosing how to write this. Will the audience have to be familiar with the terminology used, as in the above sailing example? See if you can “baffle me with your techno-jargon” and then re-write for a general audience, using plain language.

1.1 KEY CONCEPT: Problem-Solving Approach to Communications Tasks

In the workplace, many of the communications tasks you perform are designed to solve a problem or improve a situation. Whether you are doing work for a client, for your employer, with your team, or for someone else, you will typically use some sort of design process to tackle and solve the problem. A clearly-articulated design process provides you with a clear, step-by-step plan for finding the best solution for your situation.

Take a moment to search the Internet for the term “design process” and look at “images.” You will find many variations. Have a look at several of them and see if you can find a common pattern.

One commonality you will likely find in examining other people’s design process diagrams is this: the first step in designing any solution is to clearly define the problem. Figure 1.1.1 shows NASA’s basic design process. Think about the kind of communication that each step of this process might entail.

State the problem, generate ideas, select a solution, build the item, evaluate, present results, and repeat
Figure 1.1.1 NASA’s Design Process Diagram. "NASA design process."  NASA STEM Engagement [Online]. Available: https://www.nasa.gov/audience/foreducators/best/index.html.Used for educational and noncommercial purposes.

You cannot begin to work on solutions until you have a clear definition of the problem and goals you want to achieve. This critical first stage of the design process requires that you effectively communicate with the “client” or whoever has the “problem” that needs solving. Poor communication at this stage can derail a project from the start.

For our purposes, we will use Barry Hyman’s Problem Formulation model B. Hyman, “Ch. 2: Problem formulation,” in Fundamentals of Engineering Design, Upper Saddle River, NJ: Prentice Hall, 2002, pp. 40-54. to clearly define a problem. Hyman’s Problem Formulation model consists of 4 elements:

  1. Need Statement: recognizes and describes the need for a solution or improvement to an “unsatisfactory situation.”  It answers the questions, “what is wrong with the way things are currently? What is unsatisfactory about it? What negative effects does this situation cause?” You may need to do research and supply data to quantify the negative effects.
  2. Goal Statement:  describes what the improved situation would look like once a solution has been implemented. The goal statement defines the scope of your search for a solution. At this point, do not describe your solution, only the goal that any proposed solution should achieve. The broader you make your goal, the more numerous and varied the solution can be; a narrowly focused goal limits the number and variety of possible solutions.
  3. Objectives define measurable, specific outcomes that any feasible solution should optimize (aspects you can use to “grade” the effectiveness of the solution). Objectives provide you with ways to quantifiably measure how well any solution will solve the problem; ideally, they will allow you to compare multiple solutions and figure out which one is most effective (which one gets the highest score on meeting the objectives?).
  4. Constraints define the limits that any feasible solution must adhere to in order to be acceptable (pass/fail conditions, range limits, etc.). The key word here is must — constraints are the “go/no go” conditions that determine whether a solution is acceptable or not.  These often include budget and time limits, as well as legal, safety and regulatory requirements.

Communication as Solution

This model can apply to a communications task as well as more physical design tasks. Imagine your communications task as something that will solve a problem or improve a situation. Before you begin drafting this document or presentation, define the problem you want to solve with this document:

EXERCISE 1.2 Define a problem

Think of a problem or an “unsatisfactory situation” that you have recently experienced.  It could be as simple as it’s 8pm, I haven’t had dinner yet, and I’m hungry. Use Hymen’s Problem Formulation schema to formally define the problem — without proposing any particular solutions. Your problem definition should ideally allow a multitude of possible solutions that adhere to the following:

  1. Need/Unsatisfactory situation:
  2. What is your goal?
  3. What are some measurable objectives you want to achieve?
  4. What are your constraints?

Download and use the attached Problem Definition Template (.docx)

1.2 Conventions and Characteristics

Every genre of writing has unique characteristics and rules, called conventions, that help readers classify a document as belonging to a particular genre. This also applies to film and music. Think about the last movie you saw. What type of movie was it? What about that movie gave you that impression? Did the characters wear Stetson hats, ride horses, and carry guns? Did they fly in space ships, encounter alien beings, and use futuristic technology? Those elements are typical conventions of Western and Science Fiction genres.

Non-fiction is a category that can be broken into various genres. The main genres that are relevant to us are journalism (newspaper writing), academic writing (written by scholars and published in peer reviewed academic journals or books), and technical writing. Before we get into the specific conventions that characterize technical writing, take a moment to think back to your academic writing course and list some conventions typical of journalism (popular press) and academic writing in Table 1.1.1.

TABLE 1.1.1 Identify the conventions for journalistic and academic writing
Criteria Journalistic Academic
Purpose
Audience
Writing Style
Tone
Structure
Format/Formatting
Other Features

Like journalism and scholarly writing, technical writing also has distinct features that readers expect to see in documents that fall within this genre. These include (a) use of headings to organize information into coherent sections, (b) use of lists to present information concisely, (c) use of figures and tables to present data and information visually, and (d) use of visual design to enhance readability (all of these topics are covered in Chapter 3:  Document Design). These conventions are connected to the main purposes of technical writing, which include communicating the following:

Technical documentation is intended to communicate information to the people who need it in a way that is clear and easy to read, at the right time to help make decisions and to support productivity. Designing technical communication is like designing any other product for an intended user:  the ultimate goal is to make it “user friendly.”

Key words here are accessible, usable, clear, goal-oriented, effective, and reader-centred.  The characteristics of technical writing support these goals and concepts.

If we filled in Table 1.1 with typical characteristics of technical writing, it might look something like Table 1.1.2:

TABLE 1.1.2 Conventions of technical writing
Criteria Technical Writing
Purpose To communicate technical and specialized information in a clear, accessible, usable manner to people who need to use it to make decisions, perform processes, or support company goals.
Audience Varied, but can include fellow employees such as subordinates, colleagues, managers, and executives, as well as clients and other stakeholders, the general public, and even readers within the legal system.
Writing Style Concise, clear, plain, and direct language; may include specialized terminology; typically uses short sentences and paragraphs; uses active voice; makes purpose immediately clear.
Tone Business/professional in tone, which falls between formal and informal; may use first person or second person if appropriate; courteous and constructive.
Structure Highly structured; short paragraphs; clear transitions and structural cues (headings and sub-headings) to move the reader through and direct the reader.
Format/Formatting Can be in electronic, visual, or printed formats; may be long (reports) or short (emails, letters, memos); often uses style guides to describe required formatting features; uses headings, lists, figures and tables.
Other Features Typically objective and neutral; ideas are evidence and data-driven; descriptors are precise and quantitative whenever possible.

1.3 Understanding the Rhetorical Situation

Suzan Last and Candice Neveu

It is common knowledge in the workplace that no one really wants to read what you write, and even if they want to or have to read it, they will likely not read all of it. So how do you get your reader to understand what you need quickly and efficiently? Start by doing a detailed Task and Audience Analysis — make sure you understand the “rhetorical situation.” Before you begin drafting a document, determine the needs of your rhetorical situation (See Figure 1.3.1).

In a rhetorical situation, you have to consider the Writer, Purpose, Audience, Message, and Context & Culture
Figure 1.3.1 The Rhetorical Situation.

The “rhetorical situation” is a term used to describe the components of any situation in which you may want to communicate, whether in written or oral form. To define a “rhetorical situation,” ask yourself this question:  “who is talking to whom about what, how, and why?” There are five main components:

PURPOSE refers to the why you are writing. Determining your purpose requires that you engage in Task Analysis — that is, determine what you hope to accomplish by writing this document. Ask yourself what you hope the reader(s) will do/think/decide/ or how they will behave as a result of reading the text. There are three general purposes for communication in the workplace: 1) to create a record, 2) to give or request information, and 3) to persuade.

Within those general purposes, you will find a myriad of specific purposes. For example, your purpose may be to  propose an innovative solution to a specific problem. In this case, you want the reader to agree to explore the idea further, or approve funding for further research and development, which would fall under the general purpose of writing to persuade.

WRITER refers to you, the writer/creator/designer of the communication. It is important to examine your own motivation for writing and any biases, past experiences, and knowledge you bring to the writing situation. These elements will influence how you craft the message, whether positively or negatively. This examination should also include your role within the organization, as well as your position relative to your target audience.

AUDIENCE refers to your readers/listeners/viewers/users. Audience Analysis is possibly the most critical part of understanding the rhetorical situation.  Consider Figure 1.3.2 below. Is your audience internal (within your company) or external (such as clients, suppliers, customers, other stakeholders)? Are they lateral to you (at the same position or level), upstream from you (management), or downstream from you (employees, subordinates)? Who is the primary audience? Who are the secondary audiences? These questions, and others, help you to create an understanding of your audience that will help you craft a message that is designed to effectively communicate specifically to them.

You have relationships with Supervisors; Colleagues and Team Members; Subordinates; and the public, clients, supplies, and government.
Figure 1.3.2 Understanding your relationship to your audience.

Keep in mind that your different audiences will also have a specific purpose in reading your document. Consider what their various purposes might be, and how you can best help them achieve their purpose. Considering what they are expected to do with the information you provide will help you craft your message effectively. Consider also that technical writing often has a long “life-span” – a document you write today could be filed away and reviewed months or even years down the road. Consider the needs of that audience as well.

Audience Purpose for Reading
Executives Make decisions
Supervising Experts/Managers Advise decision makers; direct subordinates
Technical Experts/Co-workers Implement decisions; advise
Lay People/Public/Clients Become informed; choose options; make decisions

Some companies develop audience profiles to help guide their communications. This is a good exercise whenever you have something to communicate, especially if the information is complex. Here are some questions to consider as part of the audience profile:

Developing an Audience Profile

  • Who are your primary readers? (specific names and titles, or general roles)
  • Are they above you in the organizational hierarchy? Lateral, subordinate? Outside of your organization?
  • Who else might read this document? (secondary readers)
  • Do you know what their attitude towards the topic is?
  • How might cultural differences affect their expectations and interpretations?
  • How much technical background do the readers have?
  • How much do they already know about the topic?
  • What situation gave rise to this document?

MESSAGE refers to what information you want to communicate. This is the content of your document. It should be aligned to your purpose and targeted to your audience. While it is important to carefully choose what content your audience needs, it is equally critical to cut out content that your audience does not need or want. “Time is money” may be a tired old cliché, but it is important to avoid wasting your audience’s time with information that is unnecessary or irrelevant to them. Your message should be professional, and expressed in an appropriate tone for the audience, purpose, and context. We will discuss aspects of using a professional style and tone in crafting your message more in Chapter 2.

CONTEXT refers to the situation that creates the need for the writing. In other words, what has happened or needs to happen that creates the need for communication? The context is influenced by timing, location, current events, and culture, which can be organizational or social. Ignoring the context for your communication could result in awkward situations, or possibly offensive ones. It will almost certainly impact your ability to clearly convey your message to your audience.

Consider the subtle (and not so subtle) similarities and differences in the rhetorical situation when you offer feedback on Course Experience Surveys vs when you evaluate an instructor on Ratemyprofessor.com.

EXERCISE 1.3 Identify the differences in the rhetorical situations

Course Evaluation Survey Ratemyprofessor.com
Purpose
Audience
Writer
Message
Context

EXERCISE 1.4 Task and audience analysis

Download Task and Audience Analysis Exercises (.docx)

The table below contains a collection of details about a research project you have just completed on rising sea levels. Imagine that you’re writing documents for each of the 5 following audiences:

  1. Your supervisor/boss
  2. Scientists
  3. The general public
  4. Politician
  5. High school students

What information about rising sea levels might each audience be interested in? As you go down the list, write in the blank spaces in front of each detail the letter that corresponds to the audiences that you think would find this detail most relevant.

Consider what kind of document might contain that information for that audience.

Interested Audience Categories of Information on Sea Level Rise
The dollar damage caused by sea level increases each year.
A literature review of previous research on rising sea levels.
Descriptions of calibration procedures for your instruments.
Some basic physics of how tides and currents work.
How much your project costs.
A log of all your measurements during the whole project.
A list of people who worked on the project.
Specifications of a new instrument to measure water conditions.
A new result showing a connection between sea level and coastal developments.
Procedures you used to avoid statistical biases in your data.
Your plans for further measurements.
Your recommendations for future research.

1.4 Case Study: The Cost of Poor Communication

No one knows exactly how much poor communication costs business, industry and government each year, but estimates suggest billions.  In fact, a recent estimate claims that the cost in the U.S. alone are close to $4 billion annually!J. Bernoff, "Bad writing costs business billions," Daily Beast, Oct. 16, 2016 [Online]. Available: https://www.thedailybeast.com/bad-writing-costs-businesses-billions?ref=scroll Poorly-worded or inefficient emails, careless reading or listening to instructions, documents that go unread due to poor design, hastily presenting inaccurate information, sloppy proofreading — all of these examples result in inevitable costs. The problem is that these costs aren’t usually included on the corporate balance sheet at the end of each year, so often the problem remains unsolved.

You may have seen the Project Management Tree Cartoon before (Figure 1.4.1); it has been used and adapted widely to illustrate the perils of poor communication during a project (you can make your own version at ProjectCartoon.com!).

Different interpretations of how to design a tree swing by different members of a team and communication failures can lead to problems during the project.
Figure 1.4.1 Project Management Tree Swing Cartoon. J. Ward, "The project management tree swing cartoon, past and present," TamingData, July 8, 2019 [Online] Available: https://www.tamingdata.com/2010/07/08/the-project-management-tree-swing-cartoon-past-and-present/CC-BY-ND 4.0.

The waste caused by imprecisely worded regulations or instructions, confusing emails, long-winded memos, ambiguously written contracts, and other examples of poor communication is not as easily identified as the losses caused by a bridge collapse or a flood. But the losses are just as real—in reduced productivity, inefficiency, and lost business. In more personal terms, the losses are measured in wasted time, work, money, and ultimately, professional recognition. In extreme cases, losses can be measures in property damage, injuries, and even deaths.

The following “case studies” show how poor communications can have real world costs and consequences. For example, consider the “Comma Quirk” in the Rogers Contract that cost $2 million.G. Robertson, “Comma quirk irks Rogers,” Globe and Mail, Aug. 6, 2006 [Online]. Available: https://www.theglobeandmail.com/report-on-business/comma-quirk-irks-rogers/article1101686/  A small error in spelling a company name cost £8.8 million.“The £8.8m typo: How one mistake killed a family business,” (28 Jan. 2015). The Guardian [online]. Available: https://www.theguardian.com/law/shortcuts/2015/jan/28/typo-how-one-mistake-killed-a-family-business-taylor-and-sons  Examine Tufte’s dis

cussion (.pdf) of the failed PowerPoint presentation that attempted to prevent the Columbia Space Shuttle disaster.E. Tufte, The Cognitive Style of PowerPoint, 2001 [Online]. Available: https://www.inf.ed.ac.uk/teaching/courses/pi/2016_2017/phil/tufte-powerpoint.pdf The failure of project managers and engineers to communicate effectively resulted in the deadly Hyatt Regency walkway collapse.C. McFadden, "Understanding the tragic Hyatt Regency walkway collapse," Interesting Engineering, July 4, 2017 [Online]: https://interestingengineering.com/understanding-hyatt-regency-walkway-collapse  The case studies below offer a few more examples that might be less extreme, but much more common.

In small groups, examine each “case” and determine the following:

  1. Define the rhetorical situation: Who is communicating to whom about what, how, and why? What was the goal of the communication in each case?
  2. Identify the communication error (poor task or audience analysis? Use of inappropriate language or style? Poor organization or formatting of information? Other?)
  3. Explain what costs/losses were incurred by this problem.
  4. Identify possible solutions or strategies that would have prevented the problem, and what benefits would be derived from implementing solutions or preventing the problem.

Present your findings in a brief, informal presentation to the class.

Exercises adapted from T.M Georges’ Analytical Writing for Science and Technology.T.M. Goerges (1996), Analytical Writing for Science and Technology [Online], Available: https://www.scribd.com/document/96822930/Analytical-Writing

CASE 1: The promising chemist who buried his results

Bruce, a research chemist for a major petro-chemical company, wrote a dense report about some new compounds he had synthesized in the laboratory from oil-refining by-products. The bulk of the report consisted of tables listing their chemical and physical properties, diagrams of their molecular structure, chemical formulas and computer printouts of toxicity tests. Buried at the end of the report was a casual speculation that one of the compounds might be a particularly effective insecticide.

Seven years later, the same oil company launched a major research program to find more effective but environmentally safe insecticides. After six months of research, someone uncovered Bruce’s report and his toxicity tests. A few hours of further testing confirmed that one of Bruce’s compounds was the safe, economical insecticide they had been looking for.

Bruce had since left the company, because he felt that the importance of his research was not being appreciated.

CASE 2: The unaccepted current regulator proposal

The Acme Electric Company worked day and night to develop a new current regulator designed to cut the electric power consumption in aluminum plants by 35%. They knew that, although the competition was fierce, their regulator could be produced more cheaply, was more reliable, and worked more efficiently than the competitors’ products.

The owner, eager to capture the market, personally but somewhat hastily put together a 120-page proposal to the three major aluminum manufacturers, recommending that their regulators be installed at all company plants.

She devoted the first 87 pages of the proposal to the mathematical theory and engineering design behind his new regulator, and the next 32 to descriptions of the new assembly line she planned to set up to produce regulators quickly. Buried in an appendix were the test results that compared her regulator’s performance with present models, and a poorly drawn graph showed how much the dollar savings would be.

Acme Electric didn’t get the contracts, despite having the best product. Six months later, the company filed for bankruptcy.

CASE 3: The instruction manual the scared customers away

As one of the first to enter the field of office automation, Sagatec Software, Inc. had built a reputation for designing high-quality and user-friendly database and accounting programs for business and industry. When they decided to enter the word-processing market, their engineers designed an effective, versatile, and powerful program that Sagatec felt sure would outperform any competitor.

To be sure that their new word-processing program was accurately documented, Sagatec asked the senior program designer to supervise writing the instruction manual. The result was a thorough, accurate and precise description of every detail of the program’s operation.

When Sagatec began marketing its new word processor, cries for help flooded in from office workers who were so confused by the massive manual that they couldn’t even find out how to get started. Then several business journals reviewed the program and judged it “too complicated” and “difficult to learn.” After an impressive start, sales of the new word processing program plummeted.

Sagatec eventually put out a new, clearly written training guide that led new users step by step through introductory exercises and told them how to find commands quickly. But the rewrite cost Sagatec $350,000, a year’s lead in the market, and its reputation for producing easy-to-use business software.

CASE 4: One garbled memo – 26 baffled phone calls

Joanne supervised 36 professionals in 6 city libraries. To cut the costs of unnecessary overtime, she issued this one-sentence memo to her staff:

When workloads increase to a level requiring hours in excess of an employee’s regular duty assignment, and when such work is estimated to require a full shift of eight (8) hours or more on two (2) or more consecutive days, even though unscheduled days intervene, an employee’s tour of duty shall be altered so as to include the hours when such work must be done, unless an adverse impact would result from such employee’s absence from his previously scheduled assignment.

After the 36 copies were sent out, Joanne’s office received 26 phone calls asking what the memo meant. What the 10 people who didn’t call  about the memo thought is uncertain. It took a week to clarify the new policy.

CASE 5: Big science — Little rhetoric

The following excerpt is from Carl Sagan’s book, The Demon-Haunted World: Science as a Candle in the Dark,C. Sagan, The Demon-Haunted World: Science as a Candle in the Dark, New York, NY: Random House, 1995. itself both a plea for and an excellent example of clear scientific communication:

The Superconducting Supercollider (SSC) would have been the preeminent instrument on the planet for probing the fine structure of matter and the nature of the early Universe. Its price tag was $10 to $15 billion. It was cancelled by Congress in 1993 after about $2 billion had been spent — a worst of both worlds outcome. But this debate was not, I think, mainly about declining interest in the support of science. Few in Congress understood what modern high-energy accelerators are for. They are not for weapons. They have no practical applications. They are for something that is, worrisomely from the point of view of many, called “the theory of everything.” Explanations that involve entities called quarks, charm, flavor, color, etc., sound as if physicists are being cute. The whole thing has an aura, in the view of at least some Congresspeople I’ve talked to, of “nerds gone wild” — which I suppose is an uncharitable way of describing curiosity-based science. No one asked to pay for this had the foggiest idea of what a Higgs boson is. I’ve read some of the material intended to justify the SSC. At the very end, some of it wasn’t too bad, but there was nothing that really addressed what the project was about on a level accessible to bright but skeptical non-physicists. If physicists are asking for 10 or 15 billion dollars to build a machine that has no practical value, at the very least they should make an extremely serious effort, with dazzling graphics, metaphors, and capable use of the English language, to justify their proposal. More than financial mismanagement, budgetary constraints, and political incompetence, I think this is the key to the failure of the SSC.

CASE 6: The co-op student who mixed up genres

Chris was simultaneously enrolled in a university writing course and working as a co-op student at the Widget Manufacturing plant. As part of his co-op work experience, Chris shadowed his supervisor/mentor on a safety inspection of the plant, and was asked to write up the results of the inspection in a compliance memo. In the same week, Chris’s writing instructor assigned the class to write a narrative essay based on some personal experience. Chris, trying to be efficient, thought that the plant visit experience could provide the basis for his essay assignment as well.

He wrote the essay first, because he was used to writing essays and was pretty good at it. He had never even seen a compliance memo, much less written one, so was not as confident about that task. He began the essay like this:

On June 1, 2018, I conducted a safety audit of the Widget Manufacturing plant in New City. The purpose of the audit was to ensure that all processes and activities in the plant adhere to safety and handling rules and policies outlined in the Workplace Safety Handbook and relevant government regulations. I was escorted on a 3-hour tour of the facility by…

Chris finished the essay and submitted it to his writing instructor. He then revised the essay slightly, keeping the introduction the same, and submitted it to his co-op supervisor. He “aced” the essay, getting an A grade, but his supervisor told him that the report was unacceptable and would have to be rewritten – especially the beginning, which should have clearly indicated whether or not the plant was in compliance with safety regulations. Chris was aghast! He had never heard of putting the “conclusion” at the beginning. He missed the company softball game that Saturday so he could rewrite the report to the satisfaction of his supervisor.

1

1.5 Writing Processes

Just as we use design processes to creatively solve complex problems, we use writing processes to create complex documents. In both cases, there are steps or stages, but we don’t always proceed directly from one step to next in a chronological manner. These processes are often iterative, meaning we might return to previous stages in the process from time to time. The more complex the task, the more iteration might be needed. Examine the Design Process (Figure 1.5.1) and Writing Process (Figure 1.5.2) diagrams below. What similarities and differences can you see in these two processes?

An Iterative design process. Image description available
Figure 1.5.1 Design Process. "The Engineering design process," Tufts University, [Online]. Available: https://engineering.tufts.edu/ggs/designprocess.htm. [Image description]
An iterative Writing Process Diagram. Image description available.
Figure 1.5.2 Writing Process Diagram. M.J. Curry and A. Hewings "Approaches to teaching writing," in Teaching Academic Writing: A Toolkit for Higher Education. New York: Routledge, 2003. Used with permission. [Image description]

You may have come across a “writing process” before, and it may or may not have worked well for you. There is no single process that works for everyone in every situation. The key is to recognize the various steps in a typical writing process and figure out how to use or adapt them most effectively for your situation.

For example, you may have come across the 40-20-40 writing process, which suggests that you should break up the amount of time you spend on the writing task into three distinct stages of planning, drafting and revising, and give each one a specific percentage of the time you have available.

40-20-40 Writing Process

Stage 1 – Planning:  spend 40% of your time planning your document (task analysis, thinking, discussing, free-writing, researching, brainstorming, concept mapping, focusing ideas, outlining, etc.)

Stage 2 – Drafting:  spend 20% of your time writing a rough draft (quickly getting all your ideas down in print, in more or less complete sentences and paragraphs, in more or less the right order, without agonizing over style or grammar choices)

Stage 3 – Revising:  spend 40% of your time revising, editing, and proofreading (polishing your draft, making sure the content is complete and well supported, ideas flow logically, formatting meets expectations, expression is grammatically correct and has the appropriate tone and vocabulary).

These percentages are a helpful guideline, as they emphasize the need to allot significant time for revision, but don’t always work for all people in all situations (think of a final exam situation!). It also does not clearly account for the need to iterate; sometimes while revising your draft (stage 3), you may have to go back to the planning stage (stage 1) to do additional research, adjust your focus, or reorganize ideas to create a more logical flow. Writing, like any kind of design work, demands an organic and dynamic process.

As with the design process, the writing process must begin with an understanding of the problem you are trying to solve. In an educational context, this means understanding the assignment you’ve been given, the specifications of that assignment, the objectives you are meant to achieve, and the constraints you must work within (due dates, word limits, research requirements, etc.). This is often referred to as “Task Analysis.” In professional contexts, you must also consider who your intended reader(s) will be, why they will be reading this document, and what their needs are, as well as deadlines and documentation requirements.

EXERCISE 1.5

Consider an upcoming writing assignment or task you must complete. To avoid putting it off until the last minute (and possibly doing a poor job), try planning a writing process for this task, and build in milestones. Anticipate how long various sub-tasks and stages might take. Make sure to include time for “task and audience analysis” to fully understand what’s involved before you start. Consider the following:

  • What is the purpose of the document? What are the specific requirements? Who will read it and why?
  • How much planning is needed? What will this entail? Will you need to do research? Do you need to come up with a topic or focus, or has one been assigned to you?
  • How complicated will the document be? Will it have several sections? Graphics? How much revision will be needed to perfect your document? Will you have time for a peer/tutor review?

Now try using the Assignment Calculator to see if it offers something similar to your planned writing process.

Image descriptions

Figure 1.5.1 image description:

A design process flow chart that encourages you to revisit previous steps as needed.

  1. Define the problem. This involves a needs assessment, problem statement, designing criteria and goals and background research.
  2. Generate possible solutions. Brainstorming using the idea trigger method, thumbnail sketching, and creative thinking. At this point, you may need to revisit your problem definition. Once you have a number of possible solutions, move on to the next step.
  3. Evaluate possible solutions. Do ideas meet design criteria? List the advantages and disadvantages. Select the best design alternatives. Use a decision matrix to evaluation. At this point, you may need to revisit your problem definition or brainstorm some more. Once you have evaluated possible solutions, move on to the next step.
  4. Make and test a model. Create detailed technical drawings, prototype or scale model, mathematical and computer models, Conduct performance and user tests. At this point, you made need to go back to brainstorming solutions or evaluating possible solutions. Once you have a model you are happy with, move on to the next step.
  5. Modify and improve design. Fix problems, improve design, do more testing if needed. In the worse case, scrap the design. You may need to go back to evaluating possible solutions to making and testing the model. Once you have a design you are happy with, move on to the next step.
  6. Communicate final design. Create final technical drawings, and technical manuals for assembly, operation, and maintenance.

[Return to Figure 1.5.1]

Figure 1.5.2 image description:

A writing process diagram that encourages constantly revisiting previous stages.

  1. Prewriting. This stage is for generating ideas, understanding the ideas of others, and collecting information (note taking, free-writing, brainstorming, looping).
  2. Planning. Here, you are organizing and focusing ideas. This may involve mind mapping, clustering, listing, and creating outlines.
  3. Drafting. In the drafting stage you are writing initial drafts of a text focusing mainly on the development, organization, and elaboration of ideas.
  4. Reflection. In the reflection stage, you can let the work sit and come back to it at a later point. You may cycle back between drafting a reflection a number of times before moving on.
  5. Peer/tutor review. Now you can get feedback from others. This may require you to return to the drafting and reflecting stages.
  6. Revision. Here you are further developing and clarifying ideas and the structure of the text. This may require you to return to the drafting and reflecting stages. If the work requires additional research or idea generation, return to the planning stage.
  7. Editing and proofreading. Here the focus is on surface-level features of the text.

[Return to Figure 1.5.2]

II

2. PROFESSIONAL STYLE

In the previous chapter, we defined technical writing as a “transactional” and primarily “problem-solving” genre and described some of the key conventions and considerations technical writers must keep in mind. In this chapter, we will look more deeply into the style of writing expected of this genre.

Chapter 2 Learning Objectives

2.1 Reader-Centered Writing: Understand how to take a reader-centred approach (rather than a writer-centred one) that focuses on knowing your audience and writing specifically to meet their needs.

2.2 Communicating with Precision: Review and practice techniques to make your writing more precise and concise.

2.3 Writing to Persuade: Understand how to use rhetoric in a professional context, avoiding logical fallacies and inappropriate marketing language.

2.4 The Importance of Verbs: Recognize how to choose strong verbs as the “engines” that drive efficient and effective sentences; revise passages to improve concision and flow.

For review of grammar basics, see Appendix E: Sentence Structure and Appendix F: Punctuation Rules.

To start off, complete the exercise below.

EXERCISE 2.1 Describe some differences between writing for school vs. writing for work

Writing for School Writing for Work
Purpose
Audience
Content
Document Life Span
Liability
Format & Design Elements
Writing Style

What key differences do you note between the two writing contexts? What do you think accounts for those differences?

2.1 KEY CONCEPT: Reader-Centred Writing

Writing can be conceptualized as writer-centred or reader-centred. Things like diaries and journals are primarily writer-centred, in that they are written for the benefit of the writer. Your schoolwork may also have been somewhat writer-centred, in that often your goal was to “show what you know” and thereby “get a good grade.” Technical communications require that you shift this mindset and write for the benefit of your reader—or design the content and structure of your communication for your “user.” This mindset should be informed by an understanding of your audience.  Use these guidelines and ask yourself the following questions:

Getting a clear understanding of your audience is important in communicating effectively. It also enables you to imagine your audience as you write and revise. Keep asking yourself whether what you have said would be clear to your audience. How could you say it better?

EXERCISE 2.2 Audience analysis

Choose one of the topics below. Then perform an audience analysis, using the questions above to gain an understanding of the needs of different audiences. Write a profile of your intended reader(s) and consider what sort of information they will need and why?

  1. You have been asked to write a report on Maintaining Internet Privacy for
    a) A new internet user who just signed up for internet service
    b) A start up e-commerce website developer
  2. Prepare a document on Food-born Diseases for
    a) Restaurant workers (servers and kitchen staff)
    b) For a health inspector training course
  3. Provide information on a proposed New Bus Shelter Design to
    a) Mayor’s office
    b) Contractor
    c) Newspaper reporter writing an article on the issue

Professional Tone

“Tone” refers to the attitude that a document conveys towards the topic and/or the reader. You have likely read something that sounded angry, or optimistic, or humorous, or cynical, or enthusiastic. These words characterize the tone.  Technical communication tends to avoid displaying an obvious emotion, and instead strives for a neutral tone.

Tone is created through word choice (diction), word order (syntax), sentence construction, and viewpoint. Consider a piece of academic writing that you may have read. It creates a formal tone through its use of specialized terminology, sophisticated vocabulary, complex sentence structures, and third person voice. This style suits the genre because it is directed at experts and scholars in the field, and seeks to convey complex information densely and objectively, with an emphasis on reason, logic, and evidence.

Now consider a piece of business writing that you may have read. The tone may be sightly less formal but not colloquial. The language is direct and plain, and the sentences are shorter and more straightforward. It may make use of the second person (“you”). This style suits business writing because it is directed at colleagues, management, or clients who are seeking information clearly and quickly and who may need to take action on it.

Writing Constructively

Striking the appropriate tone involves understanding your purpose, context, and audience. It also involves an understanding that workplaces are often hierarchical, and that cooperation and teamwork are required. Therefore, it is important to consider how you want your reader to feel, and what may make your reader feel that way. Your goal is to write constructively, which means to use positive phrasing to convey your message to your reader. Table 2.1.1 illustrates the differences between destructive/negative and constructive/positive feelings the reader may experience as a result of the tone used in a document.

TABLE 2.1.1 Differences between destructive/negative and constructive/positive
Negative Constructive
misunderstood understood
outraged conciliatory
disgusted pleased
guilty capable
belittled empowered
patronized respected
defensive proud
chastised valued
humiliated honoured
excluded a sense of belonging
resentment contentment

Considering how your reader may feel after reading your document is an important part of revision. Did your tone come across like you hoped it would? Could it be misconstrued? Often this is where peer reviewing can be helpful. Asking a colleague to review your document before sending it off to its intended audience is a common professional practice.

Sometimes, you will need to communicate information that is unpleasant, such as delivering bad news or rejecting a request. Communicating constructively is possible—and arguably even more important—in these situations. Regardless of message, how can you ensure you are communicating constructively?

Consider the following perspectives:

Writer-Centred (I, we) Reader-Centred (you)
If I can answer any questions, I’ll be happy to do so. If you have any questions, please ask.
We shipped the order this morning. Your order was shipped this morning.
I’m happy to report that … You’ll be glad to know that …
Negative Phrasing Constructive Phrasing
We cannot process your claim because the necessary forms have not been completed Your claim can be processed as soon as we receive the necessary forms
We do not take phone calls after 3:00pm on Fridays You try …
We closed your case because we never received the information requested in our letter of April …

EXERCISE 2.3 Revise an email for appropriate tone

A colleague has asked you to review his email before sending. What revisions to content, tone, and style would you suggest?

From:        Jake Burns
To:            J. Parsons, Project Co-ordinator
Date:        12 December 2015
Subject:   Two Problems


Hi Ms. P

Say, we may need to increase the budget on this project by $12,000. Sam screwed up when he calculated material costs. Now we don’t have enough budgeted to add the additional G3 servers with the 36GB 15k hot pluggable hard drives. I know you don’t know what all that means, but trust me. WE NEED THOSE SERVER UPGRADES!!!

Also, I would like to talk about getting my office moved closer to the rest of the IT department. All the running back and forth is disturbing other employees. I am so far away from everyone that I figure I must need to change deodorant or something. ; )

JB

EXERCISE 2.4 Revise for constructive tone

How do you think the following memo will make the recipients feel? How would you revise the following memo to more constructively address the problem?

From:     Ann Onymous
To:          All Employees
Date:       Feb. 3, 2011
Subject:   Littering


For some time now, smoking has been strictly prohibited within five metres of the Main Building entrance. Do NOT smoke anywhere near the doors!

Some of you still insist on smoking and have been doing so inside this area. As a result, the areas near the rear exit and around the picnic tables are constantly littered with smoking-related debris (filter tips, half-smoked cigarettes, empty lighters, etc.), creating an eyesore and making more work for my staff, who have to keep cleaning up this mess.

Starting Monday, sand buckets will be provided outside the read doors and in the picnic area. Use them!

For further reading, see “Communication in the Workplace: What Can NC State Students Expect?” a study based on the responses of over 1000 professionals from various fields, including engineering, on how important business, technical and scientific communication is to their work.

This work is included with permission and is licensed under a Creative Commons Attribution 4.0 International License.

2.2 Communicating with Precision

So far we have discussed the importance of writing with the reader in mind; of striking the right tone for your audience, message, and purpose; of writing constructively; and of writing persuasively. Now we move onto the actual writing itself.  Two key characteristics of professional technical communication are that it is precise and concise. This precision and concision must be evident at all levels, from the overall document, to paragraphing, to sentence structure to word choice, and even to punctuation. Every word or phrase should have a distinct and useful purpose.  If it doesn’t, cut it or revise.

The 7 Cs of Professional Writing

The 7 C’s are simply seven words that begin with C that characterize strong professional style. Applying the 7 C’s of professional communication will result in writing that is

CLEAR writing involves knowing what you want to say before you say it because often a lack of clarity comes from unclear thinking or poor planning; this, unfortunately, leads to confused or annoyed readers. Clear writing conveys the purpose of the document immediately to the reader; it matches vocabulary to the audience, avoiding jargon and unnecessary technical or obscure language while at the same time being precise. In clarifying your ideas, ensure that each sentence conveys one idea, and that each paragraph thoroughly develops one unified concept.

COHERENT writing ensures that the reader can easily follow your ideas and your train of thought. One idea should lead logically into the next through the use of transitional words and phrases, structural markers, planned repetition, sentences with clear subjects, headings that are clear, and effective and parallel lists. Writing that lacks coherence often sounds “choppy” and ideas seem disconnected or incomplete. Coherently connecting ideas is like building bridges between islands of thought so the reader can easily move from one idea to the next.

CONCISE writing uses the least words possible to convey the most meaning while still maintaining clarity. Avoid unnecessary padding, awkward phrasing, overuse of “to be” forms (is, are, was, were, am, be, being), long preposition strings, vagueness, unnecessary repetition and redundancy. Use active verbs whenever possible, and take the time to choose a single word rather than a long phrase or cliched expression. Think of your word count like a budget; be cost effective by making sure every word you choose does effective work for you.  Cut a word, save a buck! As William Zinsser asserts, “the secret of good writing is to strip every sentence to its cleanest components.”W. Zinsser, “Simplicity,” [Online]. Available: http://www.geo.umass.edu/faculty/wclement/Writing/zinsser.html

CONCRETE writing involves using specific, precise language to paint a picture for your readers so that they can more easily understand your ideas. If you have to explain an abstract concept or idea, try to use examples, analogies, and precise language to illustrate it. Use measurable descriptors whenever possible; avoid vague terms like “big” or “good.” Try to get your readers to “see” your ideas by using specific terms and descriptions.

CORRECT writing uses standard English punctuation, sentence structure, usage, and grammar. Being correct also means providing accurate information, as well as using the right document type and form for the task.

COMPLETE writing includes all requested information and answers all relevant questions. The more concrete and specific you are, the more likely your document will be complete as well. Review your checklist of specifications before submitting your document to its intended reader.

COURTEOUS writing entails designing a reader-friendly, easy-to-read document; using tactful language and appropriate modes of addressing the audience; and avoiding potentially offensive terminology, usage, and tone. As we have discussed in an early section, without courtesy you cannot be constructive.

In some cases, some of these might come into conflict: what if being too concise results in a tone that sounds terse, or an idea that seems incomplete? Figure 2.2.1 illustrates one method of putting all the 7Cs together.

An ordered list of all the 7Cs with summarized tips for each one. Image description available.
Figure 2.2.1 Putting all the 7Cs together Figure 2.2.1 created by Alyssa Zicari and Jenna Hildemann; used with permission [Image description]

Be mindful of the tradeoffs, and always give priority to being clear: writing that lacks clarity cannot be understood and therefore cannot achieve its purpose. Writing that adheres to the 7 C’s helps to establish your credibility as a technical professional.

EXERCISE 2.5 Revise for clarity

Remember the librarian’s “garbled memo” from the Case Studies in Chapter 1.4? Try revising it so that it adheres to the 7 Cs; make it clear, coherent, concrete and concise, while also being complete, courteous and correct.

MEMO

When workloads increase to a level requiring hours in excess of an employee’s regular duty assignment, and when such work is estimated to require a full shift of eight (8) hours or more on two (2) or more consecutive days, even though unscheduled days intervene, an employee’s tour of duty shall be altered so as to include the hours when such work must be done, unless an adverse impact would result from such employee’s absence from his previously scheduled assignment.

Sentence Variety and Length

While variety makes for interesting writing, too much of it can also reduce clarity and precision. Technical writing tends to use simple sentence structures more often than the other types. That said, simple does not necessarily mean “simplistic,” short, or lacking in density. Remember that in grammatical terms, simple just means that it has one main clause (one subject and one predicate). You can still convey quite a bit of concrete information in a simple sentence.

The other consideration for precise writing is length. Your sentences should vary in length just as they can vary in type. However, you want to avoid having too many long sentences because they take longer to read and are often more complex. That is appropriate in academic writing but less so in technical writing. The goal is to aim for an average of around 20 to 30 words per sentence. Reserve the short sentences for main points and use longer sentences for supporting points that clarify or explain cause and effect relationships. If you feel the sentence is too long, break it into two sentences. You do not want your reader to have to read a sentence twice to understand it. If you make compound or complex sentences, ensure that you use appropriate coordinating or subordinating strategies to make the relationship between clauses perfectly clear. See Appendix E to review specific information on simple, compound, and complex sentence structures.

Precise Wording

Technical writing is precise writing. Vague, overly general, hyperbolic or subjective/ambiguous terms are simply not appropriate in this genre. You do not want to choose words and phrasing that could be interpreted in more than one way. Choose words that most precisely, concisely, and accurately convey your point. Below are some guidelines and examples to follow for using precise wording.

1. Replace abstract nouns with verbs.

Verbs, more than nouns, help convey ideas concisely, so where possible, avoid using nouns derived from verbs. Often these abstract nouns end in –tion and –ment. See examples in the following chart.

Abstract Noun Verb
acquisition acquire
analysis analyze
recommendation recommend
observation observe
application apply
confirmation confirm
development develop
ability able, can
assessment assess

2. Prefer short words to long words and phrases.

The goal is to communicate directly and plainly so use short, direct words whenever possible. In other words, don’t use long words or phrases when short ones will do. Write to express, not impress.

Long Short
cognizant; be cognizant of aware, know
commence; commencement begin, beginning
utilize; utilization use (v), use (n)
inquire; make an inquiry ask
finalize; finalization complete, end
afford an opportunity to permit, allow
at this point in time now, currently
due to the fact that because, due to
has the ability to can

3. Avoid clichés.

Clichés are expressions that you have probably heard and used hundreds of times. They are over-used expressions that have largely lost their meaning and impact.

Clichés Alternatives
as plain as day plainly, obvious, clear
ballpark figure about, approximately
few and far between rare, infrequent
needless to say of course, obviously
last but not least finally, lastly
as far as ___ is concerned ?

4. Avoid cluttered constructions.

This category includes redundancies, repetitions, and “there is/are” and “it is” constructions.

Redundancies
combine/join together fill completely unite as one
finish entirely refer/return/revert back to emphasize/stress strongly
examine (closely) suddenly interrupt better/further enhance
eventually evolve over time strictly forbid rely/depend heavily
plan ahead harshly condemn protest against
completely surround on all sides estimate/approximate roughly gather/assemble together
clearly  articulate carefully consider successfully prove
future plan mutual agreement years of age
in actual fact positive benefits end result/product

5. Use accurate wording.

Sometimes this requires more words instead of fewer, so do not sacrifice clarity for concision. Make sure your words convey the meaning you intend. Avoid using words that have several possible meanings; do not leave room for ambiguity or alternate interpretations of your ideas. Keep in mind that readers of technical writing tend to choose literal meanings, so avoid figurative language that might be confusing (for example, using the word “decent” to describe something you like or think is good). Separate facts from opinions by using phrases like “we recommend,” “we believe,” or “in our opinion.” Use consistent terminology rather than looking for synonyms that may be less precise.

Qualify statements that need qualifying, especially if there is possibility for misinterpretation. Do not overstate through the use of absolutes and intensifiers.  Avoid overusing intensifiers like “extremely,” and avoid absolutes like “never, always, all, none” as these are almost never accurate. Remember Obiwan Kenobi’s warning:

“Only a Sith deals in absolutes.”Star Wars: Episode III - Revenge of the Sith (2005). [Film]. Directed by G. Lucas

We tend to overuse qualifiers and intensifiers, so below are some that you should be aware of and consider whether you are using them effectively.

Overused Intensifiers
absolutely actually assuredly certainly clearly completely
considerably definitely effectively extremely fundamentally drastically
highly in fact incredibly inevitably indeed interestingly
markedly naturally of course particularly significantly surely
totally utterly very really remarkably tremendously
Overused Qualifiers
apparently arguably basically essentially generally hopefully
in effect in general kind of overall perhaps quite
rather relatively seemingly somewhat sort of virtually

For a comprehensive list of words and phrases that should be used with caution, see Kim Blank’s “Wordiness, Wordiness, Wordiness List.” K. G. Blank, “Wordiness list,” Department of English, University of Victoria [Online]. Available: http://web.uvic.ca/~gkblank/wordiness.html

6. Use the active voice.

The active voice emphasizes the person/thing doing the action in a sentence. For example, The outfielder throws the ball. The subject, “outfielder” actively performs the action of the verb “throw.” The passive voice emphasizes the recipient of the action. In other words, something is being done to something by somebody: The ball was thrown (by the outfielder). Passive constructions are generally wordier and often leave out the person/thing doing the action.

Active Passive
S →V →O S ←V ←O
Subject → actively does the action of the verb → to the object of the sentence Subject ← passively receives the action of the verb ← from the object
Subject → acts → on object Subject ← is acted upon ← by the object

While the passive voice has a place—particularly if you want to emphasize the receiver of an action as the subject of the sentence, or the action itself, or you want to avoid using first person—its overuse results in writing that is wordy, vague, and stuffy. When possible, use the active voice to convey who or what performs the action of the verb.

Precise writing encapsulates many of the 7 C’s; it is clear, concise, concrete, and correct. But it is also accurate and active. To write precisely and apply the 7 C’s, it is important to look critically at your sentences, perhaps in a way you may not have done before. You need to consider the design of those sentences, from the words to the phrases to the clauses, to ensure that you are communicating your message effectively.

Image descriptions

Figure 2.2.1 image description:

A priority list of the 7 Cs.

  1. Clear: Plan ahead! Know your purpose and convey your ideas in a unified manner.
  2. Coherent: Organize your thoughts in a logical, structured progression.
  3. Concise: Budget your words wisely; ensure your writing contains only what’s necessary.
  4. Concrete: Use specific and precise language, use measurable descriptors and avoid vague language.
  5. Correct: Adhere to proper grammar, punctuation, and document structure.
  6. Complete: Give all the important information and answer all relevant questions.
  7. Courteous: Format so that the document is easy to read. Use appropriate and tactful language.

[Return to Figure 2.2.1]

2

2.3 Writing To Persuade

Sometimes, you may want to persuade your reader to take a particular action or position on an issue. To be effective, you should consider the following elements of persuasion, often referred to as Rhetorical Appeals. The ancient Greek words are ethos, pathos, logos, and kairos. These concepts are still critical in rhetoric studies today (see Figure 2.3.1):

Finding the appropriate blend of appeals is critical to making a successful argument; consider that when making your case, you often have to “win both hearts and minds”—so you’ll need to appeal to both emotions and logic, do whatever you can to show the reader that you are a trustworthy source of information, and present your argument at the most opportune time. In addition to these elements, you should also be mindful of the word choice and tone so that you are presenting a persuasive argument that is also constructive and conveys the appropriate tone for your intended audience, message, and purpose.

Flow chart showing how to use appeals to logic, emotion, credibility, and timeliness to convine an audience
Figure 2.3.1 Using the rhetorical appeals to convince and audience [Image description]

Avoiding Ad-Speak

“Ad-speak” refers to the kind of language often used in advertisements.  Its aim is to convince consumers to buy something, whether they need it or not, hopefully without thinking too much about it. Because we hear this kind of rhetoric all the time, it easily becomes habit to use it ourselves. We must break this habit when communicating in professional contexts.

Ad-Speak tends to use strategies such as

As a student in a professionalizing program learning the specialized skills and developing the sense of social obligation needed to become a trusted professional, you should avoid using “sensational” language characteristic of marketing languge. Instead, when trying to persuade your reader, make sure you use quantifiable, measurable descriptors and objective language in your writing. You cannot determine how many units of “excellence” something has, or its quantifiable amount of “awesomeness,” “fantastic-ness,” or “extraordinariness.” Describing something as “incredible” literally means it’s unbelievable.  So avoid using these kinds of words shown in Figure 2.3.2.

awesome, wonderful, fantastic, outstanding, great, excellent, fabulous, ideal, shiny, marvellous, amazing, intense, tasty, decent
Figure 2.3.2 Ad-Speak Word Cloud.

Find measurable terms like “efficiency” (in time or energy use), “effectiveness” at fulfilling a specific task, measurable benefits and/or costs, or even “popularity” as measured by a survey.

Communicating Ethically

In professional writing, communicating ethically is critically important. Ethical communications involves communicating from a place of accountability, responsibility, integrity, and values. If you are communicating ethically, you are demonstrating respect for your reader, the organizations you work for and with, and the culture and context within which you work. You also foster fairness and trust through honesty. Failure to maintain integrity and ethics can result in consequences ranging from damage to reputation, loss of work, lawsuits, criminal charges, and even tragic loss of life.

This is precisely why many professional associations have guidelines that govern the ethical behavior of their membership. Two such documents that may be relevant to you are the Faculty of Engineering’s “Standards for Professional Behavior” (.pdf) and the Association of Professional Engineers and Geoscientists of BC APEGBC Code-of-Ethics (.pdf). For example, take note of the portions of the APEGBC Code of Ethics that relate specifically to ethical communication.

“Members and licensees shall act at all times with fairness, courtesy and good faith to their associates, employers, employees and clients, and with fidelity to the public needs. They shall uphold the values of truth, honesty and trustworthiness and safeguard human life and welfare and the environment…. Members and licencees shall:
  • Provide an opinion on a professional subject only when it is founded upon adequate knowledge and honest conviction;
  • Conduct themselves with fairness, courtesy and good faith towards clients, colleagues and others, give credit where it is due and accept, as well as give, honest and fair professional comment;
  • Present clearly to employers and clients the possible consequences if professional decisions or judgments are overruled or disregarded;
  • Extend public knowledge and appreciation of engineering and geoscience and protect the profession from misrepresentation and misunderstanding.”

It is important to become familiar with these standards of practice, and to consider how they impact communication practices. Remember that you are communicating in a professional context, and that comes with responsibility.  Consider the different rhetorical situations diagrammed in Figure 2.3.3, one for a marketer and one for an engineer.

Two Rhetorical triangles: one with the author as "Marketer," audience as "Consumer," and message as "Information about the product"; the other with the author as "Engineer, the audience as "clients, colleagues, etc)," and the message as "information about the design". There is some overlap between the two messages.
Figure 2.3.3 Comparison of the rhetorical situation for a marketer vs. an engineer. [Image Description]

Clearly, there may be some overlap, but there will also be significant differences based on the needs and expectations of the audience and the kind of message being delivered. We hear marketing language so often that it is easy to fall into the habit of using it, even when it’s not appropriate. Make sure you are not using “ad-speak” when trying to persuade in a professional context.

Image descriptions

Figure 2.3.1 image description:

Use rhetorical appeals to convince your audience of a claim or recommendation you’ve made or a position you’ve taken. From there, you can support your claim using different types of appeals or address and refute opposing ideas.

To support the claim, position, or recommendation, you can use different types of appeals:

When addressing and/or refuting opposing ideas, it’s okay to concede where appropriate. Conceding strengthens credibility appeal by making you seem fair-minded and unbiased. You may need to draw on credibility appeals to show that you are qualified, experienced, and a reliable, unbiased source of information.

Supporting your position using different types of appeals and addressing opposing ideas will allow you to convince your audience.

[Return to Figure 2.3.1]

Figure 2.3.3 image description:

When the marketer is the author, their audience is the consumer and their message is information about the product. When the engineer is the author, their audience could be a client or colleague, and their message is information about the design. There may be some overlap between the messages of the marketer and the engineer.

[Return to Figure 2.3.3]

2.4 The Importance of Verbs

Much of the style advice given so far revolves around the importance of verbs. Think of your sentence as a machine, and the verb as the engine that makes the machine work. Like machines, sentences can function efficiently or inefficiently, and the use of a strong verb is one way to make them work effectively. Here are some key principles regarding the effective use of verbs in your sentences. While effective sentences may occasionally deviate from the suggestions in this list, try to follow these guidelines as often as possible:

Use the verb strength chart in Table 2.4.1 as a guide to “elevate” weaker verbs (or words with implied action) in a sentence to stronger forms.

TABLE 2.4.1 Verb strength chart
[Skip Table]
Verb Forms Verb Strength Examples
Command/Imperative

STRONG

WEAK

Maintain the machine properly!

Write the report!

Active Indicative*

(S → V)

He maintains the machine regularly.

She writes reports frequently.

Active conditional

She would maintain the machine if he would let her.

He would write reports if he had more training.

Gerunds ( __ -ing)

Infinitives (to ___)

(these do not function as verbs in your sentence; actual verbs are highlighted in yellow)

While maintaining the machine, he gets quite dirty.

Report writing takes skill.

It takes a lot of time to maintain this machine.

To write effectively, one must get a sense of the audience.

Passive   (S ← V)

Passive Conditional

The machine is maintained by him.

It would be maintained by her if…

The report was written by her.

Reports would be written by him if…

Nominalizations (verbs turned into abstract nouns)

Participles (nouns or adjectives that used to be verbs)

Machine maintenance is dirty work.

A well-maintained machine is a thing of beauty.

Written work must be free of errors.

While you are not likely to use the command form very often, unless you are writing instructions, the second strongest form, Active Indicative, is the one you want to use most often (say, in about 80% of your sentences).

Part of the skill of using active verbs lies in choosing the verbs that precisely describes the action you want to convey. English speakers have become somewhat lazy in choosing a small selection of verbs most of the time (to be, to do, to get, to make, to have, to put); as a result, these often-used verbs have come to have so many possible meanings that they are almost meaningless. Try looking up “make” or “have” in the dictionary; you will see pages and pages of possible meanings! Whenever possible, avoid these bland verbs and use more precise, descriptive verbs, as indicated in Table 2.4.2.

TABLE 2.4.2 Bland vs. descriptive verbs
[Skip Table]
Bland Verbs Descriptive Verbs

Signal Verbs:

Says
States
Talks about
Discusses
Writes

Describe the rhetorical purpose behind what the author/speaker “says”:

Explains, clarifies
Describes, illustrates
Claims, argues, maintains
Asserts, stresses, emphasizes
Recommends, urges, suggests

Is, are, was, were being been

Is verb-ing

Instead of indicating what or how something “is,” describe what it DOES, by choosing a precise, active verb.

Replace progressive form (is ___ing) with  indicative form

She is describingShe describes

Get, gets

Usually too colloquial (or passive); instead you could use more specific verbs such as

Become, acquire, obtain, receive, prepare, achieve, earn, contract, catch, understand, appreciate, etc.

Do, does

Avoid using the emphatic tense in formal writing:

It does work →  it works.

I do crack when I see apostrophe errors → I crack when I see apostrophe errors.

Instead:  Perform, prepare, complete, etc.

Has, have

Has to, have to

This verb has many potential meanings! Try to find a more specific verb that “have/has” or “has to”:
  • She owns a car
  • They consume/eat a meal
  • The product includes many optional features
  • The process entails several steps

Instead of “have to” try:  Must, require, need, etc.

Make

Build, construct, erect, devise, create, design, manufacture, produce, prepare, earn, etc.

Make a recommendation → recommend
Make a promise → promise
Make a plan → plan

For more detailed information on using signal verbs when introducing quotations, see Appendix C: Integrating Source Evidence into Your Writing.

EXERCISE 2.6 Improve the following sentences by elevating the verb and cutting clutter

  1. Market share is being lost by the company, as is shown in the graph in Figure 3.
  2. A description of the product is given by the author.
  3. An investigation of the issue has been conducted by her.
  4. His task is regional database systems troubleshooting handbook preparation.
  5. While a recommendation has been made by the committee, an agreement to increase the budget will have to be approved by the committee.

EXERCISE 2.7 Revision practice

The following paragraph on The Effects of Energy Drinks does not conform to the 7Cs and contains far too many “to be” verbs. Revise this paragraph so that it has a clear topic sentence, coherent transitions, correct grammar, and concise phrasing. In particular, try to eliminate all “to be” verbs (am, is, are, was, were, being, been, be), and rephrase using strong, descriptive, active verbs. The first 7 are highlighted for you. Try to cut the word count (260) in half.
Energy Drinks are able to be consumed in many varied and different ways by people all over the world. Moreover, drinking these energy drinks is able to provide people in today’s society with the helpful benefits of increased awareness and energy. Besides, even though there are enhancements that may be present from drinking an energy drink, the negative side effects are posing more of a threat to a person than the energy boost that is able to be achieved. In a survey that was taken in the United States at an American university, it was reported that fifty one percent of participants were consuming greater than three energy drinks each month in the semester [1]. Looking at this statistic, it can be seen that a majority of students in university are drinking energy a large amount of drinks on a very regular basis. Which can be the cause of some health problems experienced by students. In the same study, it was also shown that energy drinks are capable of helping to increase energy and athletic endurance; for those who drank it. Despite the fact that there are some benefits to be had from drinking energy drinks, there is the problem of the negative side affects that are caused by the drinking of these energy drinks. However, the side affects that were commonly reported in the study are: headaches, and “energy crashes” (Smith 5). Being a potentially more severe problem than the minor problems of headaches and “crashes;” there is definitely the possibility of people which are becoming addicted to caffeine.

Here is the exercise in a Word document for you to download and revise:

Revision Exercise – Energy Drinks (.docx)

After trying the exercise, click on the link below to compare your revision to effective revisions of this passage done by other students:

Sample Revisions of Exercise 2.7 (.docx)

Table 2.4.3 sums up many key characteristics of effective professional style that you should try to avoid (poor style) and implement (effective style) while writing technical documents.

TABLE 2.4.3 Key characteristics of effective professional style
Poor Style Effective Style
Low VERB/WORD ratio per sentence High VERB/WORD ratio per sentence
Excessive ‘is/are’ verbs Concrete, descriptive verbs
Excessive passive verb constructions Active verb constructions
Abstract or vague nouns Concrete and specific nouns
Many prepositional phrases Few prepositional phrases
Subject and verb are separated by words or phrases Subject and verb are close together
Verb is near the end of the sentence Verb is near the beginning of the sentence
Main idea (subject-verb relationship) is difficult to find Main idea is clear
Sentence must be read more than once to understand it Meaning is clear the first time you read it
Long, rambling sentences Precise, specific sentences

III

3. DOCUMENT DESIGN

Document design is the “nuts and bolts” of technical writing. No matter how brilliant or important the content, if it is not formatted in way that enhances readability, it will likely not receive the attention it deserves. This section includes the information on how technical writers use formatting features to optimize readability.

Chapter 3 Learning Objectives

This chapter covers the following topics:

3.1  Readability: Understand the importance of “readability” to your technical audience, and what that looks like in technical documents.

3.2  Headings (See the Headings PowerPoint): Understand how to use headings to organize information logically to enhance readers’ comprehension.

3.3  Lists (See the Lists PowerPoint): Understand the rules for embedding various kinds of lists in your documents to emphasize key points and simplify text.

3.4  Figures and Tables (see the Visuals – Tables and Figures PowerPoint): Understand how to integrate various kinds of figures and tables into documents to effectively present visual data and images.

3.5 Style Tips: Apply revision strategies to enhance clarity and readability.

3.1 KEY CONCEPT: Readability

All documents have a purpose—to persuade, to inform, to instruct, to entertain—but the first and foremost purpose of any document is to be read. Choosing effective document design enhances the readability or usability of your document so that the target audience is more likely to get the message you want them to receive, and your document is more likely to achieve your intended purpose.

Choose document design elements that make your document “user friendly” for the target audience. Keep in mind that people do not read technical writing for pleasure; they read it because they have to; it’s part of their job. And since “time is money,” the longer it takes to read the document, the higher the “cost.” Your job as the document designer is to make their reading process as easy, clear, useful and efficient as possible by using all the tools at your disposal.

Designing a document is like designing anything else:  you must define your purpose (the goals and objectives you hope your document achieves, as well as the constraints — such as word count and format — that you must abide by), understand your audience (who will read this document and why), and choose design features that will best achieve your purpose and best suite the target audience. In essence, you must understand the Rhetorical Situation (see Chapter 1.3) in which you find yourself: Who is communicating with whom about what and why? What kind of document design and formatting can help you most effectively convey the desired message to that audience? You want to use the most effective rhetorical strategies at your disposal; document design is one of those strategies.

Genres and Conventions

As you learned in previous writing classes, readers in different contexts expect different textual features, depending on the type of document they are reading and their purpose. A reader of an online editorial can expect strongly worded arguments that may rely on inflammatory emotional language, but not be backed up with much empirical evidence;  we do not expect an online editorial to cite reliable sources in a scholarly format. In contrast, an academic reader expects the opposite: neutral, unemotional language, and plenty of empirical evidence to logically and validly support claims, with sources cited and documented in an appropriately academic bibliographical formats. These are some of the conventional expectations of the genres.

It’s not only the content and rhetorical strategies that have differing conventions; documents also differ in how they are designed and formatted. All genres of writing adhere to certain conventions, in terms of content, the style of language used to express that content, and how the content is presented visually. If you look at an online news article (or an article in an actual newspaper), you will often notice consistent formatting features.

Typical Newspaper Formatting Conventions
  • Large headlines, often using rhyme, alliteration, exaggeration or some other rhetorical device to grab attention (sometimes called “click bait”)
  • Very short paragraphs (generally 1-3 sentences long)
  • Pictures related to the article
  • A cut out box with a particularly attention-grabbing quotation from the article in larger, bolder print (to get readers interested in the article)
  • Advertisements on the side.

It is important for writers to understand the conventions of the genre in which they are writing. Conventions are the “rules” or expectations that readers/viewers have for that particular genre or medium. If you do not follow the target readers’ expectations, you run the risk of confusing them—or worse, damaging your credibility—and therefore not effectively conveying your message and fulfilling your purpose. Think of document design as “visual rhetoric.”  Make document design choices that best conform to the expectations of the genre and audience, and that most effectively convey the message you want to send.

Style Guides and Templates

In many writing contexts, style guides and templates will be available. Style guides dictate the general rules and guidelines that should be followed; templates offer specific content and formatting requirements for specific kinds of documents. Academic publishers make style guides available to prospective authors so that they know how to properly write and format documents they submit for publication. Newspapers, academic journals, organizations, and businesses often have their own “in house” style that must be followed by all writers within that organization. A company may have specific templates, for example, a Memo template, that all employees must follow, in order to ensure consistency of messaging.

You likely had a style guide to help you format your written assignments for your Academic Writing class, and in Science classes, you likely had a template to help you organize Lab Reports.

EXERCISE 3.1 List some conventions of academic formatting

Examine the formatting in Figure 3.1.1 below and list some of characteristics that adhere to academic writing format requirements that you are familiar with. It does not matter if you cannot read the text; simply examine the formatting.

An excerpt from an typical academic essay. It contains info about the student and course, a centred title, and double-spaced text with the first line of each paragraph indented
Figure 3.1.1 Page Excerpt from an Academic Essay.

Now examine the document in Figure 3.1.2. What differences do you notice? List some of the features that differ from the academic writing sample above. Consider why typical readers of technical writing would find these features desirable. Which document would you rather read?

An excerpt from a Technical Report. It includes headings and sub-headings, a figure, and lists
Figure 3.1.2 Excerpt from a Technical Report.

Technical writing makes use of several typical design features to organize information efficiently and enhance readability. These include headings, lists, figures, and tables, as well as strategic use of passive space around all of these features and text. Each company, publisher, or organization may have its own style guide to which all writers within that organization, or those wishing to contribute written material, must adhere. All work written for ENGR 120 and 240 should adhere to the ENGR 120/240 style guide. An excerpt from this style guide, listing the main formatting requirements for all assignments, is presented below.

Style Guide For ENGR 120 and 240 Written Assignments

Most workplace documents are created using Microsoft Office products (Word, Excel, and PowerPoint). This is generally industry standard, so it is crucial that you learn how to use these programs effectively to create sophisticated workplace documents.

The general specifications of technical writing documents in WORD are as follows:

Margins 1-1.5 inches on all sides
If you are binding your report, leave a 2-inch left margin
Body Text Font A serif font such as Times, Times New Roman, Cambria, etc.**
Heading Font A sans serif font such as Ariel or Calibri
Font Size 11-12 point serif font (12 is preferred) for body text
12-20 point sans serif font for headings

Generally technical writing is single spaced, the first line of each paragraph is not indented, and an extra space is placed between paragraphs. Letters and Memos are always single spaced; reports may be single, 1.5 spaced. Drafts are often double spaced to make room for comments. Paragraphs tend to be no longer than 10 lines long, and each line should avoid having more than 15-20 words.

Justify your left margin only; leave a “ragged right” edge. This is considered much more “reader friendly” than fully justified margins.  In some cases, fully justifying your left and right margins results in odd spacing between words that can be disorienting to the reader.

NOTE: For specific document elements such as title page, letter of transmittal, and table of contents, see “Engineering Co-op Work Term Report Guideline” (.pdf).

The rest of this chapter offers specific and detailed information on how and why technical writers use the following document design features:

  1. Headings: headings and subheadings provide a clearly visible organization and structure that allows readers to read selectively and preview information. There are several guidelines for font style, size and color to help design headings effectively.
  2. Lists: lists provide a way to concisely and efficiently convey information and emphasize ideas. There are several kinds of lists, each used for specific purposes.
  3. Figures and Tables: visual representations of data and concepts offer a reader a break from sentence and paragraphs, and provide additional ways to understand information.
  4. Passive Space: leaving blank spaces strategically on the page (around lists, figures, and headings, and between paragraphs) helps the reader to absorb the information in the “active” space more effectively, and helps create a visually appealing look.

** NOTE: Traditionally, serif fonts have been preferred for body text as they were considered more “readable” in paragraph form, especially in print media. However, recent research has suggested that the serif fonts are less readable for people who have visual impairments or disabilities related to perceiving written text.  In addition, sans serif fonts are considered more readable on a screen.AbilityNet, “Producing accessible materials for print and online,” [Online]. Available: https://www.abilitynet.org.uk/quality/documents/StandardofAccessibility.pdf This is one reason why Microsoft Word has changed its default body font from Cambria or Times New Roman to Calibri, which is a sans serif font. It is wise to check with the intended audience to see which is preferred.

3.2 Headings

Headings are standard features of technical documents that serve several important functions:

Effective headings use concrete, descriptive language to tell the reader what to expect from the content of each section. Avoid “function” headings when writing technical reports. Function headings are used in documents that have consistent structures, such as science lab reports, when each section must fulfill a particular function. For example,

  1. Introduction
  2. Materials
  3. Procedure/Methodology
  4. Data/Results
  5. Discussion/Conclusions
  6. References

Technical reports are usually not so strictly organized or predictable.  Readers will find it much more helpful if headings concretely describe the content of each section rather than the function.

Note the differences in the two Tables of Contents in Figure 3.2.1, each generated automatically from headings within their respective documents. Which one gives a clear idea of the content of the report?

the box on the left shows a table of contents using only function based headings (Introduction, Problem Definition, Proposed Solution, Benefits, Conclusion, Recommendation, References. Table 1. Figure 1. The box on the right contains a table of contents using descriptive headings and captions: Ski Lift Safety Issues, Deropement Problems in Tow Lifts, Propsed Rope Catcher Solution, Benefits of Implementation, Resolving the Safety Issues, Recommendation, References. Table 1. Cost breakdown for one tower installation. Figure 1. Proposed Retainment Device
Figure 3.2.1 Function-based vs Descriptive Headings. [Image description]

General Principles for Designing Headings

When designing the headings in your document, keep in mind these general principles:

SUMMARY:  DO and DON’T rules when designing headings

DO the following:

  • Use a sans serif font for your headings
  • Use descriptive (rather than functional) headings
  • Make sure there is slightly more white space above a heading than below it
  • A heading must have a block of text below it.

DON’T do the following:

  • Do not “stack” headings. Avoid stacking one heading directly below another. A heading is like a chapter title; it must have at least a sentence of information below it.  Stacked headings can indicate inefficient organization of information.
  • Do not overuse headings. Keep in mind that every sentence does not require its own heading, nor does every paragraph. Ideally, a heading should have at least one, often several, paragraphs of text below it. A heading defines a SECTION of the document. Overuse of headings indicates an inefficient organization of ideas that needs revision.
  • Do not use a heading to introduce a table, figure, or list. You must have text below a heading that introduces and explains the figure or table. A list requires a lead-in sentence to explain what this is a list of.
  • Avoid creating “lone headings” at any level of your document. In the example below, there are 2 first-level headings, 2 second-level headings, and 2 third-level headings. Having only one heading at a level is like having only one item in a list. Try to avoid it.
  • Avoid creating “widows and orphans” by leaving a heading at the bottom of the page with no body text below it. Insert a hard page break before your heading to avoid this.
  • Don’t refer to a heading as “this” in the body text below it. Begin your sentence as if the heading were not there. Never start a new section with a pronoun that refers to a previous idea.

The examples below illustrate the use of heading sizes and font types, with numbered headings and without, to show the relationship of ideas within the report. The headings were created using the Styles option in Word.

Level One Headings

First level headings should be the largest, and should be bolded. You might consider using ALL CAPS, but avoid this if the headings are along.

Level Two Headings

Second level headings should be slightly smaller or in some way distinguished from first level headings. You might consider indenting the heading and aligning the subsequent blocks of text.

Level Three Headings

Third level headings, if you use them should be further distinguished by smaller size, italicizing, and/or indenting them. And so on…

Using the Styles function in Word, as well as the Document Elements, allows you to auto-create a table of contents from the headings in your documents. These will automatically update as you revise your document and add sections, which will save you considerable time in the long run. Similarly, you can also create an automatic Table of Figures if you use the Caption function. Learning how to use these formatting tools will make your report writing much easier, and will allow you combine sections written by different team members easily and effectively. Use the tutorials in Word, or search for current online video tutorials showing how to use these tools.

1. Straw Bale Construction

Under this first level heading you will find text all about straw bale construction. It will go on for several lines. If there is a Section numbered “1”, there will also be a 2. Section. Avoid lone headings.

1.1. Post and Beam with Straw Bale Infill

This section may align directly under the previous heading, or be indented.

This will not be a lone heading; this section will have a more than one heading at this level (1.2 and maybe a 1.3).

1.1.1. Relevance

This third level heading is indented, and smaller or in italics to set it off from second level heading. Again, if you have a number 1.1.1 heading, you should have a number 1.1.2, etc.

1.1.2. Additional Third Level Heading

Text should added below each heading. Avoid stacked headings.

1.2. Additional Second Level Heading

Text, text text

2. Cinder Block Construction

More text… Make sure that you do not stack headings one on top of the other.

EXERCISE 3.2 Review questions

Answer the following review questions:

  1. As a guideline, how many headings should you use per page?
  2. What is an acceptable size range and font style for headings?
  3. What are “widows and orphans” in the context of document design?
  4. What are several purposes that headings can have in a document?
  5. What are “lone headings”? Should you use them?
  6. What are “stacked headings?”  Should you use them?
  7. What is the difference between a “function” heading and a concrete or “descriptive” heading?
  8. True or False: You should have more white space above a heading than below it.
  9. True or False: A heading can be used to introduce a figure or a list.

Further practice: 

Review a document you have written, such as a research essay, and see if you can divide it into logical sections introduced by concrete, descriptive headings.

Review the Headings PowerPoint.

Image descriptions

Figure 3.2.1 image description:

Function-based headings:

Descriptive headings:

[Return to Figure 3.2.1]

3.3 Lists

Lists, when used correctly, can be a technical writer’s—and reader’s—best friend. Lists allow you to emphasize important ideas. They also increase the readability of text by simplifying long sentences or paragraphs and adding aesthetic passive space to make reading more pleasant. However, using the wrong kind of list or poorly formatting a list can create confusion rather than enhance readability. Therefore, it is important to understand the various types of lists and how and why to use them.

Example Lead-in Sentences for Lists

Adhere to the following guidelines when creating lists of any kind:

  • Include between 2-8 items in a list. You must have at least two items in a list (or it’s not a list; it’s just an item). Avoid having more than 8 items in a list, as too many items can have the reverse effect. If you emphasize too many ideas, you end up emphasizing nothing. NASA recommends no more than 8 steps in an emergency procedure; more than 8 can be overwhelming in a crisis situation.
  • Try to avoid splitting a list over two pages if possible.
  • Avoid overusing lists. A list should always have explanatory text around it to indicate what this is a list of and why it is needed. A series of lists does not give a reader adequate information and context.
  • Adjust spacing before, after, and within lists to enhance readability. Avoid having a list of information all scrunched up into a dense block of text; this defeats the purpose of enhancing readability.
  • Capitalize the first letter of each list item.
  • Use parallel phrasing for each listed item (note that each item in this list starts with a verb that is bolded only to catch your attention, not as a style you must follow).
  • Never use a heading to introduce a list.

Each kind of list is suited for specific purposes. All lists must conform to a set of rules of construction and formatting. Learning to use the Paragraph formatting tool in Word (see Figure 3.3.1) is crucial to designing effective lists.

""
Figure 3.3.1 Screenshot of Paragraph tools in Word 2010; you can auto-create lists using the top left buttons.

NOTE: If you are making lists by hitting ENTER then TAB and then a dash, you are doing it wrong, and this will make future editing and maintaining readability very difficult if not impossible. Especially when writing documents collaboratively that will need extensive revision and editing, you must make sure to use the correct formatting tools.

Common Types of Lists

Just as bar graphs serve a different purpose than pie charts, different kinds of lists also serve different purposes. This section will describe when and how to use the following five commonly used types of lists:

Bullet Lists

Bullet lists are the most commonly used kind of list. They are effective when

Bullet list items should generally be short (a word or a phrase). If you find your bulleted items are longer than this, consider using another kind of list, such as a labeled list or a nested list.

Numbered Lists

Use numbered lists when the order of the listed items is important and ideas must be expressed in chronological order. For example, use a numbered list when you must enumerate a series of steps in instructions, or when you are introducing ideas that will be discussed in a certain order in the following text. If you have a list of more than 8 items, consider breaking up the list in two or more stages or categories (Steps in Stage 1, Steps in Stage 2, etc.).

Sample Numbered List

Revision of your document should be undertaken in 4 stages done in the following order:

  1. Check formatting for readability
  2. Review content to ensure the document contains all necessary information
  3. Edit sentence style and structure to ensure ideas are clearly and correctly expressed in a formal and precise manner
  4. Proofread for grammar, spelling, punctuation and usage errors.

NOTE:  The 4 steps in the sample numbered list each begin with a verb (check, review, edit, and proofread), indicating what the reader should do, and the numbers indicate the order in which these steps should be performed.

In-Sentence Lists

Use in-sentence lists when you want to (a) keep paragraph style, (b) to avoid having too many lists on one page, and (c) when the list items are relatively short and can be expressed in a sentence clearly without creating a run-on. The previous sentence is an example of an in-sentence list. Note that a bracketed, lower-case letter introduces each listed item.

Typically, in-sentence lists have 2-4 items. Generally avoid putting more than 4 items in this kind of list (unless they are very short), or your sentence might become difficult to read.

Labeled Lists

Use a labeled list when you are listing items that need further explanation. These can be bulleted or numbered. Start the list item with the word or term (the “label”), placed in italics (or bold) and followed by a colon. After the colon, write the explanation or amplification of the term or concept in normal body text.

Sample Labeled Lists (two formats)

The course assessment plan includes three main written assignments given in the following order:

  1. Report One: an internal proposal written in Memo format
  2. Report Two: an internal proposal written in Short Report format
  3. Report Three: A comparative recommendation report written for an external client in Long Report format.

The plan also includes two oral presentations:

  • Presentation 1: Individual or pair presentation on a technical writing topic (worth 5%)
  • Presentation 2: Team presentation giving a progress report on Report 3 (worth 10%).

Make sure the label portions (before the colon) are phrased consistently and either italicized or bolded for emphasis; try to make the explanations that follow roughly equal in length and detail.

Nested Lists

A “nested” list is a list-within-a-list or a list with sub-listed items. These can be useful for avoiding overly long bullet lists by categorizing items into sub-lists. Note the long bullet list on the left does not effectively categorize items, so emphasis is lost. The Nested List is more effective.

Sample Bullet List (too long)
Sample Nested List

Every restaurant should contain the following beverage containers:

  • Coffee cups/mugs
  • Latte bowls
  • Tea cups
  • Travel mugs
  • Water glasses
  • Red Wine glasses
  • White wine glasses
  • Beer glasses
  • Beer steins
  • Cocktail glasses
  • Shot glasses
  • Reusable plastic cups.

(12 items is too many for one list!)

Every restaurant should contain the following kinds of beverage containers:

  • Hot beverage containers

    • Coffee mugs/cups
    • Latte bowls
    • Tea cups
    • Travel mugs
  • Cold beverage containers
    • Water glasses
    • Red wine glasses
    • White wine glasses
    • Beer glasses
    • Beer steins
    • Cocktail glasses
    • Shot glasses
    • Reusable plastic cups.

This is not an exhaustive list of the kinds of lists you may run across in your technical reading. These are simply the most common kinds of lists, and ones you should be able to identify and use effectively in your technical writing assignments to enhance readability.

A Note on Punctuating the End of List Items

Conventions for punctuating list items vary depending on the context. Legal writing tends to use more punctuation than technical writing (list items often end in semicolons and the final item is introduced by an “and”). In technical documents, because this style favors simplicity, you typically place a period only after the final item in your list. If each listed item has complete sentences within it, then you will place a period at the end of each list item. If you have a simple bullet list, you may omit the final period.

EXERCISE 3.3 Identify the document design errors in the following example

Five Kinds of List:

  1.     Bullet lists
  2. numbered lists.
  3. Lists can be written within a sentence using bracketed letters to introduce the list items.
  4. nested list
    • Also called a “list within a list”
  5. Labeled List

Integrating Lists into Body Text

Just as there are rules for constructing lists, there are rules for how to incorporate them into your text. Most importantly, a list must be introduced by a lead-in sentence (or clause) that contains both a subject and a verb. Technical writers often use the expression “the following” somewhere in the lead-in sentence to clearly indicate that a list of items will follow.

If the lead-in is a complete sentence (ie. it could end in a period), it should end in a colon that introduces the listed items. If the sentence is not a complete thought, (ie. you could not put a period there) the lead-in should not end in any punctuation, and each listed item must be able to grammatically complete the lead-in sentence.

Example Lead-in Sentences for Lists

Complete lead-in sentence (ends in a colon)

The term design project must allow students to incorporate the following elements into their solution:

  • Mechanical engineering principles
  • Electrical engineering knowledge
  • Software/programming basics.

Partial lead-in sentence (no punctuation after lead-in)

The term design project must allow students to design a solution using

  • Mechanical engineering principles
  • Electrical engineering knowledge
  • Software/programming basics.

GRAMMAR TIP: One of the most common errors found in technical reports has to do with the introduction of lists and how these are punctuated. Here are some additional examples of how—and how NOT—to introduce lists.

Don’t use a colon before a list unless the introduction to the list is a complete thought, that is, an independent clause. Remember this rule: if you can’t put a period there, then you can’t put a colon there.

In some cases, a list might not be helpful and instead might just over-complicate your document. In such cases, list your ideas in sentence form, within the paragraph, as in the final panda example below. A page with too many lists looks like an outline instead of a coherently expressed series of ideas.

Pandas have the following traits:

  • Black and white fur
  • Vegetarian diet
  • Excellent problem-solving skills.

Common characteristics of pandas include: ×

  • Black and white fur
  • Vegetarian diet
  • Excellent problem-solving skills.

Pandas are: ×

  • Black and white
  • Vegetarian
  • Intelligent.

Pandas are

  • Black and white
  • Vegetarian
  • Intelligent.

Pandas have black and white fur, eat a vegetarian diet, and can solve difficult problems.

EXERCISE 3.4 Which of the follow lead-ins should end in a colon? Which should end with no punctuation?

  1. Our solution aims to meet the following objectives
  2. The design constraints that must be considered are
  3. All proposed designs must abide by the following constraints
  4. The proposed solutions offers many tangible benefits, such as
  5. The proposed solution offers the following tangible benefits

EXERCISE 3.5 Identify the types of lists below

1. List type: 2. List type:
Revision of your document should be undertaken in 4 stages:
  1. Check formatting for readability

  2. Review content to ensure the document contains all necessary information in a logical order

  3. Edit sentence style and structure to make sure it is formal, clear, and correct

  4. Proofread for grammar, punctuation, spelling, and format errors.

The assessment plan for this course includes three main writing tasks:
  • Report 1: an internal proposal written in memo format

  • Report 2: an internal proposal written in short report format

  • Report 3: an external Comparative Recommendation Report, written in long report format.

3. List type: 4. List type:
The 7 Cs refers to seven characteristics of effective professional writing. This writing should be
  • Clear

  • Concise

  • Concrete

  • Coherent

  • Correct

  • Complete

  • Courteous.

The term design project tests your knowledge of the following principles:
  • Mechanical engineer

    • Forces

    • Torque

    • Gear trains

  • Electrical engineering

    • Sensors

    • Circuits.

EXERCISE 3.6

  1. Create your own list, using the Paragraph Tools in Word. For example, make a list of as many kinds of vehicles as you can think of, being as creative as you can. If you can think of more than 8, consider what kind of list would be most suitable.
    1. Could you categorize them into nested lists? What kind of categories?
    2. Consider what text would introduce and follow your list.
    3. What kind of document would contain a list of vehicle types? Who would read it?
  2. Read Farkas’ article on “Understanding and using PowerPoint” (.pdf)D. K. Farkas, “Understanding and using PowerPoint,” STC Annual Conference Proceedings, May 2005, pp. 313-320. and create a set of bullet-listed notes summarizing his ideas on “Criteria for Creating Bullet Points.”

Review the Lists PowerPoint.

3.4 Figures and Tables

Visual elements such as graphs, charts, tables, photographs, diagrams, and maps capture your readers’ attention and help them to understand your ideas more fully. They are like the illustrations that help tell the story. These visuals help to augment your written ideas and simplify complicated textual descriptions. They can help the reader understand a complicated process or visualize trends in the data. The key concept to remember here is that visuals clarify, illustrate, and augment your written text; they are not a replacement for written text. The old adage, “a picture is worth a thousand words” does not hold true in technical writing, but adding visuals may save you a hundred words or so of additional explanation and clarification. If you have visual elements in your document, they must be based on and supplement your written content. Throwing in “gratuitous graphics” just to decorate or take up space can confuse your reader.

yin yang symbol, put in the document randomly to illustrate the point about "gratuitous graphics"

It is important to choose the right kind of visual to convey the story you want your reader to understand. If visuals are poorly chosen or poorly designed for the task, they can actually confuse the reader and have negative consequences. For example, it’s very likely that the first thing you noticed when you opened this page was the image above. Did you wonder why is it there? Has it distracted you?

Conventions for Integrating Visuals in your Document

Each style of visual has its own conventions that you will recognize after you have seen enough of them. In addition, different publications have different style guides that dictate the specific of how to format and integrate visual elements.  In general, however, whenever you integrate any kind of visual, you should adhere to five key rules.

Five Rules for Integrating Graphics into your Document
  • Give each visual a numbered caption that includes a clear descriptive title
  • Refer to the caption number within the body text and discuss its content
  • Label all units (x and y axes, legends, column box heads, parts of diagrams, etc)
  • Provide the source of the data and/or visual image if you did not create it yourself
  • Avoid distorting the data or image.

In addition, visual elements should also be surrounded with sufficient passive space to emphasize the image and enhance its readability. If copying and pasting an image, make sure all elements are clear and the print size is readable. A visual that has been shrunk down to an unreadable size does not help the reader understand your ideas.  If at all possible, try to orient the visual image in the same direction as the body text.

Examine Figure 3.4.1 below. Do you understand what information it conveys? What is missing?

A graph with missing information. Image description available.
Figure 3.4.1 [Image Description]

If you look carefully, you might be able to guess what story this graph is telling. However, the lack of a descriptive caption and labelling of axes makes it impossible to know for sure. Compare it to Figure 3.4.2 below.

A graph that contains all of the necessary labels. Image description available.
Figure 3.4.2 Water Consumption in Edmonton during the 2010 Gold Medal Hockey Game. EPCOR, Edmonton’s Water Utility. “Water Consumption in Edmonton during 2010 Gold Medal hockey game,” Cited on Flowing Data[Online] Available:https://flowingdata.com/2010/03/09/canada-the-country-that-pees-together-stays-together/ [Image description]

Figure 3.4.2 has a numbered caption (which I have just referred to in my paragraph), a descriptive title, and it has properly labelled x and y axes and legends. It also cites the source the graph was retrieved from in the caption using an in-text citation, which is linked to a full reference below.  The original image has not been distorted in any way. Thus, it follows the five key rules listed above.

In addition to those five general rules, there are specific guidelines for implementing them. These are outlined in detail in the Faculty of Engineering Co-op Work Term Report Guideline (.pdf).

Specific Guidelines for Integrating Graphics

Terminology

Visual elements are referred to as either Tables or Figures. Tables are made up of rows and columns and the cells usually have numbers in them (but may also have words or images). Figures refer to any visual elements—graphs, charts, diagrams, photos, etc.—that are not Tables. They may be included in the main sections of the report, or if they contain supplemental material they may be contained in an appendix. Try to ensure that figures and tables are not broken over two pages. Tables that require a full page might be best put in an appendix.

Labeling Tables and Figures

Tables and figures must all be labeled with numbered captions that clearly identify and describe them.  Figure captions are generally placed below the figures, while table captions must be placed above the tables. This is because we generally read tables from the top down, and therefore want to see the caption at the top. Figures are not always read top down. When you open a page and see a figure, the first thing you want to know is “what is that?” The caption below it should immediately identify what the figure represents for the reader.  If you choose to place figure captions above the figures, do so consistently throughout your document.

Use the following conventions to assist the reader in understanding your graphics:

  • Numbering:  Table and Figures are numbered sequentially, but separately

e.g. Table 1, Table 2, Figure 1, Figure 2, Table 3, etc.

  • Captioning: After the Figure or Table number, add a descriptive caption that clearly indicate what the figure or table illustrates without having to read anything else on the page.

There are two systems for numbering figures and tables within your document:

  • Simple Consecutive Numbering: All figures and tables are numbered consecutively (Figure 1, Figure 2, Figure 3, Table 1, Table 2, Table, 3 etc.) throughout the document regardless of which section they are in.
  • Section-based Numbering: Within each section, figures and tables may be numbered sequentially through each section (e.g. Table 1.1 refers to the first table in section 1, Table 2.4 refers to the fourth table in section 2).

If a large number of illustrations are presented, the latter option is the better choice. This can become confusing, however, when using sub-sections.

If the table or figure that you present in your report was not created by you, but comes from other sources, you must include a reference for the original source in your caption: e.g.: Figure 1. Network Design [3]. You must ensure that all figures and tables represent data accurately and ethically, and that they do not distort data to create bias.

Using the Insert → Caption … function will allow Word to keep track of the Figure and Table numbering for you, and allow you to auto-create a List of Figures and Tables at the beginning of your document.

If you don’t use the Insert Caption function, then you should manually change the font of your captions to distinguish them from body text.  Caption font is usually slightly smaller than body font and is often italicized.  The numbered portion is often bolded in both the caption and in the in-paragraph reference to the figure or table.

Referring to Tables and Figures in your Text

Any figures or tables you use in your document must be discussed in your text. Use the following guidelines when discussing and referring to tables and figures:

  • Place the table/figure close to where it is first referred to in the text (preferably immediately below the paragraph in which it is first mentioned).
  • Refer to tables and figures in your text by their numbers, not their placement in the text. E.g, “See Figure 9 for a detailed schematic” (not “see the figure below”); “the test results are summarized in Table 1.”
  • When referring to a figure or table in your body text, it is helpful to place the reference in bold font.

Selecting the Right Visual

Table 3.1.1 lists common kinds of visual elements used in technical writing, along with their general purpose or description (for a more detailed discussion of how and when to use these kinds of visuals, see Graves and Graves.H. Graves and R. Graves, “Communicating through visuals,” in A Strategic Guide to Technical Communications, 2nd ed. Peterborough, ONT: Broadview Press, 2011, pp. 137-148. Notice the “box head” on the top and “stubs” on the left are bolded and centred to enhance readability. Tables that have text in the cells instead of numbers can also be referred to as figures. Thus, Table 3.1.1 could have been captioned as Figure 3.7 instead.

TABLE 3.1.1 Common types of illustrative graphics
[Skip Table]
Type of Visual Description and Purpose
Tables Place detailed data/information in categories formatted into rows and columns for comparison; use when exact figures are important. Label column headings (box heads) and/or rows (stubs).
Graphs Bar Graph Compare and contrast two or more subjects at the same point in time, or compare change over time.
Column Graph Reveal change in a subject at regular intervals of time.
Line Graph Show the degree and direction of change relative to two variables; compare items over time, show frequency or distribution, or show correlations.
Charts Pie Chart Display the number and relative size of the divisions of a subject; shows relation of parts to a whole (parts must sum to 100% to make sense).
Org. Chart Map the divisions and levels of responsibility or hierarchy within an organization.
Flow Chart Show the sequence of steps in a process or procedure.
Gantt Chart Indicates timelines for multi-stepped projects, especially used in proposals and progress reports.
Illustrations Diagram Identify the parts of a subject and their spatial or functional relationship; emphasize detail or show dimensions.
Photo Show what a subject looks like in realistic detail or show it being used.
Animation Simulate a process, operation, or incident.
Film clip Depict a process, operation, or incident in realistic detail.

For more information on how to format a long report, see the Faculty of Engineering’s “Co-op Work Term Report Guidelines.” Engineering Co-op Work Term Report Guidelines (.pdf)

EXERCISE 3.7 Design a figure to match the data

Using what you have learned about figures and tables, create two different visual representations of the data described in the following paragraph. Explain why you chose those methods and list the pros and cons of each:

We surveyed the students in 3 sections of ENGR 240 (total of 100 students) to gauge which aspect of the writing process they found most challenging: Pre-writing, Drafting, or Revising. The results among the 3 sections were consistent. Overall 50% of students said that they found the Pre-writing stage to be the most challenging, while 28% found the Drafting stage most difficult and 22% said the Revision stage was most challenging (see Figure 1). These results suggest that we should place more emphasis on teaching and practicing pre-writing strategies during the course.

[create a Figure 1 and a descriptive caption that illustrates the data above]

Additional Resources

Review the Visuals – Tables and Figures in Reports PowerPoint.

For a look at how professionals can animate data, check out Hans Rosling’s “The Joy of Stats” on YouTube [Online].

Image descriptions

Figure 3.4.1 image description:

A graph with no figure number or caption and no x or y axis labels, so it is difficult to determine what point it is trying to make. It shows something rising and falling during a hockey game. This thing spikes at the end of each period and drops dramatically when Canada wins.

[Return to Figure 3.4.1]

Figure 3.4.2 image description:

A graph charting water consumption in Edmonton during the 2010 Gold Medal Hockey Game. The graphs shows spikes in water consumption at the end of each period, followed by very low usage periods, especially near the end of the 3rd period, and between the end of the game and the medal ceremony. It also has a line depicting water usage the previous day, which was fairly steady throughout the day.

[Return to Figure 3.4.2]

3.5 Style Tips: Revising to Enhance Readability

Anything that you write is designed to be read. That is its first and foremost purpose. Thus, increasing readability means increasing the functionality of your document in terms of both content and document design—making it “user friendly.” If your document is difficult to read because vocabulary, sentence structure, paragraphing, organization, or formatting is unclear, your reader will likely stop reading.

The Revision Checklist below offers a step-by-step process for revising your document to achieve a readable style. It incorporates key information fromChapter 2: Professional Style and Chapter 3: Document Design. Implementing this checklist means doing several “passes” over your document, looking at different aspects each time. For example, in your “first pass,” review the entire document for overall formatting, content requirements, coherent flow of information, and appropriate tone.

Revision Checklist

1. First Pass: Document-level Review

  • Review specifications to ensure that you have included all required content.
  • Make sure your title, headings, subheading, and table/figure labels are clear and descriptive. Headings should clearly and efficiently indicate the content of that section; Figure and Table captions should clearly describe the content of the visual.
  • Make sure visual elements have appropriate passive space around them.
  • Make sure ideas flow in a logical order and explanations come in a timely manner. Make sure visuals illustrate your textual information.
  • Write “Reader-Centred” prose: determine the relationship between your purpose in writing and your reader’s purpose in reading. Give your readers the information they want and need to get from your document as efficiently as possible.
  • Make sure you are using an appropriate tone (neutral, objective, constructive, formal)

2. Second Pass: Paragraph-level Review

  • Make sure each paragraph begins with a topic sentence that previews and/or summarizes the content to come.
  • Add coherent transitions to link one sentence logically to the next.
  • Cut unnecessary or irrelevant information.
  • Avoid overly long or short paragraphs (5-10 lines long is a reasonable guideline).

3. Third Pass: Sentence-level Review

  • Watch sentence length; consider revising sentences longer than 25 words. Vary the length and structure of sentences.
  • Look at the ratio of verbs:number of words per sentence. Generally, the more verbs/words in the sentence, the better the sentence.
  • Use concrete, strong, active verbs – avoid vague, passive, verbs and “is/are/was/were/being” whenever feasible (move the –tion and –ment words up the verb scale).
  • Create a clear Actor/Action relationship (Subject-Verb).
  • Verbs like “make” “do” ‘have” and “get” have many possible meanings. Try to find more precise ones.
  • In general, keep subject and verb close together, and keep verb near the beginning of the sentence.

4. Fourth Pass: Word-level Review

  • Use concrete, specific, precise words; avoid vague, abstract, generalizing words.
  • Match your vocabulary to your audience: experts can tolerate complex information with a lot of terminology; general readers require simpler, less detailed descriptions/explanations.
  • Use clear, plain language rather than pompous diction; write to express, not impress.
  • Avoid “sound bite” phrases that have no real meaning; use a single word instead of a phrase whenever possible.
  • Avoid clichés, colloquial expressions, and slang.
  • Use second person (you) pronouns carefully and sparingly.
  • Avoid “ad speak” — don’t sound like you are “selling” something; use objective, measurable descriptors.

If your document incorporates sources, you will want to do an additional “pass” to make sure that all sources are cited properly and in chronological order in the body text, and that they all cross-reference to your list of references at the end of the document. See Chapter 6: Citing and Documenting in IEEE Style for details.

IV

4. TEAMWORK AND COMMUNICATION

As companion reading to this chapter that offers a comprehensive discussion of how to work effectively in teams, I recommend reading the sections called “Introduction to Teamwork” and “Project Management” in Designing Engineers: An Introductory Text, by Susan McCahan et al.S. McCahan, P. Anderson, M. Kortschot, P. E. Weiss, and K. A. Woodhouse, “Introduction to teamwork,” in Designing Engineers: An Introductory Text, Hoboken, NJ: Wiley, 2015, pp. 219-246..

Learning Objectives

This section contains the following chapters with the following learning objectives:

4.1 Team Project Management Tools and Strategies: Understand how to use strategies and documents, such as Team Charters, Agendas, Minutes, Work Logs to facilitate effective teamwork.

4.2 Models for Understanding Team Dynamics: Understand various models of team dynamics, and reflect on how you might apply them to help you and your team mates resolve conflicts and work productively.

4.3 Collaborative Writing: Understand the processes and strategies for writing collaboratively, and reflect on what works for your team.

4.1 Team Project Management Tools and Strategies

Suzan Last and Candice Neveu

Teamwork is a key component of almost any workplace, but it is essential in engineering and software development environments where you often find yourself working as part of a team on large projects. Imagine for a moment how many people must work together to designs a product like Skyrim (click here if you want to know: Skyrim development team).

It is is widely accepted that team synergy and team intelligence lead to greater efficiency and better results in most situations. Why, then, are some people reluctant to engage in teamwork? Perhaps this reluctance stems from ineffective or dysfunctional teamwork experiences in the past. Often the culprit in these situations is not a “poor team player” or an “inability to get along with others.” More likely it was caused by one of two things:  misaligned goals or confusion over roles. For teamwork to be effective, all members of the team must understand and share the goals of the project, and all members must fully understand their roles—what is expected of them, and how they will be held accountable. An effective team leader will make sure that goals and roles are fully understood by all team members.

“Introduction to Teamwork,” a section in Designing Engineers, by Susan McCahan et al.S. McCahan, P. Anderson, M. Kortschot, P. E. Weiss, and K. A. Woodhouse, “Introduction to teamwork,” in Designing Engineers: An Introductory Text, Hoboken, NJ: Wiley, 2015, pp. 219-246. provides a detailed description of the stages of the Tuckman Team Formation model and the need for effective communications at each stage. A team, according to McCahan et al., “is a group of people who come together to work in an interrelated manner towards a common goal.” They go on to differentiate a team from a group by noting that a team is connected by “a common purpose or goal and the reliance on the skills of all the members to meet the goal” McCahan et al., p. 220. In other words, team members see themselves as part of a collective working towards a common goal rather than individuals working on separate tasks that may lead to an end product. In order to work effectively, team members need to communicate clearly and constructively, and learn how to deal with crises and conflicts that will inevitably arise.

EXERCISE 4.1 Reflect on your previous team work experience

Think of a time when you had to work with others to produce something – a poster, presentation, document, etc. Briefly describe what the task was and then consider the following questions:

  1. What was the team’s overall goal?
  2. What was your job within the group?
  3. How were the jobs distributed?
  4. How well did your group function?  Did anyone on the team behave in ways that McCahan et al. characterize as “hitchhikers, hijackers, isolationists, and enablers”?McCahan et al., p. 243
  5. Was the outcome successful?
  6. Would you happily work with those team mates again on another project? Why or why not?
  7. How would you rate your overall experience and why?

Some common benefits of working in teams include increased productivity, increased innovation, and increased efficiency. Excellent teams have synergy that makes them more than simply the sum of their parts. The term “team intelligence” refers to the fact that collectively, teams have more knowledge and skill than the single individuals working separately. However, challenges can also arise when working in a team. Conflicts within a team do occur and often they begin as a result of poor communication and weak focus. Some ways to handle these challenges include the following:

There are several tools and strategies that teams can use to improve their functioning and productivity. Some examples include using the following documents:

There are also many software programs and apps that can help teams manage projects. Students often use Google docs to work collaboratively on a document or project. The most common one used in the workplace is Microsoft Project. However, other productivity apps can be used to great effect as well.  Slack, Wrike, and Asana are free popular web based options. Whatever tool you choose to use, it should be something that all members can access and understand.

Meeting Documents: Agendas and Minutes

What happens at team meetings should be planned and recorded for future reference. Agendas and Minutes are documents that do this. A meeting also should have a chair (the person who keeps things on track) and a recorder (who records what happened and what decisions were made). The Agenda is the plan for what you want to discuss and accomplish at the meeting. It is usually made up of a list of items, sometimes with a time frame for each item.

Sample Agenda

ENGR 240 Team Meeting Agenda

Date:

Place and time:

Members:

—————————————————-

  • Updates from each team member (progress) (5 min each)
  • Develop work plan for upcoming week (15 min)
  • Determine next meeting time (5 min)
  • Work on Milestone 3 together (45 min)
  • Matters arising

Minutes follow up on the agenda by recording what decisions were made and what important topics were discussed. One person is responsible for recording the events of the meeting, and distributing the minutes to each member (via email usually). That way, no one should forget what tasks they agreed to complete and when.

Sample Minutes

ENGR 240 Team Meeting Minutes

Thursday Feb, 15, 2016

Cle A035, 3:30-4:45

Present: Jaime, Chris, Renee

Regrets: Joe (has the flu)

—————————————————-

  • All team members have completed last week’s work plan (Joe emailed a report, as she is sick)
  • In the coming week, we plan to complete the following:
    Task Who will do it?
    1. Interview Facilities Management contact Renee
    2. Research bike share programs (Joe?)
    3. Design a survey/questionnaire Chris
    4. Do a site visit Jaime
  • Next meeting: next Thursday Feb 21, after class
  • Excellent progress during meeting; Joe will follow up on researching bike share programs.
  • Meeting adjourned 4:50

Work Logs

Work logs are common documents used in the work place (and in your Co-op Work Terms) to keep track of what work is done, by whom, and how long it took. These can be very helpful for keeping a team on track and ensuring equitable workloads. To ensure accountability, have each team member sign off on the work log.

Sample Work Log
Date Task Description Assigned to Status / Date Completed Total Time Spent


Team signatures:

Name: __________________________________

Name: __________________________________

Name: __________________________________

Name: __________________________________

The next section reviews several Models for Understanding Team Dynamics.

4.2 Five Models for Understanding Team Dynamics

An important aspect of effective teamwork entails understanding group dynamics in terms of both team situation and individual temperament. This section reviews a variety models often applied in workplaces that can help a team perform optimally and manage crises effectively.

The Tuckman Team Model

“Tuckman’s Stages of Group Development,” proposed by psychologist Bruce Tuckman in 1965,B. Tuckman, "Developmental sequence in small groups," Psychological Bulletin, vol. 63, no. 6, pp. 384-399. Available: http://dx.doi.org/10.1037/h0022100 : is one of the most famous theories of team development. It describes four stages that teams may progress through: forming, storming, norming, and performing (a 5th stage was added later:  adjourning).  According to McCahan et al., the stages move from organizing to producing, and although the stages appear linear, in fact teams may move backwards depending on events that may influence the team and the communications strategies that they use. Some teams can also stall in a stage and never fully realize their potential. Figure 4.2.1 outlines these stages. Please refer to the McCahan et al. textS. McCahan, P. Anderson, M. Kortschot, P. E. Weiss, and K. A. Woodhouse, “Introduction to teamwork,” in Designing Engineers: An Introductory Text, Hoboken, NJ: Wiley, 2015, pp. 219-246. for a more complete discussion.

circular diagram of Tuckman’s Linear Model of group development. Shows five stages: Forming, stroming, norming, performing, and adjourning.
Figure 4.2.1
The Stages of the Tuckman Model.
eCampus Ontario. “Tuckman’s Linear Model of group development”, in Communication for Business Professionals - Canadian Edition [Online]. eCampus Ontario, 2018. Available: https://ecampusontario.pressbooks.pub/commbusprofcdn/. CC-BY-SA.  

Note that at each stage, communication is a critical component of successfully moving to the next stage. The forming stage, when everyone is getting to know each other and are trying to make a good impression, is a good time to create a set of shared expectations, guidelines, or a Team Charter. A team forming activity is also a good idea to help build trust and get to know the various strengths and weaknesses of the team members. This is an orientation stage, on both an interpersonal and professional level, where preliminary boundaries and expectations are established.

The storming stage is the one most often characterized by group conflict and dysfunction. It is often where the preliminary expectations and boundaries are challenged as individuals learn more about each other’s motivations. This coincides with the “brainstorming” stage of the design process, in which each member contributes ideas that could potentially become the focus of the project. It is also the stage where team mates learn about each others’ strengths and weaknesses, and try to determine what their roles will be in the project.  Learning to harness the constructive potential of conflict and compromise in this stage is important to progressing to the next stage.

During the norming stage, if conflicts have been resolved and team mates have proved flexible, all is going well, each team member knows their role and works on their part of the project. Sometimes, people work independently in this stage, but check in with team mates frequently to make sure work flow is efficient and effective. Group cohesion ensures that everyone is responsible to the task and to each other.  Problems might arise at this stage if teammates do not fully understand their role, the team expectations, or the overall goal; revisiting the forming or storming stage may be required.

Few first-time teams reach the performing stage, as this happens when teams have worked together well on several projects, have established a synergy, and have developed systems that that make projects go smoothly and efficiently. Less time is needed to form, storm and learn to norm; performing teams can move quickly and interdependently to tackling the task at hand. Adjourning and going their separate ways can often be somewhat emotional for these teams. Figure 4.2.2Dlogo Nicoleti. “Modelo de Tuckman.png”, Wikimedia Commons, https://commons.wikimedia.org/wiki/File:Modelo_de_Tuckman.png . CC BY-SA 4.0 . depicts the trajectory of each team member during each stage.

Forming: 4 arrows pointing to the centre. Storming, 4 arrows going in various random directions. Norming: 4 arrows going in almost the same direction. Performing: 4 arrows perfectly aligned. Adjourning: 4 arrows pointing outward from the centre in the 4 cardinal directions.
Figure 4.2.2 Trajectory of team mates during each stage of the Tuckman team formation model.

DISC Model

DISC theory, developed in 1928 by Dr. William Moulton Marston (who also, as it happens, created the Wonder Woman comic series!), has evolved into a useful model for conflict management as it predicts behaviours based on four key personality traits he originally described as Dominance, Inducement, Submission, and Compliance.W. M. Marsten, Emotions of Normal People. Keegan Paul Trench Trubner and Co. Ltd., 1928; republished London: Routledge, 2002 The names of these four traits have been variously revised by others over the decades, so you might find different terms used in different contexts. The four general traits are now often described as (1) Dominance, (2) Influence/Inspiring (3) Steadiness/Supportive, and (4) Compliance/Conscientiousness (see Figure 4.2.3).

Circle separated into 4 quadrants, each with one of the DISC profiles briefly described
Figure 4.2.3 DISC Profile

Industries often use DISC assessments in professional contexts. Having some insight into your teammates’ personality traits can help when trying to resolve conflicts. General characteristics of each trait are as follows:

GRIP Model

Richard Beckhard’s GRPI model,R. Beckhard, (1972). “Optimizing team building efforts,” Journal of Contemporary Business, 1972, pp. 23–27. originally developed in 1972, has been widely adapted in sports contexts as the GRIP model (see Figure 4.2.4), outlining four interrelated components of highly effective teamwork:

A circle in 4 pieces representing each of the GRIP elements: GOALS, ROLES, INTERPERSONAL RELATIONSHIPS, AND PROCESSES
Figure 4.2.4 GRIP Model of teamwork dynamics.

Thomas-Kilmann Conflict Mode Model

Thomas and Kilmann’s modelK. W. Thomas & R. H. Kilmann, “Thomas–Kilmann Conflict Mode Instrument,” Tuxedo NY: Xicom, 1974. for handling team conflict outlines five main approaches to managing team conflict (Competing, Accommodating, Compromising, Avoiding, and Collaborating), placed in a matrix of two scales: Assertiveness—the degree to which one tries to meet one’s own needs; and Cooperativeness—degree to which one tries to satisfy the needs of other team members (See illustration).

Each approach can have both positive and negative impacts:

  1. Competing:  highly assertive, but uncooperative behaviour, characterized by the urge to “win at all costs,” dominate, and engage in power struggles. This can result in animosity, but can also spur teammates to compete constructively, which can lead to interesting innovations if well managed.
  2. Accommodating:  highly cooperative, but unassertive behaviour. This may seem like a good way to avoid conflict, but it can also lead to self-silencing of good ideas in order to appease others, which may lead to feelings of resentment.
  3. Compromising:  this approach is the most moderate in both scales, and while it might seem constructive, it can lead to dissatisfaction and mediocre progress or results. Sometimes compromise is necessary, but often, the best solution comes from a single inspirational source.
  4. Avoiding:  being unassertive and uncooperative is generally the least effective way to deal conflict, as this simply avoids the problem and neglects the need for a solution. However, when a feasible solution to a problem seems impossible, sometimes ignoring it and focusing on what is good can be the best way to just get through it.
  5. Collaborating:  being highly assertive and cooperative is the best way to find solutions that benefit the whole team and build respect.

Lencioni Model

In his 2005 book, The Five Dysfunctions of a Team, LencioniP. Lencioni, Five Dysfunctions of a Team, New York, NY:  John Wiley and Sons Inc., 2002. outlines five common problems teams experience that impact their effectiveness:

  1. Lack of trust:  if team members do not trust each other, they are unlikely to take risks or ask for help. A lack of trust means a low level of comfort that makes it difficult to communicate and perform effectively as a team
  2. Fear of conflict:  avoiding conflict can lead to an artificial “peace” at the expense of progress and innovation. Conflict is a normal part of team work and can be very productive if managed effectively.
  3. Lack of commitment:  team members do not commit to doing the work, do not follow through on decisions or tasks, do not meet deadlines, and let their teammates down, ultimately affecting the success of the whole project.
  4. Avoidance of accountability.
  5. Inattention to results:  when team members focus on their own personal goals instead of project goals, they lose sight of the expected results that actually measure the success of the project. Not focusing on the results during the process means that no one is planning how to improve those results.
    A pyramid representing the Lencioni model
    Figure 4.2.5 Lencioni Model: Five Dysfunctions of a Team

Lencioni advises tackling each dysfunction, displayed in the pyramid in Figure 4.2.5, from the bottom up. Establishing trust is a crucial first step to being able to manage conflict, achieve commitment, create accountability and focus on results.

EXERCISE 4.2 Apply these models to your experience

Apply one or more of these models to your past or current experience of teamwork:

  1. Have you engaged in the Tuckman team formation steps?
  2. Can you determine which of the DISC characteristics most closely matches your personality traits?
  3. Have you experienced a team project where misaligned goals or unclear roles had a negative impact?
  4. Do you think learning about the conflict modes or typical dysfunctions can help make your future team experiences more productive?
  5. Could you propose an alternative model for effective teamwork?

4.3 Collaborative Writing

Suzan Last and Candice Neveu

You have likely had at least one opportunity to work and write collaboratively with others, as this is an increasingly common way to work, both in school and in the workplace. The engineering design process, at least in part, entails working collaboratively to gather, organize, manage and disseminate information.S. McCahan, P. Anderson, M. Kortschot, P. E. Weiss, and K. A. Woodhouse, “Introduction to teamwork,” in Designing Engineers: An Introductory Text, Hoboken, NY: Wiley, 2015, p. 14. This information is often carefully analyzed and used to make important decisions, so it is critical that team members collaborate effectively in managing these communications tasks.

Engineers report spending a considerable amount of their time writing, and they frequently engage in collaborative writing (CW). A recent survey asked various professionals what portion of their work week was devoted to writing, collaborative writing, and international communications.J. Swartz, S. Pigg, J. Larsen, J. Helo Gonzalez, R. De Haas, and E. Wagner, "Communication in the workplace: What can NC State students expect?" Report from the Professional Writing Program, North Carolina State University, 2018. The results shown in Table 4.3.1 indicate that collaborative writing makes up a significant portion of overall writing tasks.

TABLE 4.3.1 Percentage of total work week that engineers and programmers report spending on communications tasks
Engineers Programmers
Time spent writing 35 25
Time spent planning and writing documents collaboratively 19 12
Time spent communicating internationally (across national borders) 14 18

Research has also shown that “writing in general and CW in particular have been recognized to be fundamental to most professional and academic practices in engineering.”J. Gimenez and J. Thondhlana, “Collaborative writing in Engineering: Perspectives from research and implications for undergraduate education,” European Journal of Engineering Education, vol. 37, no. 5, 2012, 471-487. DOI: http://dx.doi.org/10.1080/03043797.2012.714356  Figure 4.3.1 shows that engineers rate writing skills as extremely important to career advancement.J. Swartz, et al.

37%=Extremely important; 36%=very important; 20%=moderately important; 5%=slightly important; 2%=not at all important
Figure 4.3.1 The importance of writing for career advancement for surveyed engineers. J. Swartz, et alCC-BY 4.0.

Like any kind of teamwork, collaborative writing requires the entire team to be focused on a common objective; according to Lowry et al., an effective team “negotiates, coordinates, and communicates during the creation of a common document.”P.B. Lowry, A. Curtis, and M.R. Lowry, “Building a taxonomy and nomenclature of collaborative writing to improve interdisciplinary research and practice,” Journal of Business Communication, vol. 41, 2004, pp. 66-97. DOI: https://doi.org/10.1177/0021943603259363 The collaborative writing process, like the Tuckman team formation model, is iterative and social, meaning the team works together and moves back and forth throughout the process.

Successful collaborative writing is made easier when you understand the different strategies you can apply, how best to control the document, and the different roles people can assume. Figure 4.3.2 outlines the various activities involved at various stages of the collaborating writing process.

Four collaborative writing stages. Image description available.
Figure 4.3.2  Collaborative writing stages [Image description]

Collaborative writing strategies are methods a team uses to coordinate the writing of a collaborative document. There are five main strategies (see Table 4.3.2), each with their advantages and disadvantages. Can you think of any other benefits or limitations?

TABLE 4.3.2 Collaborative writing strategies(adapted from Lowry et al. [4])
[Skip Table]
Writing Strategy
When to Use Pros Cons
Single-author

One member writes for the entire group

For simple tasks; when little buy-in is needed; for small groups

Efficient; consistent style

May not clearly represent group’s intentions; less consensus produced

Sequential

Each member is in charge of writing a specific part and write in sequence

For asynchronous work with poor coordination; when it’s hard to meet often; for straightforward writing tasks; small groups

Easy to organize; simplifies planning

Can lose sense of group; subsequent writers may invalidate previous work; lack of consensus; version control issues

Parallel Writing: Horizontal Division

Members are in charge of writing a specific part but write in parallel. Segments are distributed randomly.

When high volume of rapid output is needed; when software can support this strategy; for easily segmented, mildly complex writing tasks; for groups with good structure and coordination; small to large groups

Efficient; high volume of output

Redundant work can be produced; writers can be blind to each other’s work; stylistic differences; doesn’t recognize individual talents well

Parallel Writing: Stratified Division

Members are in charge of writing a specific part but write in parallel. Segments are distributed based on talents or skills.

For high volume rapid output; with supporting software; for complicated, difficult to segment tasks; when people have different talents/skills; for groups with good structure and coordination; small to large groups

Efficient; high volume of quality output; better use of individual talent

Redundant work can be produced; writers can be blind to each other’s work; stylistic differences; potential information overload

Reactive Writing

Members create a document in real time, while others review, react, and adjust to each other’s changes and addition without much pre-planning or explicit coordination

Small groups; high levels of creativity; high levels of consensus on process and content

Can build creativity and consensus

Very hard to coordinate; version control issues

Document management reflects the approaches used to maintain version control of the document and describe who is responsible for it. Four main control modes are listed in Table 4.3.3, along with their pros and cons. Can you think of any more, based on your experience?

TABLE 4.3.3 Document control modes
Mode Description Pros Cons
Centralized When one person controls the document throughout the process. Can be useful for maintaining group focus and when working toward a strict deadline Non-controlling members may feel a lack of ownership or control of what goes into the document
Relay When one person at a time is in charge but the control changes in the group Democratic Less efficient
Independent When person maintains control of his/her assigned portion Useful for remote teams working on distinct parts Often requires an editor to pull it together; can reflect a group that lacks agreement.
Shared When everyone has simultaneous and equal privileges Can be highly effective; non-threatening; good for groups working F2F, who meet frequently, who have high levels of trust Can lead to conflict, especially in remote or less functional groups

Roles refer to the different hats participants might wear, depending on the activity. Table 4.3.4 describes several roles within a collaborative writing team. Which role(s) have you had in a group project? Are there ones you always seem to do? Ones that you prefer, dislike, or would like to try?

TABLE 4.3.4 Collaborative writing roles
Role Description
Writer A person who is responsible for writing a portion of the content
Consultant A person who is external to the project and has no ownership or responsibility for producing content but who offers content and process-related feedback (peer reviewers outside the team; instructor)
Editor A person who is responsible for the overall content production of the writers, and can make both style and content changes; typically has ownership of the content production
Reviewer A person, internal or external, who provides specific content feedback but is not responsible for making changes
Team Leader A person who is part of the team and may fully participate in authoring and reviewing the content, but who also leads the team through the processes, planning, rewarding, and motivating.
Facilitator A person external to the team who leads the team through processes but doesn’t give content related feedback.

EXERCISE 4.3 Follow up and reflect

Refer back to the warm-up at the start of this section. Using the tables above, analyze your example to determine the writing strategy and mode that best describes your experience, and what role(s) you took on.

How effective was the strategy that you used? Would another strategy have been more effective?

Image description

Figure 4.3.2 image description:

Four stages of collaborative writing

  1. Team Formation
    • Team introductions, getting to know each others’ skill sets
    • Team bonding, building trust
    • Operating agreements, setting expectations
  2. Team Planning
    • Review tasks to be done and roles of each team mate, create a work plan
    • Set team goals and objectives: milestones, deliverables, due dates
    • Determine processes for workflow and decision making
  3. Document Production
    • Plan the document: research, brainstorm, outline the document format and content
    • Compose a draft of the document
    • Revise: iterative revisions, consider using an outside peer reviewer
  4. Wind Up
    • Final document review to edit and approve content, organization, and style
    • Final document processing (proofreading and submitting)
    • External approval

[Return to Figure 4.3.2]

V

5. RESEARCH METHODS

Most projects you work on—whether you are developing innovative new products, planning or implementing ideas, proposing ideas, or recommending solutions—will require research. Research can save you time by determining what other similar designs/solutions have already been proposed, what has been tried and tested in the past and what the results were, what patents are already in place, and so forth. It also helps you to understand the background of your project and how it fits into a larger context. Finally, research is necessary to help you to develop and validate your ideas by showing how similar projects have had beneficial outcomes. Researching is one of the key steps in any design process.

Chapter 5 Learning Objectives

The chapter contains the following sections that will help you develop your research skills and meet the following learning objectives:

5.1 Research Terminology: understand basic terms related to conducting and disseminating various kinds of research.

5.2 Finding and Evaluating Research Sources: review various kinds of sources and how to determine their reliability, authority, and relevance as research sources in professional context.

5.3 Defining the Scope of Your Project: understand how to use various methods to refine the scope of your project and determine a focused research question for a problem-based project.

5.4 Human Research Ethics: understand the requirements and protocols for conducting primary research using human subjects (e.g.: surveys, interviews, focus groups, etc.)

5.5 Stakeholder Engagement and Consultation: Understand what stakeholders are, how to map the stakeholders related to your project, and the general types of engagement strategies commonly used in public engagement plans.


5.1 Research Terminology

Nicholas Walliman, in his handbook Research Methods: The Basics, defines research methods as “the tools and techniques for doing research.”N. Walliman, Research Methods: The Basics. New York: Routledge, 2011 These techniques include collecting, sorting, and analyzing the information and data you find. The better the tools and more comprehensive the techniques you employ, the more effective your research will be. By extension, the more effective your research is, the more credible and persuasive your argument will be.

Here are some basic terms and definitions you should be familiar with:

Research:  the systematic process of finding out more about something than you already know, ideally so that you can prove a hypothesis, produce new knowledge and understanding, and make evidence-based decisions

Research Methods:  techniques of collecting, sorting, and analyzing information/data

Data:  bits of information.

The typical kinds of research sources you will use can be grouped into three broad categories:

Data can be categorized in several ways:

Primary data

Data that have been directly observed, experienced and recorded close to the event. This is data that you might create yourself by

  • Measurement: collecting numbers indicating amounts (temperature, size, etc.)
  • Observation: with your own senses or with instruments (camera, microscope)
  • Interrogation: conducting interviews, focus groups, surveys, polls, or questionnaires
  • Participation: experience of doing or seeing something (visit the site, tour the facility, manipulate models or simulations, Beta test, etc.)

Note:  primary research done in an academic setting that includes gathering information from human subjects requires strict protocols and will likely require ethics approval. Ask your instructor for guidance and see chapter 5.4 Human Research Ethics.

Secondary Data

Comes from sources that record, analyze, and interpret primary data. It is critical to evaluate the credibility of these sources. You might find such data in

  • Academic research: refereed academic studies published in academic journals
  • Print sources: books, trade magazines, newspapers, popular media, etc.
  • Online research: popular media sources, industry websites, government websites, non-profit organizations
  • Non-written Material: TV, radio, film, such as documentaries, news, podcasts, etc.
  • Professional Documents: annual reports, production records, committee reports, survey results, etc.

Quantitative Data

Uses numbers to describe information that can be measured quantitatively. This data is used to measure, make comparisons, examine relationships, test hypotheses, explain, predict, or even control.

Qualitative Data

Uses words to record and describe the data collected; often describes people’s feelings, judgments, emotions, customs, and beliefs that can only be expressed in descriptive words, not in numbers. This includes “anecdotal data” or personal experiences.

Research methods are often categorized as quantitative, qualitative or “mixed method.” Some projects, like a science, require the use of the scientific method of inquiry, observation, quantitative data collection, analysis and conclusions to test a hypothesis. Other kinds of projects take a more deductive approach and gather both quantitative and qualitative evidence to support a position or recommendation. The research methods you choose will be determined by the goals and scope of your project, and by your intended audience’s expectations. More specific methodologies, such as ways to structure the analysis of your data, include the following:

In all cases, the way you collect, analyze, and use data must be ethical and consistent with professional standards of honesty and integrity. Lapses in integrity can not only lead to poor quality reports in an academic context (poor grades and academic dishonesty penalties), but in the workplace, these lapses can also lead to lawsuits, loss of job, and even criminal charges. Some examples of these lapses include

Failing to cite quoted, paraphrased or summarized sources properly is one of the most common lapses in academic integrity, which is why your previous academic writing class spent considerable time and effort to give you a sophisticated understanding of how and why to avoid plagiarizing, as well as the consequences of doing so. If you would like to review this information, see Appendix C: Integrating Source Evidence into Your Writing, and consult the University of Victoria Calendar entry on Academic Integrity.

5.2 Finding and Evaluating Research Sources

In this “information age” when so much information is available at our fingertips on the Internet, it is crucial to be able to critically search through the reams of information in order to select credible sources that can provide reliable and useful data to support your ideas and convince your audience. In the era of “fake news,” deliberate misinformation, and “alternative facts,” developing the skill to evaluate the credibility of sources is critical.

From your previous academic writing course, you are familiar with academic journals and how they differ from popular sources, as in Figure 5.2.1. If you would like to refresh your memory on this, watch UVic library’s video on Scholarly and Popular Sources. These contain peer-reviewed articles written by scholars, often presenting their original research, reviewing the original research of others, or performing a “meta-analysis” (an analysis of multiple studies that analyze a given topic).

Magazines like Psychology Today are popular sources. Academic journals like the Journal of Marriage and Family are scholarly
Figure 5.2.1 Examples of Popular vs Scholarly Sources.Cover images from journals are used to illustrate difference between popular and scholarly journals, and are for noncommercial, educational use only.

Scholarly articles published in academic journals are usually required sources in academic research essays; they are also an integral part of engineering projects and technical reports. Many projects require a literature review, which collects, summarizes and sometimes evaluates the work of researchers in this field whose work has been recognized as a valuable contribution to the “state of the art.” However, they are not the only kind of research you will find useful. Since you are researching in a professional field and preparing for the workplace, there are many credible kinds of sources you will draw on in a professional context. Table 5.2.1 lists several types of sources you may find useful in researching your projects.

TABLE 5.2.1 Typical research sources for technical projects
[Skip Table]
Source Type Description
Academic Journals, Conference Papers, Dissertations, etc.

Scholarly (peer-reviewed) academic sources publish primary research done by professional researchers and scholars in specialized fields, as well as reviews of that research by other specialists in the same field.

For example, the Journal of Computer and System Sciences publishes original research papers in computer science and related subjects in system science; International Journal of Robotics and Animation is one of the most highly ranked journals in the field.

Reference Works

Specialized encyclopaedias, handbooks and dictionaries can provide useful terminology and background information.

For example, the Kirk-Othmer Encyclopedia of Chemical Technology is a widely recognized authoritative source.

Do not cite Wikipedia or dictionary.com in a technical report.

Books

Chapters in Books

Books written by specialists in a given field and contain a References section can be very helpful in providing in-depth context for your ideas.

For example, Designing Engineers by Susan McCahan et al. has an excellent chapter on effective teamwork

Trade Magazines and Popular Science Magazines

Reputable trade magazines contain articles relating to current issues and innovations, and therefore they can be very useful in determining the “state of the art” or what is “cutting edge” at the moment, or finding out what current issues or controversies are affecting the industry.

Examples include Computerworld, Wired, and Popular Mechanics.

Newspapers (Journalism)

Newspaper articles and media releases can offer a sense of what journalists and people in industry think the general public should know about a given topic. Journalists report on current events and recent innovations; more in-depth “investigative journalism” explores a current issue in greater detail. Newspapers also contain editorial sections that provide personal opinions on these events and issues.

Choose well-known, reputable newspapers such as The New York Times.

Industry Websites (.com)

Commercial websites are generally intended to “sell,” so you have to select information carefully, but these websites can give you insights into a company’s “mission statement,” organization, strategic plan, current or planned projects, archived information, White Papers, technical reports, product details, costs estimates, etc.

Organization Websites (.org)

A vast array of .org sites can be very helpful in supplying data and information. These are often public service sites and are designed to share information with the public.

Government Publications and Public Sector Web Sites (.gov/.edu/.ca)

Government departments often publish reports and other documents that can be very helpful in determining public policy, regulations, and guidelines that should be followed.

Statistics Canada,Government of Canada, Statistics Canada [online]. Available: http://www.statcan.gc.ca/eng/start for example, publishes a wide range of data.

University web sites also offer a wide array of non-academic information, such as strategic plans, facilities information, etc.

Patents

You may have to distinguish your innovative idea from previously patented ideas; you can look these up and get detailed information on patented or patent-pending ideas.

Public Presentations

Public Consultation meetings and representatives from industry and government speak to various audiences about current issues and proposed projects. These can be live presentations or video presentations available on YouTube or TED talks.

Other

Can you think of some more? (Radio programs, Podcasts, Social Media, etc.)

The importance of critically evaluating your sources for authority, relevance, timeliness, and credibility cannot be overstated. Anyone can put anything on the internet; and people with strong web and document design skills can make this information look very professional and credible—even if it isn’t. Since much research is currently done online, and many sources are available electronically, developing your critical evaluation skills is crucial to finding valid, credible evidence to support and develop your ideas.  In fact, this has become such a challenging issue that there are sites like this List of Predatory Journals that regularly update its online list of journals that subvert the peer review process and simply publish for profit.

Mark Twain, supposedly quoting British Prime Minister Benjamin Disraeli, famously said, “There are three kinds of lies: lies, damned lies, and statistics.” On the other hand, H.G. Wells has been (mis)quoted as stating, “statistical thinking will one day be as necessary for efficient citizenship as the ability to read and write.”“What is the source of the H.G. Wells quote, ‘Statistical thinking will one day be as necessary for efficient citizenship as the ability to read and write/”? Quora n.d.[Online]. Available: https://www.quora.com/What-is-the-source-of-the-H-G-Wells-quote-Statistical-thinking-will-one-day-be-as-necessary-for-efficient-citizenship-as-the-ability-to-read-and-write The fact that the actual sources of both of these “quotations” are unverifiable makes their sentiments no less true. The effective use of statistics can play a critical role in influencing public opinion as well as persuading in the workplace. However, as the fame of the first quotation indicates, statistics can be used to mislead rather than accurately inform—whether intentionally or unintentionally.

When evaluating research sources and presenting your own research, be careful to critically evaluate the authority, content, and purpose of the material, using questions in Table 5.2.2.

TABLE 5.2.2 Evaluate the authority, content, and purpose of information
[Skip Table]
Authority
Researchers
Authors
Creators

Who are the researchers/authors/creators? Who is their intended audience?

What are their credentials/qualifications? What else has this author written?

Is this research funded? By whom? Who benefits?

Who has intellectual ownership of this idea? How do I cite it?

Where is this source published? What kind of publication is it?

Authoritative Sources: written by experts for a specialized audience, published in peer-reviewed journals or by respected publishers, and containing well-supported, evidence-based arguments.

Popular Sources: written for a general (or possibly niche) public audience, often in an informal or journalistic style , published in newspapers, magazines, and websites with a purpose of entertaining or promoting a product; evidence is often “soft” rather than hard.

Content

Methodology

What is the methodology of their study? Or how has evidence been collected?

Is the methodology sound? Can you find obvious flaws?

What is its scope? Does it apply to your project? How?

How recent and relevant is it? What is the publication date or last update?

Data

Is there sufficient data here to support their claims or hypotheses?

Do they offer quantitative and/or qualitative data?

Are visual representations of the data misleading or distorted in some way?

Purpose
Intended Use and Intended Audience

Why has this author presented this information to this audience?

Why am I using this source?

Will using this source bolster my credibility or undermine it?

Am I “cherry picking” – the use of inadequate or unrepresentative data that only supports my position (and ignores substantial amount of data that contradicts it)?

Could “cognitive bias” be at work here? Have I only consulted the kinds of sources I know will support my idea? Have I failed to consider alternative kinds of sources?

Am I representing the data I have collected accurately?

Are the data statistically relevant or significant?

Given the pie chart in Figure 5.2.2, if you only consulted articles that rejected global warming in a project related to that topic, you would be guilty of cherry picking and cognitive bias.

Pie chart showing that of the 13,950 peer-reviewed climate articles between 1991-2012, only 24 rejected global warming
Figure 5.2.2 The number of articles that reject global warming out of all peer-reviewed climate articles within a 21 year time period. “Why climate deniers have no credibility — in one pie chart,” DeSmog Blog [Online]. Available: https://www.desmogblog.com/2012/11/15/why-climate-deniers-have-no-credibility-science-one-pie-chart

Beware of Logical Fallacies

There are many logical fallacies that both writers and readers can fall prey to (see Table 5.2.3). It is important to use data ethically and accurately, and to apply logic correctly and validly to support your ideas.

TABLE 5.2.3 Common logical fallacies
[Skip Table]
Bandwagon Fallacy

Argument from popularity – “everyone else is doing it, so we should too!”

Hasty Generalization

Using insufficient data to come to a general conclusion.

An Australian stole my wallet; therefore, all Australians are thieves!

Unrepresentative Sample

Using data from a particular subset and generalizing to a larger set that may not share similar characteristics.

e.g.:  giving a survey to only female students under 20 and generalizing results to all students.

False Dilemma

“Either/or fallacy” – presenting only two options when there are usually more possibilities to consider

e.g.:  You’re either with us or against us.

Slippery Slope

Claiming that a single cause will lead, eventually, to exaggerated catastrophic results.

Slanted Language

Using language loaded with emotional appeal and either positive or negative connotation to manipulate the reader

False Analogy

Comparing your idea to another that is familiar to the audience but which may not have sufficient similarity to make an accurate comparison

e.g.: Governing a country is like running a business.

Post hoc, ergo prompter hoc

“After this; therefore, because of this”

e.g.A happened, then B happened; therefore, A caused B.

Just because one thing happened first, does not necessarily mean that the first thing caused the second thing.

Begging the Question

Circular argument – assuming the truth of the conclusion by its premises.

e.g.I never lie; therefore, I must be telling the truth.

Ad hominem

An attack on the person making an argument does not really invalidate that person’s argument. It might make them seem a bit less credible, but it does not dismantle the actual argument or invalidate the data.

Straw Man Argument

Making a “straw man” argument means restating the opposing idea in an inaccurately absurd or simplistic manner to more easily refute or undermine it.

Others?

There are many more… can you think of some?

For a bit of fun, check out Spurious Correlations.

We all have biases when we write or argue; however, when evaluating sources, you want to be on the look out for bias that is unfair, one-sided, or slanted. Consider whether the author has acknowledged and addressed opposing ideas, potential gaps in the research, or limits of the data. Look at the kind of language the author uses: is it slanted, strongly connotative, or emotionally manipulative? Is the supporting evidence presented logically, credibly, and ethically? Has the author cherry-picked or misrepresented sources or ideas? Does the author rely heavily on emotional appeal?

Critical thinking lies at the heart of evaluating sources. You want to be rigorous in your selection of evidence, because once you use it in your paper, it will either bolster your own credibility or undermine it.

5.3 Defining the Scope of your Project

Often, when you are first given a project, the problem is fairly general and open-ended. This allows you to approach the problem in a variety of ways, but also requires you to do some work to decide which particular approach you will take. Most projects will require careful consideration of scope.

Who is your audience? What is your purpose? What are the limitations placed on what can be expected or achieved? What are the constraints you have to work within? Clearly, no project will be relevant to all people in all places at all times. You must define the scope by considering:

Your project will first require background research to clearly define the problem you are tackling. How do you know there is a problem? What measurable impacts can you point to? What will you need to prove that this is a significant problem that needs to be addressed? Can you provide data to show the extent of the “unsatisfactory situation” and how it negatively affects people? Is there an expected goal or target that any proposed solution is expected to meet?

The process of coming up with a focused idea for your research can take many forms. Strategies for narrowing and focusing include the following:

In engineering fields, projects most often take a Problem-Solution approach. This entails clearly defining the problem in as open-ended a way as is feasible, possibly considering its causes and effects, and potentially coming up with or evaluating solution ideas.

In presenting your solution, you will have to find research to provide support for the basic premise of your research question (is this idea feasible?) and prove your hypothesis (it will be effective/beneficial). You might do this by showing that similar ideas have been implemented and/or researched in other areas, or that the ideas you are presenting are based on sound evidence. Collecting your own primary data (such as a questionnaire or site visit) may also help show how your ideas are feasible in the local community context.

Using appropriate methods and finding the right sort of research allows you to convince people that your ideas have validity and merit, and that the knowledge you have acquired or created is evidence-based. Research gives you the tools to inform and persuade by doing the following:

The first step in most projects is figuring out what you don’t know and what you need to know. Without this basic context work, it’s difficult to work your way to finding relevant sources that can help you apply and analyze information and data from sources, and synthesize them into your own argument or recommendation.

A problem-solving approach offers many ways to narrow your focus. Try creating a concept map like in Figure 5.3.1 to get a sense of the many ways you might approach your topic, and then narrow down your focus to one of those approaches. This will help you think of key words to use in your search for sources. The more you brainstorm, the more potential key words and synonyms you can come up with. The “mind map” below shows various ways to consider the larger context of your problem and find a specific area to focus on.

Hand-drawn concept map with "Climate Change" in the bubble, and several ideas radiating from it.
Figure 5.3.1 Concept map for refining a topic on climate change.[Concept Map]. [Online]. Available: http://libguides.uvic.ca/c.php?g=256802&p=3906769 [Image description]

This kind of “graphic brainstorming” can help you consider many different ways your topic can be approached. You can ask questions such as how? why? who? to further extend this exploration. Your goal here is to narrow down your focus to one “bubble” (that is perhaps 3 or 4 nodes away from your central topic node) that can afford a promising topic while limiting the scope to something you can accomplish in the given time frame and assignment specifications (word count, research requirement, goal, etc).

Clearly you can’t solve the problem of climate change in one paper or project. And no reasonable instructor or employer would expect you to. However, you might be asked to explore effective ways to reduce carbon emissions in a specific industry in a given period of time and/or geographical region. Or you might investigate whether a particular form of alternative energy would be effective in a particular situation. Even then, you would have to consider approaches. Would you recommend changing a policy or law to try to address the causes of the problem? Providing incentives to industry or consumers? Innovating a current technology or process? Creating a new technology or process? Evaluating a currently proposed solution?

Researching what other people working in this field have studied and written about can help you refine your focus and choose how you want to “participate in this conversation.” The ultimate aim is to narrow your topic enough to provide a specific question to guide your research and identify key words and terminology related to your topic. A good research question should be somewhat open ended; that is, the answer should not be a simple “yes” or “no.” The focus of your research question should allow you to provide a comprehensive answer that takes context into careful consideration.

Figure 5.3.2 shows a more specifically problem-based approach to concept mapping the general idea and finding areas of potential focus.  A good focus for a paper or project will likely be 3-4 nodes away from the central problem box.

A problem-based approach to concept mapping. Image description available
Figure 5.3.2 Refining your project scope using a problem-based approach to concept mapping. [Image description]

You generally cannot cover all of these issues in one paper or project. Try to narrow your focus so that you can research a specific aspect of the topic in-depth. Choose one specific focus (proposing a solution), and consider what other aspects must be included (defining the problem; choosing a specific demographic or geographical area to focus on).

As an example, consider the issue of Climate Change and how it might fit into each of these “narrowing your focus” categories.

Examples of Narrowing the Focus on Climate Change Topics

Define the Problem

Several years ago, research focused on defining the problem, and convincing the general public and government officials that a problem exists and is serious enough that we must start working on solutions immediately. Now, the vast majority of scientists and researchers accept that a problem exists: the climate is indeed warming and this is a problem. Ongoing research might determine ways to convince people who are not yet convinced and ways to motivate people to take the problem seriously enough to consider changing their behaviour or policies.

Identify Causes

In the last few years, there has been controversy over what the CAUSES of this problem are. Is climate change a naturally occurring, cyclical phenomenon or “anthropogenic” (human-caused)? Research has convinced most people that climate change is anthropogenic: that human consumption of fossil fuels is the main cause of climate change.

Research is ongoing about what kinds of activities (fracking, building dams, etc.) might contribute more or less to climate change. Research might also consider effective ways to modify human behaviour in order to slow down those causes.

Identify Effects

Much research currently explores the effects of climate change, and even how we can determine what specific effects can be the direct effect of climate change. This can be done from many different disciplinary approaches. For example:

  • Social justice research explores how certain groups of people (based on geography or socio-economic status) are impacted more severely than others.

  • Political theorists may explore how different government types create different kinds of policies in response to the problem.

  • In economics, researchers might try to predict how climate change may affect certain aspects of the global or local markets.

  • In psychology, researchers might explore how people respond to the idea of climate change (e.g.: stress, depression, motivation, etc.

  • Environmental researchers have numerous possible topics!  For example, how is climate change affecting a particular species in a particular region?  What impact might this have on the local ecology or human society?  How should building standards in coastal areas be adapted for climate change?      

Explore Solutions

Research questions—such as “Are Carbon Taxes and Caps an Effective Way to Reduce GHS Emissions?” and “Will Developed Nations Taxes Help Developing Countries Develop Low Carbon Technologies?”—analyze the effectiveness of proposed or currently implemented solutions. Some research compares the effectiveness of two possible solutions. Some propose new solutions (Tidal Power or AI controlled systems to enhance efficiency). Some might propose implementation of previous solutions in new contexts.

Why Project Proposals Might be Rejected

A proposal or recommendation needs research to convince the reader that the idea is worth pursuing or implementing. A project proposal could be rejected for any of the of following reasons related to insufficient research:

As you can see, research will be needed in all stages and sections of your project.

EXERCISE 5.1 Background research

Think of a problem you have recently encountered on campus – something that caused inconvenience, unnecessary cost, or some other “unsatisfactory situation” for you. What kind of research would you have to do to prove

  1. that this is a significant problem that needs solving?
  2. that it affects a large number of people, not just you?
  3. that this situation has tangible, measurable, negative consequences?

How would you convince someone in a position of authority (ie. “Decision-makers”) that they should apply time and resources to remedy this situation?

Use the relevant Library Guide ENGR 120 Library Guide [Online]. University of Victoria Library. Available :  http://libguides.uvic.ca/engr120 and ENGR 240 Library Guide [Online]. University of Victoria Library. Available: http://libguides.uvic.ca/engr240 to help you determine where you can find appropriate sources to research this problem in more depth.

Image descriptions

Figure 5.3.1 image description:

A concept map to brainstorm topics related to climate change.

Climate change

[Return to Figure 5.3.1]

Figure 5.3.2 image description:

A problem based approach to concept mapping.

What is the central problem or issue you are researching?

  1. Define the problem.
    1. Are people aware of the problem? Do you need to create awareness?
    2. Is the current situation misunderstood?
  2. Identify causes.
    1. Need to create awareness?
    2. Known causes
    3. Yet to be determined?
    4. Controversial?
  3. Identify effects.
    1. Environmental
    2. Political
    3. Social
    4. Economic
  4. Look at solutions.
    1. Propose a solution
    2. Compare or evaluate proposed solutions
    3. Critique proposed solutions
    4. Consider disciplinary approaches

[Return to Figure 5.3.2]

3

5.4 Human Research Ethics

“Primary research” is any research that you do yourself in which you collect raw data directly from the “real world” rather than from articles, books, or internet sources that have already collected and analyzed the data. If you are collecting data from human participants, you are engaging in “human research” and you must be aware of and follow strict ethical guidelines of your academic institution. Doing this is part of your responsibility to maintain academic integrity.

In Canada, any post-secondary educational institution that receives funding from one of the three federal granting bodies must ensure that all research involving humans conducted at that institution complies with the Tri-Council Policy Statement. These rules are in place to protect people and communities from potential risk or harm and to ensure ethical conduct while doing research. In some cases, your instructors may have applied for “course-based ethics approval” for students in their classes to conduct certain kinds of carefully limited research (such as surveys or interviews) for a class project or assignment. Ethics approval is generally required for research that collects data from human subjects in the following ways:

These are the most common methods used in undergraduate courses. There are many other methods, including engaging with people and their information via social media, organizing focus groups, engaging in beta-testing or prototype trials, etc. But for the purposes of your writing course, these other methods are generally not recommended because they involve additional ethical considerations for you and your instructor.

Guidelines for Students Conducting Human Research

In order to adhere to the ethical requirements involved in conducting human research for your course project, you should abide by the following ethics guidelines when recruiting participants, gaining their informed consent, and managing the data you collect.For more in-depth information, see the University of Victoria's "Human Research Ethics" page: https://www.uvic.ca/research/conduct/home/regapproval/humanethics/index.php

Ethics Guidelines for Conducting Course-Based Human Research

Recruiting Participants

When recruiting potential participants, you must give them the following information before you begin:

  • Student researcher(s) name(s):  inform them of your name and contact information
  • Affiliation:  provide a) the name of your institution, b) your course name and number, and c) your instructor’s name and contact information
  • Purpose:  describe the purpose of your research (objectives), and the benefits you hope will come from this research (overall goal).  Your research should not involve any deception (e.g.:  claiming to be gathering one kind of information, such as “do you prefer blue or green widgets?”, but actually gathering another kind, such as “what percentage of the population is blue/green color blind?”).

Informed Consent

You must gain the informed consent of the people you will be surveying, interviewing, or observing in non-public venues. This can be done using a consent form they can sign in person, or an “implied consent” statement on an electronic survey. The consent form should include all the information in the “recruiting” section above; in addition, you should

  • Inform participants that their participation is voluntary and that they may withdraw at any time without consequence, even if they have not completed the survey or interview
  • Disclose any and all risks or discomfort that participation in the study may involve, and how these risks or discomfort will be addressed
  • Ensure that all participants are adults (19 years of age or older) and fully capable of giving consent; do not recruit from vulnerable or at-risk groups, and do not collect demographic data regarding age, gender, or any other information not relevant to the study (e.g.: phone numbers, medications they are taking, whether they have a criminal records, etc.)

Managing the Data

Participants should be told what will happen to the data you gather:

  • In the case of surveys, the data is anonymous if you will not track who submitted which survey.  In anonymous surveys, let participants know that once they submit their survey, it cannot be retrieved and removed from the overall results.
  • Let survey participants know a) that your research results will be reported without their names and identifiers, b) where the data will be stored, c) how it will be “published”, and d) what will happen to the raw data once your project is complete
  • Let interview participants know how their information will be used and if their names will be included or cited.

There may be additional issues that must addressed, such as accessibility and cultural considerations, but those listed above are the most essential. If you are unsure whether a particular line of inquiry or method of data collection requires ethics approval, you should ask your instructor, and your instructor should contact the Research Ethics Office. Most importantly, you should always be completely up front and honest about what and how you are researching.

It may seem like “a lot of fuss” to go through simply to ask people whether they prefer blue widgets or green widgets, but there are important reasons for these guidelines. In the past, people posing as students have conducted “surveys” on campus for unethical reasons, asking students questions that were inappropriate and even harassing. People participating in your research need to be reassured that you are doing this for a legitimate reason, and must be able to contact the relevant faculty member or the campus research ethics office to verify that you have authority to do this research.

For larger scale research projects, such as for a capstone course, an honour’s or master’s thesis, or a dissertation, students must apply for ethics approval with their academic supervisor before doing any research involving human subjects. Failure to obtain ethics approval before conducing research may result in the data not being accepted as part of the project, thesis or program. It may  prevent work from being accepted for publication, and can result in a university audit or academic integrity investigation.

Designing a Survey

When designing a questionnaire to give to the public, you must avoid doing anything that would cause physical or emotional harm to your participants. For example, be careful how you word sensitive or controversial questions in surveys and during interviews.  Be careful to avoid inserting unintended bias or asking leading questions. You want to design questions to get meaningful and accurate responses rather than ambiguous information that is impossible to quantify or analyze. For more detailed information on how to design effective and ethical questionnaires, see Purdue University’s OWL site for information on Creating Good Interview and Survey Questions.

If you plan to conduct a survey as part of your research project, you may be asked to provide your instructor with detailed information regarding your research methodology. Commonly requested details are in the checklist below.

Course-Based Human Research Checklist

Students wishing to do human research to collect data for a class project may be asked to provide their instructor with the following information:

  • A brief description of the project in lay language that can be understood by the participants and clearly identifies that this is a course-based project; this must include the course name and number, the instructor’s name and contact information, and the names of all persons involved in collecting data for the project
  • A full description of all data collection methods, procedures, and instruments, as well as expectations regarding the amount of time required for participation; copies of any questionnaires must be provided for the instructor’s approval
  • A copy of the informed consent form, that will be read and signed by the participants (see the sample Consent Form Template)
  • A sample script you will use to explain to participants that their participation is entirely voluntary and that they can withdraw at any time, without explanation or consequences.  See Sample Participant Recruitment Scripts.
  • The means by which participants’ anonymity will be protected and data will be kept confidential
  • How the raw data, including tapes, notes and other types of data will be disposed of at the end of the project
  • The way in which the results will be presented and/or dissemination.


4

5.5 Stakeholder Engagement and Consultation

One important area of primary research undertaken when embarking on any large scale project entails “public engagement,” or stakeholder consultation. Public engagements is the broadest term used to describe the increasingly necessary process that companies, organizations, and governments must undertake to achieve a “social licence to operate.” Stakeholder engagement can range from simply informing the public about plans for a project, to engaging in more consultative practices like getting input and feedback from various groups, and even to empowering key community stakeholders in the final decision-making process.

For projects that have social, economic, and environmental impacts, stakeholder consultation is an increasingly critical part of the planning stage. Creating an understanding of how projects will affect a wide variety of stakeholders is beneficial for both the company instigating the project and the people who will be affected by it. Listening to stakeholder feedback and concerns can be helpful in identifying and mitigating risks that could otherwise slow down or even derail a project. For stakeholders, the consultation process creates an opportunity to be informed, as well as to inform the company about local contexts that may not be obvious, to raise issues and concerns, and to help shape the objectives and outcomes of the project.

What is a Stakeholder?

Stakeholders include any individual or group who may have a direct or indirect “stake” in the project – anyone who can be affected by it, or who can have an effect on the actions or decisions of the company, organization or government. They can also be people who are simply interested in the matter, but more often they are potential beneficiaries or risk-bearers. They can be internal – people from within the company or organization (owners, managers, employees, shareholders, volunteers, interns, students, etc.) – and external, such as community members or groups, investors, suppliers, consumers, policy makers, etc. Increasingly, arguments are being made for considering non-human stakeholders such as the natural environment.C. Driscoll and M. Starik, “The primordial stakeholder: Advancing the conceptual consideration of stakeholder status for the natural environment,” Journal of Business Ethics, vol. 49, no. 1, 2004, pp. 55-73. Available: https://doi.org/10.1023/B:BUSI.0000013852.62017.0e

Stakeholders can contribute significantly to the decision-making and problem-solving processes. People most affected by the problem and most directly impacted by its effects can help you

People who are attempting to solve the problem can help you

There are also people who could help solve the problem, but lack awareness of the problem or their potential role. Consultation processes help create the awareness of the project to potentially get these people involved during the early stages of the project.

Stakeholder Mapping

The more a stakeholder group will be materially affected by the proposed project, the more important it is for them to be identified, properly informed, and encourage to participate in the consultation process. It is therefore critical to determine who the various stakeholders are, as well as their level of interest in the project, the potential impact it will have on them, and power they have to shape the process and outcome. You might start by brainstorming or mind-mapping all the stakeholders you can think of. See Figure 5.5.1 as an example.

Hand-drawn concept map with 35 color-coded nodes listing stakeholders in the traffic citation system
Figure 5.5.1 Sample Brainstorm Stakeholder Map. M. Hagan, “Stakeholder mapping of traffic ticket system,” Open Law Lab [Online] Aug. 28, 2017. Available: http://www.openlawlab.com/2017/08/28/stakeholder-mapping-the-traffic-ticket-system/ . CC-BY-NC-SA 4.0.[Accessed Feb 24, 2019].

Once you have identified stakeholders who may be impacted, organize them into categories or a matrix. One standard method of organizing stakeholders is to determine which are likely to be in support of the project and which are likely to oppose it, and then determine how much power or influence each of those groups has (see Figure 5.5.2).  For example, a mayor of a community has a strong level of influence. If the mayor is in full support of the project, this stakeholder would go in the top right corner of the matrix. Someone who is deeply opposed to the project, but has little influence or power, would go at the bottom left corner.

A tool for mapping the level of support different groups have for a project in relation to their level of influence
Figure 5.5.2 Sample stakeholder mapping matrix

A matrix like this can help you determine what level of engagement is warranted:  where efforts to “consult and involve” might be most needed and most effective, or where more efforts to simply “inform” might be most useful.  You might also consider the stakeholders’ level of knowledge on the issue, level of commitment (whether in support or opposed), and resources available.

Levels of Stakeholder Engagement

There are various levels of engagement, ranging from simply informing people about what you plan to do to actively seeking consent and placing the final decision in their hands. This range, presented in Figure 5.5.3, is typically presented as a “spectrum” or continuum of engagement from the least to most amount of engagement with stakeholders.

spectrum moves from left to right: Inform, consult, involve, collaborate, empower.
Figure 5.5.3 Spectrum of public engagement

Depending on the type of project, the potential impacts and the types and needs of stakeholders, you may engage in a number of levels and strategies of engagement across this spectrum using a variety of different tools (see Table 5.5.1):

  1. Inform:  Provide stakeholders with balanced and objective information to help them understand the project, the problem, and the solution alternatives. (There is no opportunity for stakeholder input or decision-making.)
  2. Consult: Gather feedback on the information given. Level of input can range from minimal interaction (online surveys, etc) to extensive. Can be a one-time or ongoing/iterative opportunities to give feedback to be considered in the decision-making process)
  3. Involve: Work directly with stakeholders during the process to ensure that their concerns and desired outcomes are fully understood and taken into account. Final decisions are still made by the consulting organization, but with well-considered input from stakeholders.
  4. Collaborate: Partner with stakeholders at each stage of the decision-making, including developing alternative solution ideas and choosing the preferred solution together. Goal is to achieve consensus regarding decisions.
  5. Empower: Place final decision-making power in the hands of stakeholders. Voting ballots and referenda are common examples. This level of stakeholder engagement is rare and usually includes a small number of people who represent important stakeholder groups.
TABLE 5.5.1 Typical tools for public engagement
Inform Consult Involve / Collaborate / Empower
  • Public meetings
  • Briefings
  • News media
  • Public Presentations
  • Info Kiosks
  • Hotlines
  • Newsletters
  • Bulletins
  • Social media
  • Websites
  • Fact sheets
  • Arts and entertainment
  • Public meetings, hearings, workshops
  • Focus groups
  • Study circles
  • Interviews
  • Surveys
  • Opinion polls
  • Questionnaires
  • Social Media
  • Suggestion boxes
  • Comment forms
  • Consensus workshops
  • Charrettes
  • World Cafes
  • Study groups
  • Focus groups
  • Task Force
  • Think Tanks
  • Advisory boards, committees
  • Citizen panels or juries
  • Polling
  • Votes, referenda
  • Social media

Consultation Project Management Steps

There is no single “right” way of consulting with stakeholders. Each situation will be different so each consultation process will be context-specific and will require a detailed plan. A poorly planned consultation process can backfire as it can lead to a lack of trust between stakeholders and the company. Therefore, it is critical that the process be carefully mapped out in advance, and that preliminary work is done to determine the needs and goals of the process and the stakeholders involved. In particular, make sure that whatever tools you choose to use are fully accessible to all the stakeholders you plan to consult; an online survey is not much use to a community that lacks robust wifi infrastructure. Consider the following steps:

  1. Situation Assessment: Who needs to be consulted about what and why? Define internal and external stakeholders, determine their level of involvement, interest level, and potential impact, their needs and conditions for effective engagement.
  2. Goal-setting: What is your strategic purpose for consulting with stakeholders at this phase of the project? Define clear understandable goals and objectives for the role of stakeholders in the decision making process. Determine what questions, concerns, and goals the stakeholders will have and how these can be integrated into the process.
  3. Planning/Requirements: Based on situation assessment and goals, determine what engagement strategies to use and how to implement them to best achieve these goals. Ensure that strategies consider issues of accessibility and inclusivity and consider vulnerable populations. Consider legal or regulatory requirements, policies, or conditions that need to be met. Determine how you will collect, record, track, analyze and disseminate the data.
  4. Process and Event Management: keep the planned activities moving forward and on-track, and adjust strategies as needed.  Keep track of documentation.
  5. Evaluation: Design an evaluation metric to gauge the success of the engagement strategies; collect, analyze, and act on the data collected throughout the process. Determine how will you report the results of engagement process back to the stakeholders.
Stakeholder Consultation:  Communication Skills

Effective communication is the foundation of stakeholder consultation. The ability to create and distribute effective information, develop meaningful relationships, build trust, and listen to public input is essential. The basic communication skills required for any successful stakeholder engagement project include:

  • Effective Writing: The ability to create clear and concise written messages in plain language.
  • Visual Rhetoric: The ability to combine words and graphics to make complex issues understandable to a general audience.
  • Public Speaking/Presenting: The ability to present information to large audiences in a comfortable and understandable way. The ability to create effective visual information that assists the audience’s understanding.
  • Interpersonal and intercultural skills: The ability to relate to people in face-to-face situations, to make them feel comfortable and secure, and to be mindful of cultural factors that may affect interest level, accessibility, impact, values, or opinions.
  • Active listening: The ability to focus on the speaker and portray the behaviors that provide them with the time and safety needed to be heard and understood. The ability to report back accurately and fully what you have heard from participants.

Additional Resources

For more information regarding consulting with Indigenous peoples and considering gender, with specific case study examples, see Clennan’s “Stakeholder Consultation” (.pdf). R. Clennan, “Part 1: Stakeholder Consultation IFC,” [Online .pdf]. Available: https://www.ifc.org/wps/wcm/connect/5a4e740048855591b724f76a6515bb18/PartOne_StakeholderConsultation.pdf?MOD=AJPERES April 24, 2007. [Accessed Feb. 24, 2019].  The US Environmental Protection Agency (EPA) also has an online “Public Participation Guide.”EPA, “Public Participation Guide: View and Print Version,” United States Environmental Protection Agency [Online]. Available: https://www.epa.gov/international-cooperation/public-participation-guide-view-and-print-versions [Accessed Feb. 24, 2019].  For a recent and local example of a stakeholder engagement plan, see the University of Victoria’s  “Campus Greenway Engagement Plan.”University of Victoria Campus Planning and Sustainability, “Engagement plan for: The University of Victoria Grand Promenade landscape plan and design guidelines,” Campus Greenway [Online]. Available: https://www.uvic.ca/campusplanning/current-projects/campusgreenway/index.php  A significant step in this plan — a Design Charrette — was implemented in the fall of 2018; the results of that engagement activity, presented in a Summary Report (.pdf) University of Victoria Campus Planning and Sustainability, "The Grand Promenade Design Charrette: Summary Report 11.2018," Campus Greenway [Online]. Available: https://www.uvic.ca/campusplanning/current-projects/campusgreenway/index.php resulted in changes and augmentation of the original plan based on stakeholder feedback.


VI

6. CITING AND DOCUMENTING SOURCES IN IEEE STYLE

Citing and documenting your sources is a critical component of using research in your writing. It gives credit to the experts upon whom you have built your argument. From an ethical standpoint, citing correctly, accurately, and thoroughly strengthens your credibility and the validity of your ideas.

Chapter 6 Learning Objectives

This chapter will help you understand how to use IEEE style to

  • Create in-text citations that alert the reader to your use of a source
  • Effectively place in-text citations within your sentences
  • Create an informative and usable References section
  • Document various kinds of sources you may use in your documents.

It contains the following sections:

6.1 Frequently Asked Questions: on how to cite within the body of your report

6.2 Setting Up Your Reference List: Sample References for various kinds of sources

6.1 Frequently Asked Questions

1. What is IEEE Style and why do I need to use it?

The Institute of Electrical and Electronics Engineers (IEEE) Style is one of many systems for referencing (citing and documenting) sources that you have quoted, paraphrased, or summarized in your documents or presentations. Different disciplines use different styles, as they suit the needs of their users. For example,

IEEE is the generally accepted format for writing research papers and reports in technical fields, particularly in computer science. The University of Victoria’s Faculty of Engineering requires students to use IEEE style, and you must use the citation style required by your discipline or department. In your assignments and Work Term Reports, you often have to gather information, data, illustrations, theories, interpretations and facts about your assigned topic. These sources often provide the evidence or theoretical framework you need to support and develop your ideas. You must cite information and images that you retrieved from other sources to show that you have done good quality research, and to give credit for the ideas to the original author. Failing to cite the source—whether quoted, paraphrased or summarized—is plagiarism. Citing your sources correctly has the following benefits:

2. How do I cite and reference sources properly?

Citing and referencing sources is a two-part process: there is an in-text marker that directs the reader to the complete bibliographical reference at the end of the document. Both elements are essential and missing one or the other can result in plagiarism. This cross-referencing system made up of the following two elements:

  1. In-Text Citations:  when you a) refer to a source, b) quote, paraphrase or summarize a source, or c) use data or graphics from a source, you place an in-text citation referring to that source within paragraph. The citation takes the form of a number in a square bracket [1] typed inline with your sentence text (not super-scripted). Citations are numbered in chronological order as they appear in your paper. Thus, the first source that you site is [1]. The second source is [2], etc. Once a source is given a number, it always retains that number. So if you cite the first source later on in your paper, it is still (and always) cited as [1] throughout your paper.
  2. References List:  include a numbered list of all the sources you have cited in your paper, documented properly in IEEE style, at the end of your paper. A reader familiar with academic conventions will be able to tell what kinds of sources you are referencing, and will be able to find the source based on the information included.

3. In-Text Citations – Where do they go?

It can be tricky to know exactly where to place the in-text citation in your sentence. Generally, the default position for a citation is at the end of the sentence, unless placing it there would create confusion. For example, where should the citation go in the following sentence?

Smith claims that “insert a quotation here,” but other scientists argue that her conclusions are flawed.

If you place the citation for Smith at the end of the sentence, you are saying that Smith acknowledges that many scientists think her conclusions are flawed. That wouldn’t make sense. You would have to cite like this:

Smith claims that “insert a quotation here” [1], but other scientists [2]-[5] argue that her conclusions are flawed.

The citation can be placed at several places:

NOTE: Your citation should NOT go inside the quotation marks; it is not part of the quotation. However, punctuation must be placed AFTER the citation, as that citation is part of that sentence (or clause), not part of the next sentence.  For example

Author X claims “this idea is a quotation” [1]. The next sentence starts here…

Author X claims “this ideas is a quotation” [1], and I add my interpretation after.

Occasionally, some writers use IEEE citations like this (but I don’t recommend it for your university assignments or Co-op Work Term Reports):

As [1] and [5] have shown, quantum theory has many practical applications in real world settings. [2] disagrees, however, and argues that ….

This is why you must put the period AFTER the citation when a sentence ends with a citation. A citation that comes AFTER the period technically belongs to the next sentence, as [2] does in the preceding example.

4. What about page numbers for quotations?

When citing a quotation from a print source, your citation should indicate the page where that quotation can be found:

[2, p.7]. or, if referring to several consecutive page [2, pp. 7-12]

If the source is from the Internet or does not have pagination, you don’t have to indicate page numbers (or paragraph numbers).

When citing equations, figures, appendices and such, use the same format you use for citing the page number:

[3, eq. (2)]

[3, Fig. 7.2]

[3, Appendix B]

If you create your own visual (table or graph) based on the data from a source, then your citation should refer to the source. You might include a note such as

… figure data adapted from [3].

5. Do I need to keep citing the source every time I refer to it?

If you are discussing the ideas in a source at length (for example, in a summary), you do not need to cite every consecutive sentence. Cite the first time you mention the source. As long the following sentences clearly indicate that the ideas come from the same source—for example, you are using signal phrases, such as “the author further clarifies the problem by…”—you do not need to keep citing.

If you stop using signal phrases, be sure to include a citation. If you introduce material from another source or add your own analysis between references to that source, you will have to re-cite the source when you refer to it again. Always make sure your reader knows which ideas come from a source, and which come from you, and when you shift from one to the other. If in doubt, cite.

6. What if a source has more than one author?

If the source you are citing has one or two authors, use their names in your signal phrase:

If the source has three or more authors, use the name of the lead author, followed by et al., the Latin term meaning “and the others.” Like all Latin words, et al. should be italicized:

NOTE: in your Reference at the end of your paper, it is a courtesy to list the names of ALL the authors who contributed to the source (rather than using et al.). However, if there are 6 or more authors, it is acceptable to use et al. in your reference list.

7. How do I figure out what the title of an academic journal is?

 Figure 6.1.1 shows a typical .pdf file of a journal article.  It will help you determine the various elements of an academic article that must be included in your reference. Note the difference between the database (such as Elsevier, EbscoHost, JSTOR, etc) and the name of the journal.

An academic article will have information about the database, title, volume, issue, date, pages, authors, doi, and summary
Figure 6.1.1 Elements of an Academic Article.

8. How do I set up my References list?

 Different citation styles use various terms to introduce their list of references, for example, Bibliography or Works Cited. IEEE style uses the term References, or sometimes Cited References to distinguish from General References (of works that have helped to form the author’s ideas, but have not been cited in the document).

At the end of your paper, add a list of all the sources you have cited in your paper, in the order you have cited them—that is, in numerical order (not in alphabetical order). Each reference must provide thorough and complete documentation so that readers can identify the kind of source, and retrieve it if they want to read it. Section 6.2 shows the formats for many of the different kinds of sources you will likely use in your papers and projects. It is important to use the correct conventions for each type of source, as readers familiar with academic conventions will expect this, and they will be able to tell what kinds of sources you are referencing based on what information is included and how it is formatted. If you use conventions incorrectly (such as failing to italicize or use quotation marks around titles to indicate what kind of source it is), you can confuse and mislead your readers.

Format Guidelines for Setting up a REFERENCES List

Here are some general formatting guidelines for setting up your references list:

  • Create a bold heading called References, aligned with the left margin. If you are using headings, make this heading consistent with other first level headings in your document.
  • The square-bracketed numbered references should be flush with the left margin, and should form a column of their own, with the text of the references indented so the numbers are easier for the reader to see (use the “hanging indent” function to format this, or use a table with invisible grid lines).
  • Give all authors’ names (up to five), but only use the first initial. Don’t invert the order. Separate names with commas, and include the word “and” before the last author.
  • Capitalize only the first word (and the first word after a colon, as well as proper nouns) in titles of articles within journals, magazines and newspapers, chapters in books, conference papers, and reports. Only use ALL CAPS for acronyms.
  • Capitalize the first letter of all main words in the titles of books, journals, magazines and newspapers.
  • Add a space between references if you single space each reference.

If you use citation software (such as Zotero, Endnote, or Mendeley) to generate a list of references, be sure to review the references it generates for any errors. These programs are not foolproof, and it is up to you to make sure your references conform to IEEE conventions. For example, sometimes the auto-generator will give a title in ALL CAPS or the author’s full first name. You will have to revise this. They usually do not give DOIs; you may have to add these.

Sample References List

The sample References list below presents shows the preferred formatting.  Note the hanging indent that makes the numbers on the left stand out in a highly readable format.

References

[1] M. Ogot and G. Kremer, Engineering Design: A Practical Guide, Pittsburgh: Togo Press, 2004.
[2] A. B. Brown, P. D. Adams and J. A. Smith, “Improved procedure for error detection,” Can. J. of Elec. Engineers, Vol. 9, pp. 545-588, Nov. 1979.
[3] S. McCahan, P. Anderson, M. Kortschot, P. E. Weiss, and K. A. Woodhouse, “Working in Teams,” in Designing Engineers:  An Introductory Text, Hoboken, NJ: Wiley, 2015, pp. 219-260.
[4] “IEEE Style: A guide to referencing style for Murdoch University students and staff,” Murdoch University Library, 6 July, 2017. [Online]. Available: http://libguides.murdoch.edu.au/IEEE

6.2 Setting Up A Reference List - Sample Entries

Below are some examples of how to document the kinds of sources you will typically reference in your academic and technical papers. When possible, include the DOI (Digital Object Identifier) for .pdf and other documents found online through a database, and/or a URL link for other online sources.

* IEEE Reference Guide (.pdf) (2018)IEEE Editorial Style Manual, IEEE Author Centre [Online]. Available: https://ieeeauthorcenter.ieee.org/your-role-in-article-production/ieee-editorial-style-manual/ indicates that the basic guideline for citing online sources is to follow the standard citation for the print source given previously and add electronic location (URL) or the Digital Object Identifier (DOI) at the end of the citation.  Add a URL at the end of the reference if the source is available on the world wide web.  If both a URL and a DOI are available, place the DOI last.

Examples of how to reference different kinds of sources

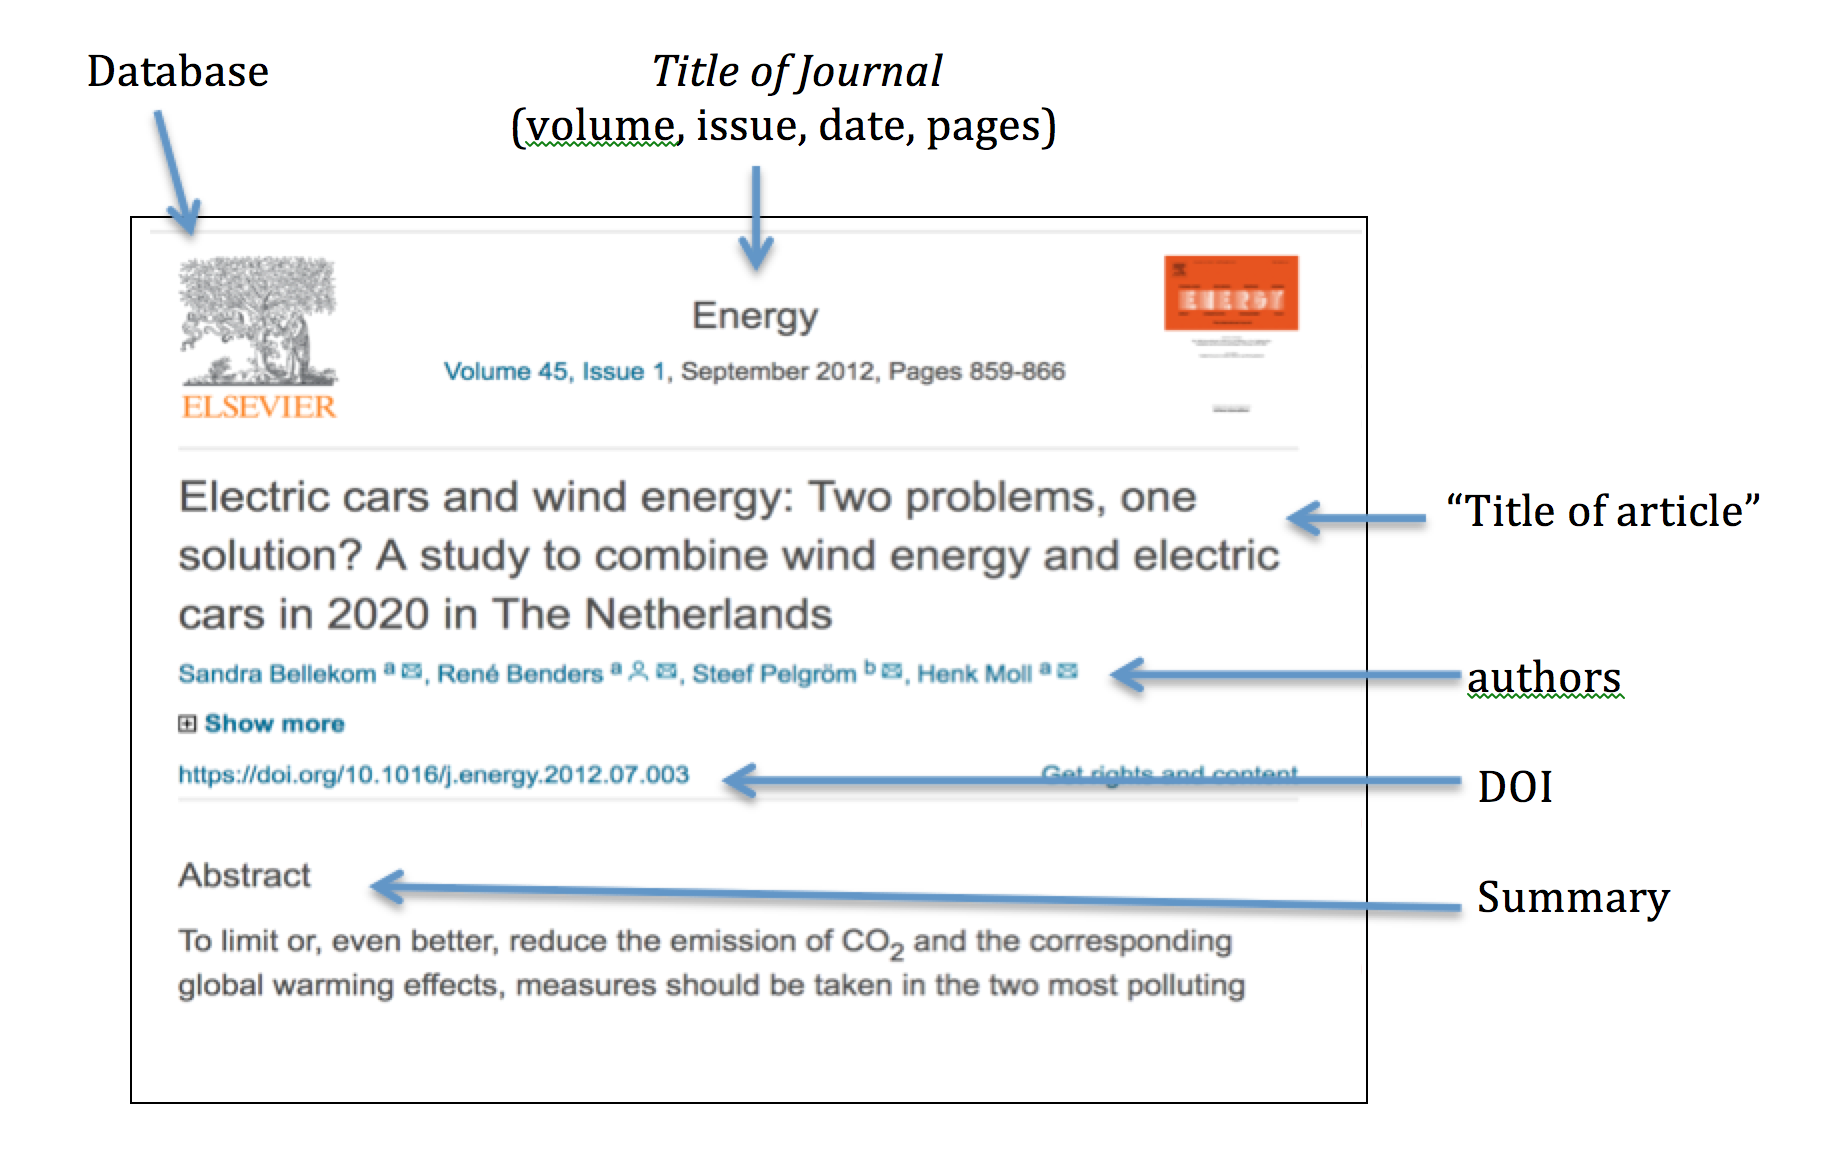
Articles from Journals and Magazines (Things that are published periodically)

Author(s), “Article title,” Journal or Magazine Title, vol. #, no. #, pp., Mo. year. DOI [If available online, add URL and/or DOI link]

Print

H. Y. Zhou and K. M. Hou, “Intelligent urban public transportation for accessibility dedicated to people with disabilities,” Sensors, vol. 12, no. 8, pp. xx-xx, Aug. 2012.

Online

M. Sakals, “Eyes in the sky: Unmanned aerial vehicles in the natural resources sector,” Innovation Magazine [Online], vol. 19, no. 5, pp. 17-19, Sept-Oct. 2015. Available: http://www.digitalityworks.com/Viewers/ViewIssue.aspx?IssueID=140&PageNo=1

Conference Paper

Author(s), “Title of paper,” Presented at Name of Conf., City of Conf., Abbrev. State/Prov., year, pp. xxx-xxx. Paper number [If available online, give URL or DOI].

M. Ibrahim, “Creative design dynamics and creative systems,” in Proc. 2009 IEEE Int. Systems Conf., Vancouver, BC, 2003, pp. 273-278. DOI: 10.1109/SYSTEMS.2009.4815811.

Newspaper Articles

Author(s), “Title of article,” Title of Newspaper, Mo. day, year, [Online]. Available: URL [Accessed: Mon. day, year].

Online

C. Wilson-Clark, “Computers ranked as key literacy,” The West Australian, March 29, 2004. [Online]. Available: http://www.thewest.com.au. [Accessed Sept. 18, 2004].

Print

B. Bart. “Going Faster.” Globe and Mail, sec. A p.1, Oct. 14, 2002.

Webpage or Website (WWW) (material only available online such as blogs, etc.)

Author(s), “Webpage Title,” Website Name [Type of medium]. Available: URL and date. [Accessed: mo. day, year].

M. Fogarty,Which versus that,Grammar Girl, Quick and Dirty Tips [Online]. Available: https://www.quickanddirtytips.com/education/grammar/which-versus-that-0. [Accessed: June 1, 2019].

“IEEE Style: A guide to referencing style for Murdoch University students and staff,” Murdoch University Library, [Online]. Available: http://libguides.murdoch.edu.au/IEEE

Book

Author(s), Title of Book. City: Publisher, year.

M. Ogot and G. Kremer, Engineering Design: A Practical Guide. Pittsburgh: Togo Press, 2004.

Chapter in a book

Author(s), “Title of Chapter,” in Title of Book. City: Publisher, year, pp.

S. McCahan, P. Anderson, M. Kortschot, P. E. Weiss, and K. A. Woodhouse, “Introduction to Teamwork,” in Designing Engineers: An Introductory Text, Hoboken: Wiley, 2015, pp. 219-260.

Technical Report (Government, Industry, Organizations)

Author(s), “Title of report,” Name of Company/Organization, City, Report. #, year. Accessed: date [Online]. Available: URL or DOI

Delcan, “Johnson Street Bridge Condition Assessment Report,” Delcan and City of Victoria, Victoria, B.C., 2009. Accessed: June 14, 2019 [Online]. Available: https://www.johnsonstreetbridge.com/wp-content/uploads/2018/01/johnson-street-bridge-condition-assessment-delcan-engineering.pdf

University of Victoria Campus Planning and Sustainability, “The Grand Promenade: Design Charrette,” Campus Greenway, Summary Report 11.2018. Accessed: May 1, 2019 [Online]. Available: https://www.uvic.ca/campusplanning/current-projects/campusgreenway/index.php

Personal Communication (interview, telephone, email, etc.)

Author, private communication, Mo. day year.

Patent

Author, “Title of patent,” U.S. Patent x xxx xxx, Mo. day, year.

J. P. Wilkinson, “Nonlinear resonant circuit devices,” U.S. Patent 3 624 125, July 16, 1990.

Lecture or Presentation

Speaker (Date), “Title of Presentation/Lecture,” Occasion and location of presentation. [Type of medium: URL if available online].

J. Dagg (Oct. 22, 2017), “Team Dynamics,” ENGR 110 Plenary Lecture, University of Victoria. [PowerPoint slides available: https://coursespaces.uvic.ca/mod/folder/view.php?id=1021973]

Lecture Notes

“Title of class notes,” class notes for Course Number, Department, University, Term, year.

“Maxwell’s equations and time-varying electromagnetic fields,” class notes for ECE 359, Department of Electrical and Computer Engineering, University of Victoria, Winter, 2015.

Reference Work (Encyclopedia, Dictionary, Handbook, etc.)

Author(s). (year). “Chapter title,” in Book Title, xth ed. [Type of medium]. Editor(s) name(s), Ed(s). Location: Publisher, mo. day, volume or chapter no. (if available), pp. Available: URL [access date].

With an author

D. Hart and A. Bauen. (2002). “Fuel cell fuel cycles,” in Fuel Cell Technology Handbook. [Online]. G. Hoogers, Ed. Boca Raton, FL: CRC Press. Available: ENGnetBASE [Accessed: Sept. 22, 2008].

A. D. French, N. R. Bertoniere, R. M. Brown, H. Chanzy, D. Gray, K. Hattori, and W. Glasser. (2003). “Cellulose” in Kirk-Othmer Encylopedia of Chemical Technology. [Online]. John Wiley & Sons, Inc. DOI: 10.1002/0471238961.0305121206180514.a01.pub2.

No author

“Composite material,” in Wikipedia, the Free Encyclopedia. [Online]. May 13, 2008. Available: http://en.wikipedia.org/w/index.php?title=Composite_material [Accessed: May 24, 2008].

Image from a print source

Similar to a chapter in a book or article in a print journal:

Creator of image, “Title of image,” in “Title of article” or Title of Book, and the rest of the required publication information for an article or book.

Images from an online source

Creator of image, if available. “Title of the image” if there is one, Web Site name, the URL, and the date of access.

Podcast

A. A. Artist, Credit, and B. B. Artist, Credit, “Title of episode,” Title of Program: Subtitle, Date of recording, year. Place of recording: Publisher. [Format]. Available: URL. [Accessed: Mo. day, year].

S. Gary, Presenter, “Mars Insight’s Drill Fails,” SpaceTime with Stuart Gary, June 12, 2019. Sydney: SpaceTime. [Podcast episode]. Available: https://megaphone.link/BIT3581656190. [Accessed June 14, 2019].

Others?

See the IEEE style guide from Murdoch University“IEEE Style: A guide to referencing style for Murdoch University students and staff,” Murdoch University Library, 18 May 2018. [Online]. Available: http://libguides.murdoch.edu.au/IEEE for helpful examples of many other kinds of sources.

Also see IEEE Reference Guide (2018) for a more complete list of various types of sources and how to reference them.

EXERCISE 6.1

Find a variety of sources (at least 5 different types) on a specific topic related to your current course project. Set up a References list for them in IEEE Style.

VII

7. COMMON DOCUMENT TYPES

Just as the literary genre of poetry contains many forms — such as sonnets, haiku, epics, limericks, etc., — each with its own set of rules and conventions, technical writing also contains many forms, and each form has some conventions that must be observed.  This chapter discusses several of the most common document forms, and reviews the general requirements for content, formatting, and style.

Chapter 7 Learning Objectives

In the following sections, you will learn about the general format, structure, and content expectations for the following types of technical documents:

7.1 Correspondence: Text Messages, E-mails, Letters, and Memos

7.2 Proposals

7.3 Progress Reports

7.4 Technical Descriptions and Definitions

7.5 Long Reports: Feasibility and Recommendation Reports

7.6 Lab Reports

7.7 Instructions

7.1 Correspondence: Text Messages, Emails, Memos, and Letters

Netiquette

Text messaging, emailing, and posting on social media in a professional context requires that you be familiar with “netiquette,” or proper etiquette for using the internet. We have all heard the news stories about people who have been fired and companies that have been boycotted for making offensive or inappropriate social media posts. People have even gone to prison for illegal use of private messaging.  The digital world may seem like a free-for-all, “wild wild west” with no clear rules or regulations; however, this is clearly a dangerous perspective for a professional to take, as the consequences for breaking tacit rules, expectations, and guidelines for professional communications can be very costly.

The way that you represent yourself in writing carries significant weight. Writing in an online environment requires tact, skill, and an awareness that what you write may be there for a very long time and may be seen by people you never considered as your intended audience. From text messages to memos to letters, from business proposals to press releases, your written business communication represents you and your company:  your goal is to make it clear, concise, constructive, and professional.

We create personal pages, post messages, and interact via online technologies as a normal part of our careers, but how we conduct ourselves can leave a lasting image, literally. The photograph you posted on your Instagram page or Twitter feed may have been seen by your potential employer, or that insensitive remark in a Facebook post may come back to haunt you later.

Guidelines for Communicating Online

Following several guidelines for online postings, as detailed below, can help you avoid embarrassment later:

  • Know your context
    • Introduce yourself
    • Avoid assumptions about your readers; remember that culture influences communication style and practices
    • Familiarize yourself with policies on Acceptable Use of IT Resources at your organization.
  • Remember the human
    • Remember there is a person behind the words; ask for clarification before making judgement
    • Check your tone before you publish; avoid jokes, sarcasm, and irony as these can often be misinterpreted and get “lost in translation” in the online environment
    • Respond to people using their names
    • Remember that culture, age, and gender can play a part in how people communicate
    • Remain authentic and expect the same of others
    • Remember that people may not reply immediately. People participate in different ways, some just by reading the communication rather than jumping into it.
  • Recognize that text is permanent

    • Be judicious and diplomatic; what you say online may be difficult or even impossible to retract later

    • Consider your responsibility to the group and to the working environment

    • Agree on ground rules for text communication (formal or informal; seek clarification whenever needed) if you are working collaboratively

  • Avoid flaming:  research before you react
    • Accept and forgive mistakes
    • Consider your responsibility to the group and to the working environment
    • Seek clarification before reacting; what you heard is not always what was said
    • Ask your supervisor for guidance.*
  • Respect privacy and original ideas
    • Quote the original author if you are responding with a specific point made by someone else
    • Ask the author of an email for permission before forwarding the communication.

* Sometimes, online behavior can appear so disrespectful and even hostile that it requires attention and follow up. In this case, let your supervisor know right away so that the right resources can be called upon to help.

For further information on netiquette, check out the following links:


Texting

image of person using cell phone to text message
[Texting image]. [Online]. Available: https://www.flickr.com/photos/13604571@N02/2094946972. CC BY-NC 2.0.

Whatever digital device you use, written communication in the form of brief messages, or texting, has become a common way to connect. It is useful for short exchanges, and is a convenient way to stay connected with others when talking on the phone would be cumbersome. Texting is not useful for long or complicated messages, and careful consideration should be given to the audience.

When texting, always consider your audience and your company, and choose words, terms, or abbreviations that will deliver your message appropriately and effectively.

Guidelines for Effective Business Texting

If your work situation allows or requires you to communicate via text messages, keep the following tips in mind:

  • Know your recipient:  “? % dsct” may be an understandable way to ask a close associate what the proper discount is to offer a certain customer, but if you are writing a text to your boss, it might be wiser to write, “what % discount does Murray get on $1K order?”
  • Anticipate unintentional misinterpretation:  texting often uses symbols and codes to represent thoughts, ideas, and emotions. Given the complexity of communication, and the useful but limited tool of texting, be aware of its limitation and prevent misinterpretation with brief messages.
  • Use appropriately:  contacting someone too frequently can border on harassment. Texting is a tool. Use it when appropriate but don’t abuse it.
  • Don’t text and drive:  research shows that the likelihood of an accident increases dramatically if the driver is texting behind the wheel."Deadly distraction: Texting while driving, twice as risky as drunk driving, should be banned," Houston Chronicle, Sept 23, 2009 [Online]. Available:  http://www.chron.com/opinion/editorials/article/Deadly-distraction-Texting-while-driving-should-1592397.php Being in an accident while conducting company business would reflect poorly on your judgment as well as on your employer.

Email

email icon
[Email icon]. [Online]. Available: https://www.iconfinder.com/icons/4417125/%40_email_envelope_letter_icon. Free for commercial use.

Email is familiar to most students and workers. In business, it has largely replaced print hard copy letters for external (outside the company) correspondence, and in many cases, it has taken the place of memos for internal (within the company) communication.M. Guffey, Essentials of Business Communication (7th ed.). Mason, OH: Thomson/Wadsworth, 2008.

Email can be very useful for messages that have slightly more content than a text message, but it is still best used for fairly brief messages. Many businesses use automated emails to acknowledge communications from the public, or to remind associates that periodic reports or payments are due. You may also be assigned to “populate” a form email in which standard paragraphs are used but you choose from a menu of sentences to make the wording suitable for a particular transaction.

Emails may be informal in personal contexts, but business communication requires attention to detail, awareness that your email reflects you and your company, and a professional tone so that it may be forwarded to any third party if needed. Email often serves to exchange information within organizations. Although email may have an informal feel, remember that when used for business, it needs to convey professionalism and respect. Never write or send anything that you wouldn’t want read in public or in front of your company president.

As with all writing, professional communications require attention to the specific writing context, and it may surprise you that even elements of form can indicate a writer’s strong understanding of audience and purpose. The principles explained here apply to the educational context as well; use them when communicating with your instructors and classroom peers.

Guidelines for Effective Business Emails

Open with a proper salutation:  proper salutations demonstrate respect and avoid mix-ups in case a message is accidentally sent to the wrong recipient. For example, use a salutation like “Dear Ms. X” (external) or “Hi Barry” (internal).

Include a clear, brief, and specific subject line:  this helps the recipient understand the essence of the message. For example, “Proposal attached” or “Electrical specs for project Y.”

Close with a signature:  identify yourself by creating a signature block that automatically contains your name and business contact information.

Avoid abbreviations:  an email is not a text message, and the audience may not find your wit cause to ROTFLOL (roll on the floor laughing out loud).

Be brief:  omit unnecessary words.

Use a good format:  divide your message into brief paragraphs for ease of reading. A good email should get to the point and conclude in three small paragraphs or less.

Reread, revise, and review:  catch and correct spelling and grammar mistakes before you press “send.” It will take more time and effort to undo the problems caused by a hasty, poorly written email than to take the time to get it right the first time.

Reply promptly:  watch out for an emotional response—never reply in anger—but make a habit of replying to all emails within twenty-four hours, even if only to say that you will provide the requested information in forty-eight or seventy-two hours.

Use “Reply All” sparingly:  do not send your reply to everyone who received the initial email unless your message absolutely needs to be read by the entire group.

Avoid using all caps:  capital letters are used on the Internet to communicate emphatic emotion or yelling and are considered rude.

Test links:  if you include a link, test it to make sure it is working.

Email ahead of time if you are going to attach large files:  audio and visual files are often quite large; be careful to avoid exceeding the recipient’s mailbox limit or triggering the spam filter.

Give feedback or follow up:  if you don’t get a response in twenty-four hours, email or call. Spam filters may have intercepted your message, so your recipient may never have received it.

Tip:  add the address of the recipient last to avoid sending prematurely.  This will give you time to do a last review of what you’ve written, make sure links work, make sure you’ve added the attachment, etc., before adding the sender’s address and hitting send.

The sample email below demonstrates the principles listed above.

From: Steve Jobs <sjobs@apple.com>

To: Human Resources Division <hr@apple.com>

Date: September 12, 2015

Subject: Safe Zone Training


Dear Colleagues:

Please consider signing up for the next available Safe Zone workshop offered by the College. As you know, our department is working toward increasing the number of Safe Zone volunteers in our area, and I hope several of you may be available for the next workshop scheduled for Friday, October 9.

For more information on the Safe Zone program, please visit http://www.cocc.edu/multicultural/safe-zone-training/

Please let me know if you will attend.

Steve Jobs
CEO Apple Computing
sjobs@apple.com


Memos

Memoranda, or memos, are one of the most versatile document forms used in professional settings.  Memos are “in house” documents (sent within an organization) to pass along or request information, outline policies, present short reports, and propose ideas.  While they are often used to inform, they can also be persuasive documents.  A company or institution typically has its own “in house” style or template that is used for documents such as letters and memos.

Memo Format

Figure 7.1.1 shows a sample of our “in house” memo style (the style we will use for memo assignments written for this class), with annotations pointing out various relevant features. The main formatted portions of a memo are the Logo or Letterhead (optional), the Header Block, and the Message.  The attached Memos PowerPoint reviews some of these features in detail.

An annotated memo. Image description available.
Figure 7.1.1 Sample Memo, annotated. [Image description]

Memo Header Block

The Header Block appears at the top left side of your memo, directly underneath the word MEMO or MEMORANDUM in large, bold, capitalized letters.  This section contains detailed information on the recipient, sender, and purpose.  It includes the following lines:

Place a horizontal line under your header block, and place your message below.

Memo Message

The length of a memo can range from a few short sentences to a multi-page report that includes figures, tables, and appendices.  Whatever the length, there is a straightforward organizational principal you should follow.  Organize the content of your memo so that it answers the following questions for the reader:

  1. Opening:  Do I have to read this?  Why do I have to read this?
  2. Details:  What do I need to know?
  3. Closing:  What am I expected to do now?

Memos are generally very direct and concise.  There is no need to start with general introductions before getting to your point. Your readers are colleagues within the same organization, and are likely familiar with the context in which you are writing.  The opening sentences of the memo’s message should make it clear to the reader whether they have to read this entire memo and why (if the memo is informing me about an elevator that’s out of service in a building I never enter, then I don’t really have to read any further).

The middle section of the message should give all of the information needed to adequately inform the readers and fulfill the purpose of the memo. Start with the most general information, and then add the more specific facts and details. Make sure there is enough detail to support your purpose, but don’t overwhelm your readers with unnecessary details or information that is already well known to them.

The final part of the message indicates what, if any, action is required or requested of the readers.  If you are asking your readers to do something, be as courteous as possible, and try to indicate how this action will also benefit them.

For more information on writing memos, check out the memo page on the the Online Writing Lab at Purdue University: Parts of a Memo.


Letters

Letters are brief messages sent to recipients that are often outside the organization. They are often printed on letterhead paper that represents the business or organization, and are generally limited to one or two pages. While email and text messages may be used more frequently today, the business letter remains a common form of written communication. It can serve to introduce you to a potential employer, announce a product or service, or even serve to communicate feelings and emotions (compliant letters, for example).

There are many types of letters, and many adaptations in terms of form and content, but this chapter presents the fifteen elements of a traditional block-style letter. Letters may serve to introduce your skills and qualifications to prospective employers (cover letter), deliver important or specific information, provide documentation of an event or decision, or introduce an attached report or long document (letter of transmittal). Figure 7.1.2 A. Hamlin, C. Rubio, and M. DeSilva, Technical Writing. [Online] Available: https://coccoer.pressbooks.com/chapter/professional-communications/. CC-BY-NC-SA 4.0shows a letter of transmittal meant to introduce a technical report to its recipient.

A sample cover letter
Figure 7.1.2 Sample letter of transmittal (click image for an accessible PDF).
Strategies for Effective Letters

A typical letter has 7 main parts:

  1. Letterhead/logo:  Sender’s name and return address
  2. The heading:  names the recipient, often including address and date
  3. Salutation:  “Dear ______ ” use the recipient’s name, if known.
  4. The introduction:  establishes the overall purpose of the letter
  5. The body:  articulates the details of the message
  6. The conclusion:  restates the main point and may include a call to action
  7. The signature line:  sometimes includes the contact information


Keep in mind that letters represent you and your company in your absence. In order to communicate effectively and project a positive image, remember that

  • your language should be clear, concise, specific, and respectful
  • each word should contribute to your purpose
  • each paragraph should focus on one idea
  • the parts of the letter should form a complete message
  • the letter should be free of errors.

Letters with Specific Purposes

There are many possible reasons you might write a letter in a professional context.  Here is a list of the most common kinds of letters:

Transmittal Letters:  when you send a report or some other document, such as a resumé, to an external audience, send it with a cover letter that briefly explains the purpose of the enclosed document and a brief summary.  Click the link to download a Letter of Transmittal Template (.docx).

Letters of Inquiry:  you may want to request information about a company or organization such as whether they anticipate job openings in the near future or whether they fund grant proposals from non-profit groups. In this case, you would send a letter of inquiry, asking for additional information. As with most business letters, keep your request brief, introducing yourself in the opening paragraph and then clearly stating your purpose and/or request in the second paragraph. If you need very specific information, consider placing your requests in list form for clarity. Conclude in a friendly way that shows appreciation for the help you will receive.

Follow-up Letters:  any time you have made a request of someone, write a follow-up letter expressing your appreciation for the time your letter-recipient has taken to respond to your needs or consider your job application. If you have had a job interview, the follow-up letter thanking the interviewer for his/her time is especially important for demonstrating your professionalism and attention to detail.

Letters within the professional context may take on many other purposes, such as communicating with suppliers, contractors, partner organizations, clients, government agencies, and so on. For additional examples of professional letters, take a look at the sample letters provided by David McMurrey in his online textbook on technical writing: Online Technical Writing: Examples, Cases & Models.


Information in this chapter was adapted from the following source: 

Professional Communications” chapter in Technical Writing by Annemarie Hamlin, Chris Rubio, Michele DeSilva. This source is licensed under a Creative Commons Attribution-ShareAlike 4.0 International License.

Image descriptions

Figure 7.1.1 image description:

Design features of a 1-page memorandum.

[Return to Figure 7.1.1]

7.2 Proposals

Proposals and progress reports are some of the most common types of reports you will likely find yourself writing in the workplace. These reports are persuasive in nature:  proposals attempt to persuade the reader to accept the writer’s proposed idea; progress reports assure the reader that the project is on time and on budget, or explain rationally why things might not be going according to the initial plan.

A proposal, in the technical sense, is a document that tries to persuade the reader to implement a proposed plan or approve a proposed project. Most businesses rely on effective proposal writing to ensure successful continuation of their business and to get new contracts. The writer tries to convince the reader that the proposed plan or project is worth doing (worth the time, energy, and expense necessary to implement or see through), that the author represents the best candidate for implementing the idea, and that it will result in tangible benefits.

A man holds a woman's hand and offers her flowers
Not that kind of proposal. [Proposal image]. [Online]. Available: https://pixabay.com/en/couple-love-marriage-proposal-47192/. Pixabay License.

Proposals are often written in response to a Request For Proposals (RFP) by a government agency, organization, or company. The requesting body receives multiple proposals responding to their request, reviews the submitted proposals, and chooses the best one(s) to go forward. Thus, your proposal must persuade the reader that your idea is the one most worth pursuing. Proposals are persuasive documents intended to initiate a project and get the reader to authorize a course of action proposed in the document. These might include proposals to

Proposals can have various purposes and thus take many forms. It may include sections such as the following:

Four Kinds of Proposals

  1. Solicited Proposals:  an organization identifies a situation or problem that it wants to improve or solve and issues an RFP (Request for Proposals) asking for proposals on how to address it. The requesting organization will vet proposals and choose the most convincing one, often using a detailed scoring rubric or weighted objectives chart to determine which proposal best responds to the request.
  2. Unsolicited Proposals:  a writer perceives a problem or an opportunity and takes the initiative to propose a way to solve the problem or take advantage of the opportunity (without being requested to do so). This can often be the most difficult kind of proposal to get approved.
  3. Internal Proposals:  these are written by and for someone within the same organization. Since both the writer and reader share the same workplace context, these proposals are generally shorter than external proposals, and usually address some way to improve a work-related situation (productivity, efficiency, profit, etc.). As internal documents, they are often sent as memos, or introduced with a memo if the proposal is lengthy.
  4. External Proposals:  these are sent outside of the writer’s organization to a separate entity (usually to solicit business). Since these are external documents, they are usually sent as a formal report (if long), introduced by a cover letter (letter of transmittal). External proposals are usually sent in response to a Request for Proposals, but not always.

EXERCISE 7.1 Task Analysis

Identify the kinds of proposals your Report 1 and Report 2 assignments ask you to write by placing them within the grid below. Given the kinds of proposals you must write, what forms will you use (memo, letter, report, etc.)?

Solicited Unsolicited
Internal
External

Proposals written as an assignment in a Technical Writing classes generally do the following:

  1. Identify and define the problem that needs to be solved or the opportunity that can be taken advantage of. You must show that you clearly understand the problem/situation if you are to convince the reader that you can solve it.  Rubrics that assess proposals generally place significant weight (~20%) on clarity and accuracy of the problem definition.
  2. Describe your proposed project, clearly defining the scope of what you propose to do. Often, it is best to give a general overview of your idea, and then break it down into more detailed sub-sections.
  3. Indicate how your proposed solution will solve the problem and provide tangible benefits. Specifically, indicate how it will meet the objectives and abide by the constrains outlined in the problem definition. Give specific examples. Show the specific differences between “how things are now” and “how they could be.” Be as empirical as possible, but appeal to all appropriate persuasive strategies. Emphasize results, benefits, and feasibility of your proposed idea.
  4. Include the practical details: propose a budget and a timeline for completing your project. Represent these graphically (budget table, and Gantt chart). Your timeline should include the major milestones or deliverables of the project, as well as dates or time frames for completion of each step.
  5. Conclude with a final pitch that summarizes and emphasizes the benefits of implementing your proposed idea – but without sounding like an advertisement.

Additional Proposal Elements to Consider

  1. Describe your qualifications to take on and/or lead this project; persuade the reader that you have the required skills, experience, and expertise to complete this job.
  2. Decide what graphics to use to illustrate your ideas, present data, and enhance your pitch.
  3. Include secondary research to enhance your credibility and the strength of your proposal.
  4. Choose format; is this a memo to an internal audience or a formal report to an external audience? Does it require a letter of transmittal?

All proposals must be convincing, logical, and credible, and to do this, they must consider audience, purpose and tone.

Irish and WeissR. Irish and P. Weiss, Engineering Communication: From Principle to Practice, 2nd Ed., Don Mill, ONT:  Oxford UP, 2013. urge readers to keep the following in mind:

An engineering proposal is not an advertisement. It must show, with objective language, clarity, and thoroughness, that the writers know what they are doing and will successfully complete the project.

Sample Proposal Organization

Each proposal will be unique in that it must address a particular audience, in a particular context, for a specific purpose. However, the following offers a fairly standard organization for many types of proposals:

Introduction/Background

Clearly and fully defines the problem or opportunity addressed by the proposal, and briefly presents the solution idea; convinces the reader that there is a clear need, and a clear benefit to the proposed idea.

Project Description

Detailed description of solution idea and detailed explanation of how the proposed idea will improve the situation:

  1. Confirm feasibility (is it do-able?) How will you find out?

  2. Explain the specific benefits of implementing the idea and the consequences of not doing it

  3. Give a detailed description or explanation of your proposed idea or methodology, and the resources needed to achieve goals

  4. Address potential obstacles or objections; concede where appropriate

Credentials

Establish writer’s qualifications and experience to lead this project.

Timeline and Budget

Provide a detailed timeline for completion of project (use a Gantt chart to indicate when each stage of the project will be complete). Provide an itemized budget for completing the proposed project.

Conclusion

This is your last chance to convince the reader; be persuasive!

References

List your research sources.

Language Considerations

Proposals are fundamentally persuasive documents, so paying attention to the rhetorical situation—position of the reader (upward, lateral, downward or outward communication), the purpose of the proposal, the form, and the tone—is paramount.

As always, adhere to the 7 Cs by making sure that your writing is

The Life Cycle of a Project Idea

A great idea does not usually go straight from proposal to implementation. You may think it would be a great idea to construct a green roof on top of the Clearihue building, but before anyone gives you the go ahead for such an expensive and time-consuming project, they will need to know that you have done research to ensure the idea is cost effective and will actually work.  Figure 7.2.1 breaks down the various stages a project might go through, and identifies some of the typical communications tasks that might be required at each stage.

Most ideas start out as a proposal to determine if the idea is really feasible, or to find out which of several options will be most advantageous. So before you propose the actual green roof, you propose to study whether or not it is a feasible idea. Before you recommend a data storage system, you propose to study 3 different systems to find out which is the best one for this particular situation. Your proposal assumes the idea is worth looking into, convinces the reader that it is worth spending the time and resources to look into, and gives detailed information on how you propose to do the “finding out.”

The four phases of a project and associated communications tasks. Image description available.
Figure 7.2.1 Phases of a project and some accompanying communications tasks.[Lightbulb image]. [Online]. Available: https://www.iconfinder.com/icons/667355/aha_brilliance_idea_think_thought_icon. Free for commercial use. [Image Description]

Once a project is in the implementation phase, the people who are responsible for the project will likely want regular status updates and/or progress reports to make sure that the project is proceeding on time and on budget, or to get a clear, rational explanation for why it is not. To learn more about Progress Reports, go to 7.3 Progress Reports.

Image descriptions

Figure 7.2.1 image description:

Once there is an idea, a project goes through a design process made up of four stages.

  1. Pre-project planning.
    • Problem Definition – identifying needs, goals, objectives, and constraints.
    • Define context and do research.
    • Identify potential projects.
    • Public engagement projects; Stakeholder consultation.
  2. Project Development.
    • Propose a project (budget, timeline, etc.).
    • Create or respond to a request for proposals, evaluate proposals.
    • Develop or design solution concepts.
    • Project management plan.
    • Feasibility Studies, Recommendation Reports).
  3. Project Implementation.
    • Write contracts and apply for permits for construction and building sites.
    • Progress reports, status updates.
    • Documentation of project.
    • Continued research and design improvements.
  4. Project completion.
    • Final reports and documentation.
    • Close contracts.
    • Ongoing Support: User Guides, Troubleshooting, FAQs.

[Return to Figure 7.2.1]

7.3 Progress Reports

You write a progress report to inform a supervisor, associate, or client about progress you have made on a project over a specific period of time. Periodic progress reports are common on projects that go on for several months (or more). Whoever is paying for this project wants to know whether tasks are being completed on schedule and on budget.  If the project is not on schedule or on budget, they want to know why and what additional costs and time will be needed.

Progress reports answer the following questions for the reader:

Purpose of a Progress Report

The main function of a progress report is persuasive:  to reassure clients and supervisors that you are making progress, that the project is going smoothly, and that it will be completed by the expected date — or to give reasons why any of those might not be the case. They also offer the opportunity to do the following:

Format of a Progress Report

Depending on the size of the progress report, the length and importance of the project, and the recipient, a progress report can take forms ranging from a short informal conversation to a detailed, multi-paged report. Most commonly, progress reports are delivered in following forms:

Organizational Patterns for Progress Reports

The recipient of a progress report wants to see what you’ve accomplished on the project, what you are working on now, what you plan to work on next, and how the project is going in general. The information is usually arranged with a focus either on time or on task, or a combination of the two:

Information can also be arranged by report topic. You should refer to established milestones or deliverables outlined in your original proposal or job specifications. Whichever organizational strategy you choose, your report will likely contain the elements described below.

Progress Reports – Structural Overview

1. Introduction

Review the details of your project’s purpose, scope, and activities. The introduction may also contain the following:

  • date the project began; date the project is scheduled to be completed
  • people or organization working on the project
  • people or organization for whom the project is being done
  • overview of the contents of the progress report.

2. Project status

This section (which could have sub-sections) should give the reader a clear idea of the current status of your project.  It should review the work completed, work in progress, and work remaining to be done on the project, organized into sub-sections by time, task, or topic. These sections might include

  • Direct reference to milestones or deliverables established in previous documents related to the project
  • Timeline for when remaining work will be completed
  • Any problems encountered or issues that have arisen that might affect completion, direction, requirements, or scope.

3.  Conclusion

The final section provides an overall assessment of the current state of the project and its expected completion, usually reassuring the reader that all is going well and on schedule. It can also alert recipients to unexpected changes in direction or scope, or problems in the project that may require intervention.

4.  References section if required.

7.4 Technical Descriptions and Definitions

Descriptive technical writing uses a combination of visuals and text to both “show” and “tell” the reader about the information being conveyed. Like more creative descriptions, technical descriptions sometimes draw on the “five senses” and metaphorical comparisons (analogies) to allow the reader to fully conceptualize what is being described. More often, however, they rely on concrete, measurable descriptors. Technical descriptions can take many forms, depending on purpose and audience. Descriptions can range from a brief sentence, to a paragraph, a whole section of a report, or an entire manual.  Poorly written technical descriptions can cause confusion, waste time, and even result in catastrophe!  Technical product descriptions are often legally required to ensure safety and compliance.  Attention to detail is critical.

Product specifications require detailed descriptions of design features; instructions often require specific descriptive detail to “show” the reader what to do. Some general categories of technical descriptions include the following:

Definitions in Technical Writing – Sample student presentation (.pdf)

Technical Description of a Mechanism

Mechanism descriptions should provide a clear understanding of the object being described, including

The reader should be able to clearly picture, and therefore understand, the nature of the object being described, what it does, and how it works.

In order to achieve this clarity for the reader, the writer must choose significant details and organize information logically. Select details that can be described precisely and measurably, such as

color materials texture, smell, taste
shape component parts finish
size properties patterns, designs
dimensions principles at work interactions

Depending on the reader’s need, the description may range from a general overview requiring only a few sentences to a multi-chapter manual detailing every aspect of the mechanism’s parts and functions in order to troubleshoot technical problems and complete repairs. For a fun example of the latter, see the Star Trek: The Next Generation: Technical Manual (cover depicted in Figure 7.4.1), which provides detailed descriptions of all equipment and technology used aboard the fictional U.S.S. Enterprise-D.

Cover of manual
Figure 7.4.1 Cover Page of “Star Trek: The Next Generation: Technical Manual”.R. Sturnback and M. Okuna, Star Trek: The Next Generation: Technical Manual. New York: Pocket Books, 1991.

Before you begin to draft your description, you must consider your purpose and audience: Why does your audience need this description? What will they use it for? Are you describing different types of solar panels for the average consumers to help them choose the one that best fits their needs? Are you giving schematics to technicians and installers?

Once you have your purpose and audience clearly in focus, draft a description that includes the following elements:

  1. Definition: What is it, and what is its main purpose?
  2. Overview: Describe the mechanism’s overall appearance (“big picture”).
  3. Components: Describe the main component parts in labeled sections; consider the order of information carefully here. Create a logical connection between each component described.
  4. Explanation: how do the parts work together to fulfill its function? What key principles govern its functioning? Consider how much detail is necessary here for your intended audience.
  5. Visuals: include graphics that clearly illustrate the mechanism and/or its parts. Show the device as a whole; consider showing specific details in expanded views, cut-aways, or labeled diagrams. You may even embed or link to videos showing the device in action.
  6. Conclusion: depending on the purpose, you might review product’s history, availability, manufacturing, costs, warnings, etc.)
  7. References: Sources you have used in your description, or additional sources of information available (if relevant).

You might consider using a template, like the Technical Description Template below, keeping in mind that while templates can be helpful guides, they do not provide much flexibility and may not work for all situations.

Technical Description Template
Audience and Purpose Who will read this description and why?
Definition and Function What is it? What does it do? What is its purpose?
Overview Describe its overall appearance (shape, size, color, etc)
Components and Explanations Describe the component parts (chose most relevant features) and explain how they work together
Visuals What kind of illustrative graphics will you use? Where?
  • Diagrams

  • Photographs

  • Cut-away views

  • Exploded views

Conclusion Do you need to offer any further information? History? Warnings? Context? Costs? etc.
References Any sources used, or supplemental sources to suggest

Sample Descriptions

Examine the description of the “Up Goer Five” in Figure 7.4.2 (click on image for larger version). Who might the intended audience be?

Blueprint of rocket, labeled using silly-sounding simplistic language such as "fire comes out here"
Figure 7.4.2 A description of the blueprints for NASA’s Saturn Five rocket using only the 1000 most commonly-used English words R. Munroe, "Up Goer Five" [Online]. Available:  https://xkcd.com/1133/  Also see "1133 Up Goer Five - explained," Explain xkcd wiki [Online]. Available:  https://www.explainxkcd.com/wiki/index.php/1133:_Up_Goer_Five . CC-BY-NC 2.5.

Compare the description in Figure 7.4.2 to the information given on the NASA website about the Mars Curiosity Rover.

Note the differences in the level of detail, vocabulary, and overall purpose of the descriptions.  If you used the information on the NASA site to fill in the Technical Description Template, you might end up with something like the following chart. Objectives

Template for Description of Mars Curiosity Rover
Definition Curiosity Rover – a NASA robot designed to explore Mars
Function Travels around the Gale Crater on Mars, collecting data to send back to Earth. Its mission is to see if Mars could ever have supported life, and if humans could survive there someday
Overview Car-sized, 6 wheel robot, about 7’ tall, with a roughly square chassis that has several appendages connected to it that house sensors of various types
Components
  • Main body protects the computer, electronics and instrument systems

  • “Neck and head” like a mast coming out of the centre of the chassis, this houses many of the rover’s cameras

  • Six legs – “rocker bogie” design – wide apart, allows all wheels to remain on uneven terrain

  • Arm – roughly 7 ’ long, (with “shoulder, elbow and wrist” joints), with a “hand” at the end, extends out of the front of the chassis. This contains many tools for drilling, collecting samples, etc.

  • “Tail” – contains radio-isotopic power source that powers the rover

Visuals
  • Overall view (front and side? Top view?)

  • View of arm with labeled components

  • View of head and neck with labeled components

Conclusion/Supplemental Information about lifespan? Travel speed? Energy use?
References NASA website – Mars Curiosity Rover page

You may find that some of these elements are not necessary; again, consider what your target audience already knows. Strike a balance between unnecessarily stating the obvious and incorrectly assuming your readers have knowledge that they lack.

In refining the details of your description and its component parts, consider the following:

EXERCISE 7.2 Practice technical description

Choose a common, everyday object (such as one of the objects in Figure 7.4.3) and draft a technical description for an audience unfamiliar with the object. Start by imagining a target audience and purpose, and then try filling in the Technical Description Template with detailed information. Using the information in your template, draft a short description of 1-2 paragraphs, and add properly-captioned visuals.

Figure 7.4.3 Common objects for practice description.[Corkscrew and bicycle images]. [Online]. Available: https://www.flickr.com/photos/dogbomb/527733767 and https://www.flickr.com/photos/8205548@N08/4607907389. CC BY 2.0.

7.5 Long Reports - Recommendation Reports and Feasibility Studies

Long reports, such as Feasibility and Recommendation Reports, are most often the final step in a series of documents, often beginning with a Proposal and perhaps a series of Progress Reports. The reports in this rather loosely defined category are variously called feasibility reports, recommendation reports, evaluation reports, assessment reports, etc. They all do roughly the same thing—provide a careful study of a situation or problem, and often recommend what should be done to improve the situation. There are some subtle differences among these types, and names for them can vary.

Feasibility Reports

A feasibility report studies a situation (for example, a problem or opportunity) and a plan for doing something about it, and then determines whether that plan is “feasible”—whether it is practical in terms of current technology, economics, time frame, social needs and preferences, and so on. The feasibility report answers the question “Should we implement Plan X?” by stating “yes,” “no,” or sometimes a “maybe” or “under certain conditions.” Not only does it indicate whether the idea is feasible, it also provides the data and the reasoning behind that determination; conversely, it might outline the reasons why the idea cannot or should not be implemented, or what obstacles must be overcome before the idea can become feasible. Typical questions addressed in these reports include

Recommendation Reports

A recommendation reports starts from a stated need; it offers a selection of solution options, presents a detailed comparative analysis of the options, and then recommends one, some, or none. For example, a company might be looking at grammar-checking software and want a recommendation on which product is the best fit for them. As the report writer on this project, you could study the market for this type of application and recommend one particular product, 2-3 possible products (differing perhaps in their strengths and their weaknesses), or none (maybe none of them are appropriate for the client’s specific needs). The recommendation report answers the question “Which option should we choose?” (or in some cases “Which are the best options?) by recommending Product B, or maybe both Products B and C, or none of the products. These recommendations might arise from questions such as

Evaluation Reports

An evaluation report provides a judgment or assessment rather than a yes-no-maybe answer or a recommendation. It provides a studied opinion on the value or worth of something. For example, for over a year the city of Austin had free bus transportation in an attempt to increase ridership and reduce automobile traffic. Did it work? Was it worthwhile?—These are questions an evaluation report would attempt to answer. This type of report compares a thing to a set of requirements (or criteria) and determines how well it meets those requirements. (And of course, this may result in a recommendation: to continue the project, scrap it, change it, or other possibilities.)

As you can see, these distinctions are rather fine, and they overlap somewhat. In real-world writing, these types often combine; you might see elements of the recommendation report combine with the feasibility report, for example.

Typical Contents of Recommendation and Feasibility Reports

Whatever variety of feasibility or recommendation report you write, whatever name people call it—most of the sections and the organization of those sections are roughly the same.

The structural principle fundamental to this type of report is this:  you provide not only your recommendation, choice, or judgment, but also the data, analysis, discussion, and the conclusions leading to it. That way, readers can check your findings, your logic, and your conclusions to make sure your methodology was sound and that they can agree with your recommendation. Your goal is to convince the reader to agree with you by using your careful research, detailed analysis, rhetorical style, and documentation.

The general problem-solving approach for a Recommendation Report entails the steps shown in the example below.

Typical Recommendation Report Elements
1. Identify the need What is the “unsatisfactory situation” that needs to be improved?
2. Identify the criteria for responding to the need

What is the overall goal?

What are the specific, measurable objectives any solution should achieve?

What constraints must any solution adhere to?

3. Determine the solution options you will examine

Define the scope of your approach to the problem.

Identify the possible courses of action that you will examine in your report. You might include the consequences of simply doing nothing.

4. Study how well each option meets the criteria

Systematically study each option, and compare how well they meet each of the objectives you have set.

Provide a systematic and quantifiable way to compare how well to solution options meet the objectives (weighted objectives chart).

5. Draw conclusions based on your analysis Based on the research presented in your discussion section, sum up your findings and give a comparative evaluation of how well each of the options meets the criteria and addresses the need.
6. Formulate recommendations based on your conclusion Indicate which course of action the reader should take to address the problem, based on your analysis of the data presented in the report.

These steps generally coincide with how you will organize your information.  Your report will be divided into several sections that will likely include most or all of the following elements:

  1. INTRODUCTION:  the introduction should clearly indicate the document’s purpose. Your introduction will discuss the “unsatisfactory situation” that has given rise to this report, and the requirements that must be met (the Problem Definition). Your reader may also need some background. Finally, provide an overview of the contents of the report.
  2. TECHNICAL BACKGROUND:  some recommendation or feasibility reports may require technical discussion in order to make the rest of the report meaningful. The dilemma with this kind of information is whether to put it in a section of its own or to fit it into the comparison sections where it is relevant. For example, a discussion of power and speed of tablet computers is going to necessitate some discussion of RAM, megahertz, and processors. Should you put that in a section that compares the tablets according to power and speed? Should you keep the comparison neat and clean, limited strictly to the comparison and the conclusion? Maybe all the technical background can be pitched in its own section—either toward the front of the report or in an appendix.
  3. REQUIREMENTS AND CRITERIAa critical part of feasibility and recommendation reports is the discussion of the requirements (objectives and constraints) you’ll use to reach the final decision or recommendation. Here are some examples:
    • If you’re trying to recommend a tablet computer for use by employees, your requirements are likely to involve size, cost, hard-disk storage, display quality, durability, and battery function.
    • If you’re looking into the feasibility of providing every student at Austin Community College with an ID on the ACC computer network, you’d need define the basic requirements of such a program—what it would be expected to accomplish, problems that it would have to avoid, and so on.
    • If you’re evaluating the recent program of free bus transportation in Austin, you’d need to know what was expected of the program and then compare its actual results to those requirements.

Requirements can be defined in several ways:

Numerical Values:  many requirements are stated as maximum or minimum numerical values. For example, there may be a cost requirement—the tablet should cost no more than $900.

Yes/no Values:  some requirements are simply a yes-no question. Does the tablet come equipped with Bluetooth? Is the car equipped with voice recognition?

Ratings Values in some cases, key considerations cannot be handled either with numerical values or yes/no values. For example, your organization might want a tablet that has an ease-of-use rating of at least “good” by some nationally accepted ratings group. Or you may have to assign ratings yourself.

The requirements section should also discuss how important the individual requirements are in relation to each other. Picture the typical situation where no one option is best in all categories of comparison. One option is cheaper; another has more functions; one has better ease-of-use ratings; another is known to be more durable. Set up your requirements so that they dictate a “winner” from situation where there is no obvious winner. A “weighted objectives chart” or “Decision Matrix” is often used in these cases.

4. DISCUSSION OF SOLUTION OPTIONS:  In certain kinds of feasibility or recommendation reports, you’ll need to explain how you narrowed the field of choices down to the ones your report focuses on. Often, this follows right after the discussion of the requirements. Your basic requirements may well narrow the field down for you. But there may be other considerations that disqualify other options—explain these as well.

Additionally, you may need to provide brief technical descriptions of the options themselves. Don’t get this mixed up with the comparison that comes up in the next section. In this description section, you provide a general discussion of the options so that readers will know something about them. The discussion at this stage is not comparative. It’s just a general orientation to the options. In the tablets example, you might want to give some brief, general specifications on each model about to be compared.

5. COMPARATIVE ANALYSIS: one of the most important parts of a feasibility or recommendation report is the comparison of the options. Remember that you include this section so that readers can follow the logic of your analysis and come up with different conclusions if they desire. This comparison can be structured using a “block” (whole-to-whole) approach, or an “alternating” (point-by-point) approach.

Block Approach Alternating (Point-by-Point) Approach

All the information about Option 1

Compare all Options according to Criteria A (cost)

All the information about Option 2

Compare all Options according to Criteria B (functionality)

All the information about Option 3

Compare all options according to Criteria C (ease of use)

Direct Comparative Analysis of all three options and Summary of Results

Summary of Results

You might compare 3 options (1, 2, and 3) using three criteria for comparison (A, B, and C).  If you were comparing tablets, you’d likely use the point-by-point approach, having a section that compared all three options based on cost (criteria A), another section that compared them on battery function, and so on. You wouldn’t have a section that discussed everything about option 1, another that discussed everything about option 2, and so on. That would not be effective or efficient, because you still have to make direct comparisons somewhere near the end of your discussion (such as in a weighted objectives chart).

Each of these comparative sections should end with a conclusion that sums up the relative strengths and weaknesses of each option and indicates which option is the best choice in that particular category of comparison. Of course, it won’t always be easy to state a clear winner—you may have to qualify the conclusions in various ways, providing multiple conclusions for different conditions.

If you were writing an evaluation report, you wouldn’t be comparing options. Instead, you’d be comparing the thing being evaluated against the requirements placed upon it, the expectations people had of it. For example, Capital Metro had a program of more than a year of free bus transportation.  What was expected of that program? Did the program meet those expectations?

6. SUMMARY TABLE: after the individual comparisons, include a summary table (such as a Weighted Objectives Chart) that summarizes the conclusions from the comparative analysis section. Some readers are more likely to pay attention to details in a table than in paragraphs; however, you still have to write up a clear summary paragraph of your findings.

7. CONCLUSIONS:  the conclusions section of a feasibility or recommendation report amalgamates all of the conclusions you have already reached in each of the comparison sections. In this section, you restate the individual conclusions, for example, which model had the best price, which had the best battery function, and so on. You could give a summary of the relative strengths and weakness of each option based on how well they meet the criteria.

This section has to go further. It must untangle all the conflicting conclusions and somehow reach the final conclusion, which is the one that states which is the best choice. Thus, the conclusion section first lists the primary conclusions—the simple, single-category ones. Then it must state secondary conclusions—the ones that balance conflicting primary conclusions. For example, if one tablet is the least inexpensive but has poor battery function, but another is the most expensive but has good battery function, which do you choose and why? The secondary conclusion would state the answer to this dilemma.

8. RECOMMENDATIONS: the final section of feasibility and recommendation reports states the recommendations which flow directly from your conclusions and directly address the problem outlined in the introduction. These may sometimes be repetitive, but remember that some readers may skip right to the recommendation section. Also, there will be some cases where there may be a best choice but you wouldn’t want to recommend it. Early in their history, laptop computers were heavy and unreliable—there may have been one model that was better than the rest, but even it was not worth having. You may want to recommend further research, a pilot project, or a re-design of one of the options discussed.

The recommendation section should outline what further work needs to be done, based solidly on the information presented previously in the report and responding directly to the needs outlined in the beginning. In some cases, you may need to recommend several ranked options based on different possibilities.

Revision Checklist for Feasibility and Recommendation Reports

As you reread and revise your feasibility or recommendation report, ensure that you have included all of the sections and elements described below.

Revision Checklist for Recommendation Reports
Document Section Key Content Elements Check
Introductory Sections Indicate the situation and the audience.
Discuss the background of the problem or opportunity—what brought about the need for the report? Give technical background if necessary.
State requirements—those factors that influence the decision on the choice of options (objectives and constraints).
Indicate how the field of options was narrowed to the ones being compared (if relevant).
Provide an overview of the contents.
Discussion Sections Organize the comparative analysis/discussion of the options using the point-by-point  or whole-to-whole approach. Choose the structure that best matches your content and purpose.
At the end of each comparative section, state the best choice in terms that point of comparison.
Include a summary table, if possible, in which you summarize all the key data in table form.
Conclusion Restate all the key conclusions from the Discussion sections.
State secondary conclusions, and based them on requirements established at the beginning.
State a final conclusion (about the overall feasibility of the idea or about the overall strengths and weaknesses of each option compared).
Recommendations Make recommendations for future actions; reiterate how these actions will provide the sought-after benefits outlined in the introduction.
References Fully document any sources used in the report.
Appendices Add any additional information that has been referred to, but not included in the body of the report.
This chapter was adapted from David Murrey’s “Recommendation and Feasibility Reports”  in Online Technical Writing, which is licensed under a Creative Commons Attribution 4.0 International License.

5

7.6 Lab Reports

Whether your research takes place in a university lab or on some remote work site, you will often have to write up the results of your work in a Lab Report. Most basically, this report will describe the original hypothesis your work attempts to test, the methodology you used to test it, your observations and results of your testing, your analysis and discussion of what this data means, and your conclusions.

In an academic context, especially in early courses, you are often asked to replicate the results of others rather than conduct your own original research. This is usually meant to instill an understanding of the scientific method into students, and teach students the proper use of instruments, techniques, processes, data analysis, and documentation. Once you demonstrate your ability to understand and apply the scientific method in these contexts, you will be able to go on to design your own research studies and develop new knowledge. Your reports then become the way you pass on this new knowledge to the field and to society at large.

For scientists and engineers to make valuable contributions to the sum of human knowledge, they must be able to convince readers that their findings are valid (can be replicated) and valuable. Thus, the way that you write these reports can impact the credibility and authority of your work; people will judge your work partly on how you present it. Yes, even lab reports have a persuasive edge and must make careful use of rhetorical strategies. Careless writing, poor organization, ineffective document design, and lack of attention to convention may cast doubt on your authority and expertise, and thus on the value of your work.

Science and Rhetoric

Some aspects of your report that might require you to think rhetorically are exemplified in how you approach the following questions:

Writing a Lab Report

Your report will be based on the work you have done in the lab. Therefore, you must have a plan for keeping careful notes on what you have done, how you have done it, and what you observed. Researchers often keep a notebook with them in the lab, sometimes with pre-designed tables or charts for recording the data they know they will be observing (you might be given a lab manual to use while completing a particular experiment to record your observations and data in a pre-organized format). Try to plan ahead so that you can capture as much information as possible during your research; don’t try to rely only on memory to record these important details.

How you choose the content and format for your report will depend on your audience and purpose. Students must make sure to read lab manuals and instructions carefully to determine what is required; if writing for publication, make sure to follow the submission guidelines of the publication you are sending it to. Lab reports typically contain the elements outlined below.

Typical Elements of a Lab Report

Title:  craft a descriptive and informative title that will enable readers to decide if this interests them, and will allow key words to be abstracted in indexing services. Ask your instructor about specific formatting requirements regarding title pages, etc.

Abstract:  write a summary of your report that mirrors your report structure (Hypothesis, Methods, Results, Discussion, Conclusion) in condensed form—roughly one sentence per section. Ideally, sum up your important findings.

Introduction:  establish the context and significance of your work, its relevance in the field, and the hypothesis or question your study addresses. Give a brief overview of your methodology for testing your hypothesis and why it is appropriate. If necessary for your readers, provide a specialized theoretical framework, background or technical knowledge to help them understand your focus and how it contributes to the field. Your instructor may describe a target audience for you; pay attention to that and write for that audience.  More detailed reports may require a Literature Review section.

Materials and Methods:  this section has two key purposes. First, it must allow any reader to perfectly replicate your method; therefore, you must provide a thorough description of what you used and how you conducted your experiment. Second, you must persuade your reader that your chosen methodology and the materials are appropriate and valid for testing your hypothesis, and will lead to credible and valid results. This section will generally include 1) a list of all materials needed (which may include sub-lists, diagrams, and other graphics), and 2) a detailed description of your procedure, presented chronologically. Traditionally, the Sciences have required writers to describe what they did using the Passive Voice, as passive mode emphasizes the materials and actions taken and de-emphasizes the role of the scientist in the process. This is slowly changing, as the use of Active Voice is more concise; however, you should consult your instructor about which is preferred in your context.

Results:  this section presents the raw date that you generated in your experiment, and provides the evidence you will need to form conclusions about your hypothesis. Present only the data that is relevant to your results (but if you omit data, you may have to explain why it is not relevant). You can organize this section based on chronology (following your methodology) or on the importance of data in proving (or negating) the hypothesis (most important to least important). Present data visually whenever possible (in tables, graphs, flowcharts, etc.), and help readers understand the context of your data. Make sure you present the data honestly and ethically; do not distort or obscure data to make it better fit your hypothesis. If data is inconclusive or contradictory, be honest about that. In the Results section, you should avoid interpreting or explaining your data, as this belongs in your Discussion section.

Discussion:  this section includes your analysis and interpretation of the data you presented in the Results section in terms of how well it supports your original hypothesis. Start with the most important findings.  It is perfectly fine to acknowledge that the data you have generated is problematic or fails to support the hypothesis. This points the way for further research. If your findings are inconsistent, try to suggest possible reasons for this.

Conclusion:  in 1-2 short paragraphs, review the overall purpose of your study and the hypothesis you tested; then summarize your key findings and the important implications. This is your opportunity to persuade the audience of the significance of your work.

Acknowledgements:  formally express appreciation for any assistance you have received while preparing the report (financial/funding support, help from colleagues or your institution, etc.).

References:  list all references you have cited in your report (such as those you may have included in a “literature review” in your introduction, or sources that help justify your methodology). Check with your instructor or publication guidelines for which citation style to use.

Appendices:  any information that does not fit within the body sections, but still adds valuable information to your report, can be placed in an appendix. Where your Results section may present summarized data, the full data tables may appear in an appendix. You may also include logs, calculations, or notes on analytical methods. Be sure to refer to your appendices in the body of your report to signal where readers can find additional information.

How you write up the results of a scientific experiment will generally follow the formulaic pattern described above, but may vary depending on audience and purpose. As a student, you are often writing to demonstrate to your instructor that you have mastered the knowledge and skills required in a particular course. But remember that science writing generally focuses on the observable results, not on your “learning experience.” Your report should include what anyone doing this experiment might observe and conclude; these do not typically include personal reflections. In the professional academic world, your report may have to pass through a rigorous peer review process before being published in a scholarly journal. As a professional, your work may result in the development of products and services that will be used by the public, so documenting your process and findings has financial, safety, and legal implications. It is therefore critical that your writing is accurate and ethical.Learning Objectives

A Note on Scientific Writing Style

Lab reports are often written using past tense, 3rd person, and passive verb constructions when describing what was done and what was observed. Why do you suppose that is?

Strict adherence to this style has in recent years been relaxed somewhat, and you might find more science writing that use first person and active rather than passive verb constructions. Can you think of reasons why this is changing?

Additional Resources

For a fun example of Process Report that is similar in many ways to a lab report, see the attached Drafting Behind Big Rigs – Mythbusters Report (.pdf)

When evaluating scientific literature that you read, you might find the the following TED-Ed video by David H. Schwartz helpful: Not all Scientific Studies are Created Equal.

6

7.7 Writing Instructions

One of the most common and important uses of technical writing is to provide instructions, those step-by-step explanations of how to assemble, operate, repair, or do routine maintenance on something. Although they may seems intuitive and simple to write, instructions are some of the worst-written documents you can find. Most of us have probably had many infuriating experiences with badly written instructions. This chapter will show you what professionals consider the best techniques in providing instructions.

An effective set of instruction requires the following:

Preliminary Steps

At the beginning of a project to write a set of instructions, it is important to determine the structure or characteristics of the particular procedure you are going to write about. Here are some steps to follow:

1. Do a careful audience and task analysis

Early in the process, define the audience and situation of your instructions. Remember that defining an audience means defining the level of familiarity your readers have with the topic.

2. Determine the number of tasks

How many tasks are there in the procedure you are writing about? Let’s use the term procedure to refer to the whole set of activities your instructions are intended to discuss. A task is a semi-independent group of actions within the procedure: for example, setting the clock on a microwave oven is one task in the big overall procedure of operating a microwave oven.

A simple procedure like changing the oil in a car contains only one task; there are no semi-independent groupings of activities. A more complex procedure like using a microwave oven contains several semi-independent tasks:  setting the clock; setting the power level; using the timer; cleaning and maintaining the microwave, among others.

Some instructions have only a single task, but have many steps within that single task. For example, imagine a set of instructions for assembling a kids’ swing set. In my own experience, there were more than a 130 steps! That can be a bit daunting. A good approach is to group similar and related steps into phases, and start renumbering the steps at each new phase. A phase then is a group of similar steps within a single-task procedure. In the swing-set example, setting up the frame would be a phase; anchoring the thing in the ground would be another; assembling the box swing would be still another.

3.  Determine the best approach to the step-by-step discussion

For most instructions, you can focus on tasks, or you can focus on tools (or features of tools).  In a task approach (also known as task orientation) to instructions on using a phone-answering service, you’d have these sections:

These are tasks—the typical things we’d want to do with the machine.

On the other hand, in a tools approach to instructions on using a photocopier, there likely would be sections on how to use specific features:

If you designed a set of instructions on this plan, you’d write steps for using each button or feature of the photocopier. Instructions using this tools approach are hard to make work. Sometimes, the name of the button doesn’t quite match the task it is associated with; sometimes you have to use more than just the one button to accomplish the task. Still, there can be times when the tools/feature approach may be preferable.

4.  Design groupings of tasks

Listing tasks may not be all that you need to do. There may be so many tasks that you must group them so that readers can find individual ones more easily. For example, the following are common task groupings in instructions:

  1. Unpacking and setup tasks
  2. Installing and customizing tasks
  3. Basic operating tasks
  4. Routine maintenance tasks
  5. Troubleshooting tasks.

Common Sections in Instructions

The following is a review of the sections you’ll commonly find in instructions. Don’t assume that each one of them must be in the actual instructions you write, nor that they have to be in the order presented here, nor that these are the only sections possible in a set of instructions.

For alternative formats, check out the example instructions.

A Set of Instructions Often Includes the Following

Introduction:  plan the introduction to your instructions carefully. It might include any of the following (but not necessarily in this order):

  • Indicate the specific tasks or procedure to be explained as well as the scope (what will and will not be covered)
  • Indicate what the audience needs in terms of knowledge and background to understand the instructions
  • Give a general idea of the procedure and what it accomplishes
  • Indicate the conditions when these instructions should (or should not) be used
  • Give an overview of the contents of the instructions.

General warning, caution, danger notices instructions often must alert readers to the possibility of ruining their equipment, screwing up the procedure, and hurting themselves. Also, instructions must often emphasize key points or exceptions. For these situations, you use special notices—note, warning, caution, and danger notices. Notice how these special notices are used in the example instructions listed above.

Technical background or theory:  at the beginning of certain kinds of instructions (after the introduction), you may need a discussion of background related to the procedure. For certain instructions, this background is critical—otherwise, the steps in the procedure make no sense. For example, you may have had some experience with those software applets in which you define your own colors by nudging red, green, and blue slider bars around. To really understand what you’re doing, you need to have some background on color. Similarly, you can imagine that, for certain instructions using cameras, some theory might be needed as well.

Equipment and supplies:  notice that most instructions include a list of the things you need to gather before you start the procedure. This includes equipment, the tools you use in the procedure (such as mixing bowls, spoons, bread pans, hammers, drills, and saws) and supplies, the things that are consumed in the procedure (such as wood, paint, oil, flour, and nails). In instructions, these typically are listed either in a simple vertical list or in a two-column list. Use the two-column list if you need to add some specifications to some or all of the items—for example, brand names, sizes, amounts, types, model numbers, and so on.

Discussion of the steps:  when you get to the actual writing of the steps, there are several things to keep in mind: (1) the structure and format of those steps, (2) supplementary information that might be needed, and (3) the point of view and general writing style.

Structure and format:  normally, we imagine a set of instructions as being formatted as vertical numbered lists. And most are in fact. Normally, you format your actual step-by-step instructions this way. There are some variations, however, as well as some other considerations:

  • Fixed-order steps are steps that must be performed in the order presented. For example, if you are changing the oil in a car, draining the oil is a step that must come before putting the new oil. These are numbered lists (usually, vertical numbered lists).
  • Variable-order steps are steps that can be performed in practically any order. Good examples are those troubleshooting guides that tell you to check this, check that where you are trying to fix something. You can do these kinds of steps in practically any order. With this type, the bulleted list is the appropriate format.
  • Alternate steps are those in which two or more ways to accomplish the same thing are presented. Alternate steps are also used when various conditions might exist. Use bulleted lists with this type, with OR inserted between the alternatives, or the lead-in indicating that alternatives are about to be presented.
  • Nested steps may be used in  cases when individual steps within a procedure are rather complex in their own right and need to be broken down into sub-steps. In this case, you indent further and sequence the sub-steps as a, b, c, and so on.
  • “Step-less” instructions. can be used when you really cannot use numbered vertical list or provide straightforward instructional-style directing of the reader. Some situations must be so generalized or so variable that steps cannot be stated.

Supplementary discussion: often, it is not enough simply to tell readers to do this or to do that. They need additional explanatory information such as how the thing should look before and after the step; why they should care about doing this step; what mechanical principle is behind what they are doing; even more micro-level explanation of the step—discussion of the specific actions that make up the step.

The problem with supplementary discussion, however, is that it can hide the actual step. You want the actual step—the specific actions the reader is to take—to stand out. You don’t want it all buried in a heap of words. There are at least two techniques to avoid this problem: you can split the instruction from the supplement into separate paragraphs; or you can bold the instruction.

Writing Style

Placing the key user steps in bold can a very helpful way to signal clearly what the reader needs to do.  Often the command verb is bolded; sometimes bold font highlights the key component being discussed.

Use of the passive voice in instructions can be problematic. For some strange reason, some instructions sound like this: “The Pause button should be depressed in order to stop the display temporarily.” Not only are we worried about the pause button’s mental health, but we wonder who’s supposed to depress the thing (ninjas?). It would be more helpful to indicate when the reader must “press the Pause button.”   Consider this example: “The Timer button is then set to 3:00.” Again, one might ask, “is set by whom?  Ninjas?” The person following these instructions might think it is simply a reference to some existing state, or she might wonder, “Are they talking to me?” Using the third person can also lead to awkwardness: “The user should then press the Pause button.” Instructions should typically be written using command verb forms and using “you” to make it perfectly clear what the reader should do.

Illustrating Your Instructions

Perhaps more than in any other form of technical writing, graphics are crucial to instructions. Sometimes, words simply cannot explain the step. Illustrations are often critical to the readers’ ability to visualize what they are supposed to do.  Be sure that the graphics represent the image from the reader’s perspective.

Formatting Your Instructions

Since people rarely want to read instructions, but often have to, format your instructions for reluctant readability. Try to make your reader want to read them, or at least not resistant to the idea of consulting them.  Highly readable format will allow readers who have figured out some of the instructions on their own to skip to the section where they are stuck.  Use what you have learned about headings, lists, visuals, and passive space to create effective and readable instructions:

Headings: normally, you’d want headings for any background section you might have, the equipment and supplies section, a general heading for the actual instructions section, and subheadings for the individual tasks or phases within that section.

Lists: similarly, instructions typically make extensive use of lists, particularly numbered vertical lists for the actual step-by-step explanations. Simple vertical lists or two-column lists are usually good for the equipment and supplies section. In-sentence lists are good whenever you give an overview of things to come.

Special Notices:  you may have to alert readers to possibilities in which they may damage their equipment, waste supplies, cause the entire procedure to fail, injure themselves or others—even seriously or fatally. Companies have been sued for lack of these special notices, for poorly written special notices, or for special notices that were out of place. See special notices for a complete discussion of the proper use of these special notices as well as their format and placement within instructions.

Revision Checklist for Written Instructions

As you reread and revise your instructions, check that they do the following:

  • Clearly describe the exact procedure to be explained
  • Provide an overview of content
  • Indicate audience requirements
  • Use various types of lists wherever appropriate; in particular, use numbered lists for sequential steps
  • Use headings and subheadings to divide the main sections and subsections in a logical, coherent order
  • Use special notices as appropriate
  • Use graphics to illustrate key actions and objects
  • Provide additional supplementary explanation of the steps as necessary
  • Create a section listing equipment and supplies if necessary.

This chapter was adapted from Online Technical Writing by David McMurrey, which is under a Creative Commons Attribution 4.0 International License.

VIII

8. ORAL AND VISUAL PRESENTATIONS

Oral presentations may be one of the most anxiety-inducing prospects for many students and professionals alike. Yet the ability to speak clearly and confidently in public is an important competency in the workplace.

Chapter 8 Learning Objectives

This chapter contains the following sections to help you develop confidence and skills in presenting information orally, both individually and as a team, and designing visually effective presentations:

8.1 Building Confidence as a Presenter

8.2 Developing Presentation Skills

  • Systematic process for deliberate practice
  • Designing visual aids: PowerPoint basics
  • Visual rhetoric: For posters and other displays

8.3 Presenting as a Team

7

8.1 Building Confidence as a Presenter

Monika Smith and Suzan Last

“Even the greatest was once a beginner.”

Muhammad Ali

“All the great speakers were bad speakers at first.”

Ralph Waldo Emerson

In this section, you will find some practical steps for becoming an effective public speaker, based on the principle that no matter how much of a novice or an expert you are, there’s always something to learn and room to improve. If you feel anxious about speaking in front of others—and, admittedly, most people do—then the steps, information, and additional resources provided here will help build your confidence, give you some stage tools to work with, and direct you to resources to further solidify your learning.

Since there is an enormous amount of information on this topic available on the internet, and since “showing” is often more effective than “telling,” links to several online resources are included to help you sort through and find credible and authoritative sources of information and sample presentations to help you learn more and develop your own presentations.

Before you begin the process of building skills, consider these preliminary steps.

Preliminary Steps

1. Acknowledge the Challenge:  The first thing to acknowledge up front and centre is that, aside from extroverts (a minority of the population), most people dislike, if not actively shudder at, the idea of public speaking. For many people, even those who have to speak as part of their job, the mere thought of speaking in front of a crowd can evoke feelings of doom and gloom: furrowed brows, shaking hands, trembling voice, palpitations.

If this sounds like you, you’re not alone. Figures from a range of sources show you’re in good company:

  • From a 1973 study by polling firm, Bruskin-Goldring: 45% of those surveyed feared public speaking the most; 30% feared death“What are Americans Afraid Of? The Bruskin Report," July 1973. Cited in Lilyan Wilder, 7 Steps to Fearless Speaking, New York: John Wiley and Sons, Inc., 1999
  • From the 1977 Book of Lists: the #1 fear cited by 41% of those surveyed was speaking to an audienceD. Wallechinsky, I. Wallace, & A. Wallace, The Book of Lists. New York: Morrow, 1977.

Hence, if you’d like to become an effective public speaker but feel anxious at the prospect of actually doing public speaking, you’re not alone.  Your fear of public speaking isn’t a personal failing; it’s a common human response.

The good news, of course, is that fear of public speaking can be overcome. Some of the most famous voices we know initially struggled as speakers: James Earl Jones, for one, the voice of Darth Vader, overcame tremendous personal and social anxieties to “find his voice” and in doing so, got to the point where he could comfortably and confidently speak up and speak out.J. E. Jones and P. Niven, James Earl Jones: Voices of Silence, New York: Scribner Book Co., 1993. You can too.

 2. Recognize the costs and benefits:  acknowledge the personal and professional costs of remaining stuck and not tackling the challenge that speaking before others can pose. Unfortunately, even if an employee has strong technical skills, an admirable work ethic, and intelligent, innovative ideas, if they struggle to speak confidently and coherently in a public or workplace setting, they may find it difficult to make a strong positive impact in their workplace. For example, fear of public speaking can

  • Lead people to believe they’re less competent and worthy than they are
  • Keep their ideas from being heard and acted on
  • Become a glass ceiling in a person’s career, thwarting advancement.

Being unable to persuasively communicate your ideas in front of a group or audience means that, more likely than not, your ideas, skills, and potential—qualities that could have helped solve a problem and made a positive impact—don’t get heard.

All these negatives stand in sharp contrast to what can be achieved with a strong, persuasive, confident voice. Once you commit to developing your voice as a presenter, you’ll find that speaking up is both liberating and empowering:  it not only allows your ideas to be heard, it enables you to accomplish the goals you set. Putting effort into developing your professional speaking skills will pay off in the long run, maximizing your potential as a professional.

3.  Commit to Learning:  Whether public speaking makes you anxious or whether you enjoy taking centre stage, everyone can learn how to become a better public speaker. Regardless of where you are on the public speaking spectrum, you can always develop your skills by learning about and practising the tips, techniques, and strategies that successful public speakers use to inform, persuade, and even inspire their audiences.

8

8.2 Developing Presentation Skills

Suzan Last and Monika Smith

Like any kind of advanced communication skill, the art of giving effective presentations is not in-born; it requires deliberate practice. An excellent way to learn more about delivering effective presentations is to follow a systematic process:

  1. Observe others
  2. Study their strategies and reflect on their effectiveness
  3. Select and practice strategies that will work for you; reflect and get feedback from others.

Step 1: Observation

You can learn a lot simply by observing how successful public speakers “work the room” and engage their audience. Observe what they do. How do they use their voice to make it work as a tool of communication? How do they deploy tone, pausing, pacing, and projection? What do they do with their hands? How do they make use of the physical space around them? Take note of how speakers physically operate, either in person or on media: identify what they do, make note of what you feel works well and what doesn’t, then put what you’ve learned into practice.

As a student, you might start by observing your professors. Aim to identify what makes one professor a great lecturer and another less engaging. Compare what they do with their voice, their hands, their gestures, their movements. Pay attention to how they pace their talk to draw you in and create emphasis. Reflect on what they do to convey a sense of enthusiasm for what they’re talking about—or fail to do so. You want to know what kinds of things to avoid—a dull monotonous tone, for example—as well as what kinds of things to adopt to ensure your voice comes across as a powerful tool for communicating your ideas clearly and emphatically.

EXERCISE 8.1: Observation in action

Whether observing your favourite professor give a lecture; watching your favourite podcaster, TV or YouTube presenter; or viewing the videos linked below, turn your observations into an active learning experience: create a list of what the speakers do well as speakers, and then use them as role models. The goal is to create a toolkit of practical tips, approaches, and ideas for building confidence, developing your own “spark” as public speaker, and engaging your audience. In short, watch, observe, and learn.

Here are some public speakers on film that you may enjoy watching and learning from:

Step 2: Study and Reflect

Learning from experts who lay out a set of simple techniques is a confidence builder because it shows that great speakers are made, not born. With deliberate practice, anyone can do this. There are no mysteries, just specific, applicable strategies that anyone can adopt to establish rapport with an audience and make a meaningful impact.

Here are some more great online resources to help you develop further:

EXERCISE 8.2

Take notes from the sources while you study them.  Making written notes about points you want to remember is an effective way to promote deep learning. As you watch each of the videos, identify 2-3 key tips. If you are doing this activity in class, share your “top two” tips with classmates and make note of their “top two” tips in turn.

Then consider the value of the tips and strategies you’ve compiled. What makes them seem to work so well and, equally important, how could you feasibly incorporate them into your presentations to make them your own?

Step 3: Select, Practice and Assess your Progress

Now that you have identified strategies that you find effective and think might work for you, try putting them into practice.  See if they add some extra “oomph” to your presentation style. Afterwards, either by engaging in self-reflection, or by asking for feedback, consider how well these strategies worked for you and whether you need to further hone, adapt, or change the way you used them.

Videos are helpful because they not only provide information, but visually demonstrate the ideas (both showing and telling); however, you can also learn from many books on the subject. Here are four classic books by public speaking experts designed to help you develop your own strong presentation skills. By focusing on aspects such as“voice,” or by getting you to create effective slideshows, they offer a range of practical, “tried and tested” approaches designed to help you build confidence, speak fluently, and hold an audience’s attention with relevant, well designed visuals.

EXERCISE 8.3 Build your repertoire

Just as you did when watching your videos, make a list of key tips that you want adopt as a presenter. Select a “top three” strategies, reflect on those three, rehearse them and put them in practice when you get a chance. Going through these steps will get you primed and ready to put the tips into play when time comes to actually deliver your talk. Keep adding tips to your repertoire until you’ve got a good, well-rounded set of strategies designed to keep your audience alert, engaged, and wanting to hear more!

Visual Aids – PowerPoint Basics

Even the most dynamic speakers often make use of visual aids to accompany their presentation and help illustrate their ideas. Having well designed visuals as part of your presentation is one way for beginners and those honing their skills can add interest and audience engagement to their talks. PowerPoint is probably the most common form of visual aid used in presentations, so much discussion has been focused on the pros and cons of this medium.  Indeed, a Google search of “death by PowerPoint” brings up over 90 million results!

While there are many other presentation tools out there that you should explore (and perhaps present to your classmates or colleagues in your own presentation!), PowerPoint is a standard workplace tool, so it would be wise to gain proficiency with it.  The key concept to remember is that your visual aids should supplement and illustrate what you want to say to your audience.

PowerPoint Terminology

When designing a PowerPoint presentation, it is helpful to be familiar with key terminology used to discuss the various elements.

A screenshot of a 30-slide PowerPoint deck
Figure 8.2.1  PowerPoint Deck
A sample PowerPoint slide with a title, some text, and an exhibit, which is an image.
Figure 8.2.2 PowerPoint slide. Keithonearth, [Bicycle image embedded in slide]. [Online]. Available: https://en.wikipedia.org/wiki/Derailleur_gears#/media/File:Derailleur_Bicycle_Drivetrain.svg.CC BY-SA 3.0.

Click on the Sample PowerPoint Presentations listed below to see detailed examples of PowerPoint decks.

Visual Rhetoric

PowerPoint is not the only visual medium you might use.  Pamphlets, posters, billboards, and other kinds of displays can also work to effectively convey your message if they are well designed.  Considering how to present ideas visually can be as important as determining what to say. Here are some resources to help you design visual information in a rhetorically effective way:

Visual Rhetoric page from the Online Writing Lab (OWL) at Purdue University

Rule of Thirds (Wikipedia)

Color theory (Tiger Color)

Psychology of Font Choices (The Daily Egg)

9

8.3 Presenting as a Team

Suzan Last and Candice Neveu

Since many projects are undertaken in teams, presentations related to those projects are also often given as a team.  Presenting coherent and engaging information as a team takes practice and coordination, and while different team members may share the work by being responsible for different elements of the preparation and delivery, sometimes giving a presentation as a team can entail more work than doing a solo talk.  Below are some useful resources that provide information on things to consider when presenting as a team.

Resources on Presenting as a Team

How to Coordinate a Team Presentation (Coursera: Oral Communicaiton for Engineering Leaders)  (4:45 min.)

This video resource is presented by two professors who teach at Rice University in Engineering Leadership. They model and discuss how to coordinate a team presentation.


20 Things that Great Presenting Teams Ask Before They Open Their Mouths (Inc. com)

In this article, communications expert Deborah Grayson Riegel poses 20 questions that you should consider as a team in preparing for your presentation. This is a great list and would help your team consider perhaps the less obvious things.


Ask the Experts: Presentation Strategy for Team and Group Presentations (Total Communicator e-zine)

Peter Guiliano, communications consultant and Chairman of Executive Communications Group, provides tips on preparing and delivering successful team presentations.


10 Rules for Presenting as a Team (Public Words)

Nick Morgan PhD, a communications professor and coach, offers some advice for team presentations. While some info overlaps with the sources above, he does offer some additional tips and suggestions that may be of interest such as ways to handle discussion.

IX

APPENDICES: Academic Writing Basics

Technical Writing Essentials is designed to follow up on the skills learned in a first year Academic Writing course. The following sections provide a review of some of the basic conventions and expectations of academic writing that students should be familiar with and that are relevant to technical writing:

Appendix A:  Referring to Authors and Titles

Appendix B:  Writing Summaries

Appendix C:  Integrating Quotations, Paraphrases and Summaries into your Writing

Appendix D:  Transitional Words and Phrases for University Writing

Appendix E:  Sentence Structure

Appendix F:  Punctuation Matters


10

Appendix A: Referring to Authors and Titles

Writing in an academic context often entails writing about or responding to the words and ideas of other authors. Academic writing is often a “dialogue” or conversation between scholars. Scholarly research generally builds on or reacts to the work of previous scholars. As student writers, you often use the works of published scholars to support your arguments or provide a framework for your analysis. When you do this, you must cite and document your source; you may also need to identify the author and title that you are referring to. There are some basic conventions (rules) to adhere to when you do this.

Referring to Authors

The first time that you mention the author, use the full name (but no titles, such as Mr. Ms, or Dr.). If there are more than three authors, use the Latin abbreviated term et al. to refer to additional authors:

Every time you refer to the author after the first time, use the last name only. Never refer to the author by the first name (William or Will) only. Always use the last name:

Referring to Titles

When referring to titles, there are two distinct methods to indicate two types of works:

  1. The titles of shorter works that are published within a larger work (an article in a newspaper, an academic article in a periodical, a poem in an anthology, a chapter in a book) are enclosed in quotation marks:
    • “The Case Against Bottled Water” is an editorial written by Justin Trudeau and Sean Petty, published in The Star, a Toronto newspaper.
    • “People For Sale” is an magazine article in The Utne Reader written by E. Benjamin Skinner.B. Skinner, "People for sale," Utne Reader, July/Aug 2008 [Online]. Available: https://www.utne.com/politics/people-for-sale
    • “Bottled Water: The Pure Commodity in the Age of Branding” is an academic journal article by Richard Wilk, published in the Journal of Consumer Culture.R. Wilk, "Bottled water: The pure commodity in the age of branding," Journal of Consumer Culture, Nov. 2006, https://doi.org/10.1177/1469540506068681
Tip:  Remember to enclose in quotation marks the titles of works that are contained within other works.
  1. When referring to titles of larger works, or works that have smaller articles published within them (newspapers, magazines, periodicals, movies, novels, etc.), use italics*:

* Note: before computers, people underlined these kinds of titles, as this was the only option available on a typewriter; however, underlining is “so 20th century” and is no longer done unless you are writing by hand.

Using these conventions help the reader to know what kind of text you are writing about without you having to specify it. Like most specialized terminology or conventions, it offers a kind of short hand to avoid wordiness. If you do this incorrectly, you mislead and confuse the reader.

For example, if you are writing about William Blake’s poem, “The Lamb,” you must use quotation marks around the title.  If you don’t use them, and simply write — the lamb — then you are referring to the animal, not the poem. If you italicize The Lamb, you are telling the reader that this is the title of a book (which is incorrect).

Questions for review

  1. What is the difference between these two sentences discussing William Blake’s poem, “The Tyger”?

The Tyger is terrifying.

“The Tyger” is terrifying.

  1. Why is the following incorrect? What mistaken ideas does it give to the reader?

In The Case Against Bottled Water, Sean and Justin explain why bottled water is not as safe as tap water.

11

Appendix B: Writing a Summary

An academic summary provides an objective, condensed (shortened) description of the content of a piece of writing or presentation. Unlike a review, it does NOT analyze, evaluate, or critique; your opinion of the work is not typically part of the summary (unless you have been asked to add your thoughts afterward). Since summaries usually occur within a context (eg., part of your essay), your thoughts about what you have summarized will probably be relevant to your subsequent analysis. But when writing the actual summary of someone else’s ideas, you must neutrally and accurately describe what you take to be the important ideas in the author’s or presenter’s work in as few words as possible. Occasionally, if the work you are summarizing has an unusual form, style, or tone that affects the content, your summary might describe HOW the author presents those ideas.

What is the purpose of a summary?

A summary is meant to inform your reader—who has not read the text or seen the presentation—of what the text is about. It describes its purpose or main idea, and summarizes the supporting arguments that develop that idea. The reader will then know if he or she will find it useful and want to read it.

There are many kinds of summaries that serve different purposes:

Being able to write a clear and useful summary is a valuable skill both in academic and professional contexts.

How do you write an effective summary?

Before you can summarize anything, you must understand it and do some pre-writing. Some of the most common flaws in summaries come from not completing these pre-writing steps. For example, some summary writers get bogged down in the small details and neglect to present the main idea; or they present a series of unconnected thoughts that come directly from the source, but do not coherently indicate what that source was about or how ideas were developed; occasionally, a writer may summarize the structure of a text instead of the ideas in that text. These errors occur because the pre-writing work was done poorly.

Pre-writing Stage

  1. Actively read the article or pay attention to the presentation. Make notes. Make sure you understand what you are summarizing: what is its main purpose? What is the “thesis”? What are the main points that support the thesis? Explain it verbally to someone else. Use your own words to make sure you really understand what you have read or seen.
  2. Reread the article (or your notes on the presentation, or the  slides if they have been provided) and break it up into sections or “stages of thought.” Briefly summarize each section and indicate how it relates to the main idea. Again, paraphrase.
  3. Keep your purpose and intended audience in mind when you design your summary; remember, your intended reader has not read the article or seen the presentation. Why are you summarizing it? Why is your audience reading your summary?

Writing Stage

Now you are ready to begin writing your summary. Follow these steps:

  1. Provide the author’s name and title of the text being summarized. If you are are summarizing a speaker’s presentation, give the presenter’s name, the title or topic of the presentation. If context is important to your summary, give some details about the intended audience, etc.
    • In “Can Ethics be Technologized?” Peter Dombrowski [1] critiques the idea that …
  2. Paraphrase (write in YOUR OWN WORDS) the author’s THESIS or main idea:
    • … the idea that ethics can be reduced to an objective formula or algorithm that can implemented in any given situation. 
  3. Describe, in a neutral and objective manner, how the author supports and develops the main idea. Do not editorialize (evaluate, critique, analyze, etc); simply describe. Keep the following in mind:
    • summarize the key points used to develop the main idea
    • leave out minor details and examples that are not important to the main idea
    • do not quote from the article; or limit quotations to a single key word or important phrase. Padding your summary with quotations will lower your mark.
    • use signal phrases, such as “Dombrowski explains” and “Dombrowski asserts” to show that the ideas are not yours, but that they come from the article you are summarizing. Do not accidentally plagiarize. Do not inadvertently present the author’s ideas as your own.
    • Pay attention to verb tense: summaries of ideas are generally given in the present tense, while results and findings are often given in the past tense.
      • Dombrowski explains …  (present tense)
      • Hollander’s study found that …  (past tense)
    • Summaries of presentations are generally given in the past tense, since the presentation happened only once in the past, while a text can be read and reread several times, making it more “present.” However, a video presentation, such as a TED Talk, would likely be summarized in present tense, much like an article, because it can be reviewed over and over again. Which verb tense you should use is not subject to absolute rules; you will have to use some judgment to determine what sounds best (and what sounds awkward).
    • Cite and document your source using an IEEE note [1].

Example Reference

[1]     P.M. Dombrowski.  “Can Ethics be Technologized? Lessons from Challenger, Philosophy, and Rhetoric.”  In IEEE Transactions of Professional Communication, vol. 38.3, Sept. 1995, pp. 146-50 . DOI:  10.1109/47.406727

Rewriting Stage

Review and revise your draft using the following steps:

  1. Revise content and organization: Is it complete? Should you add any important details? Is it well organized? Does it follow the order of the original text?  Can you get rid of any unnecessary content? Have you used your own words and phrasing?
  2. Edit for flow:  Do ideas flow smoothly together? Are sentences clear, concise, correct and coherent? Or do they require effort to decode? Do transitions effectively indicate the relationships between ideas? Have you effectively introduced, developed and concluded?
  3. Proofread: Look for mechanical errors (typos, spelling, punctuation), and for grammar and usage errors that may have crept in during revision and editing.

Signal Phrases

Signal phrases allow you to clearly indicate when words, phrases and ideas you include in your writing come from someone else. These include verbs that introduce summaries, paraphrases, and quotations. In general, it is best to avoid verbs like

Instead, use a verb that more precisely and accurately describes the author’s rhetorical intention — describe what the author is DOING in this quotation, or what rhetorical purpose the author is trying to achieve. Appendix C contains a useful table of Signal Verbs for various purposes.

 “I Can’t See the Forest for the Trees”

A summary should move from a statement of the general purpose to the specific ideas used to develop that purpose; it should be neither too vague nor too specific. There is an expression: “you can’t see the forest for the trees.” It means you get too focused on the details so you miss the “big picture.” You don’t want to be too general or too detailed. You want to give an accurate description of the forest as a whole, and quickly go over the main characteristics of the types of trees that comprise it (the key examples used to illustrate the main idea). Don’t let your summary get bogged down in the minor details, specific examples, and precise data (the species of fungus on the leaves of the trees).

Appendix C: Integrating Source Evidence into Your Writing

Suzan Last and Candice Neveu

Writing in an academic context often entails engaging with the words and ideas of other authors. Therefore, being able to correctly and fluently incorporate and engage with other writers’ words and ideas in your own writing is a critical academic skill. There are three main ways to integrate evidence from sources into your writing: quoting, paraphrasing, and summarizing. Each form requires a citation because you are using another person’s words and/or ideas. Even if you do not quote directly, but paraphrase source content and express it in your own words, you still must give credit to the original authors for their ideas.  Similarly, if you quote someone who says something that is “common knowledge,” you still must cite this quotation, as you are using their sentences structure, organizational logic, and/or syntax.

Integrating Quotations

WHY:  Using direct quotations in your argument has several benefits:

WHEN:  Be careful not to over-quote.  Quotations should be used sparingly because too many quotations can interfere with the flow of ideas and make it seem like you don’t have ideas of your own. Paraphrasing can be more effective in some cases.

So when should you use quotations?

How to Integrate Quotations Correctly

Integrating quotations into your writing happens on two levels:  argumentative and grammatical. At the argument level, the quotation is being used to illustrate or support a point that you have made, and you will follow it with some analysis, explanation, comment, or interpretation that ties that quote to your argument. Never quote and run: don’t leave your reader to determine the relevance of the quotation. A quotation, statistic or bit of data cannot speak for itself; you must provide context and an explanation for quotations you use.  Essentially, you should create a “quotation sandwich” (see Figure C-1). Remember the acronym I.C.E. → Introduce – Cite – Explain.

A sandwich. "Introduce" and "Explain" are the pieces of bread that contain the quote
Figure C-1 Quotation sandwich.

The second level of integration is grammatical. This involves integrating the quotation into your own sentences so that it flows smoothly and fits logically and syntactically. There are three main methods to integrate quotations grammatically:

  1. Seamless Integration Method: embed the quoted words as if they were an organic part of your sentence (if you read the sentence aloud, your listeners would not know there was a quotation).
  2. Signal Phrase Method: use a signal phrase (Author + Verb) to introduce the quotation, clearly indicating that the quotation comes from a specific source
  3. Colon Method: introduce the quotation with a complete sentence ending in a colon.

Consider the following opening sentence (and famous comma splice) from A Tale of Two Cities by Charles Dickens, as an example:

“It was the best of times, it was the worst of times.”

1.  Seamless Integration: embed the quotation, or excerpts from the quotation, as a seamless part of your sentence

Charles Dickens begins his novel with the paradoxical observation that the eighteenth century was both “the best of times” and “the worst of times” [1].

2.  Signal Phrase: introduce the author and then the quote using a signal verb

Describing the eighteenth century, Charles Dickens observes, “It was the best of times, it was the worst of times” [1].

3.   Colon: if your own introductory words form a complete sentence, you can use a colon to introduce and set off the quotation. This can give the quotation added emphasis.

Dickens defines the eighteenth century as a time of paradox: “It was the best of times, it was the worst of times” [1].

The eighteenth century was a time of paradox: “It was the best of times, it was the worst of times” [1].

Editing Quotations

When you use quotation marks around material, this indicates that you have used the exact words of the original author. However, sometimes the text you want to quote will not fit grammatically or clearly into your sentence without making some changes. Perhaps you need to replace a pronoun in the quote with the actual noun to make the context clear, or perhaps the verb tense does not fit. There are two key ways to edit a quotation to make it fit grammatically with your own sentence:

Sample Quotation, Citation, and Reference

Engineers are always striving for success, but failure is seldom far from their minds. In the case of Canadian engineers, this focus on potentially catastrophic flaws in a design is rooted in a failure that occurred over a century ago. In 1907 a bridge of enormous proportions collapsed while still under construction in Quebec. Planners expected that when completed, the 1,800-foot main span of the cantilever bridge would set a world record for long-span bridges of all types, many of which had come to be realized at a great price. According to one superstition, a bridge would claim one life for every million dollars spent on it. In fact, by the time the Quebec Bridge would finally be completed, in 1917, almost ninety construction workers would have been killed in the course of building the $25 million structure” [3].

[3]  H. Petroski, “The Obligation of an Engineer,” in To Forgive Design, Boston: Belknap Press, 2014, p. 175.

You are allowed to change the original words, to shorten the quoted material or integrate material grammatically, but only if you signal those changes appropriately with square brackets or ellipses:

Example 1:  Petroski observed that “[e]ngineers are always striving for success, but failure is seldom far from their minds” [3; p. 175].

Example 2:  Petroski recounts the story of a large bridge that was constructed at the beginning of the twentieth century in Quebec, saying that “by the time [it was done], in 1917, almost ninety construction workers [were] killed in the course of building the $25 million structure” [3; p. 175].

Example 3:  “Planners expected that when complete the … bridge would set a world record for long-span bridges of all types” [3; p. 175].

Integrating Paraphrases and Summaries

Instead of using direct quotations, you can paraphrase and summarize evidence to integrate it into your argument more succinctly. Both paraphrase and summary requires you to read the source carefully, understand it, and then rewrite the idea in your own words. Using these forms of integration demonstrates your understanding of the source, because rephrasing requires a good grasp of the core ideas. Paraphrasing and summarizing also makes integrating someone else’s ideas into your own sentences and paragraphs a little easier, as you do not have to merge grammar and writing style—you don’t need to worry about grammatical integration of someone else’s language.

Paraphrase and summary differ in that paraphrases focuses on a smaller, specific section of text that when paraphrased may be close to the length of the original. Summaries, on the other hand, are condensations of large chunks of text, so they are much shorter than the original and capture only the main ideas.

Sample Paraphrase
At the end of its construction, the large cantilever bridge cost $25 million dollars, but the cost in lives lost far exceeded the prediction of one death for each million spent. While the planners hoped that the bridge would set a global record, in fact its claim to fame was much more grim [3].
Sample Summary
According to Petroski, a large bridge built in Quebec during the early part of the twentieth century claimed the lives of dozens of workers during its construction. The collapse of the bridge early in its construction represented a pivotal design failure for Canadian engineers that shaped the profession [3].

Regardless of whether you are quoting, paraphrasing or summarizing, you must cite your source any time you use someone else’s intellectual property—whether in the form of words, ideas, language structures, images, statistics, data, or formulas—in your document.

Using Signal Verbs

Verbs like “”says,” “writes” or “discusses” tend to be commonly over-used to signal a quotation and are rather vague. In very informal situations, people use “talks about” (avoid “talks about” in formal writing). These verbs, however, do not provide much information about the rhetorical purpose of the author.

The list below offers some suggestions for introducing quoted, paraphrased, and summarized material that convey more information than verbs like “says” or “writes” or “discusses.” When choosing a signal verb, try to indicate the author’s rhetorical purpose: what is the author doing in the quoted passage? Is the author describing something?  Explaining something? Arguing? Giving examples? Estimating? Recommending? Warning? Be sure the verb you choose accurately represents the intention of the source text. For example, don’t use “concedes” if the writer isn’t actually conceding a point. Look up any words you don’t know and add ones that you like to use.

Table C.1 Commonly used signal verbs
Making a claim Recommending Disagreeing or Questioning Showing Expressing Agreement Additional Signal Verbs
argue

assert

believe

claim

emphasize

insist

remind

suggest

hypothesize

maintains

advocate

call for

demand

encourage

exhort

implore

plead

recommend

urge

warn

challenge

complicate

criticize

qualify

counter

contradict

refute

reject

deny

question

illustrates

conveys

reveals

demonstrates

proposes

points out

exemplifies

indicates

agree

admire

endorse

support

affirm

corroborate

verify

reaffirm

responds

assumes

speculates

debates

estimates

explains

implies

uses

Be careful with the phrasing after your signal verb. In some cases, you will use “that” to join the signal phrase to the quotation:

Smith argues that “bottled water should be banned from campus” [1]. 

But not all signal verbs can be followed by “that.”

We can use clauses with that after these verbs related to thinking:

Think               I think that you have an excellent point.

Believe            He believes that unicorns exist.

Expect             She expects that things will get better.

Decide             He decided that it would be best to buy the red car.

Hope               I hope that you know what you are doing.

Know              I know that you will listen carefully

Understand      She understood that this would be complicated.

And after verbs related to saying:

Say                  She said that she would be here by 6:00 pm.

Admit              He admits that the study had limitations.

Argue              She argues that bottled water should be banned on campus.

Agree              He agrees that carbon taxes are effective.

Claim              They claim that their methods are valid.

Explain            He explained that the rules are complicated.

Suggest           They suggest that you follow instructions carefully.

But some verbs require an object (a person or thing) before you can use “that”:

Tell                  tell a person that… tell as story… tell the truth

Describe          describe the mechanism

Convince         convince an audience that you are credible

Persuade          persuade a reader that this is a worthwhile idea

Inform             inform a colleague that their proposal has been accepted

Remind            remind the client that …

Analyze            analyze a process; analyze a text; analyzethe problem

Summarize       summarize a text; summarize an idea

Support            I support the idea that all people are created equal

It would be incorrect to write the following:

12

Appendix D: Transitional Words and Phrases for University Writing

In previous English classes, you may have learned the basic transitional words or phrases in Table D.1. These can be effective when writing simple information in a structure where you simply add one idea after another, or want to show the order of events.

TABLE D.1 Basic beginner-level transitions
first

second

third

last

moreover

firstly

secondly

thirdly

last but not least,

furthermore

first of all

next

then

finally

besides

However, more complex university-level writing requires more sophisticated transitions. It requires you to connect ideas in ways that show the logic of why one idea comes after another in a complex argument or analysis. For example, you might be comparing/contrasting ideas, or showing a cause and effect relationship, providing detailed examples to illustrate an idea, or presenting a conclusion to an argument. When expressing these complex ideas, the simple transitions you’ve learned earlier will not always be effective – indeed, they may even confuse the reader.

Consider the transitions in Table D.2, and how they are categorized. While this is not an exhaustive list, it will gives you a sense of the many transitional words and phrases that you can choose from, and demonstrate the need to choose the one that most effectively conveys your meaning.

TABLE D.2 Sophisticated university-level transitions
Addition Comparison Contrast Cause and Effect
also

and

in addition

in fact

indeed

so too

as well as

furthermore

moreover

along the same lines

in the same way

similarly

likewise

like

although

but

in contrast

conversely

despite

even though

however

nevertheless

whereas

yet

while

on the other hand

accordingly

as a result

consequently

hence

it follows, then

since

so

then

therefore

thus

Conclusion Example Concession Elaboration
as a result

consequently

hence

in conclusion

in short

in sum

it follow, then

so

therefore

thus

as an illustration

consider

for example

for instance

specifically

a case in point

admittedly

granted

of course

naturally

to be sure

conceding that

although it is true that…

by extension

in short

that is to say

in other words

to put it another way

to put it bluntly

to put it succinctly

ultimately

Transitional words and phrases show the connection between ideas, and show how one idea relates to and builds upon another. They help create coherence. When transitions are missing or inappropriate, the reader has a hard time following the logic and development of ideas. The most effective transitions are sometimes invisible; they rely on the vocabulary and logic of your sentence to allow the reader to “connect the dots” and see the logical flow of your discussion.

Common Transitional Strategies to Link Ideas
  • Repeat a word or phrase from the previous sentence (or use a synonym, related word, or antonym) to show that the same idea is still being discussed, but is being developed further
  • Use the pronoun “this + noun” to show continued discussion of the idea
  • Use one of the above transitional words or phrases to show HOW you are developing your idea (are you showing contrast? Are you using an example to develop your idea? Are you showing a cause and effect relationship? Are you concluding? Are you conceding a point?).

Transition Exercises:  Place the transitional words below the paragraph into the blanks where they work most logically into the paragraphs.

Exercise 1

A vegetarian can be defined as someone who does not eat meat, fish, or other animal products, such as eggs or cheese; ________, he or she eats vegetables, fruits, grains, and seeds.  __________ this diet consists of non-meat food sources, a vegetarian typically consumes less fat and cholesterol than an individual who consumes meat.   __________, raising animals for food uses valuable land, water, and energy.    __________, adopting a vegetarian diet helps conserve the valuable resources that our future depends on.

  • Consequently
  • Because
  • Furthermore
  • Instead
  • For example

Exercise 2

__________ many educators and parents have praised the Harry Potter series, some Christian parents have called for a ban on the books in their schools and libraries.    Some churches have even gone as far as burning the books, citing biblical injunctions against witchcraft, __________ those in Exodus and Leviticus.    __________, some Christians believe the books are compatible with Christianity, __________, that they embody basic Christian beliefs.

  • However
  • Although
  • In addition
  • Such as
  • Indeed


13

Appendix E: Sentence Structure

When building anything, it is important to be familiar with the tools you are using.  Grammatical elements are the main “tools” you use when when building sentences longer written works.  Thus, it is critical to have some understanding of grammatical terminology in order to construct effective sentences.

The two essential parts of a sentence are the subject and the predicate (verb portion). The subject refers to the topic being discussed while the verb conveys the action or state of being expressed in the sentence. All clauses must contain both a subject and a verb; phrases, on the other hand, lack one or both a subject and a verb, so they need to relate to or modify other parts of the sentence. Main clauses, also called independent clauses, can stand on their own and convey an idea. Dependent clauses, also called subordinate clauses, rely on another part of the sentence for meaning and can’t stand on their own.

Consider the following examples:

The engineers stood around the table looking at the schematics for the machine.
Sentence 1

Sentence 1 is a simple sentence. It has one clause, with one subject (The engineers) and one verb (stood). These are followed by 3 modifying phrases (“around the table” “looking at the schematics” and “for the machine”).

After they discussed different options, they decided to redesign the components.
Sentence 2

Sentence 2 is a complex sentence, with one dependent and one independent clause, each with its own subject–verb combination (“they discussed” and “they decided”). The two clauses are joined by the subordinate conjunction, “after,” which makes the first clause subordinate to (or dependent upon) the second one.

Being able to identify the critical parts of the sentence will help you design sentences that have a clear and effective subject-verb relationship. Knowing the components will also help you improve your punctuation. If you would like a more detailed review of sentence structure, visit Purdue’s  OWL (Online Writing Lab) Mechanics page.

Sentence Structures

There are four main types of sentence structures: simple, compound, complex, and compound-complex. In the examples above, Sentence 1 is a simple sentence, while Sentence 2 is complex.

SIMPLE SENTENCES have one main clause (one subject + one verb) and any number of phrases. The following are all simple sentences:

  • A simple sentence can be very effective.
  • It makes one direct point.
  • It is good for creating emphasis and clarity.
  • Too many in a row can sound repetitive and choppy.
  • Varied sentence structure sounds more natural.

COMPOUND SENTENCES have two or more main clauses joined by coordinating conjunctions (CC) such as and, but, for, yet, nor, or, so (FANBOYS). You can also connect them using punctuation such as a semi-colon or a colon. By coordinating the ideas, you are giving them roughly equal weight and importance.

Subject + verb,    CC    Subject + verb
The following sentences are all compound:
  • A compound sentence coordinates two ideas, and each idea is given roughly equal weight.
  • The two ideas are closely related, so you don’t want to separate them with a period.
  • The two clauses make up part of the same idea; thus, they should be part of the same sentence.
  • The two clauses may express a parallel idea; they might also have a parallel structure.
  • You must remember to include the coordinate conjunction, or you may commit a comma splice.

COMPLEX SENTENCES express complex and usually unequal relationships between ideas. One idea is “subordinated” to the main idea by using a “subordinate conjunction” (like “while” or “although”); one idea is “dependent” upon the other one for logic and completeness. Complex sentences include one main clause and at least one dependent clause (see Example 2 above). Often, it is stylistically effective to begin your sentence with the dependent clause, and place the main clause at the end for emphasis.

Subord. Conjunction + subject + verb (this is the dependent clause),    Subject + verb (this is the main clause)

The following are all examples of complex sentences:

  • When you make a complex sentence, you subordinate one idea to another.
  • If you place the subordinate clause first, you give added emphasis to the main clause at the end.

COMPOUND-COMPLEX SENTENCES have at least two main clauses and at least one dependent clause. Because a compound-complex sentence is usually quite long, you must be careful that it makes sense; it is easy for the reader to get lost in a long sentence.

KEY TAKEAWAY

Using a variety of sentence types as well as using these types strategically to convey your ideas will strengthen your style.  Keep the following in mind:

  • Simple sentences are great for emphasis.  The make great topic sentences.
  • Compound sentences balance ideas; they are great for conveying the equal importance of related ideas.
  • Complex sentences, when you use them effectively, show complicated relationships between ideas by subordinating one idea to another.

EXERCISE Combining sentences

Combine the following pairs of sentences to make one idea subordinate to the other. Notice the impression you convey by how you subordinate one idea to another. If your combined sentence was a topic sentence for a paragraph, what idea would the reader expect that paragraph to emphasize?

  1. Pair 1.
    • Energy drinks enhance awareness and energy level.
    • Energy drinks have negative health impacts.
  2. Pair 2.
    • Smith’s study found that energy drinks can increase athletic endurance.
    • The study also found that energy drinks can cause negative side effects such as headaches and “energy crashes”, and can possibly lead to caffeine addiction.
  3. Pair 3.
    • The rates of adolescent male violence has dropped by 20% over the last decade.
    • The rates of female adolescent violence has increased by 50% over the last decade.
  4. Pair 4.
    • Nuclear power plants can pose significant dangers.
    • Nuclear energy is a clean and efficient way to generate power and reduce reliance on fossil fuels.

14

Appendix F: Punctuation Matters

“Punctuation marks are the road signs placed along the highway of our communication, to control speeds, provide directions and prevent head-on collisions.” 

Pico Iyer, “In praise of the humble comma”P. Iyer, "In praise of the humble comma," Time, 24 June, 2001 [Online]. Available: http://content.time.com/time/magazine/article/0,9171,149453,00.html

Punctuation Really Matters!

Consider how punctuation can change the meaning of the following run-on sentence:

I have two hours to kill someone come see me. 

The main function of punctuation is to separate phrases and clauses into meaningful units of information. Therefore, it is necessary to understand the basic structure of sentences—phrases and clauses—to understand the proper uses of punctuation. When punctuation is missing or incorrectly used, the reader may get a completely different message than the one intended. This can not only confuse readers and waste time, but can have disastrous results in cases where the writing has legal, economic, or safety implications.

"Let's eat grandma!" vs "Let's eat, grandma!" PUNCTUATION SAVES LIVES!
[Grandma image]. [Online]. Available: https://91rules.wordpress.com/2011/10/14/who-knew-commas-could-be-so-important/. CC-BY 2.0.

An example of how a punctuation error can have real world costs and consequences is reported in “Comma Quirk Irks Rogers”:  one comma error in a 10-page contract cost Rogers $2 million.G. Robertson, "Comma quirk irks Rogers," The Globe and Mail, Aug. 6, 2006 [Online]. Available: https://www.theglobeandmail.com/report-on-business/comma-quirk-irks-rogers/article1101686/  If you need further evidence, read about the case of the trucker’s comma that went all the way to the supreme court, resulting in a $10 million dollar payout!M. Norris, " A few words about that ten-million-dollar serial comma," The New Yorker, March 17, 2017 [Online]. Available: https://www.newyorker.com/culture/culture-desk/a-few-words-about-that-ten-million-dollar-serial-comma

There are several helpful rules that will help you determine where and how to use punctuation, but first, it might be helpful to understand the origins. Punctuation was initially developed to help people who were giving speeches or reading aloud. Various kinds of punctuation indicated when and for how long the reader should pause between phrases, clauses, and sentences:

Comma = 1 second pause

Semicolon = 2 second pause

Colon = 3 second pause

Period = 4 second pause

These “pause rules” can still offer some guidance, but they are not foolproof, as there are many reasons that someone might pause while speaking, including that they simply ran out of breath, got distracted, or need time to think of a word. Below are some more consistent rules that you should follow to properly punctuate your sentences. These are presented in a numerical order to help you remember the rules more easily.


COMMA RULE 1 – Introduce the subject
If the subject is not the first word/phrase in the sentence, place a comma before it to separate it clearly from the introductory element and indicate clearly what the subject of the sentence is.

As we have discussed before, sentences are most often strongest when the subject is the first element of the sentence:  S →  V →  O

Occasionally, however, we might want to place a word or phrase before the subject. In cases where you want to do this, it can be helpful, and often necessary, to place a comma after that word or phrase to clearly indicate the subject of the sentence. In the following sentence, see if you can determine what the subject is without a comma to help you:

Based on that initial design concepts will be generated.

The subject—and therefore the meaning of the sentence—depends on where you place the comma. If the initial phrase is “Based on that,” and “that” refers to some previously stated idea, then the sentence indicates that the subject is “initial design concepts,” and the verb is “will be generated.” However, if the initial phrase is “Based on that initial design,” then we already have an initial design to work from and do not have to generate one. We are now focusing on creating more advanced “concepts,” that will be “based on that initial design.”

So if the subject is not the #1 word in your sentence, place a comma before it to clearly show what the subject is (hence “comma rule #1”). In each of the following examples, the subject of the main clause is bolded.

After an introductory word Finally, the design must consider all constraints.
After an introductory phrase In the initial phase, the design must meet early objectives.

Meeting all the client’s needs, this design has the potential to be very successful.

Unlike Emma, Karla loves mechatronics.

After a subordinate clause If the design meets all the objectives, we will get a get a raise.

Although we are slightly over budget, the design will be  cost effective overall.

While he interviews the client, she will do a site survey.


COMMA RULE 2 – Interrupt the subject and verb
Never place a single comma between the subject and verb of the sentence; you need either two commas (like brackets) or no commas between the subject and verb.

When you place an interrupting word, phrase, or clause between the subject and verb, if that phrase is a non-essential element, you must enclose that phrase in commas (use the “bracket test”: if you could enclose it in brackets, then you can use commas).  If the phrase is essential to the meaning, omit the commas. The words interrupting the subject and verb are bolded in the examples below.

Interrupting word Communication errors, unfortunately, can lead to disastrous design flaws.

The rules, however, are quite easy to learn.

Interrupting Non-Essential Phrase or Relative Clause

(these could be bracketed, and even omitted, without changing the meaning of the sentence)

The Johnson street bridge, commonly known as the “Blue Bridge,” had to be replaced.

The new bridge, completed last year, is a rolling bascule design.

The new bridge, which is a rolling bascule design, was completed last year.

Interrupting Essential phrases or clauses

do not use commas; these are essential to the meaning of the sentence

The objective that is most critical to our success is the first one.

That bridge that needed replacing was the Blue Bridge.

The man with the yellow hat belongs to Curious George.

The student who has the best design will get an innovator’s award.

If you would like more information on Essential vs Non-Essential elements, and when to use “that” vs “which,”  check out this Grammar Girl link: Which versus That

Beware the “Pause Rule”—many comma rule 2 errors occur when a sentence has a long subject phrase followed by the verb “is.” People have the tendency to want to place a comma here, even though it is incorrect, simply because they would normally pause here when speaking:

The main thing that you must be sure to remember about the magnificent Chinese pandas of the southwest, x  is that they can be dangerous. 


COMMA RULE 3 – The serial comma
When listing a series of 3 or more items, separate the items with commas.

Whether you are listing 3 or more nouns, verb, adjectives, phrases, or even clauses, use commas to separate them. In general, do not place a comma before the first item or after the last item. If you are only listing two items, do not separate them with commas. Note what happens when you forget to put commas in the following sentence:

“I love cooking my family and my pets.”

The author may have intended to list three things that she loves, but without punctuation, she ends up listing two things she loves to cook.

Only use the commas if there are three or more elements being listed. Make sure to list the elements in a consistent grammatical form (all nouns, or all verbs, or all using parallel phrasing).

2 listed elements

(no commas needed)

All initial designs must incorporate mechanical structures and electrical systems. (2 nouns)

Squirrels eat acorns and sleep in trees.  (1 subject + compound verb (2 verbs)

3 listed elements The final design must incorporate mechanical, electrical, and software subsystems.  (3 adjectives describing different subsystems)

Squirrels eat acorns, sleep in trees, and dig holes in the garden.  (3 verbs)

The proposed designs must not go over budget, use more than the allotted equipment, or take longer than 1 week to construct.   (3 verbs:  go, use, and take)

faulty parallel phrasing

(one of these things is not like the others…)

Proposed design concepts must adhere to all constraints, meet all objectives, and the components x must be on the approved list.  (2 verbs and a 1 noun)

The new bridge is aesthetically pleasing, structurally sound, and has x a pedestrian walkway.  (2 adjectives and 1 verb)

There is some debate about whether to place a comma before the “and” used before the final listed item. This comma, referred to as the Oxford Comma as it is required by Oxford University Press, is optional in many situations. For an optional piece of punctuation, has stirred up a surprising amount of controversy! As with most grammatical rules, they can be broken when it is prudent and effective to do so; use your judgment, and choose the option that achieves the most clarity for your reader.

Review Comma Rules 1-3
Punctuate my imaginary award acceptance speech below, indicating where you would put commas and which rules you are following:
For their guidance and inspiration throughout my life I with all humility would like to thank my parents Lady Gaga and Ghandi.

COMMA RULE 4 – Joining clauses
Separate independent clauses by placing a comma before the coordinating conjunction.

While you might occasionally omit commas if the two clauses you want to join are very short (“She drove and he navigated.”), it is a good habit to separate them with a comma for the sake of clarity. The mnemonic device for remembering the coordinating conjunctions that can link two independent clauses together is FANBOYS (for, and, nor, but, or, yet, so). When you have two complete sentences, but you want to join them together to make one larger idea, use a comma before the coordinating conjunction.

FANBOYS Two clauses joined by a comma and coordinating conjunction
, for Thanks goodness next week is reading break, for we all need rest.
, and Vampires drink blood, and zombies eat brains.
, nor You should not play with vampires, nor should you hang around with zombies.
, but The undead are not acceptable playmates, but werewolves are ok.
, or You can simply avoid werewolves during the full moon, or you can lock them in the basement.
, yet Some rules of etiquette suggest it is rude to lock someone in the basement, yet safety is of paramount concern.
, so I think you understand my concerns, so I will leave it at that.

COMMA RULE 5
Use commas to indicate that a non-essential sentence element (a word, phrase, or clause) follows the comma, or to signal an abrupt shift in thought.
Meme: seals on a club dance floor: "Stop clubbing, baby seals"
[Baby seals image]. [Online]. Available: https://www.flickr.com/photos/venditti_min_min-venditti/30088824650. CC-BY 2.0.

Learning comma rules takes practice, of course.

Practice makes perfect, in the long run.

Vampires make everyone nervous, even the bravest slayers.

I told you I need it by Wednesday, not Thursday.

Consider the difference between “It’s raining cats and dogs” and “It’s raining, cats and dogs.”


SEMICOLON RULES
Use semicolons to link ideas when something stronger than a comma is needed. 

A semicolon has three main functions:

1. Join closely related independent sentences into one sentence:

Scott was impatient to get married; Sharon wanted to wait until they were financially secure.

(Subject are strongly related — indeed, in this case, they are engaged!)

2. Link two sentences joined by a transitional phrase/conjunctive adverb (however, therefore, finally, moreover, etc.):

Canadian History is a rather dull class; however, it is a requirement for the elementary education program.

3. Separate items in a complex list where one or more of the items have internal punctuation:

The role of the vice-president will be to enhance the university’s external relations; strengthen its relationship with alumni, donors, and community leaders; and implement fundraising programs.

In the first two cases, a semicolon works the same way a period does; if you could put a period there, then you can put a semicolon there. The semicolon simply connects the ideas more closely as part of one key idea, and makes the pause between them a little shorter.Picture of bifold doors showing hinges holding the two separate pieces together

The main rule you must remember is that if you use a semicolon in this way, the clauses on either side of the semicolon must be complete sentences. You cannot use a semicolon to introduce a phrase or fragment.

Complete sentence; complete sentence.

Think of the semicolon as working like a hinge in a bi-fold door; it joins two complete door panels that each have their own frame together as one.

Also remember that you cannot simply use a comma instead of a semicolon to link the two clauses; that would result in a comma splice error.

The 3rd case–using semicolons to separate long, complex list items that contain commas within them–can result in complicated sentences that are difficult to read. You might consider using a bullet list instead of an in-sentence list in these cases.

How would you punctuate the following to clearly show how many courses Makiko is taking?

Makiko is taking Classics, a course on the drama of Sophocles, Seneca, Euripides, Fine Arts, a course on Impressionism, Expressionism, Modernism, Literature, a course on Satire, Pastiche, Burlesque, and Science, a new course for Arts students.

Punctuation Practice : Add commas and/or semicolons as needed in the following sentences
  1. Many companies make sugar-free soft drinks that are flavored by synthetic chemicals the drinks usually contain only one or two calories per serving.
  2. The crab grass was flourishing but the rest of the lawn unfortunately was dying.
  3. The hill was covered with wildflowers it was a beautiful sight.
  4. The artist preferred to paint in oils he did not like watercolors.
  5. The house was clean the table set and the porch light on everything was ready for the guests’ arrival.
  6. The computer could perform millions of operations in a split second however it could not think spontaneously.
  7. The snowstorm dumped twelve inches of snow on the interstate subsequently the state police closed the road.
  8. We invited a number of senior managers including Ann Kung senior vice-president Lionel Tiger director of information technology and Marty Sells manager of marketing.

COLON RULES
Use a colon to introduce amplification in the form of an example, explanation, quotation, summary, or list.

Keep in mind that when correctly used, colons are only placed where the sentence could come to a complete stop (i.e: you could put a period there instead).

Amplification The hurricane lashed the coastal community: within two hours, every tree on the waterfront had been blown down.
Example The tour guide quoted Gerald Durrell’s opinion of pandas: “They are vile beasts who eat far too many leaves.”
List Today we examined two geographical areas: the Nile and the Amazon.

Remember that when introducing a list, example, or quotation with a colon, whatever comes before the colon should be a complete sentence.  You should not write something like this:

Today we examined:  x

Three important objectives we must consider are: x

If these cannot end in a period, they should not end in a colon. Whatever comes after the colon can be a fragment or list; it does not have to be a complete sentence.

Punctuation Exercises
  1. Download the attached Punctuation Exercise (.docx) document and compete the exercises with a classmate.
  2. Choose a paragraph from the Pico Iyer’s Time Magazine article, “In praise of the humble comma,” and examine how he has used punctuation to demonstrate his point in that paragraph.  In particular, note how he not only explains the importance of punctuation, but also shows its use in action.