Learning to Learn Online at Fanshawe College is designed to support current and prospective students within the Fanshawe College community who are interested in taking online and blended courses or who need additional learning supports .
This text is the basis for Fanshawe’s Open LMS resource where learners can explore our online learning Platform – FanshaweOnline – before enrolling in an online course or program. It’s designed to promote confidence and provide hands-on practice in taking an online course.
We would like to thank the members of Fanshawe’s Student Technology Council and the Fanshawe Student Union for their support in funding our open access initiative, as well as as the teams from Learning Systems Services and Reputation and Brand Management who provided assistance at various stages through the project.
Andrew Stracuzzi and Shauna Roch (Editors)
Creative Commons Attribution
We would also like to acknowledge and thank the following authors/entities from Kwantlen Polytechnic University Learning Centres team who have graciously made their work available for the remixing, reusing, and adapting of this text:
This resource would not be possible without the contributions of the following individuals:
Christina Page, editor of Learning to Learn Online at KPU
Alice Macpherson, who developed many of the Learning Aids that provided foundational content for the material in this book. The workshop content on teamwork depends heavily on the learning resources she created.
Rawia Inaim and Graeme Robinson-Clogg, who created many of the educational graphics and worksheets found in these materials.
Adam Vincent, who developed many of the time management materials and interactive exercises.
Emily Tan, who recorded many of the videos included in these materials and served as a reviewer.
Kim Tomiak, for her work reviewing the book and valuable suggestions on presenting the Community of Inquiry model.
Marti Alger, who developed many of the Learning Aids that provided foundational content, and contributed to the initial resource development content.
Wajeeha Rahman, who reviewed the materials and provided key insights from a student perspective.
Mustafa Mohammed, who created accessible alternatives for some learning activities.
Leeann Waddington and Laurel Tien, who helped to shape the initial structure of the resource, and piloted these materials in their classes.
KPU Open Education Resources Grant, and Rajiv Jhangiani, for support in creating these materials.
February 2020
Introduction to the Online Learning Journey
2
Welcome to Learning to Learn Online at Fanshawe College
To explore this textbook in Fanshawe’s learning platform, FanshaweOnline, please visit the FanshaweOpen course catalogue and enroll yourself into our free Learning to Learn Online course.
There, you will have an opportunity to explore our LMS, to gauge your comfort level with technology, and to learn strategies to succeed as an online student. You can also earn a digital certificate of completion for your participation.
This resource will guide you through your journey as an online learner. You will begin with three core chapters. Click on the image hotspots to explore your journey through this path.
Image credit: Graeme Robinson-Clogg and Andrew Stracuzzi
Read these three core chapters first. As you complete them, you should be able to:
Define your role as an online learner by developing a mindset for independent learning.
Prepare for your role as a team member in an online environment.
Relate to online instructors in a way that supports your learning and growth.
After reviewing these core modules, you may select additional chapter and content to support your skill development. These chapters are described in the image below.
Communicate professionally in an online environment
Analyze writing assignments, and
Read strategically
You may read these four chapters in any order. To navigate to the chapter of your choice, use the chapter menu found in the top left of each page.
Move to the first chapter to begin the core learning modules.
Chapter 1: Who am I as an Online Learner?
I
Learning Outcomes
In this section of the learning toolkit you will explore your role as an online learning student. By the end of this section, you will be able to:
Describe the characteristics of a self-directed learner.
Use the plan-monitor-evaluate strategy to organize and evaluate your learning.
Apply critical questioning and reflective strategies to assess your learning at each stage in your course.
Image Credit: Graeme Robinson-Clogg
Go to the next chapter to move on to the first section of this module.
1.1 Identifying Skills for Self-directed Learning
1
Though all college courses ask students to apply independent learning strategies, online learning requires an even higher level of self-directed learning skill.
Many students have experience in teacher-directed classrooms. In these classrooms, the teacher is the central figure, and the students take direction about what to learn directly from the instructor. In these environments, students might spend time taking notes on an instructor’s lecture, and might focus much of their learning time on memorizing concepts in preparation for recalling them on an exam.
Online college courses are different. The instructor is no longer the central figure in the learning environment. You, the student, become the central actor in your own learning journey. As you undertake this journey, you are supported by your community of fellow students. Your instructor serves as your guide, using their knowledge and experience to direct you to learning experiences that will lead you to your learning goals.
As you begin the workshop, reflect on your current self-directed learning skills. The quiz below will help you to get started. Complete the quiz before continuing on in the workshop below. If you are unable to view or complete the quiz, please access this activity in an alternative format.
Independent learning requires the following skills:
Defining your learning goal for your program, each course, and each assignment you complete.
Identifying the steps you must take to move towards your goal. What content do you need to know? How will you learn it?
Choose strategies that will support your own learning.
Reach out for the support you need from your instructor, classmates, and university support services.
In the next section, you will explore the ways that a skill called metacognition supports you in becoming an independent learner.
1.2 Applying the Plan-monitor-evaluate Model for Assessing Your Learning Progress
2
What is Metacognition?
Have you ever wondered what the most successful students do differently from other students? Students who have developed effective ways of learning have mastered a skill called metacognition. In simple terms, metacognition is understanding your own thinking and learning processes. In other words, it is “thinking about your thinking”. Metacognitive skills include planning your learning, monitoring whether your current learning strategies are successful, and evaluating results of your learning. Improving your metacognitive skills is associated with increased success in all of your academic life. To learn more about how metacognition applies to student life, watch the video below.
Learning Choices: Videos and Text
At several points in the textbook, you will have the opportunity to learn key skills by watching a short video. If you prefer reading to watching videos, you will find a video transcript located directly below each video. Scroll past the video to read if this is your learning preference.
How do you gain the skill of metacognition? One way to think about developing metacognition is gaining the ability to plan, monitor, and evaluate your learning.
Image Credit: Christina Page and Andrew Stracuzz
Planning involves two key tasks: deciding what you need to learn, and then deciding how you are going to learn that material.
Monitoring requires you to ask “how am I doing at learning this?”. In monitoring, you are constantly tracking what you have learned, what you don’t yet know, and whether your study strategies are helping you to learn effectively.
Evaluation involves reflection on how well you met your Learning Objectives after completing a unit of study, or receiving feedback (such as a test or assignment).
Key Questions to Improve Your Learning
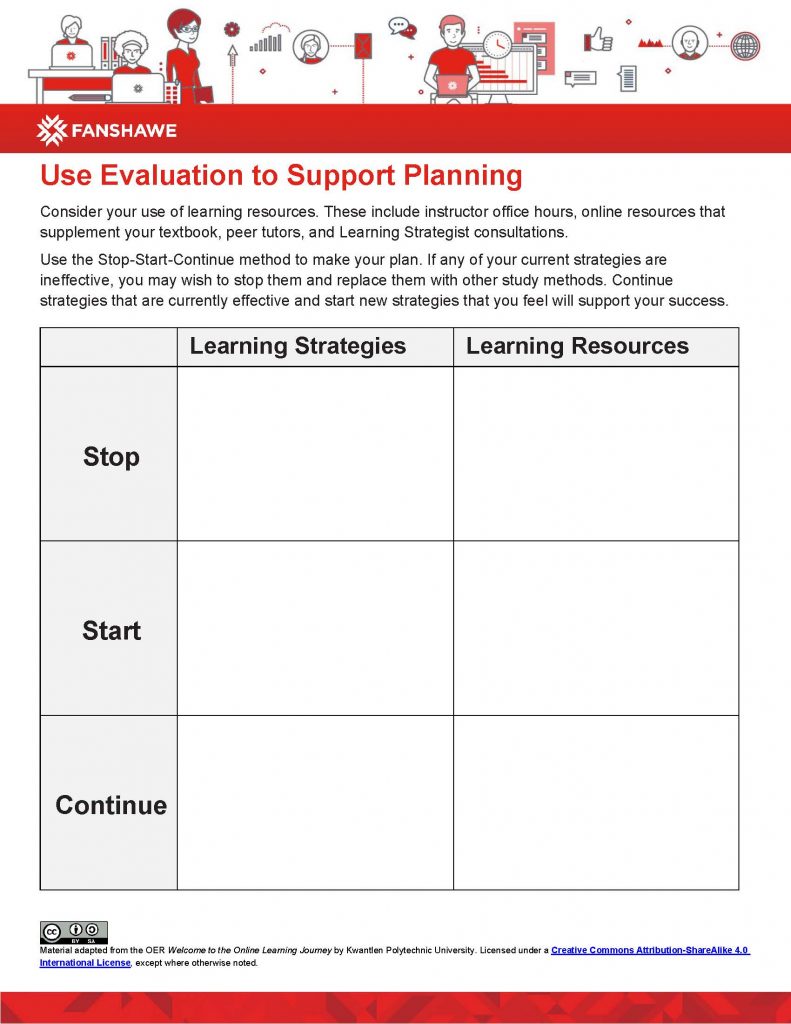
At each stage in the learning cycle, there are key questions that you will ask yourself to support your learning process. In the chart below, you will identify the key question for each stage in the cycle, along with the other questions you will want to consider. To use these questions in your courses, download a printable worksheet version.
Key question
Other questions to ask yourself
What do I need to learn? (Planning)
What are the Learning Objectives for this class?
What do I already know about this topic?
What are the concepts I need to master before my next test?
What do I want to learn about this topic?
How do I distinguish important information from the details?
How am I going to learn the material? (Planning)
How can I integrate textbook reading with lecture notes?
What active learning strategies will support my learning?
Will I study alone or with a study group?
What charts or visuals will help me reorganize or process this material?
What memory strategies can I use to remember key words and concepts?
How can I connect with my instructor in office hours?
How am I doing at learning this material? (Monitoring)
What concepts do I understand well?
What concepts are still confusing for me?
Can I explain the material to someone else without referring to notes?
Can I create and answer self-testing questions about these concepts?
What other strategies could I use to learn this material?
Am I using the supports available to me (e.g. office hours, tutors)?
How can I make this material more personally relevant to me?
Did I learn the material effectively? (Evaluation)
To what extent did I meet the Learning Objectives for this unit?
What in my exam preparation worked well?
What in my exam preparation did not go well? What do I want to change?
How did my exam answer compare with the suggested answer? What key components did I miss?
How will what I have learned help me in my next courses?
One key metacognitive skill is being able assess what you already know about a course topic, and to identify what you would like to learn through your reading, discussions, assignments and other class activities.
1.3 Using Critical Questioning to Support Your Learning
3
Learning in an online environment requires you to move beyond simple memorization of course concepts. To gain knowledge that will support you in your growth as a lifelong learner and in your future career, you will want to interact with course concepts deeply and in ways that are personally relevant to you.
One way of picturing deeper learning is Bloom’s Taxonomy.
Image Credit: Rawia Inaim
The levels of Bloom’s taxonomy build upon each other. While you need to be able to remember key concepts, your courses will spend more time developing your ability to apply, analyze, evaluate, and create using this knowledge. As you encounter new concepts, you will want to use critical questioning to understand the concepts at all levels, moving from surface to deeper knowledge. The chart below includes some questions that might be relevant at each level.
Level
Question Stems
Remember (knowledge recall) – retrieving relevant knowledge from long-term memory
What is the definition of…?
Who did…?
When did…occur?
How much/many…?
Understand (comprehension) – interpreting the meaning of information; being able to “translate” knowledge into one’s own words; linking new information to what you already know
What are types of…?
How does…function?
How does the process occur?
What are my own examples of…?
Apply – using what you know to do required tasks
What is a case study where this might apply?
How would I perform _____ task using this information?
What problems can I use this information to solve?
What does theory x predict will happen?
How does… affect or apply to…?
Analyze – taking things apart; dissecting; asking “why?”; seeing relationships and how things work
What is the relationship between…and…?
How is…similar to/different from…?
What is the best solution to the problem, conflict, issue?
Distinguish between ____ and ____
What hypothesis or theory explains this data or given information?
Evaluate – appraising, judging and critiquing the outcomes of any of the other levels
Is…
Correct or incorrect? Why?
Effective or ineffective? Why?
Relevant or irrelevant? Why?
Logical or illogical? Why?
Applicable or not applicable? Why?
Proven or not proven? Why?
Ethical or unethical? Why?
What are the advantages or disadvantages of…? Why?
What is the best solution to the problem, conflict, issue? Why is it the best?
Create (synthesis) – putting things together; building on what you know to create something new; seeing new relationships or making new connections. Anderson, L. W., & Krathwohl, D. (Eds.). (2001). A taxonomy for learning, teaching, and assessing: A revision of Bloom's taxonomy of educational objectives. New York: Longman.Bloom, B., Englehart, M. Furst, E., Hill, W., & Krathwohl, D. (1956). Taxonomy of educational objectives: The classification of educational goals. Handbook I: Cognitive domain. New York, Toronto: Longmans, Green; Salustri, F. (2015). Four levels of questions. Retrieved April 23, 2018, from http://deseng.ryerson.ca/dokuwiki/design:four_levels_of_questions.
How does this new information change my understanding of ____.
Can I create a paragraph/journal/video/portfolio page that demonstrates how I integrate this information with my other knowledge?
One method for creating study questions or planning active learning activities is to move step-by-step through each level of Bloom’s Taxonomy. Begin with a few questions at the Remembering level. If you don’t yet know the technical language of the subject and what it means, it will be difficult for you to apply, evaluate, analyze, or be creative. Then, go deeper into your subject as you move through the levels. Learning at university requires you to learn the basics of your discipline by remembering and understanding; however, you will spend much more of your time applying, analyzing, evaluating, and creating.
Here is an example of what this might look like. What questions can you create for your topic?
Image Credit: Rawia Inaim
Try It!
Create Study Questions Using Bloom’s Cognitive Taxonomy
Pick a subject area in which you are working. For each level of Bloom’s Taxonomy on this page:
Develop a question and answer it to show that you can think about the material at that level. Use the example questions on the handout above as a guide.
Think about how your questions would allow you to assess how much you know and what level you are working at.
Applying information in a familiar situationMy question(s):
Analyzing
Analyzing by breaking information into parts to explore relationships.
My question(s):
Evaluating
Justifying a decision or course of action.
My question(s):
Creating
Generating new ideas, products, or ways of viewing things.
My question(s):
1.4 Managing Information for Online Learning
As you develop your identity as an online learner, you will want to consider the role of information management in your learning process. Strong independent learners actively read, evaluate, and use information for current course tasks, but more importantly, to develop a resource file of information that will support professional growth.
Many online learners feel overwhelmed at the volume of reading and the wealth of online resources available to them. Managing information well requires you to develop skills in identifying the purpose for your reading (What do you need to learn from this reading? Why is it important to you personally and professionally?), and the strategy that will help you achieve your purpose (skimming, reading key portions, a close reading). In the Strategic Reading module of this workshop, you will discover additional ways to manage the reading process.
Early in your learning journey, you will want to select a system for managing information. As you will frequently work with electronic texts and articles, selecting a system that allows you to store, search, and retrieve readings and notes from current and past courses. Online note systems, such as OneNote or Evernote, are highly effective for this purpose.
Benefits of Using an Online Notebook
Online notebook platforms allow you to do the following:
Create individual notebooks for courses or assignments, creating additional sections or pages for weekly module topics
Create flexible notes that include text, images, audio, and video files
Store PDFs and other course documents for your own records (note: you will eventually lose access to the college’s LMS when courses are complete)
Clip and store relevant information from the web
Search stored content to quickly find relevant information, making connections between courses and your previous learning
Sync notes across all of your devices
Choose a Notebook
Two fully-featured and common software platforms are Onenote and Evernote
Advantages
Disadvantages
OneNote
Included in Office 365 subscriptions (free to KPU students)
Mac version is less fully featured
Evernote*Used under license from Evernote Corporation
Simple interface is easy to learn and use
Basic version is free, but additional features require an annual subscription
To evaluate which platform best serves your needs, you may wish to investigate by trying out each on your preferred devices. You may also wish to explore the following linked video tutorials for further information, and to begin developing your organizational system.
After investigating and installing your preferred digital notebook, create a notebook for each of your semester courses. Save your course presentation as a file in each of the notebooks.
Chapter 2: Who am I on my Learning Journey With?
II
Learning Outcomes
While you are on your own unique learning journey, much of your learning will come through your interactions with your fellow students. In preparation for your future career in a collaborative professional context, much of your learning will take place in groups. In some disciplines, this process is referred to as becoming part of a community of inquiry or community of practice.
By the end of this module, you will be able to:
Define the role of a the learning community in your online program.
Understand processes that shape effective team interactions.
Plan your strategy for working effectively in teams.
Image Credit: Graeme Robinson-Clogg
Go to the next chapter to move on in the textbook.
2.1 Defining your Learning Community
4
When you join an online course, you become part of what is known as a Community of Inquiry. In the Community of Inquiry, you will have an Instructor, content to process, and a learning community in which to grow.
This is a learning community that fosters your learning (cognitive growth), in a way that allows you to apply new insights to your life and work. Within a Community of Inquiry, learners have two key roles:
Maintaining a cognitive presence in the community. This requires a continual process of critical thinking.
Developing a social presence in the learning community. This involves creating the open and mutual relationships that allow for learning and collaboration to occur.
How does learning happen? Is it the result of reading, memorizing, and taking exams? While many learning experiences have these components, the best kind of learning involves constructing new knowledge in a learning community. This requires interacting with new information (for example, from readings, discussions, videos, and lectures). You may receive this information with instructors, from fellow students, or you may search it out to solve questions or problems. Then, together with your learning community, you make connections between this new knowledge and your prior experiences. You also determine how this new knowledge will shape your professional practice.
The Community of Inquiry supports this process through the exchange of ideas, supporting one another exploring connections, and challenging ways of thinking through thoughtful questioning.
Social Presence
If learning occurs in a collaborative community, how does this take place online? Maintaining a social presence in an online environment involves allowing for open communication. Social presence allows you to risk expressing your ideas online, based on the knowledge that your classmates will be respectful and supportive. All members of the community commit to supporting each other in their learning. Though it may be difficult to express some nuances and emotions online, using emoticons can help.Athabasca University. (n.d.). Community of inquiry coding template. Retrieved from http://cde.athabascau.ca/coi_site/documents/Coding%20Template.pdf; Garrison, D. R., Anderson, T., & Archer, W. (1999). Critical Inquiry in a Text-Based Environment: Computer Conferencing in Higher Education. The Internet and Higher Education, 2(2–3), 87–105. https://doi.org/10.1016/S1096-7516(00)00016-6
Group work is also a key part of the Community of Inquiry experience. The best online learning experiences happen when you are able to form connections within a team as you work towards your learning goals. The next sections of this module provide strategies for developing your learning community in the context of group work and team development.
2.2 Understanding the Principles of Effective Teamwork
5
Now that you have identified what you hope to achieve through teamwork in your learning community, consider how you will form effective teams.
Five Basic Elements of Effective Teams
Image Credit: Rawia Inaim
Effective teams share five key characteristics:
Positive Interdependence
Members believe they are linked together; they cannot succeed unless the other members of the group succeed (and vice versa).
They sink or swim together.
Individual Accountability
The performance of each individual member is assessed and the results given back to the group and the individual
Group Processing
At the end of its working period, the group processes it’s functioning by answering two questions:
What did each member do that was helpful for the group?
What can each member do to make the group work better?
Skills in Communication
Necessary for effective group functioning.
Members must have – and use – the needed leadership, decision-making, trust-building, communication, and conflict-management skills.
Promotive Interaction
Members help, assist, encourage, and support each other’s efforts to learn.Johnson, D., T. Johnson, R., & Smith, K. (1998). Active Learning: Cooperation in the College Classroom (Vol. 47). https://doi.org/10.5926/arepj1962.47.0_29
Complete the quiz below to strengthen your knowledge of the five elements of effective teams.
Now that you understand the characteristics of effective teams, move to the next section to discover how good teams develop and grow through their life cycle.
2.3 Planning for Successful Teamwork
6
Tuckman suggested that teams move through stages in their life cycle: forming, storming, norming, and performing. At each stage, the group will work through a series of interpersonal tasks, as well as a series of project-related tasks.
Image Credit: Alice Macpherson and Rawia Inaim
In the first section of this module, you explored the components of a Community of Inquiry. Both cognitive presence and social presence are required in the online learning community. Tuckman’s model of team development also indicates that both components are needed. In a class-based team, it may be easy to focus only on the cognitive output of the group — the creation of the project, paper, or presentation. However, as you can observe from Tuckman’s model, a well-functioning team requires its members to exhibit social presence throughout, communicating well in interpersonal interactions.
In the days ahead, you will likely find yourself on a newly forming team in an online environment. Consider the strategies you plan to use to demonstrate social presence and form a strong interpersonal foundation for your newly forming team.Tuckman, B.W. (1965) ‘Developmental sequence in small groups’, Psychological Bulletin, 63, 384-399. Reprinted in Group Facilitation: A Research and Applications Journal ,Number 3, Spring 2001
2.4 Progressing Through the Stages of Team Development
7
As your group moves through these stages, stay aware of the patterns that tend to occur at each stage. For example, many teams falsely assume that their group cannot function when they find themselves at the storming stage. However, this stage is a normal part of team development, like the others. The infographic below indicates what steps you and your group members can take together to move to the next stage in your work together. Ultimately, you want to achieve a performing team that supports your learning in community.
Image Credit: Alice Macpherson
Now that you have reviewed the ways that a team can move on in their development, apply your knowledge to team dilemmas in the quiz below. When you have finished the quiz, go to the next chapter to move on in the workshop.
A Team is two or more people; working together; on a Common Goal (or goals). Groups become Teams if the common goals are clear and attention is paid to both interpersonal and task functions.
The Team must Decide how to Communicate Effectively (Interpersonal)
Each Team must set up their own guidelines for good communication and a Team Charter. Through discussion and negotiation the members choose the items that are most important for their clear communication as a Team. These often include commitment to:
Respect and Listen to others
Not blame (work hard on the problem, not on the person)
Group members and Project process
Supportive and Constructive Feedback
Agreed upon Goals and Clear Timelines
Positive interdependence (sink or swim together)
Individual Accountability (say what you will do and do it)
Analysis of work done and Planning for next steps
Process for conflict and Problem Management
The Team must Decide what is Important and Measure This (Task)
Early in the formation of the group, the members must decide what will be measured in the process. These items are generally critical to success and for the group to become an Effective Team. A team that has succeeded shares the following characteristics. Its members:
Came prepared
Offered ideas and suggestions, Provided information
Asked for clarification/feedback
Identified resources
Solicited others’ participation
Kept group on task
Was easy to work with
Prepared materials
Made presentation
Participated in discussions
Managed group conflict
The Team must Acknowledge Success and Aim for Improvement
What have we done (individually and collectively) to meet our goals and keep the Team Charter?
How can we do better for next time? (Next steps)
The Team Celebrates!
Celebrate what you have accomplished and then refocus your efforts for greater success!
Framework for Working Together
Core Values
Your personal beliefs are the core values that affect and drive how you look at the world, your behaviour in the world and your interaction with others. They are how you do “business” with the rest of the world. In other words, they are the basis for everything that you are and do. These beliefs about appropriate behaviours, attitudes and strategies also guide every working group and need to be explicit and understood.
Mandate
It is useful to know what you are expected to do in a group situation. This is often delivered or requested from an administrative or political level and appears in the form of a “job description”. The group which is mandated may not be able to effect the general outline of the mandate. The context in which the group operates has critical effects on what can be done.
Identifying a Mission Statement
A mission statement embodies the group’s current purpose and intent and answers (within the mandate of the group) questions such as: What are we about? Why are we working together? What do we want to achieve? It describes the business that you are in. This may be a statement developed by the whole organization or it may be more localized in a department, program, class, work group or individually. It gives direction to actions. Without knowing your mission, you may not be able to get started.
Developing Shared Vision
Vision is a future oriented statement of a group’s purpose in a task, project or work team. Having the members shared a vision that aligns with their personal values and aspirations is a solid basis for production. Time spent at the beginning in dreaming and discussing what the final result will be is time well spent. If it is not possible to have a shared vision of the end product and the goals and milestones that must be reached then the team may also have difficulty identifying whether they have accomplished their purpose.
Sometimes, when the project is open ended or ongoing, the final product cannot be totally “visioned” at the beginning. A shared vision will then be one that all of the team members agree are the elements of where they want to get at this time and the direction that they will start moving towards to achieve these elements.
Visions should be revisited and refined over time. If the team is not heading in the same direction, then it may not get anywhere.
Determining Appropriate Goals
What are the individual tasks and goals that will build to making your vision manifest? Goals lead towards the realization of the vision. It is important to develop appropriate goals, make them explicit and share an understanding of each one.
Goals have:
Targets – where we expect to get to realistically balanced with time and resources.
Objectives – identifiable, measurable and achievable steps.
Tasks – ways of reaching the objectives.
Indicators – ways of measuring progress.
Like our vision statement, goals need to be realigned with reality on a regular basis. Evaluation and adjustment drive this process.
Improving Continuously
Knowing where you are going and how you intend to get there is a good start. The final step is continuous improvement. Planning, implementation, and verification are tools for analysis and change as the process unfolds. Improvement is continual but the steps are small. Pick changes that can be made now that will have a positive effect – 1% is enough each time.
Chapter 3: Who are my Instructors? What is their Role?
III
Learning Outcomes
The online learning journey requires a different relationship to instructors than you may have experienced in the past. You may not see your instructors as regularly face to face, yet you can still develop effective relationships with instructors that support you in your learning. By the end of this module, you will be able to:
Describe the role of an online instructor.
Develop an effective student-instructor connection.
Image Credit: Graeme Robinson-Clogg
Go to the next chapter to move on in the textbook.
3.1 The Role of an Online Instructor
9
Image Credit: Christina Page; Andrew Stracuzzi
In online classrooms, your instructor takes on the following roles:
Designer: In a museum, a curator locates the best artifacts to create an effective experience for those who visit. In an online learning environment, your instructors take on the role like that of a curator as they design the course. They will guide you towards readings and other learning materials that will serve your learning goals. Based on their experience in their field, they are able to help you focus your attention on learning resources that are accurate and relevant.
Facilitator: Your instructor carefully creates opportunities for you to learn the skills you need for your future career, and designs assignments and learning activities to lead you towards intellectual, personal, and professional growth. As you review the course presentation, consider each of the learning activities and assignments. Think about the reasons why your instructor may have selected these course components to contribute to your development.
Director: Online instructors are available to answer questions along the way. As you learn, you will inevitably find areas that are unclear to you, either related to the course content or your learning process. By communicating with your instructor effectively, you will take full advantage of their role in guiding you on your journey.Garrison, D. R., & Vaughan, N. D. (2008). Blended learning in higher education: framework, principles, and guidelines (1st ed). San Francisco: Jossey-Bass.
For Reflection
Now that you have considered the roles of your online instructor, consider how these roles will shape your work as a student, and your relationship with the instructor.
3.2 Developing an Effective Student-instructor Connection
10
Image Credit: C.C.0
Making the Right Connection
Now that you have developed a picture of the role that your instructors will have in your online learning journey, how might you develop an effective relationship with them. Consider the following suggestions:
When you look at a course reading, activity, or assignment, try to put yourself inside the mind of your instructor. Why do you think they chose this particular learning experience for you? What do you think they intend for you to learn? Understanding the purpose of a learning activity can increase your motivation and help you to stay on track in your work.
Take advantage of opportunities to connect with your instructor, either face to face or during online office hours. You can attend office hours to clarify course difficulties, but also to build your relationship with your instructor and demonstrate your interest in the course material.
Check FanshaweOnline regularly. Your instructor is likely to post announcements and other key messages for the class. This provides another point of frequent contact.
Use email effectively to connect. You will learn more about how to construct an effective email in the section on professional communication in this workshop — but if you are curious, you may choose to view the chapter on how to email an instructor now.
When you receive feedback on an assignment, consider it carefully. How does your instructor want to see you grow in your academic or professional skills?
How would you define an effective relationship with an online instructor?
What is one step you will take to develop a relationship with each of your course instructors?
Chapter 4: Time Management for Online Learning
IV
Learning Outcomes
Online learning requires effective time management skills. You may not have the structure of a weekly class to help you organize your time and prioritize your assignments. If you are in a blended course, you will be responsible for a higher number of independent self-study hours than in traditional classroom courses. How will you manage your time?
By the end of this module, you will be able to:
Explore strategies for organizing work throughout the semester,
Develop a realistic study schedule.
Balance your online learning with your work or other commitments.
Image Credit: Graeme Robinson-Clogg
Move on to the next chapter to get started
4.1 Using Course Material to Plan Your Semester
11
How to Use Course Presentations to Understand the Shape of your Semester
Online courses often provide you with a great deal of flexibility in organizing your time. This can be a tremendous asset, particularly if you are balancing study with work, family, or other commitments. However, this also requires you to accurately determine how much work you must complete over the semester, and to develop a plan that allows you to complete this work effectively.
Many students find it helpful to develop a semester schedule that provides an “overview at a glance” of what will be required. You will find the information you need for this in your course presentations.
The following video will help you to better understand how to read your course presentation and how to plan for the semester ahead.
Creating a master schedule for your whole semester can help you to see the big picture and to stay on track. In this video, you will learn how to compile the information from your course presentations into one master schedule that will allow you to see your semester at a glance.
Here are 3 STEPS you can take to use your course presentations to create a semester schedule.
Step 1: Create a table with 7 columns, one column for each day of the week, and with one rows for each week of the semester. Label the days, Monday, Tuesday, and all the way along, across the top of the table. Then label the weeks, across the side of the table. At this point you can also add specific dates for each week of the semester. You can download a ready-made semester schedule by clicking in the description of this video.
Step 2: Next, gather up all of your course presentations for the semester. You should have one for each course you are taking, which includes details about the weekly schedule and readings, assignment due dates, and exams. If you have a part time job, and know your schedule, and if you have family commitments which have a regular schedule, gather up these schedules as well.
Step 3: Now, go through the course presentation looking for important details and commitments that will take place in Week 1 of the semester. This could include required course readings, homework and assignments. On your semester schedule table, find the day of the week these commitments need to be completed by and write them down. Make sure to include the course name, the details of the commitment, and what it is worth if it is a graded assignment. Now keep working through your course presentation, through each week of the semester. Keep following these same steps for each of your courses, until you have completed your schedule.
Now, add important life events to your semester schedule – this might include work events, family events, trips and special occasions.
In summary, once you have completed these 3 steps using your course presentations to create a semester schedule, you will now have a central and easily accessible schedule that includes all of your commitments, in one place. You won’t have to go searching through piles of paper, or back online through the course website, to remember what you have to get done each week. As well, being able to see, in one place, what your commitments are today, this week, and in the upcoming weeks, can help you organize your time in the most efficient way possible.
4.2 Creating a Semester Schedule
12
A semester schedule gives you a visual picture of the assignments, projects, tests, exams, presentations, and practicum requirements that will happen during the semester. If you are taking a number of classes, this is a tool to be able to see what is coming up next.
By having the “big picture” in view, you will be able to proactively manage busy periods in your semester. If you have flexible due dates, you will be able to schedule your assignments for the optimal time in the semester. For example, you may notice that you have a larger than typical number of major assignments due in week 6. This allows you to schedule work on some of these projects earlier in the semester.
Look at the example semester schedule below. What do you notice about what the student chose to include? What will you include on your semester schedule? After viewing the example schedule below, download the semester schedule template (PDF) to create your own schedule. When you have completed your schedule, click the Next arrow to move ahead.
Image Credit: Rawia Inaim
4.3 Developing a Weekly Schedule that Works
13
Your next step is to create a weekly schedule. This will include your class times for face to face or blended classes, work commitments, volunteer roles, practicum placements, as well as any other regular events in your week. A weekly schedule is a good tool to evaluate whether your time use allows you to meet your overall goals. Do you have enough time for study? Is there time to maintain a healthy lifestyle?
Analyze the example student schedule below. What do you notice about how this student has planned their week?
Record your regular weekly commitments on the schedule template. This includes any face to face or blended class times.
Designate regular study blocks for each of your classes. Remember that university courses typically require at least 9-12 hours of weekly study. Remember that it is more effective to study for multiple, shorter blocks of time during the week than to plan for one extended study block. Shorter study periods will allow for greater focus. Regular review will help you retain information well.
Record meal times, family times, laundry times, etc.
Record all regularly scheduled personal activities such as meetings, employment and athletics.
Record any special activities you need to do or want to do on a regular basis.
Schedule to start your study period with the courses you like least or that you’re not doing well in. Try to study the same subjects at the same time each study day. Although this seems to be a mechanical way of scheduling, you will find that such a routine can help you develop a pattern for efficient and effective learning.
Schedule a weekly review (WR) for each course. Do it at the end of the week if possible. This weekly review gives you an opportunity to go over the past week’s notes along with the reading assignments to see what you have been learning in the past week during class and study time for each course. You can also look ahead to plan the next week and determine how much reading you need to do, what projects are due, and if any tests are scheduled.
Keep open some time for daily physical activity. Remember, research indicates that regular exercise will not only give you a general sense of well-being, but can reduce tension and help you accomplish a tough class, study, and work schedule.
Label some empty blocks of time as OPEN for academic or personal needs.
Schedule some time during Friday, Saturday, and Sunday for you to play, relax, or do whatever you want to do. This is your reward for sticking to your schedule. In addition, you’ll enjoy your free time more. Because it is scheduled you do not need to feel guilty.
Try it!
Download the weekly schedule template. Create your weekly schedule based on the principles you have explored in this chapter. Follow your schedule for a two week period. Then, evaluate and make adjustments.
4.4 Manage Daily Tasks
14
Now that you can see the big picture of your semester and weekly priorities, the next step is to create a daily to-do list to prioritize your tasks. The video below introduces you to some principles for creating daily task lists. When you are finished, click the Next arrow to choose strategies for managing your tasks.
By the time you’ve finished the day today, what will you have accomplished? In this video, you will learn to create a system to manage your daily to-do list, so that you can prioritize effectively and use your time efficiently. For every task you have to complete, you need to decide:
When do I need to finish this by?
How much time will it take? and
Is this task a priority, or can it wait until later?
A good to-do list helps you make sure that you complete all of your high priority tasks, and that you allocate a manageable amount of work to each day. So, how do you make a daily task list?
First, you will want to find the format that works best for you. Some people prefer to use a paper planner. Others prefer to use the reminders function on their phone, or another task list app. Choose the format that meets your needs the best.
Second, you will need to divide your work into tasks that are specific, measurable, and achievable. In general, a task should be anything that you can complete in a single work period – for example, in an hour or less. If you have a large project, break it down into smaller tasks.
Third, you will need to assign your tasks to a specific day. Make sure that each day’s task list is reasonable and achievable.
Fourth, prioritize each day’s tasks. What tasks must be finished today. Be sure that you complete these before moving on to lower priority tasks. After the most important things have been done, move on to the less urgent tasks.
At the end of the day, decide what to do with any tasks that aren’t yet complete. Most often, you will move the task to another day. You might also decide that the task isn’t important, and delete it from your list.
Finally, be sure to reward yourself for a day’s work well done. If you are able to create an effective motivational system for yourself, you will be less likely to procrastinate, and more likely to finish your most important work each day.
To summarize, a daily to-do list can help you stay on track and achieve your most important goals. Choose a tool that works for you, organize your tasks, prioritize them, and work through your list each day.
4.5 Choosing a Daily Task Management System
15
Some students prefer paper-based task management systems, while others prefer to use technology to manage daily tasks. Consider the following advantages and disadvantages of systems you might choose.
Consider what kind of task management system will help you most in your current study program:
What kind of time management system do you prefer? Paper or technology-based?
Do you plan to keep your current time management system, or make some changes to support your online learning? If you are trying a new system, when will you evaluate how effective it is for you?
When will you organize your daily tasks? Will you set aside a longer block of time on a weekly basis for planning, or set aside a few moments for planning at the beginning or end of each day?
Through using smaller blocks of time you can cover material in chunks (more on the next page) and not have to worry about the larger whole. A mistake that many people make is that they try to cram information into their minds in one large session. This isn’t a successful strategy for most students.
Look for smaller blocks of time to study. If you are a public transit user, you can likely spend 20 minutes on your bus ride to read or review for your upcoming class or exam. You could even listen to an audio recording of your notes. In the evening, instead of watching three episodes of your favourite TV show, you could watch one and spend the remaining time preparing for your studies. Going out to eat often? Consider making something simple at home that you could put in the oven to cook without needing tending to; that time could be used doing some work for class and still leave you time for other activities once dinner is done.
Making time for your studies can be overwhelming. The following video introduces you to ways to use smaller blocks of time to get your tasks done, while not using up numerous hours at once.
Click on the video to learn more as you continue down this pathway. Answer the questions (by clicking on the icons that appear) to further your learning. When you are finished, go on to the next chapter to move ahead.
Video Transcript: Using Small Blocks of Time Productively
One trick to balancing work and study is taking advantage of small blocks of time to get things done.
In this video, you will consider the small blocks of time in your schedule, and identify strategies to increase your productivity during these moments in your day.
Often, we think we need to have a lot of time available for study, or we think that we can only study at home or in the library. By adjusting your thinking, you’ll be able to open up additional productive learning time.
Do you commute by transit? Though it wouldn’t be ideal to try to master detailed or complicated reading material on the bus, perhaps you can do some initial scanning or skimming while in transit, to prepare yourself for class or deeper reading later.
Consider creating flash cards for material that you need to learn. You can take a set of flash cards with you and work whenever a few minutes become available. If you use one of the many flash card or self-testing apps available on your phone, you’ll be able to easily pull out your phone and make use of those small blocks of time.
Self-testing is one of the most effective ways to learn. Create a list of study questions for your course. Pull out the list when you have time available, and review a few questions. Keep track of those you answer correctly, and those you need to study more.
Does your course include access to online videos that explain and review key concepts? Watch a video or two to review, or to improve your understanding of a key course idea.
Some courses also include access to online self-study questions. Try answering a few review questions in your spare moments. These online quizzes usually provide immediate feedback on what you understand, and what you should study further.
Do you like to learn by listening? Make an audio recording of the important points you want to remember, and listen while you commute or exercise. Maybe audio books are for you – are any of your course materials available in this format?
Chapter 5: Professional Communication in the Online Environment
V
Learning Outcomes
Online learning requires you to communicate effectively with instructors and fellow learners, often in writing. The skills you practice in these courses support your growth as an effective communicator in professional environments.
When you finish this module, you will be able to:
Write clear and professional emails.
Communicate effectively in online forums.
Give and receive feedback to fellow learners.
Image Credit: Graeme Robinson-Clogg
Move on to the next chapter to get started.
5.1 Using Email in the Online Learning Environment
17
In an online learning environment, communicating by email is an important part of getting things done. For many students, emailing instructors can be intimidating, at least at first. The video below, which includes an interactive quiz, will provide you with some tools for sending a clear and professional email. You will use many of these same principles for your communication with classmates, and in other work settings.
Communicating with your instructor throughout the semester is an important part of being an active and engaged post-secondary student. Email is by far the most popular means by which this type of communication takes place. For students, emailing instructors is particularly appealing because it is familiar, easy and convenient. But messages sent via email can easily be misunderstood unless special care is taken in their composition.
To avoid confusion, and to make it as easy for your busy instructors to read and understand your email as possible, there are a few basic principles to keep in mind when sending an email message to your professor. In this video, we are going to cover five of these principles that will help ensure that your email communication is clear, effective, and professional.
First, it is important to use a formal, professional tone when emailing your instructor. Include an informative subject, and avoid simply saying “hey” or “hello” For example, if your instructor’s name was Tom Smith, an email to them might look something like “Dear Professor Smith.” You may wish to conclude with a closing like “best regards”. In general, don’t worry about being too formal with your instructor. Think of your email as a professional, business communication.
Second, make sure that your email is grammatically correct. You should think about your email as a chance to show your instructor that you care about the class, and that you are willing to take the time to proofread your message before sending it. It is also a good idea to break your message up into multiple paragraphs with appropriate punctuation. This makes your email easier to read, and it helps to avoid unnecessary confusion. Remember, your instructor is much more likely to help you if they are able to understand what you are saying.
Third, it is helpful to keep your message brief. Avoid long emails that go into too many unnecessary details or that appear to be long-winded rants. Keep your tone friendly and respectful, and keep your emails concise and to the point. With that said, it is also not a good idea to be too short with your message, as shortness can sometimes be misinterpreted as rudeness.
Fourth, it is a good idea to make sure that you actually need to send the email in the first place. Sometimes, simply reading through your syllabus, assignment description, class website, or lecture notes can answer many of the questions you might have.
Finally, it is important not to expect that your instructor will response to you immediately. Unlike with instant messaging, email responses can take anywhere from one to three days. Your instructors have a lot of email to respond to, along with their other responsibilities, so patience is advisable. Moreover, it is important to only re-send an email after at least five days have passed.
In this video, we covered five key principles that, if followed when writing an email to your instructor, will help ensure that you communicate clearly, effectively, and professionally.
5.2 Communicating in Online Forums
18
Many online courses include forums, either as a required assignment, or to support your learning process. How can you use forums to support your learning in the best way possible?
Earlier in the workshop, you encountered the social presence and cognitive presence elements of the community of inquiry you are building in your course. Forums are a tool for creating collaborative learning relationships. They can also be a low-stakes way to express your developing ideas, and to get feedback on the ways in which you are learning the course material as you work towards larger assignments.
What Makes a Good Forum Post?
The rubric below outlines what distinguishes stronger online posts from those that are less successful. Review the chart below. What do you notice? If your instructor has provided a rubric for online posts, read the rubric, and identify your instructor’s criteria for success.Fenwick, T. J., & Parsons, J. (2009). The art of evaluation: a resource for educators and trainers (2nd ed.). Toronto: Thompson Educational Publishing.
Image Credit: Christina Page; Andrew Stracuzzi
Tips for Participating in Forums
Develop a clear understanding of the expectations and ground rules for the forum. Review your course presentation (syllabus) to guidance on how often to post, the type of content to include in each post, and the best way to respond to others’ posts.
Make connections between your posts and the content you are learning in the course. A forum post is often an excellent place to engage in critical reflection. Make connections between the course content and the ways that your growing understanding are shaping your present and future practice.
Set a regular schedule for posting and commenting on forums. This prevents the amount of content from becoming overwhelming, and allows you to develop stronger relationships in the course by regularly engaging with classmates.
Include resources that might be useful to other classmates or your instructor in your posts.
Use language that is appropriate for an academic environment. Avoid writing in a way that is too informal (ie. writing that resembles a text message).
Make sure that each post is clearly written and well structured. Take time to clarify the message you want to communicate in your post, and organize your content into clear and concise paragraphs. This is easier for your reader than a long or disorganized post.
Respond to others’ posts in a supportive and challenging way. In writing, messages may be unintentionally misinterpreted. Be sure that your responses to others are respectful, positive in tone, and do not appear angry, even when you wish to disagree or present an alternative viewpoint.
Participate in the community discussion. Read others’ comments before posting, and connect your ideas with what you are hearing from your classmates. Pappas, C. (2015a, June 6). 10 netiquette tips for online discussions. Retrieved August 7, 2018, from https://elearningindustry.com/10-netiquette-tips-online-discussions; Pappas, C. (2015b, August 16). 7 tips on how to use forums in elearning. Retrieved August 7, 2018, from https://elearningindustry.com/7-tips-use-forums-in-elearning.
For Reflection
Read through your course presentations and find any guidelines for posting to forums. Create a checklist for yourself based on these guidelines and the rubric above. What do you need to do to create successful forum posts in your course? Keep this checklist, and refer to it regularly as you post to forums.
Good communication and learning in an online environment requires giving and receiving feedback. You might give feedback to classmates in a group project, or receive feedback from your classmates and instructors. What strategies can help you use feedback most effectively?
Feedback Criteria
Effective feedback must include:
What is being done correctly and well.
How it can be improved.
What the next steps might be.
Image credit: Rawia Inaim
Receiving Feedback
If another person offers you feedback, it may sound like criticism. It may be that they intend to be positive but they may not know how to say something positively. It may also be that their self-esteem is low and they are being defensive or aggressive towards you. Most importantly, you may become defensive or aggressive if you see their feedback as critical or negative, no matter what was meant.
Attempt to suspend your reaction until you understand the information that is being given. Paraphrase what you hear. If it seems unclear, ask for clarification. Having it presented in other words or from another point of view may increase your understanding about what is being said.
Explore and discover the reasons for the comments.
Is a change by you indicated?
Is it an evaluation of the past or an indication for the future?
Think about and cope with your possible defensive reaction.
Do you see wants as demands?
Do you feel guilty or obligated?
Are you hearing more than is being said?
Ideally, listen to his/her comments and find the positive side of them. Then, explain your position or point of view without feeling that you must justify yourself. Determine the importance of the message to you. You may choose not to change.
Any discussion will profit from more information. You can wall yourself away from information and change by being defensive. You may open new lines of communication by being open.
Giving Positive Feedback
It is easy to criticize and to think that we are helping a person deal with a situation. To give the right commentary, at the right time, to the right person, with the right reasons, in the right way, and to the right degree is very difficult.
You first need agreement to interact. If the other person is not ready to hear your comments, you set up a negative interaction that will cause them to block you and your opinions out. If you do not have permission to comment, you may be seen as aggressive and the other person may respond by being aggressive or defensive towards you.
Ask if the other person wants your feedback. If they say no, then you will have to discuss or problem-solve that before you say anything more, or you will say nothing at all.
Search out all the facts you can prior to giving your feedback. Ask the people involved about what they feel is happening and how they see the situation. This may solve or help to solve the problem.
Time the discussion so that you are all reasonably unstressed. Leave time so there is another chance to talk before a parting of ways. This will help to avoid or clear misunderstanding or confusion.
Be Positive. Try to begin and end your feedback with comments about what is working, correct, or right about the situation. No matter how bad you perceive things to be, there will be good points to comment on.
Avoid using absolutes or negative words, words like always or never or don’t. Each situation tends to be many shades of grey rather than black and white. Actions taken are seen by each person in the light of his/her own experiences and perceptions. Use alternative positive words and phrases. Avoid comparing the person involved to other people in other situations. The where, when, what, and who of each situation are different. Comparisons tend to produce resentment and frustration.
Be Specific in your description of the problem. Avoid vague or misleading statements. If attitude seems to be a problem, show specific instances and then take one point at a time so as not to overload or overwhelm the other person. Make sure that it is something that can be changed.
When you tell someone that you feel they could improve or change, then also make suggestions on how you think they might go about making those changes, and what behaviour would be observed if the changes were made. Be prepared for no change.
Feedback can be Positive if it:
is offered at the right time and place,
is offered with comments on good points as well as possible changes,
is connected to facts and not rumours,
is directed to behaviour that can be changed,
is specific and one point at a time, and
gives information and possible solutions to change the situation.
You will not use all of these items in all circumstances, but all of them can be used in some situations.
Many online courses include the opportunity to learn and demonstrate your learning with ePortfolios.
To get started with your ePortfolio, you may need to learn to use an online tool: Mahara and WordPress are two commonly used tools. Though ePortfolio assignments differ from class to class, there are some advantages to producing portfolios — both for your classes, and to extend your professional learning. Eportfolios offer the following benefits:
By recording your learning regularly, you are able to show your growth as a learner and a professional over time.
Eportfolios allow you to show and reflect on your learning process. While other assignments focus on the final product, an eportfolio allows you to record reflections, weekly learnings, and to document the changes in your learning and practice over a semester.
The process of considering the content to include and the best way to present it is itself a learning experience. By consolidating your learning from different course activities and assignments, and applying your learning to your past experience, present personal goals, and future practice, you are engaging in meaningful life-long learning.
Eportfolios provide a record of your learning to present in applications for future study programs or employment.Fenwick, T. J., & Parsons, J. (2009). The art of evaluation: a resource for educators and trainers (2nd ed.). Toronto: Thompson Educational Publishing.
Developing your eportfolio might require you to develop new technical skills in FanshaweOnline’s ePortfolio tool. For more detailed information on using Desire2Learn’s ePortfolio Tool, please review this learner guide.
Chapter 6: Analyzing Online Assignments
VI
Learning Outcomes
Assignments are a key part of your online journey. As you work towards independent learning, you will develop strategies to support you in completing projects effectively. By completing this module, you will be able to:
Identify learning goals for your assignments.
Use a rubric to evaluate your work.
Create an assignment plan.
Use feedback to move forward.
Image Credit: Graeme Robinson-Clogg
Move on to the next chapter to get started.
6.1 Identifying Learning Goals for Assignments
21
You need a clear understanding of what the instructor wants before starting on any assignment of project. Then you will want to translate assignment terms and requirements into useful clues as to what your instructor expects. When you are not sure, remember to ask the instructor.
The first step is to read the assignment carefully as soon as you receive it.
Interpreting the Assignment
Ask yourself a few basic questions as you read and jot down the answers on the assignment sheet:
What is the task you need to do in this assignment?
Why did your instructor ask you to do this particular task?
Who is your audience?
What kind of evidence do you need to support your ideas?
Most assignment will be related to the materials you have studied in the course up to the point of the assignment. As you read the assignment or project requirements, start by identifying which theories, formulas, and graphics relate. Consider what research you will need to do to complete the project.
6.2 Using a Rubric to Evaluate Your Work
22
What is a Rubric?
When you receive many of your course assignments, you may also receive a copy of the rubric the instructor will use to grade your work. The rubric provides information on what criteria shape a highly successful assignment.
How to Use rubrics
Your assignment instructions and rubric are two of your key tools throughout the process of completing the assignment. These provide an outline of the criteria that the instructor has set out for a successful assignment. There are two key times to use the rubric and assignment instructions:
Before you start writing: Unfortunately, time may be lost writing something that does not meet the key guidelines you must follow. To avoid this problem, take time to read both the assignment instructions and rubric carefully before beginning. Clarify any areas of confusion with your instructor.
After you have written a draft, but before you submit the assignment: At this point, grade your work according to the rubric. Think carefully and critically. Are there areas where you may not have met the criteria well? If so, edit your work accordingly, making the needed revisions before submitting the assignment.
The video below provides additional strategies for using rubrics. When you are finished the video, scroll to the bottom of the page for a reflective activity. Then, go to the next chapter to move on in the workshop.
When you receive an assignment, you may notice that it includes a rubric or checklist that indicates how your instructor will mark your work.Have you ever thought that this could be a powerful learning tool for you?
In this video, you’ll learn how use a rubric to its maximum potential to support your learning.
The first time you want to look at the rubric is when you first begin working on your assignment.You want to avoid making the unfortunate make of putting a lot of time and effort into an assignment, only to miss an important element of the assignment requirements.
Analyze the rubric carefully.What is your instructor looking for? Which sections receive more marks? What elements are worth fewer marks?Use this information to determine how you want to focus your efforts.
Not sure what a term on the rubric means?Now is a great time to ask!
Now, imagine that you’ve finished writing the first draft of your assignment.How does the rubric help now?As it turns out, there are some powerful things you can do with a rubric at this stage in your work.
One secret to student success is learning to accurately understand how your work meets the expectations of your course. One way that you can do this is to put yourself into the place of your instructor, and try to grade your own assignment according to the rubric.
Does your assignment meet expectations?If it doesn’t quite yet, you still have time to consider what changes you want to make.
After you receive the marked assignment from your instructor, compare how your self-evaluation with the rubric compares with how your instructor graded your work.Where did you notice differences?
As you continue to use this process, you will work towards using a rubric to self-evaluate accurately – so that your self-evaluation closely matches your instructor’s evaluation of your work.
So, as you can see, a rubric can be a powerful tool for learning. By using your rubric effectively, you will be able to produce work that accurately meets the expectations of your course.Make the rubrics work for you!
Reflection and Application
Take out your assignment instructions and rubric. Use them to answer the following questions:
Describe in one sentence your task on this assignment: What do you need to do?
What resources will you use to complete this assignment? Review any textbook materials, handouts, or class notes that relate to this assignment.
How many additional resources do you need to find to complete the assignment task? (consider books, peer reviewed articles, websites, or other resources).
What content do you need to create for this assignment?
What guidelines do you need to follow related to the format of the assignment?
What format do you need to use for citations and references (APA, MLA, and Chicago are the most commonly used).
Now that you have a clear idea of what you need to do, the next step is to break down the assignment into manageable “chunks”. The idea of completing a major research paper may seem overwhelming, but if you can divide the task into achievable steps you will be on your way to success.
Use the chart below to break your assignment into smaller steps. You will want to create steps that can be done easily in one day, and preferably in a single work period. Consider the following example breakdown for a research paper.
Assignment Task
Target Completion Date
Complete?
Read assignment instructions and rubric
October 2
Y
Review course materials and choose topic
October 3
Y
Library research — find 3 peer reviewed articles and two books
October 5
Read and take notes on two articles
October 7
Read and takes notes on final article and books
October 8
Organize notes; write thesis and outline
October 9
Write body paragraph 1
October 10
Write body paragraph 2
October 10
Write body paragraph 3
October 11
Write body paragraph 4
October 11
Write conclusion
October 12
Write introduction
October 12
Self-edit content and organization (use the rubric)
October 14
Writing tutor appointment
October 15
Edit and proofread assignment
October 16
Submit final assignment
October 18
In the above example, the assignment is divided into smaller pieces, with a manageable amount to complete each day. It is also clear when each task has been completed. A daily work goal like “work on research paper” is not well-defined, and can seem overwhelming. This can make it easy to procrastinate. By choosing specific and achievable goals, you may become more motivated to get started, and you will be able to measure your progress each day. Remember to reward yourself for meeting your goals along the way.
Try it!
Choose one of your upcoming assignments, and create a work plan modeled on the example above.
Image Credit: Graeme Robinson-Clogg; Andrew Stracuzzi
6.4 Using Feedback to Move Forward
24
“We all need people who will give us feedback. That’s how we improve.” – Bill Gates
During the learning process, we have many opportunities to receive feedback about the quality of our learning and work. In the university environment, this often comes in the form of grades and instructor comments on assignments and exams. By using this feedback to evaluate your learning strategies in light of your goals, you will be able to make adjustments to move you towards your goals in current and future courses.
Consider the Purpose of Feedback
Many people find feedback difficult to receive, particularly when it indicates areas for improvement. Shifting your mindset as you receive feedback can be a catalyst for personal growth. View feedback as a gift that is intended to allow personal growth, stronger future academic performance, and professional development. When you receive feedback, take time to reflect on the comments given. Direct the feedback towards future assignments; rather than considering what you might to differently on the current assignment, use the feedback to inform your future goals and work on subsequent projects.
Reflecting Mid-course
An excellent time for self-evaluation is after you have received feedback on your first midterm exam or major assignment. Consider the following reflection questions at this stage in your course:
What grade do I hope to achieve in this course? ________
To what extent am I meeting my goal for the course at this point?
What about my exam/assignment preparation worked well?
What about my exam/assignment preparation did not work well? What do I want to change?
How will what I have learned help me in the second half of the course?
If you have identified an area for growth that requires change, consider new learning strategies. Consider the resources available to you: online learning, workshops, tutoring, support from classmates, and your instructor. Identify the people on your “team” that can help you respond to feedback and move towards your new goals.
Reflecting at the End of a Course
The completion of a course is also an excellent time for reflection and evaluation. In addition to the questions in the midterm evaluation, consider the following:
How will what I have learned help me in my next courses?
How will I use what I have learned in my future career and other aspects of my life?
By reflecting on feedback and evaluating your learning regularly, you will avoid getting stuck in unproductive patterns. You will contribute to your own ongoing personal growth and development, supporting your success in future courses and other life endeavors.Chen, P., Chavez, O., Ong, D. C., & Gunderson, B. (2017). Strategic resource use for learning: A self-administered intervention that guides self-reflection on effective resource use enhances academic performance. Psychological Science, 28(6), 774–785. https://doi.org/10.1177/0956797617696456;Tanner, K. D. (2012). Promoting student metacognition. Cell Biology Education, 11(2), 113–120. https://doi.org/10.1187/cbe.12-03-0033
One of the challenges that many learners in online environments face is learning how to read and process large amounts of text — textbooks, articles, and other reading material. The materials in this module provide information on how to become a more strategic reader. These skills allow you to read with a purpose, selecting the most important material to support your growth, and reading it strategically. By the end of this module, you will be able to:
Assess the place of reading in your learning journey.
Evaluate your reading skills.
Review and apply the SQ3R method for reading.
Read journal articles strategically.
Take effective notes on online readings.
Image Credit: Graeme Robinson-Clogg
7.1 Assessing the Place of Reading in Your Learning Journey
25
Reading and the Online Learning Journey
Photo credit: Emily Tan
Online learning typically requires you to interact with a larger amount of written material than traditional in-class courses. This can benefit your growth as a lifelong learner by developing your skills in selecting relevant reading material, approaching it purposefully, and managing the information you read.
Consider the following principles as a guide as you approach reading:
Not all reading material requires equal time or attention. Unlike a novel, where you give most pages equal time in order to understand the story, much of your professional reading is focused on finding and using relevant information. This means that you may not read every word in available readings. Some information may require a close and careful reading, while other information may be skimmed to find key points.
Before you begin reading, identify your purpose for reading. What do you need to learn from this reading? This will determine how you approach the reading material.
Use questions to guide your reading. In the next sections of this module, you will learn a strategy called SQ3R that can guide you through the process of using questions to guide your reading.
Develop a system for identifying important information and taking notes. You have already explored systems for online information management. Consider how you will mark key learnings in the texts that you read, and organize this information in a form where you can easily access it again.
Move on to the next section to explore reading strategies in more detail.
7.2 Evaluating Your Reading Skills
26
Now that you have identified the place of reading in your online learning journey, the next step is to explore your current reading strategies. What do you do now?
Complete the quiz below. You will receive feedback about the effectiveness of your current preferred strategy. In the next sections of the workshop, you will learn some additional strategies to make your reading more effective. After you complete the quiz, go to the next chapter to move on in the workshop.
In this chapter, you will watch a short video that describes a method called SQ3R that provides a way to read efficiently and purposefully. After the video, you will complete a quiz that tests your knowledge of the content you learned. If you prefer reading to watching a video, scroll below the video to find a transcript.
Now that you’ve thought about your personal reasons for reading textbooks, how can you read them effectively? One of the barriers to reading for many students is the time it takes. So, what strategies can help you read more effectively and efficiently?
First, it’s important to know that you can approach a textbook very differently than a novel. You don’t need to read everything right in order. You will also pay more attention to some sections, and less attention to others. Here’s a process to guide you in your reading. It’s called the SQ3R strategy. What does that stand for?
Survey
Question
Read
Recite, and
Review
Let’s talk about each step.
S – Survey. This step allows you to get an overview of the chapter as a whole – what will you learn by reading? In this step, you will:
Read the Learning Objectives or chapter introduction
You will read the chapter summary and the end (you don’t have to wait until you’re finished the chapter to read the summary)
You’ll skim the study questions at the end of the chapter
And you’ll skim the chapter headings, and any important diagrams or charts.
At the end of this step, you should know how this chapter is organized and what you will learn by reading. You might find it helpful to end this step by making an outline of the chapter on a separate page.
Q – The in S3QR stands for question. This is a key step in reading for a purpose – you need to know what you hope to learn by reading each part of the chapter. Look at the first chapter heading. Now, make up a question that you will answer by reading.
Use who, what, where, when, and why questions.
R – The first R stands for Read. You will read to answer the questions you just created. This will help you to stay focused on your purpose for reading.
R – The second R stands for Recite. After reading each section, say the answer out loud. Now, write this down in your notes. This step helps you to summarize the material in your own words, which will support your learning and remembering. Explaining a concept in your own words demonstrates that you understand it.
R – The last R stands for Review. Look at your notes from the whole chapter. Think about how different concepts fit together, and fill in any gaps.
Now that you know the steps in the method, it’s time to think more deeply about how this method supports your learning. You’ll do that by completing the quiz in the next section of the workshop. The real test will be applying the method to your actual reading – try it out, and see how it works for you.
7.4 The Purpose of SQ3R Steps
28
In the previous section of the workshop, you watched a video or read about a reading method called SQ3R. To strengthen your knowledge of what you learned in the video, take the quiz below.
To complete the quiz, drag the words to the correct places in the paragraph. When you are finished the quiz, go to the next chapter to move to the next topic.
Now that you are familiar with the steps of the SQ3R Method, you may want to apply them to a text you are reading this week. To see how the steps are applied to an actual reading activity, watch the video below. At several points in the video, you will have the opportunity to pause and try the steps in the method. When you are finished the video or reading, go to the next chapter to move on in the workshop.
Now that you have learned the five steps in the SQ3R method, how will you apply them as you read? In this video, you will view a demonstration of how this method is applied to the type of reading you might encounter in a course textbook.
I’ll focus on the first three steps in the method: surveying the chapter, formulating questions, and reading to find key information.Today I’m going to read a chapter in an Organizational Behaviour Textbook on need-based theories of motivation – the same principles would apply to reading in other courses. My first step is to survey. I’ll skim the chapter quickly to get the main idea.
The first place I will begin is the Learning Objectives. I notice that in this textbook, they are located at the beginning of the chapter. I read these carefully to discover the main concepts that I will learn by reading. The next part of the chapter I’ll review is the key takeaways at the end of the chapter. Remember – there’s no rule that says that I need to read each page in order. By reading the key takeaways, I gain a sense of the most important information in the chapter. This will help me to focus my reading later.
Now, I’ll go back to the beginning of the chapter, and briefly skim the contents. I’ll pay particular attention to the headings and to any key diagrams. I’m noticing a key diagram for both Maslow’s hierarchy of needs and the ERG theory. I also notice two other key headings as I skim: I now know I will read about two factor theory, and acquired needs theory. From the information I’ve gained in the survey step, I’ve determined that my goals for reading are:
To be able to describe the four theories of motivation.
To identify how these theories are similar and different.
And to understand how each theory explains employee behaviour.
My next step is to begin questioning and reading. I’ll base my questions on key headings I notice. The first heading I read is Maslow’s Hierarchy of Needs. What questions can I ask about this? You may want to pause this video here, and try to create 3-4 questions you might want to ask. Then, resume the video to see how the questioning process works.
Here are the questions I’ve developed:
What is Maslow’s hierarchy of needs?
What are the levels in Maslow’s hierarchy? (I remember that there are levels from my survey step)
Why are there different levels in the hierarchy?
How does Maslow’s theory explain employee behaviour?
I’ve added my questions to my notetaking page. I begin reading looking for the answer to my first question. I find the answer here, in the first paragraph. The theory is based on a simple premise: Human beings have needs that are hierarchically ranked. There are some needs that are basic to all human beings, and in their absence nothing else matters. As we satisfy these basic needs, we start looking to satisfy higher order needs.
Now, I want to add this information to my notes. To get the most benefit of this step, I will recite the information in my own words, then write it down. The step of putting information into my own words ensures that I understand it clearly.
I pause and think about how I can express what I’ve read in my own words. I can say it like this: Maslow’s theory states that everyone has levels (a hierarchy) of needs. When our basic needs are met, we move to fulfill our higher levels of need. I’ll now add this information to my notes.
You will notice that I have left a wide margin on my notetaking page. This space allows me to add additional thoughts, images, and questions about the material later on. I may want to add additional information I learn in class.
I’ll move through the same steps to answer my other three questions. You may want to pause this video here, and try these steps out for yourself.
As I’m reading, I will also take note of key terms in bold letters. For example, I see that physiological needs is a key term in this chapter. These are words that I want to be able to define, as they are important to my understanding of the course material.
I will work through the chapter, following the same steps for each main chapter section: create questions, read to find the answers, recite my answer, and write it in my notes in my own words.
Now that you have seen how the SQ3R method might be applied to a textbook chapter, try it! Notice how this changes your reading process? How do you want to use this information to read in the future?
Apply it!
Commit to trying the SQ3R method once this week as you complete your course readings. As you do, consider the following questions:
How does the SQ3R method change how you approach your reading?
How will you adapt and personalize this process to your own learning strengths and the specific requirements of your courses?
7.6 How to Read Journal Articles Strategically
30
Throughout your academic career, you will read a variety of journal articles as you complete coursework and conduct research for assignments. Journal articles may seem daunting, but by understanding how journal articles are organized and written, you will be able to choose relevant articles and find the information you need.
Parts of a Journal Article
Abstract and Keywords
This is a concise summary of the article. Read this first to decide if the article is relevant to your current research topic. Below the abstract you will find 4-5 keywords. These indicate the subject area of the article.
Literature Review
Most articles will have a literature review early in the paper. This summarizes the past research done on the topic. Note that this is not a discussion of the research in the current article. However, the literature review may point you to other material relevant to your project.
Research Methodology
This section describes the way in which the research was conducted. Who are the participants? Is the study qualitative or quantitative? How was the data gathered? Where was the study conducted?
Results
This section discusses the findings of the study in detail. It often includes statistical information, charts and graphs.
Discussion
In this section, the researchers discuss the significance of the results. What do the results mean? Are they significant? What are the implications of what was found? The authors might also indicate areas for further study.
References
Skim the reference list. This may lead you to other key articles that are related to your topic.
How to Approach Journal Articles
Begin by reading the abstract and keywords. Decide if this article relates to your current research project. If the article does not fit well with your research, stop reading.
If the article seems relevant, scan the article briefly. Look at the headings, as well as terms in bold and italics. Also, look at charts and graphs.
Before you begin reading the article, note the bibliographic information. You will need this for your Works Cited or References page.
Now, read the discussion section closely. This is key to understanding the article well.
On a separate sheet of paper, create questions that you will answer by reading the article. Include questions such as: “From what you know, does this author agree with other researchers and what you understand about the topic? Does this article support or contradict your thesis?”
Read the article purposefully, answering your questions. Do not be afraid to change your questions as you read and discover more.
When you find the answers to your questions, write them down, along with the page number where you found the information. You will need the page numbers to properly cite your sources when you write.
As you learn to approach journal articles systematically, you will become skilled at extracting important information as you read.
Test Yourself!
Complete the quiz below to reinforce your knowledge of article reading strategies. When you are finished, go to the next chapter to move on.
7.7 How to Take Effective Notes on Online Readings
31
Why take notes on online content? After all, you can easily search for it and read it again. However, re-reading is not always the most effective use of time. Taking good notes helps you to quickly review the key points in the material that you have read.
Taking notes is also an effective learning strategy. Intentionally annotating the texts that you read requires you to critically engage with the material. You are doing the work of identifying the important content, and considering its implications for your course and your professional practice. This practice facilitates deep learning, and ensures that you remember key material.
Choose the note taking method that is most effective for you. You may prefer traditional notebooks. Many readers underline, highlight, and put key notes in the margins of their books. You may prefer to create typewritten notes, and to store these notes in using your electronic notebook/ information management system.
Another tool for engaging with digital texts is Hypothes.is. Watch the video below, and consider how this tool might work for you. If you prefer reading to watching videos, scroll to the bottom of the page for a transcript. When you are finished, go to the next chapter to move on.
So, you have your texts for your course – but they’re not regular textbooks. You’ll be using online texts and other articles as the primary readings in your course. What strategies can you use for making effective notes that will help you retain what you are reading, prepare for exams, and note key information for use in your assignments?
One tool that can help you take notes electronically is Hypothesis. Hypothesis is a free tool that you add to the Chrome browse that allows you to highlight and add notes to online text. In this video, you will learn how to install Hypothesis, create notes and highlights, and create a group to work collaboratively with your classmates.
To get started with Hypothesis, you will first create a free account. Type hypothes.is into the search bar to visit the page. On the top right, you will find a “Get Started” button. Click here to create your account. You will provide your email address, create a user name, and password. Then, check your email and click on the link to activate your account.
The second step is to install the Hypothesis extension in your web browser. In this case, you will use the Chrome browser. To install the extension, go to the “Get Started” section of the Hypothesis page. Then, click the Chrome extension button. This will guide you through the steps of installing the extension.
When the extension is installed, you will see a square icon at the top left of your screen. When you click this icon, you will see a new menu on the far right of your browser. Click the arrow to open the menu and login.
Next, you will choose where to store your notes. Be aware that the default setting is public. You will likely want to create a private group for personal notes or group projects. To create a group, click on Public, and then create a new private group. For each text you highlight, you can choose which group can see your notes. This feature can be especially helpful for group study and projects. You may also wish to create a group that only you can see to store personal notes.
Now, begin reading and taking notes. Today I’m going to read and take notes on this chapter on procrastination from an online text.
When I highlight some text, I have the option to highlight or annotate the text. When you click on highlight, the text is marked with a yellow highlight, as you might expect. This can be helpful in identifying key points in the document. However, be careful not to over-highlight – be very selective in highlighting only key information.
I assumed that procrastination was always a time management problem. What might be a different reason that I procrastinate?
Finally, I can choose to add a page note that summarizes my key learnings or questions, or indicates how I might use this information in the future. As I read this page, I found the information on the Pomodoro technique useful. If I was reading this text together with a group of classmates, I might add something like this to the notes:
I found the Pomodoro technique interesting – has anyone else used this method successfully?
My group members can then respond with their own insights.
Reading purposefully requires you to actively interact with texts. In this video, you learned how to use Hypothesis as a tool for engaging with online texts. You learned how to create an account, install the extension, and use the basic highlighting and annotation tools.
How might you use Hypothesis to support the reading in your courses?
7.8 Review Your Learning
32
To finish this section of the textbook, summarize what you have learned, and identify what you want to start doing as a result of the new strategies you have explored. The activity below allows you to identify your goals and next steps for reading and engaging with text.
Congratulations on completing the Learning to Learn Online textbook. You have gained some valuable skills to help you on your learning journey.
You may wish to continue your learning by reviewing the various learner supports available at Fanshawe College.
The resources below are to assist you becoming a successful graduate of your online course or program. We have grouped the supports based on your needs. There is a technology section, one for academic information and one for other things you may find helpful.
Technology support for online learners
WebAdvisor
Review registration information, make fee payments, view your grades, update your address and more.
FanshaweOnline (FOL)
Download course notes, do quizzes, read and send emails, participate in online discussions and more.
MyFanshawe
Discover what is happening at Fanshawe, get information on student services, access College documents and more.
IT Service Desk
Get assistance with login and general information.
Library & Media Services
With your Fanshawe username and password you can access databases, journals, e-books, stream video and other online content from anywhere in the world.
Peer Tutoring
Students needing one on one course support can seek help from a Peer Tutor who can connect remotely through video conferencing tools.
Academic Advisors
We have staff that can provide academic advice and support. You can connect with your Academic Advisor by email or phone.
eLearning Program Coordinators
As an online student, you have access to Fanshawe academic faculty who supervise and deliver elearning course material.
Administrative Support
Student Code of Conduct
Whether off campus, on campus or learning virtually, all students are expected to act in a respectful manner towards all members of the Fanshawe community as outlined in our code of conduct.
Additional supports
Accessibility
Students who would like to connect with a Fanshawe Accessibility Counsellor to discuss an accommodation can do so via email or phone. Those needing a face to face appointment may come to the London Campus.
Counselling
Students who would like to connect with a Fanshawe Counsellor to discuss a personal matter can do so via email or phone. Those needing a face-to-face appointment may come to the London Campus or will be referred to a community agency.
Employment and Student Entrepreneurial Services
Services and supports to help you find work during or after you have successfully completed your online program, as well as resources if you would like to start your own business. Staff are available by email, phone or video conference.
Indigenous Peoples at Fanshawe
First Nations, Métis, Non-status and Inuit students who would like to connect with staff in Fanshawe’s Institute for Indigenous Learning can do so via email, phone or video conference.
Office of the Ombuds
Students who would like to connect with the Ombuds to discuss a concern or dispute can do so via email, phone or video conference.
Retail Services
All the resources you need to study and learn can be ordered online and sent to your front door.
Good luck in your online learning journey!
References
2
Anderson, L. W., & Krathwohl, D. (Eds.). (2001). A taxonomy for learning, teaching, and assessing: A revision of Bloom’s taxonomy of educational objectives. New York: Longman. ↵
Bloom, B., Englehart, M. Furst, E., Hill, W., & Krathwohl, D. (1956). Taxonomy of educational objectives: The classification of educational goals. Handbook I: Cognitive domain. New York, Toronto: Longmans, Green. ↵
Chen, P., Chavez, O., Ong, D. C., & Gunderson, B. (2017). Strategic resource use for learning: A self-administered intervention that guides self-reflection on effective resource use enhances academic performance. Psychological Science, 28(6), 774–785. https://doi.org/10.1177/0956797617696456; ↵
Fenwick, T. J., & Parsons, J. (2009). The art of evaluation: a resource for educators and trainers (2nd ed.). Toronto: Thompson Educational Publishing.
Garrison, D. R., Anderson, T., & Archer, W. (1999). Critical Inquiry in a Text-Based Environment: Computer Conferencing in Higher Education. The Internet and Higher Education, 2(2–3), 87–105. https://doi.org/10.1016/S1096-7516(00)00016-6↵
Garrison, D. R., & Vaughan, N. D. (2008). Blended learning in higher education: framework, principles, and guidelines (1st ed). San Francisco: Jossey-Bass.
Tuckman, B.W. (1965) ‘Developmental sequence in small groups’, Psychological Bulletin, 63, 384-399. Reprinted in Group Facilitation: A Research and Applications Journal ,Number 3, Spring 2001 ↵
Downloadable Resources
3
Chapter Files
As you progress through this textbook, you will notice various worksheets available to help support you in your learning journey. For convenience, we have included all of the available downloadable files from each of the chapters in one place.
This page provides a record of edits and changes made to this book since its initial publication. Whenever edits or updates are made in the text, we provide a record and description of those changes here. If the change is minor, the version number increases by 0.1. If the edits involve a number of changes, the version number increases to the next full number.
The files posted alongside this book always reflect the most recent version.


 Image Credit: Graeme Robinson-Clogg
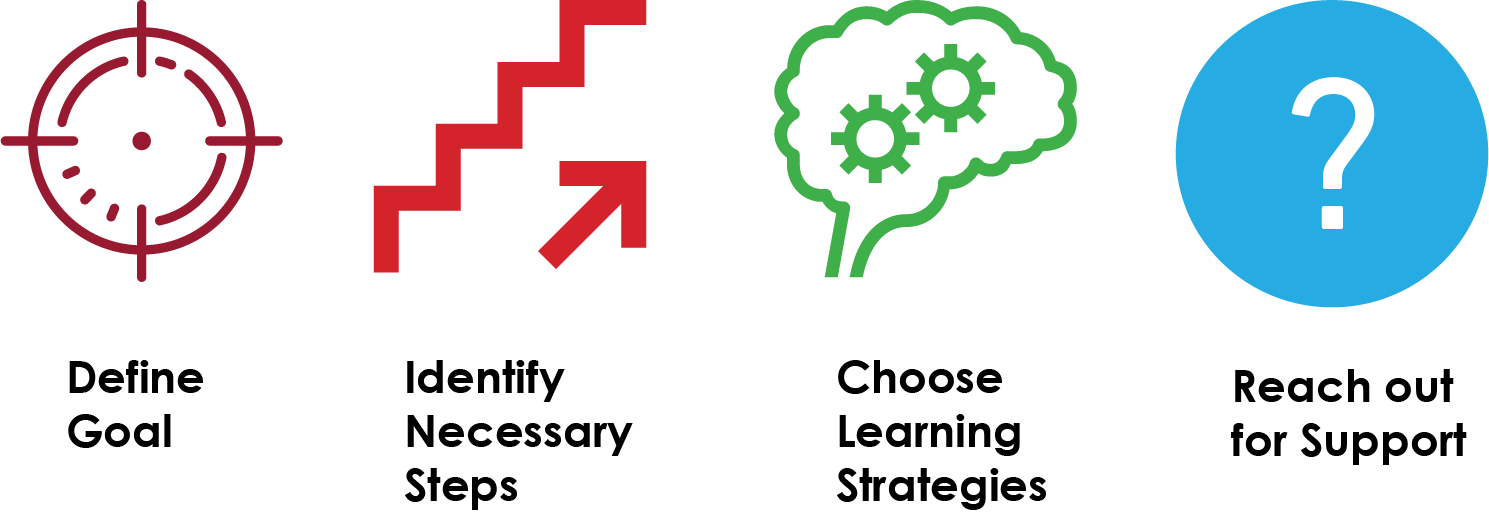


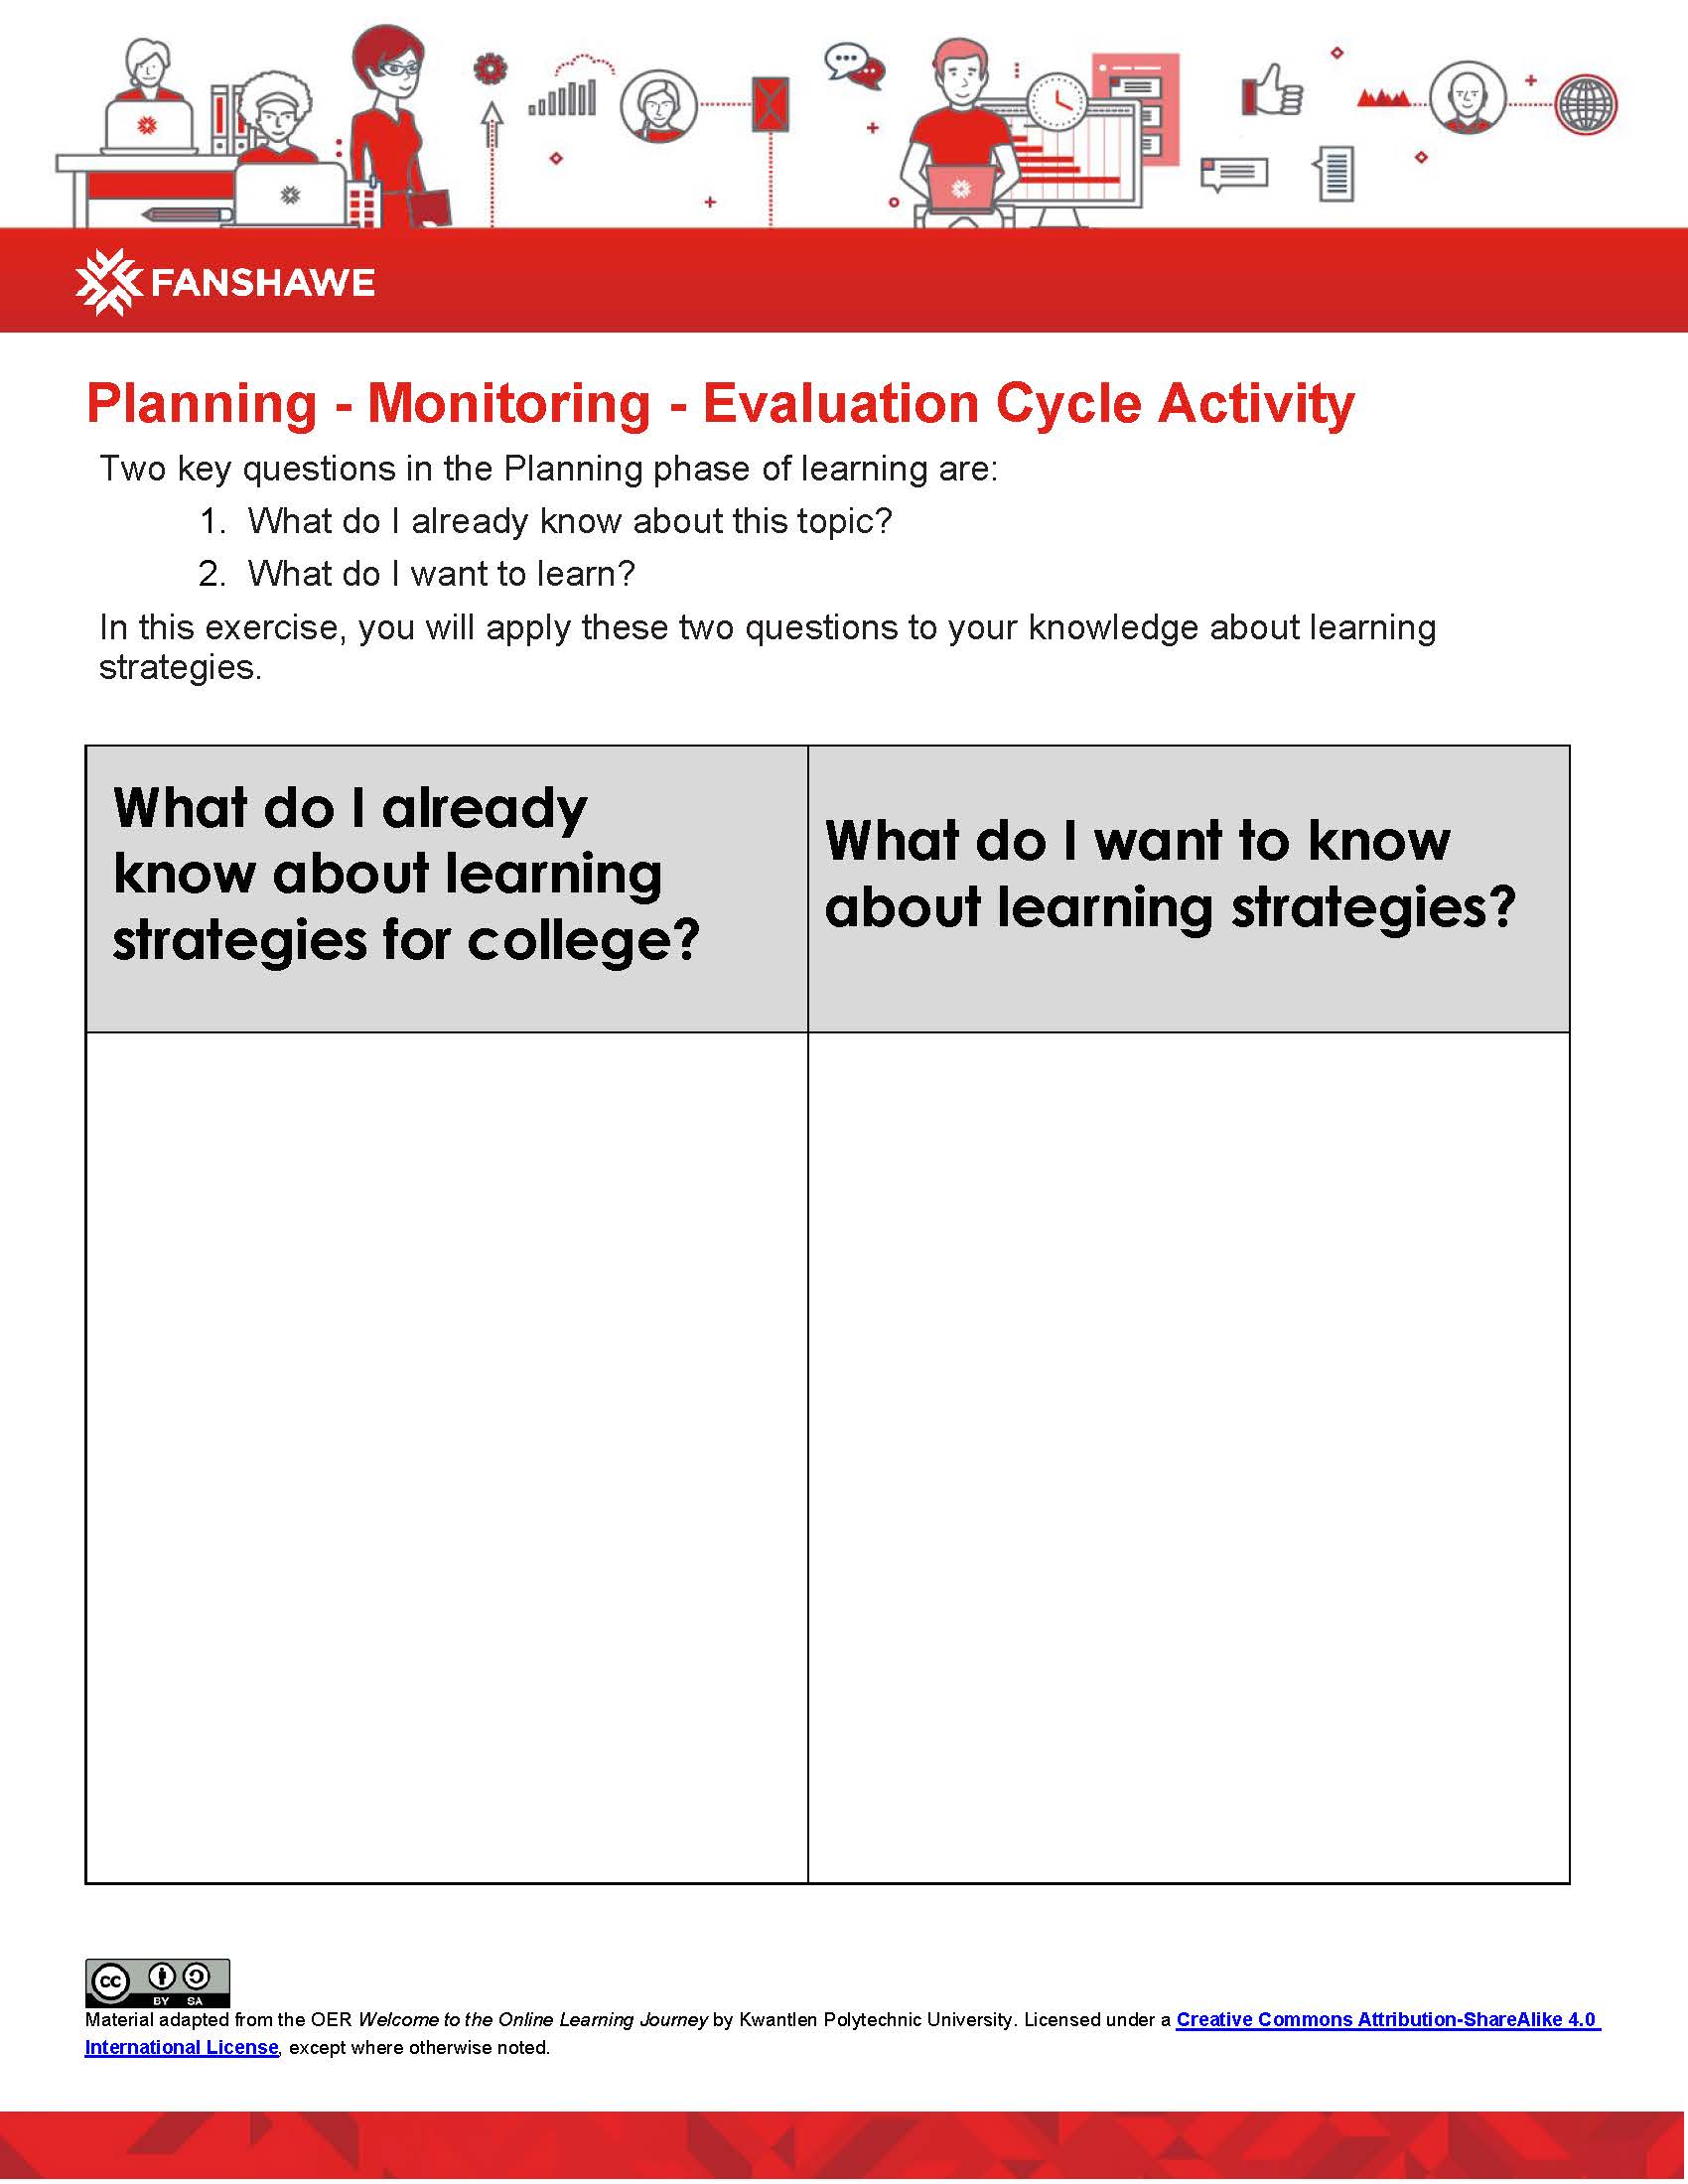
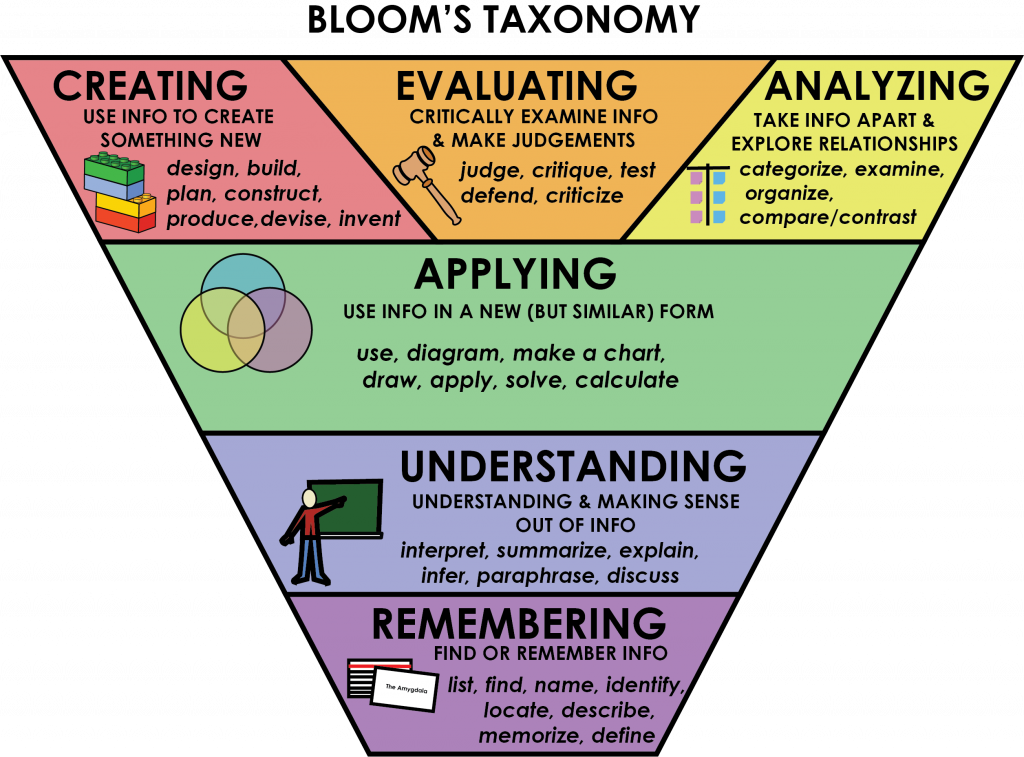


 Image Credit: Graeme Robinson-Clogg


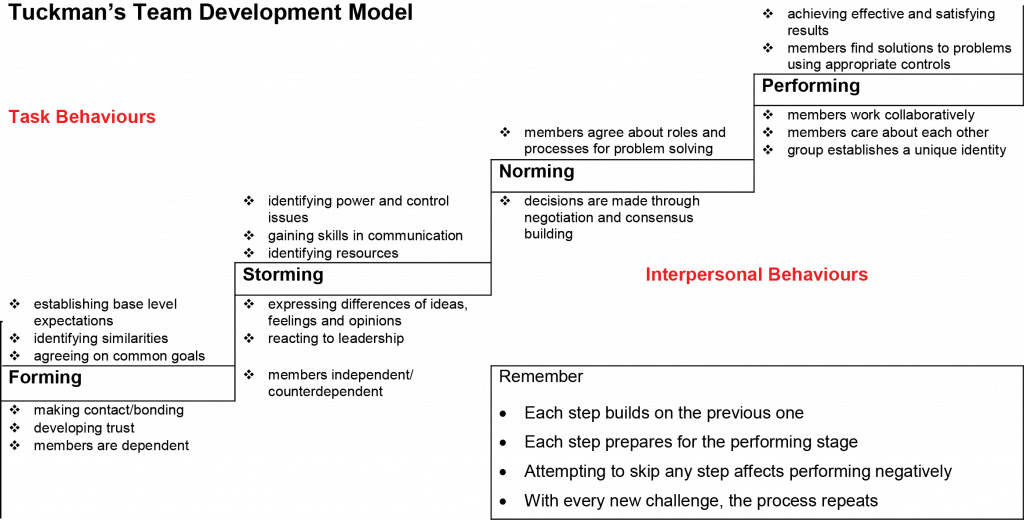
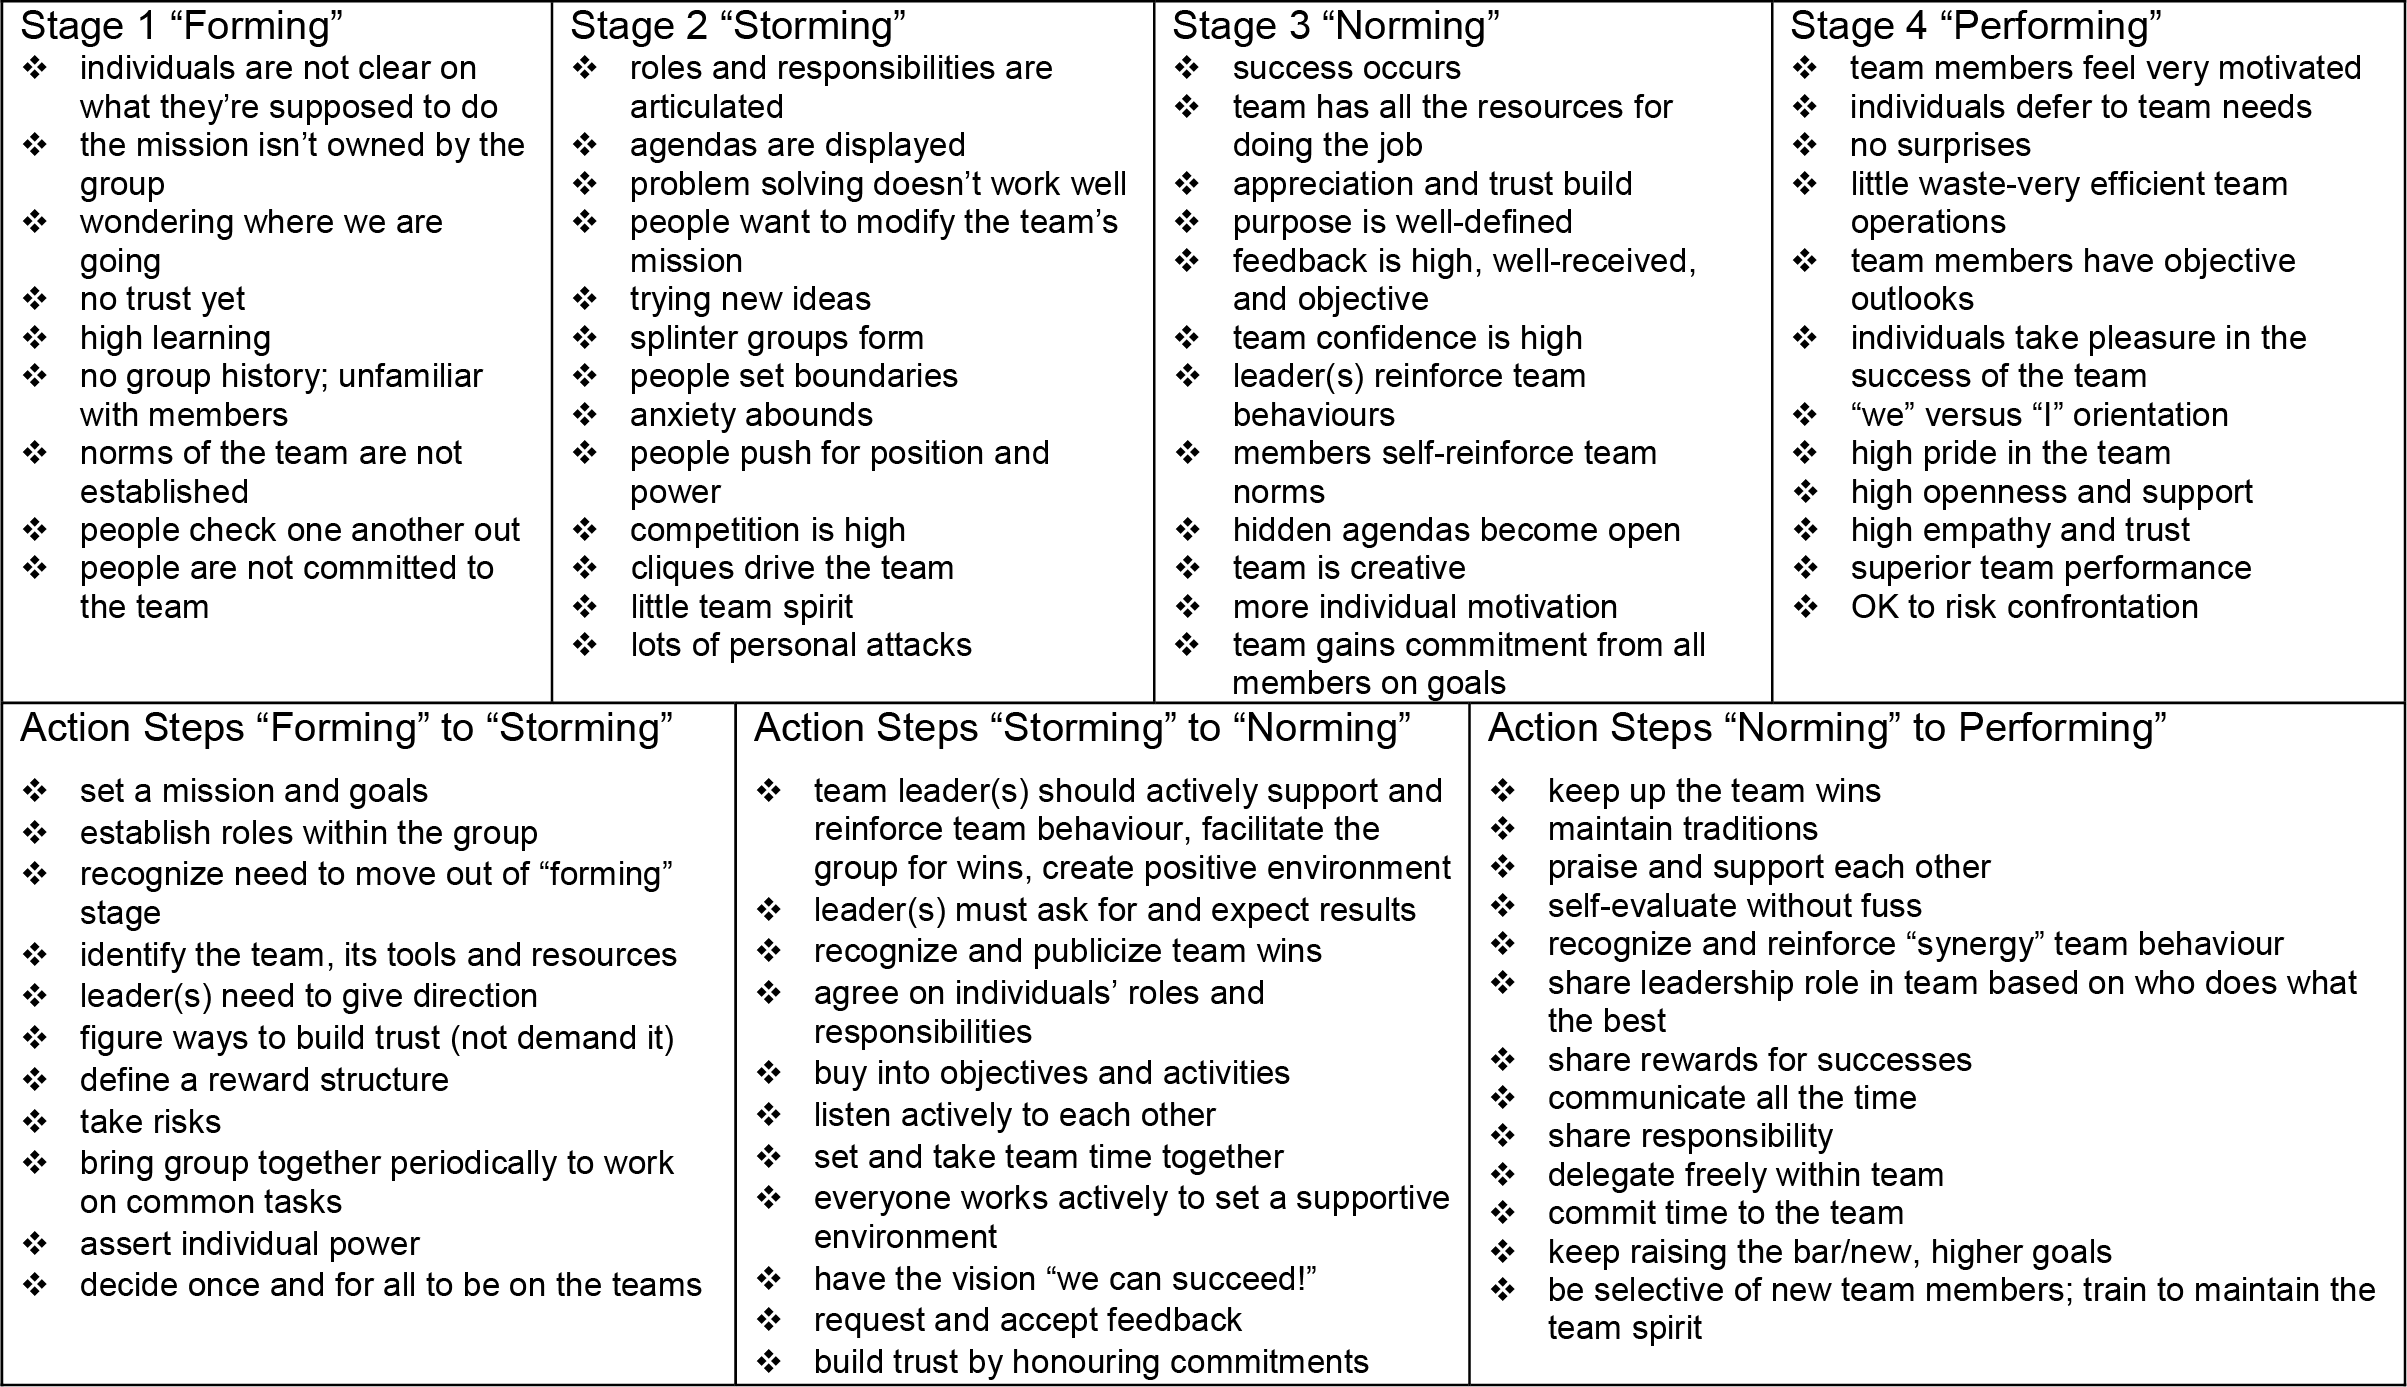
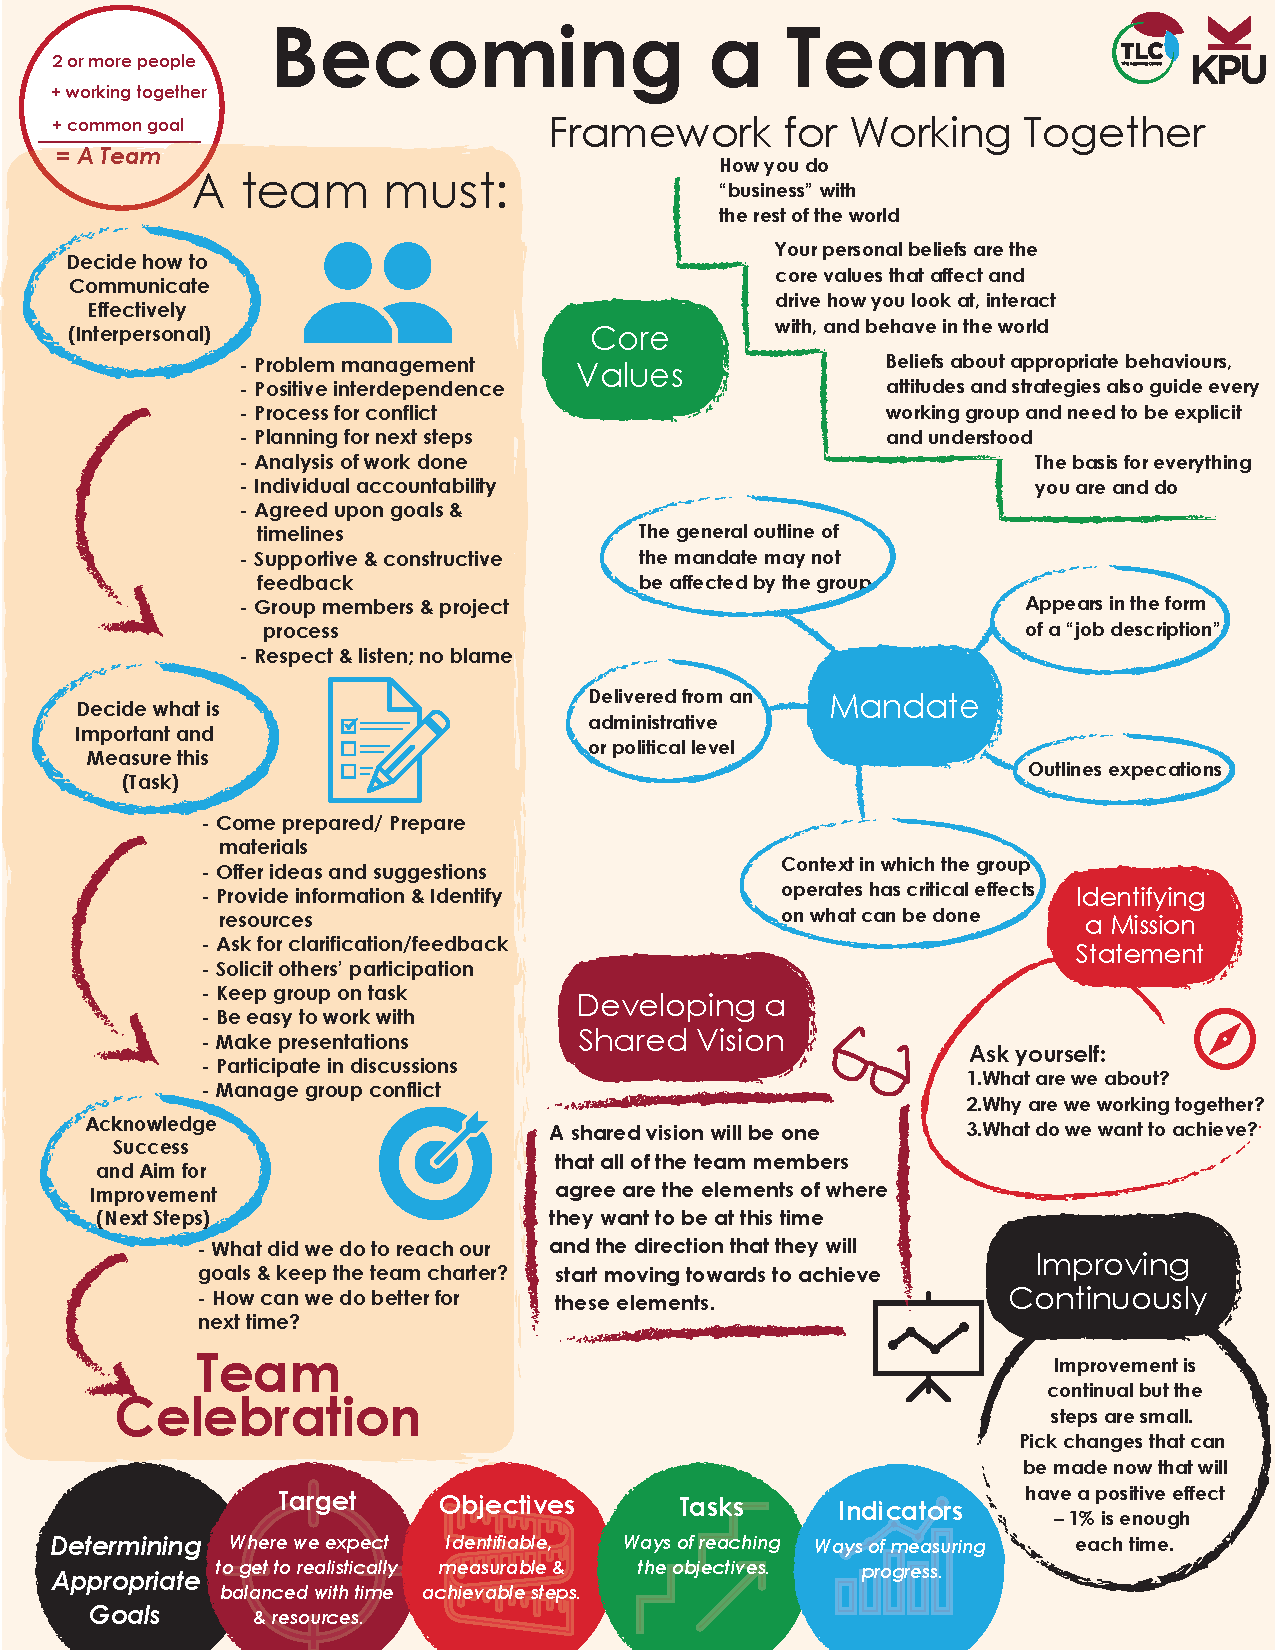


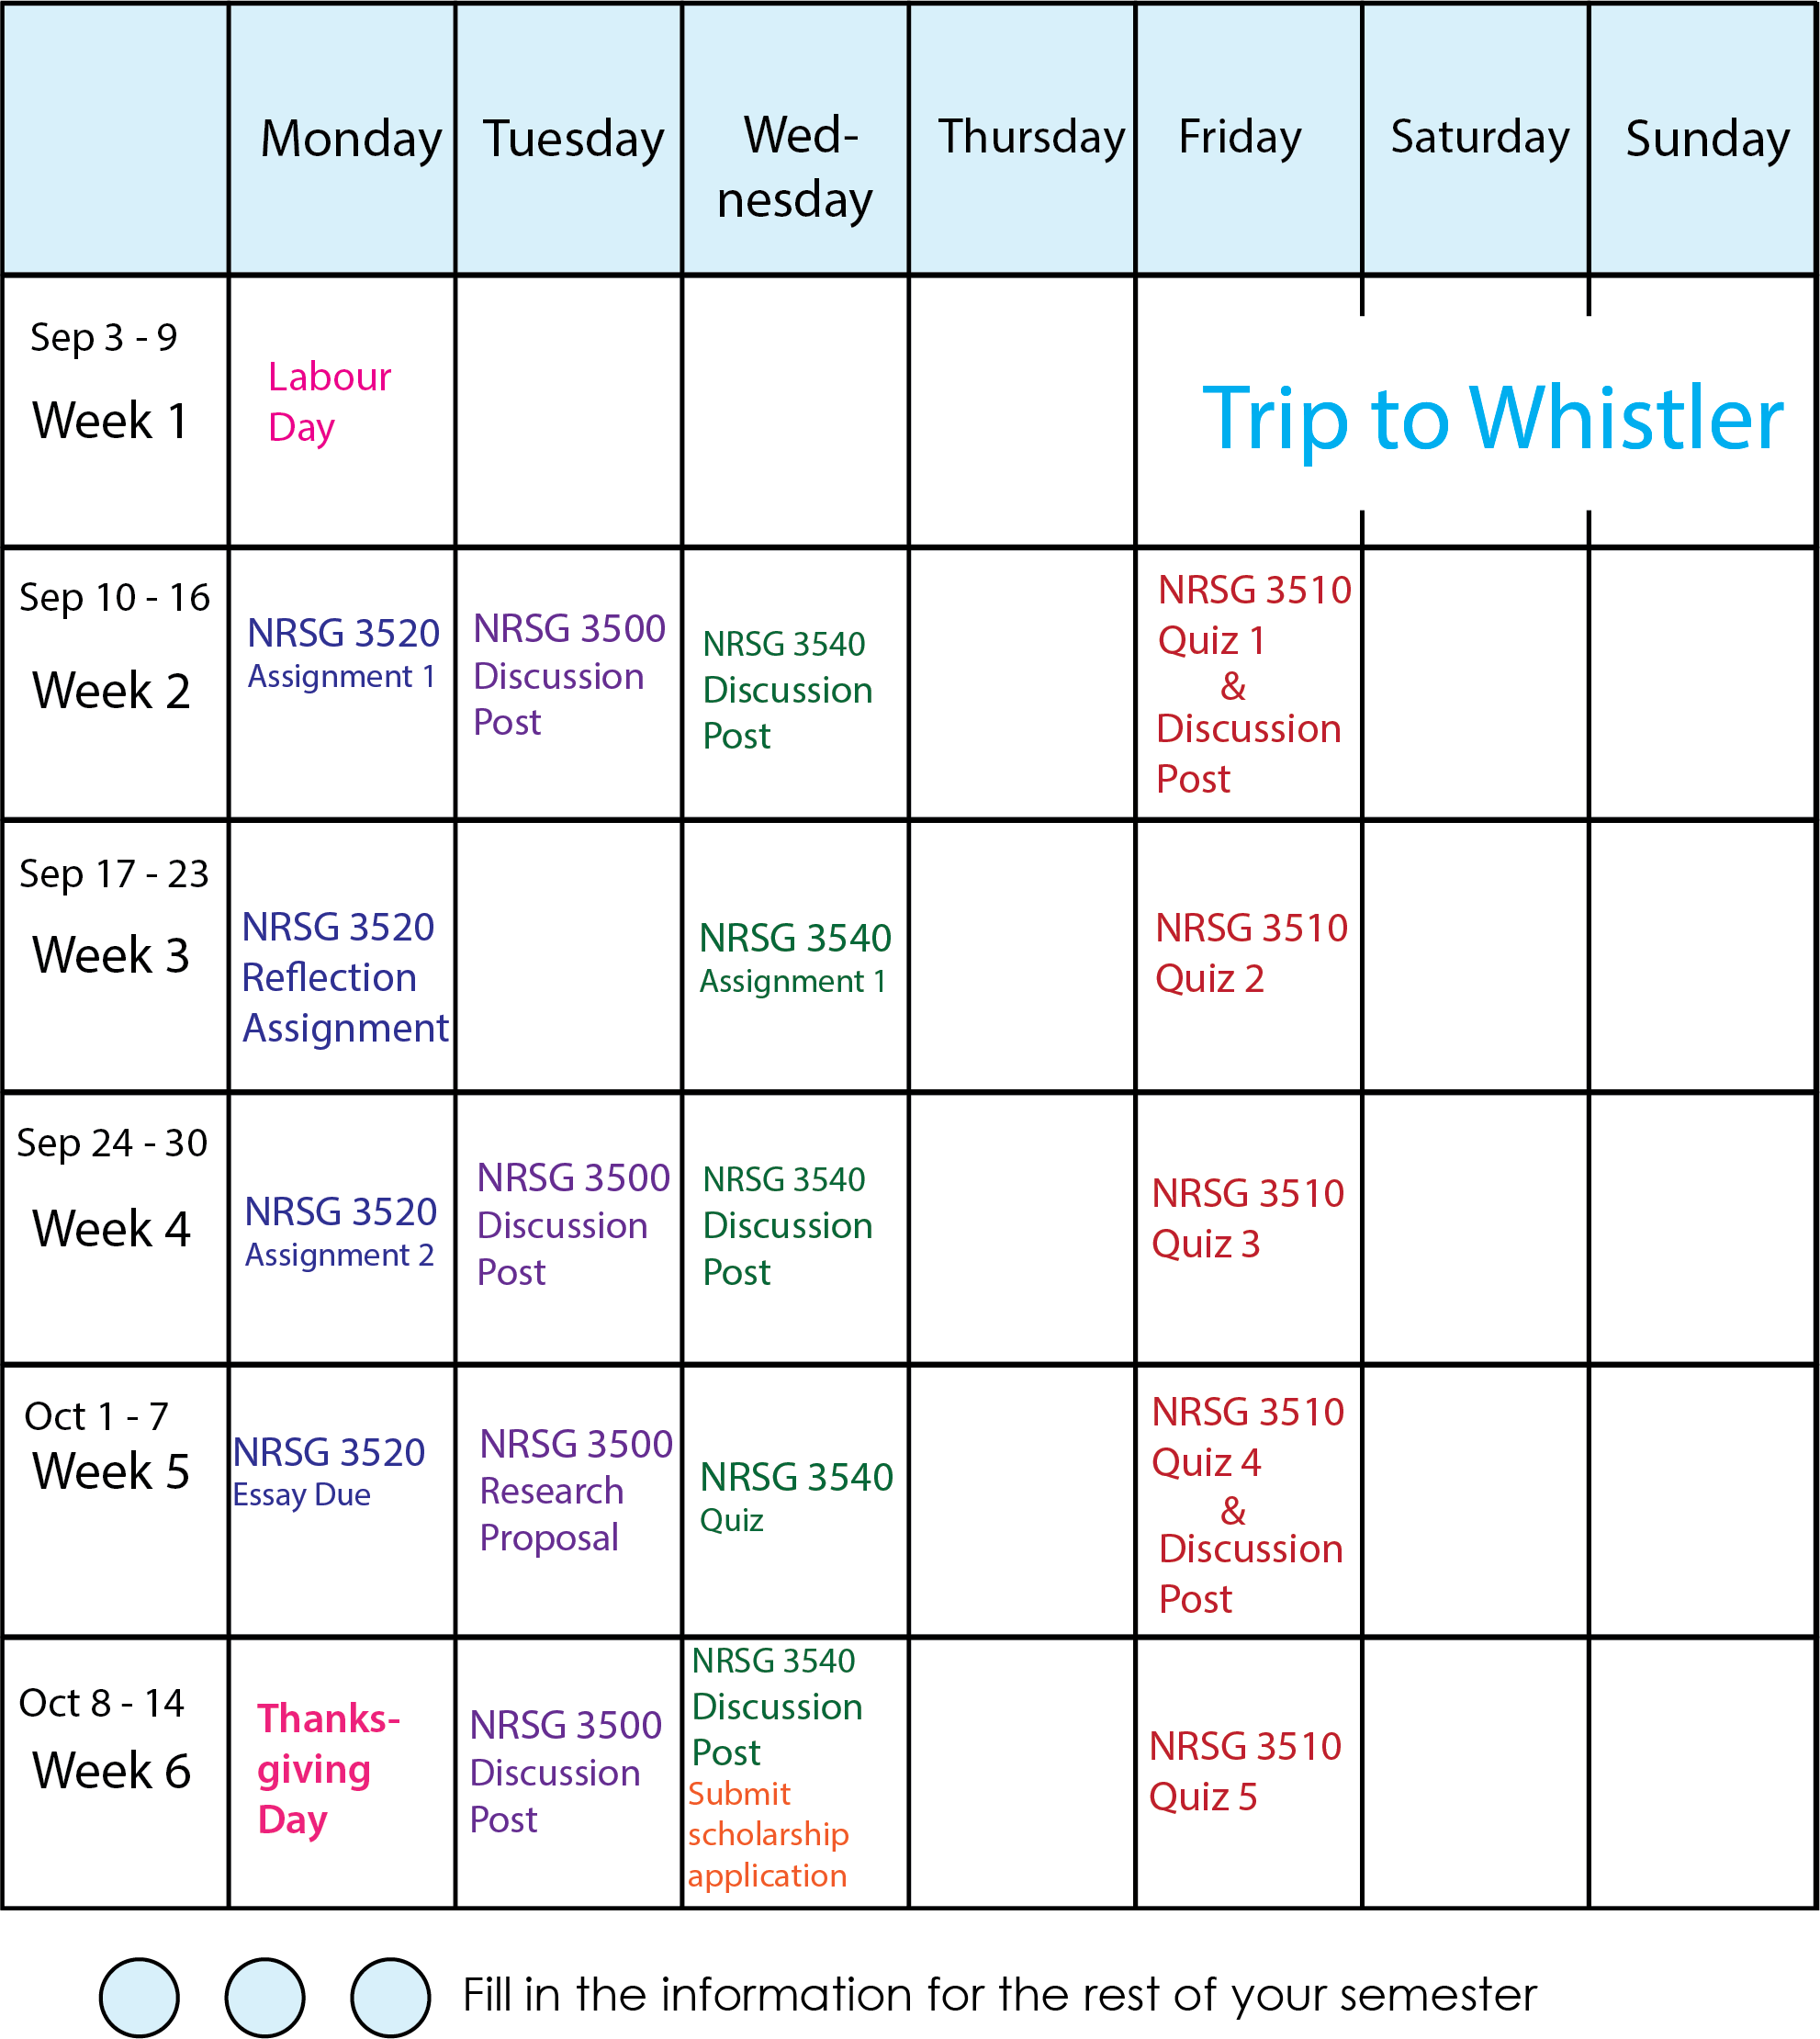
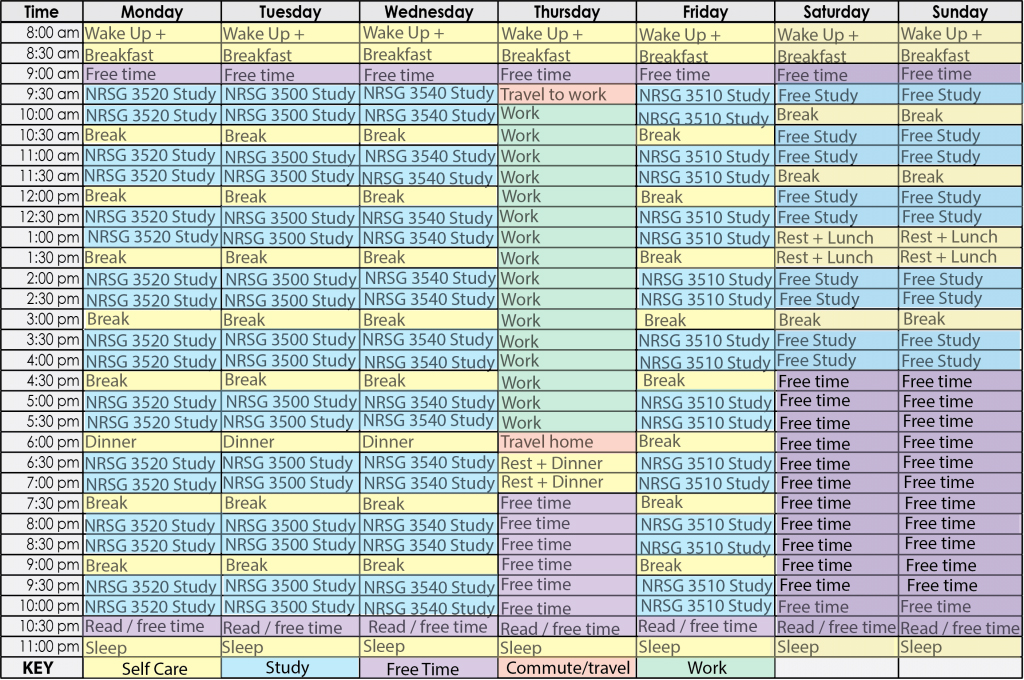

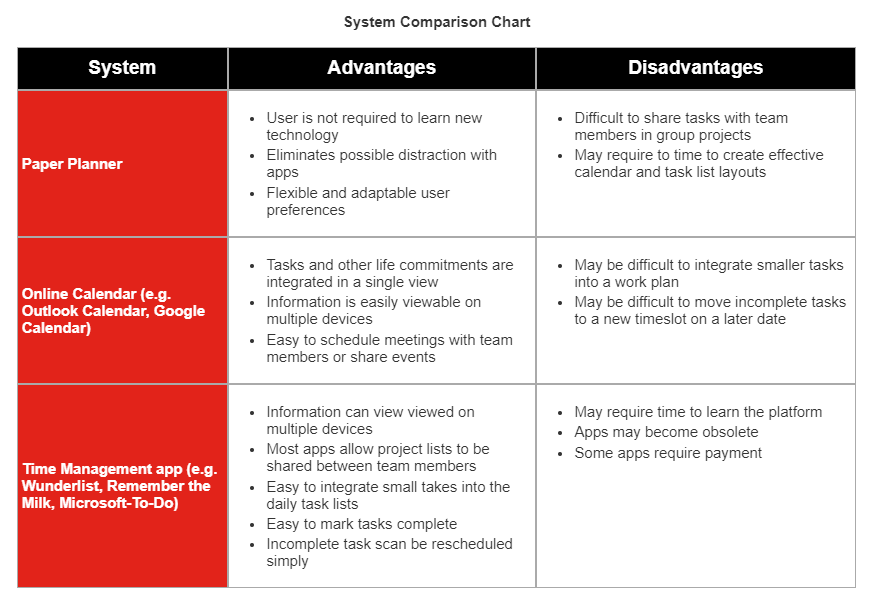


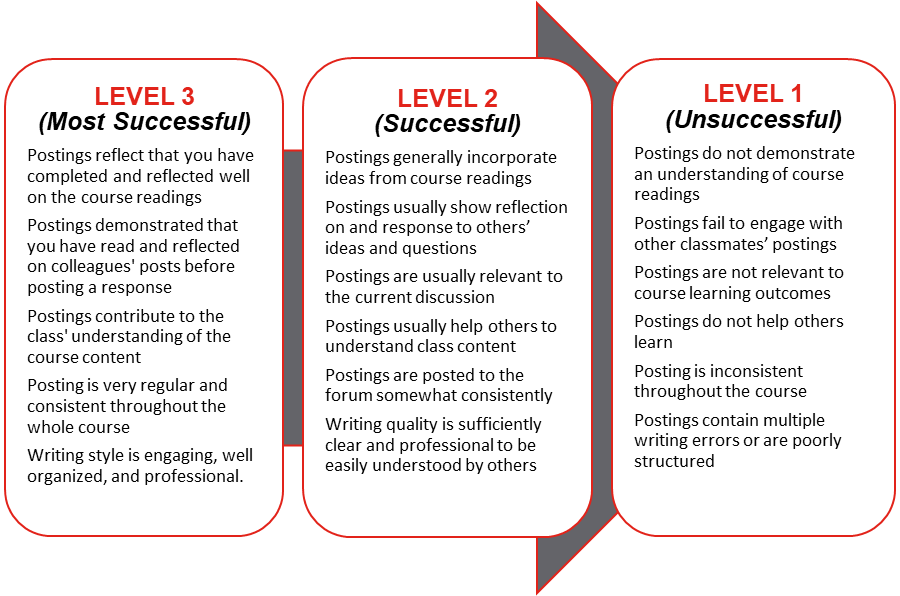
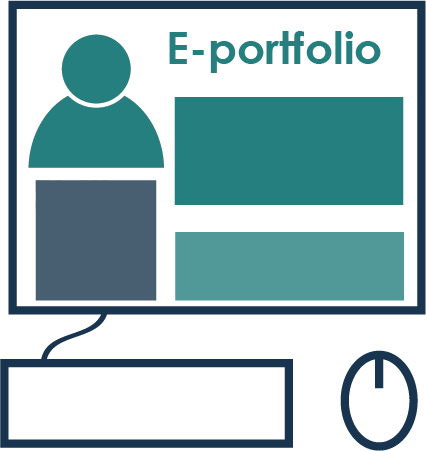


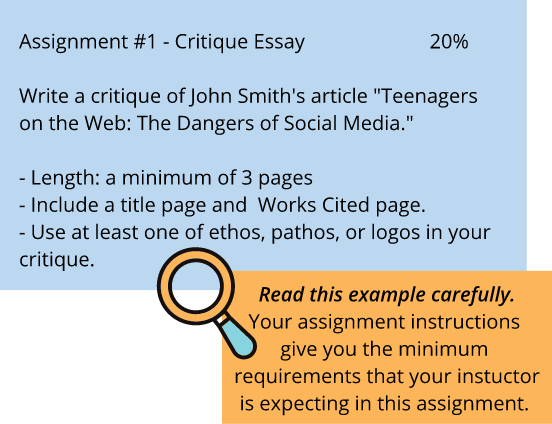

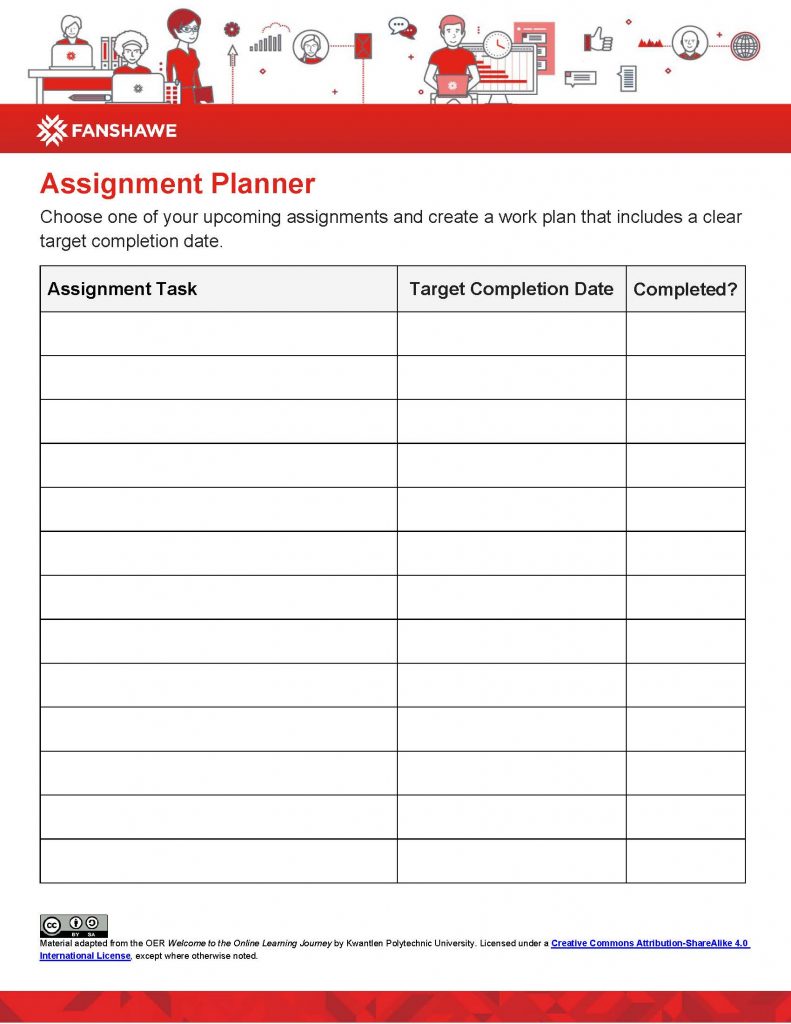 Image Credit: Graeme Robinson-Clogg; Andrew Stracuzzi