Co-designed by Students, Faculty and Staff at Trent University, Brock University, Seneca College, University of Windsor, McMaster University, Cambrian College and Nipissing University
This project is licensed under a Creative Commons Attribution-NonCommercial 4.0 International License, except where otherwise noted.
Enter The Learning
1
Welcome! Come in!
Future you will be looking fondly back in time and praising you for finding this resource. Well done, present-day you!
What Even Is This Thing?
Good question. Let’s dig in.
Even though the idea that people have built-in learning styles (visual, kinesthetic, auditory) is definitely not real (see The Learning Styles as a Myth), that doesn’t mean that we can’t learn with style, right? This program aims to help anyone become a more confident, independent, and well-rounded online learner. It’s about you liberating yourself to be able to squeeze all the learning you need out of any learning situation that you find yourself in. You can do a little of it, or a lot. Take what you need. This is for you.
The 4 distinct module areas that have been identified as the “liberated learner” framework skills are described below. You can click the little triangle to see a description of each.
Learner
That’s pretty obvious, right? That’s why this is the opening, fundamental module of the program. In it you will get help figuring things out in the areas of motivation and engagement, awareness of yourself, academic balance, and academic struggles.
Technologist
As a student, your “technology toolbox” is often filled with tools that you didn’t choose, but you need to know how to use anyway. This module aims to help you not only learn the tools you’re asked to use, but also have some of your own tools and skills at the ready for when you do get the chance to be creative.
Navigator
Every institution, every program, even every course has its own unique pathways (and barriers) to success. This module wants to help you navigate your way through it by focusing on time management, wellness and awareness, and accessing the information and services available to you.
Collaborator
Most people will recognize that the world is ever increasingly connected and collaborative. But on the other hand group work is, let’s face it, not everyone’s favourite thing ever. In this module are opportunities to enhance your skill in collaborative organization, self-advocacy, allyship, and networking in order to make the most of collaborative experiences.
Have a look through the slides below (you can click through yourself) to see a little more about what you’d be getting yourself into by doing these modules. You can take any path you want through the 4 modules. If you’re not sure where to start, we’d recommend the Learner Module.
The Liberated Learner program has an “ancestor” in the Ontario Extend Empowered Educator program. The original program aims to empower educators in 6 areas (teacher, technologist, collaborator, curator, experimenter, scholar). You can likely see the inspiration that was taken when we chose the 4 areas for the Liberated Learner framework. So, just like the Empowered Educator framework aims to help educators be ready to teach in a digital age, the Liberated Learner aims to help learners to learn in that same world.
This project is made possible with funding by the Government of Ontario and through eCampusOntario’s support of the Virtual Learning Strategy. To learn more about the Virtual Learning Strategy visit: https://vls.ecampusontario.ca.
The Wicked Problems
2
What’s Your Problem?
We invited learners to share the “wicked problems” that they face in their learning careers. Wicked problems are those tricky ones that maybe don’t have a clear cause or an easy solution. They can come from anywhere. We took the stories that all these learners told us and used them to create the “Liberated Learner” program to help you become a confident and independent online learner. You will find these stories sprinkled throughout the pages of this text.
Taking inspiration from lofi hiphop radio, students in the Seneca College Independent Music programs have crafted some beats for you to listen to as you work your way through the material. You can view the playlist in the video below, if you’d like. Or you could Listen on Soundcloud (link opens in new browser window) to all of the beats while you go through the modules. Maybe once the playlist is done, take a break!
Want to get to the point quickly rather than use this entire program to sculpt you into a learning machine? Good idea! You don’t have all day, right? If you want to just grab and go with a little bit of help from us, take a moment to go through the search tool below to find just what you need. Come back for more later, okay?
Planning on going all the way and finishing the whole program? Nice move! The “Liberated Learner Work Binder” should help you stay organized.
Below you can download a set of folders which include space for you to save all the work you will be asked to complete in this program. You will create documents, images, audio files, videos and more! They can all be saved into your work binder for you to keep as a record of your progress. The folders include checklist reminders of the activities for each module (with a link back to the instructions, just in case you need them.)
Is this work binder necessary to participate in the Liberated Learner? NOPE!
Will it help keep you organized as you work your way through it? MAYBE!
Shall we move on? OKAY!
Style Guide
6
As you go through the materials you will find that we have added some icons here and there to style things up. Here is a bit of a legend to help you decipher what you are reading.
The Liberated Learner logo. Little birdy is all ready to learn!
The Overview icon. Little birdy with a telescope kind of thing. It’s looking at the big picture.
The Wicked Problem icon. You’ll see this when we are referring to a “wicked problem”. It’s Little birdy all glitchy. Kind of like a wicked problem!
The ‘Beats to Listen to’ icon. When we remind you there are chill beats to study to, made just for you. It’s Little birdy with headphones on!
The Activity icon. Little birdy is on the move! You’ll see this when it’s time for you to do something active in the program. Go for it!
The Example icon. Pairs nicely with the activity icon. We will show you authentic examples of the activities we’ve asked you to do. Little birdy wants to show you something!
The ‘I Gotta Tip For You’ Icon. For suggestions, ideas, tips. Little birdy has an idea that it wants to share.
The ‘Just Sayin’ icon. Here and there we want to let you know that some things we talk about in one module relate directly to stuff in another module (and then give you a link). Little birdy is tweeting out a reference!
The Dig Deeper Icon. Little Birdy shows you more resources to check out if you want to find out more about a topic.
The Checklist Icon. Little birdy reminds you of the things to check out and do in the module.
Also, so that you easily can tell which of the modules you happen to be looking at, we’ve put an image of that module’s badge at the top of each page. They look like this:
The Learner
I
This module aims to help you analyze, identify, and solve your unique learning challenges.
The Learner Module “beats to study to” were crafted by students in the Seneca Independent Music Programs. Watch one of the videos below, or listen to our Soundcloud Playlist (in a new window) for all of the beats while you go through the module. Maybe once the playlist is done, take a break!
This track is called “Listening by The River” by Ian Marc.
This module was created by a team of student co-designers and learning specialists, each with their very own personality! As such, the tone of the writing shifts from section to section as we move from writer to writer. Enjoy!
Post-secondary school has distinctive challenges that have difficult solutions. It can be stressful, frustrating, and overwhelming when these challenges interfere with your academic success. This module will guide you through five critical topics that impact your pursuit of your academic and life goals. There are activities within each section for you to use as examples on how to overcome your unique challenges. By going through these five critical factors, you will be able to analysis, identify and solve your unique learning challenges.
Gentle Reminder – If you’re in a rush, you can look through the Take Out Menu to help you find just what you need.
By the end of this module, you will be able to:
Motivation and Engagement
Identify the factors that motivates and engages you in school
Improve your motivation and engagement
Mental Wellness
Manage stress
Manage study and sleep habits
Academic Balance
Identify resource management techniques that allows you to achieve an academic balance
Prioritize techniques that you can use to improve your balance
Academic Struggles
Adjust your mindset to improve yourself
Identify the Game of School Mindset
Find your path to success
Learner Module Doodle
(Click on the image below for a larger version.)
A Wicked Problem: Fake It 'Til You Make It
Fake it ‘Til You Make it by Anonymous
Wicked problems are those without a definitive answer. They can be one of the trickiest problems since everyone’s situation is unique to them. To help guide you we collected stories from students in similar situations, their advice to you and how they overcame it.
This is a story about getting away with minimal work in high school, but realizing it won’t fly in university.
The Wicked Problem
My wicked problem is that I was always the type of student who did not need to try hard to get good grades. I put in some effort of course, but never applied myself as much as I should. I did this because I would get good grades with the minimal effort I put in, and I was satisfied with it. As long as I got the overall % I needed to keep my scholarships then I was okay with it. I struggled with having to put my mind to something until I understood, and also having to put in effort to things I didn’t understand. I struggled with this because, as I already said, I got by with doing very little work, so I was satisfied.
The problem came when I would get a bad mark on an exam or something and would risk getting below 80% in the class. I always put pressure on myself to get above 80% in every class, yet I didn’t put in that much effort. Throughout the first few classes at university, I discovered that this was going to be a big issue, unless I got my act together. I never failed anything, but I felt I wasn’t reaching the grades that I could. I finally realized that if I’m going to keep/apply for scholarships and eventually grad school then I need to start putting in a real effort. Around 2nd-3rd year, I finally started to care and would go meet with GAs for extra help or go review my test after I got my mark back. I started changing those habits that make a good student great and began to overcome that barrier that had the potential to become an issue had I not taken action.
Finding a Solution
I was able to overcome my problem by beginning to take initiative and get my priorities in line. It only took a few really hard conversations or realizations within myself to know that when I graduate, I need to get the highest marks possible if I want to go on to graduate school. I began to research graduate programs and figure out what types of grades I would need to get into some of the programs. This is when it really all clicked for me because I saw statistics on how many people apply and how many people get it, also the average GPA and things of that nature. I knew that if I put my mind to it then I would be able to achieve it, I just had never had a goal before and was kind of going through the motions because I could do that and still get decent grades.
So from that moment on I began taking my classes seriously, asking for assistance when needed, spending nights studying instead of going out and getting on top of things early. Creating an agenda really helped me keep my focus on what I had going on and what was coming up. The advice I would give someone who is experiencing a similar problem is to try to figure out your purpose for going through your program, like what is your end goal. Once you can realize that and finally see what you need to get yourself there, then you will have a goal worth striving for. It helps to see that reminder daily or weekly so that you can keep yourself focused on the task at hand. I would also tell someone who struggles with putting in effort that universities are where you build your habits for life and this minimal effort is going to stick with you forever unless you figure it out now. Personally, I want to succeed in my graduate program and career eventually so building these foundational habits now is my goal.
Final Thoughts
My final words regarding this wicked problem are that university is really not all that difficult when you put your mind to it. Many people can get bad grades, but still pass and get the same degree as you. What will set you apart from them may not be your degree but it’ll be the habits and mindset that you have created in university. It is imperative to take the time now, while you have support from faculty and staff, and put effort in. Many people would love to go to university but cannot. I have been given an opportunity to get an amazing education so I need to make the most of it.
APA Reference
Fake it ’till you make it. (2021, October 12). Liberated Learners. https://wicked.liberatedlearner.ca/learner/fake-it-till-you-make-it/
Motivation and Engagement
Introduction
To reach your academic goals and pass your expectations, finding and maintaining motivation and engagement in school is an important first step to achievement and success. This section can help give ideas on how to find and maintain motivation to engage in the things you want to do.
Factors of Motivation and Engagement
The properties of motivation and engagement are very complex as there are so many intertwined factors that can influence them. A problem many students face is determining which factor is causing them to be unmotivated or not engaged in school.
To help you identify the factors that are unmotivating and not engaging, fill out the worksheet below. If you want more information about each factor and ways you can improve your motivation and engagement, you can interact with Figure 1.
Activity: Motivation and Engagement Surveys
Let’s look at identifying some of the motivational and engagement factors that are affecting you.
To find more information about each factor and ways you can improve your motivation and engagement, click any of the the purple ‘i’s on the graphic below.
We have created a role-playing game that will help you learn how to stay motivated throughout an online semester. Through this game, you will be guiding a student along a path to stay motivated throughout an online semester, exploring some of the measures you can take to feel more prepared for school.
Motivation is the reason you are doing the assignment and engagement affects the quality of your input in the assignment. Both are important in success. They are independent of each other but together could make a world of difference and even make studying easier.
An Analogy: Pre-requisite classes
Figure 2: Performance in the prerequisite class can influence performance in future classes unless the quality of the input changes
With pre-requisite classes, you must complete the beginner class before continuing in studying the more challenging topics. In this case, Math 1 must be completed prior to Math 2. If the first course is completed with a low understanding of the topic, the second course will become harder unless the time, energy and care inputs are increased. However, if you pass Mass Class 1 with a high understanding of the concepts, Math Class 2 will be easier unless you begin to slack off and reduce your time, energy and care inputs.
Similarly, you must have the motivation to begin the learning activities before you can be engaged in. Just as each math class is a separate, independent course, motivation and engagement are separate, independent, properties.
Some Examples of the Relationship
You can be highly motivated, but it may not transition into high engagement. You can be highly motivated to find the quickest and easiest path to pass the assignment. In this example, you limit your time, energy, and care to only meet the requirements of the assignment and then move on to something more enjoyable.
You can be highly engaged in the study assignment, but it may not mean you are highly motivated. In this example, you have decided to begin the study assignment so you might as well do a respectable job.
You can be highly motivated and highly engaged. In this example, you find the study assignment you are doing the best thing in the world.
You can have low motivation and low engagement. In this example you find the study assignment is the worst thing in the world.
Mental Wellbeing
Introduction
Being resilient and how you deal with these positives and negatives are important as it can impact your path to success. These negatives are like a headwind on your path to success – it makes it more difficult to achieve your goal. A good mental wellbeing can:
Make you feel more confident
Give a sense of purpose
Allow you to cope with stress
Achieving a good mental wellbeing requires resilience to be able to bounce back and overcome the negative things. This section can provide you with tips on how to have good mental wellness, so you are ready and able to achieve your goals.
Part 1: Stress Management
Managing stress can be similar to playing a card game. If you are dealt a bad hand, you try to make the best of it. It probably won’t be the best you can do, but given the circumstances, you achieved the best result.
These tips can help you to manage and cope with the stress you are facing so you are able to play the best hand possible. Using these tips will improve your mental wellbeing and help you stay on track to achieving your goals.
It can be hard to stay consistent with study and sleeping habits but in doing so you may feel more productive, better rested and you can improve your mental wellbeing. In this section we will go over some sleeping and study habits that could be beneficial to you.
Study habits:
While studying you want to be the most productive. Smartphones are amazing pieces of technology but can often lower your productivity. Find out how you can be more productive while studying with your phone.
With all the extensive reports, assignments, projects, studying for exams it can be difficult to get the recommended 7-9 hours of sleep daily. Use this tip to help you keep rested and have enough time to do what you want to do:
When times are stressful, try to get 7-9 hours of sleep for ONE or TWO nights out of the week. This way you can still avoid sleep deprivation and optimize your time usage.
Can’t fall asleep?
Try setting up a nightly schedule to help set a sleeping pattern.
Click on the image below for a larger version.
Created by Madelyn
Still can’t fall asleep?
Try some of these common sleeping methods:
Military Method
The military method is taught to soldiers to help them fall asleep by relaxing their entire body and clearing their mind of thoughts. This method is supposed to have you sleeping in ten seconds after the mind is clear.Yuen, C. (2020, May 12). How to fall asleep in 10, 60, or 120 seconds. Healthline. Retrieved January 24, 2022, from https://www.healthline.com/health/healthy-sleep/fall-asleep-fast#10-secs-to-sleep
Remove Devices
By removing your phone from the bedroom, you can promote your sleep in many ways! You remove notifications that are designed to peak your interest, by not having it in the room it will remove the urge to pick it up and answer texts. Also, blue light emitted by phones is shown to reduce melatonin production (hormone that controls sleeping cycle), by removing your phone the blue light cannot affect melatonin levels improving sleep quality.Rafique, N., Al-Asoom, L. I., Alsunni, A. A., Saudagar, F. N., Almulhim, L., & Alkaltham, G. (2020, June 23). Effects of mobile use on subjective sleep quality. Nature and science of sleep. Retrieved January 24, 2022, from https://www.ncbi.nlm.nih.gov/pmc/articles/PMC7320888/
Banana
Fun fact, did you know bananas are filled with tons of nutrients, some of which can help enhance your sleep! Try eating a banana before bed to help fall asleep.Lang, A. (2021, March 2). Does eating a banana before bed help you sleep? Healthline. Retrieved January 24, 2022, from https://www.healthline.com/nutrition/banana-before-bed#bananas-sleep-quality
Exercise
Try exercising to make yourself tired. Roughly thirty studies have shown that exercising can impact the quality of sleep and the duration but varies among people. Try this method out and see if it works for you!Dolezal, B. A., Neufeld, E. V., Boland, D. M., Martin, J. L., & Cooper, C. B. (2017). Interrelationship between sleep and exercise: A systematic review. Advances in preventive medicine. Retrieved January 24, 2022, from https://www.ncbi.nlm.nih.gov/pmc/articles/PMC5385214/
Some Suggestions
Study and Sleeping Habits:
To help give you some ideas on how to improve your study habits, you can play this H5P game, and watch this Youtube Video
To help improve your sleeping habits, measure your sleep using your phone. The week can be busy but aim for 7-9 hours twice a week.
Activity: Remove the Stressors
Purpose of Activity:
Create a mind map about an issue that is or has caused stress or anxiety, and draw in potential solutions to cope with the stressor. The mind map will be used as a roadmap for you to remove the stressors. You can make use of colour, texture, shapes, andtext to convey your thoughts and feelings to how you may overcome the stressor. Use a design mind-map program of your choice to create a mind-map to help plan on how to cope with your stress.
Difficulty Level:
Level One: 30 minutes– Spend 30 minutes on this activity to help you reflect on your own values, beliefs, challenges, barriers, successes, and goals.
Level Two: 1 hour – Spend 1 hour on this activity to help you reflect on your own values, beliefs, challenges, barriers, successes, and goals.
Level Three: 2 hours – Spend 2 hours on this activity to help you reflect on your own values, beliefs, challenges, barriers, successes, and goals.
Task:
In this activity you will be reflecting on your own sense of motivation in school and recording your thoughts on the matter.
How to Complete This Activity:
Use any of the following software: Mindmup , Text2MindMap , OneNote, or Google Draw
Jot down the stressors that affecting you. Example: Assignment deadlines, Motivation or engagement in school, unsure about the academic program.
Choose a mind-map software to create your mind-map.
Pick one stressor, and use it as the centre of your mind map. You can repeat this activity multiple times until you run out of stressors to use.
Add branches or levels to make your mind-map
Add colour, texture, pictures, and shapes to the mind map to help convey your plan
Use your completed mind-map to help you reduce your stress.
An Example
Click on the image below for a larger version.
Example Mind Map
What do I do with this?
If you are playing along using the Liberated Learner Work Binder, upload your “Remove The Stressors Mind Map” file to the Learner Module folder.
If this is the only Liberated Learner activity you plan to do, then save the file wherever you like.
Academic Balance
Key Terms
Resources: The time, energy, attention, or care you put into an assignment. Outside help like peer groups are also resources.
Management: An optimal way of accomplishing tasks.
Balance: The spread of your resources.
Prioritizing: Dealing with tasks in order of importance.
Introduction
During a semester, there are many tasks that need your time, energy, attention, and care which can get stressful. To achieve your desired academic goals, you must find a way to balance the required tasks with your time, energy, attention and care. This section can help give ideas on how to find and maintain an academic balance to be able to do things you want to do, in a less stressful way.
Resource Management
Managing your time and energy so you can complete everything you need to be a key part of school. Poor management of these resources can lead to negative consequences such as poor productivity, decrease quality in assignment, and missed opportunities to further your learning and understanding. It can make achieving your goals more difficult and add unneeded stress.
Techniques to help you improve time and energy management.
Plan and schedule your day
Creating a schedule, to-do list, or a plan is one of the most common suggestions given to support students. Why is that? It can help you keep track and understand where your time and energy will be spent. Planning ahead for when you will do an assignments or study for a test will help ensure you have enough time and energy to be successful.
Analyze the required skills you need
Analyzing the required skills that you need to have to be successful can help you understand why you doing each assignment, and can help you keep organized and use your time wisely.
It is as simple as going through the assignments or test preparation and jotting down the skills you need to use. After writing those required skills down, you can begin to create a plan to learn and apply those skills.
Avoid burnout
Knowing your limit to how much time and energy realistically you can use during a day is key to avoiding burnout. Always putting in 110% of your energy into each assignment will create unnecessary stress and frustration when you only need to put in 80% to achieve your goals.
Analyze your assignments so you can identify when you should either use a lot of your energy or save energy.
Understanding when you get diminishing returns
Avoid receiving diminishing returns for the time and energy you spend studying. You can switch to another study assignment when you feel like your productivity has dropped on the current assignment.
This ensures that you are always working productivity and benefiting the most from the time and energy you are using.
Reflect on your past usage of your time and energy
Reflecting on how you spent your time and energy in the past can help you improve your time and energy management in the future. Analyzing what went good, and what went not according to plan and help you form an idea on how to approach future study assignments.
An important part of managing your resources is that conflicts will occur. You will get new tasks to do when you’re already busy. To help you deal with this, the next part is about prioritizing your workload.
Prioritizing
Knowing what assignments to do first, second, and third can help reduce stress, improve your resource utilization, and improve your academic balance as you work towards your goals. There are multiple methods of planning and prioritizing you can use but each has their positive and negative outcomes. Depending on the situation you find yourself in, the methods below can be used to help you focus on your important priorities.
Method 1: Important and urgent assignments
This method of planning prioritizes the most important and urgent assignments to complete so you can stay on track to meet your goals. The other assignments are secondary.
Using this method will keep major activities moving forward and can be effective when you want to finish multiple assignments or tasks quickly.
This method requires you to pick the most important assignment to do, which can be difficult when you are given too many important assignments. Also, that the other less important or less urgent assignments can nag you and make you worry about not having enough time or resources to complete them.
Method 2: Build momentum
Similar but opposite to Method 1, this method to prioritize is to do the easy and shorter activities first. The idea is to build momentum by completing smaller or easier tasks first then the larger, more important tasks.
With this method you can get more things checked from your to-do list, so you are able to get ahead in school. Every time you complete a task, it can give you a boost of motivation to continue studying.
It is easy to spend too much time and energy on minor tasks, so you may not have enough time or energy to do the difficult, important tasks. To use this method effectively, you must not make the short-minor task into long-minor tasks.
Method 3: Relative prioritizing
This method of planning incorporates parts of Method 1 and 2 as it takes into accounts your resource capacity by mixing short, easy activities with the longer, harder activities. Instead of doing all the easy or hard activities back-to-back, you mix it up based upon your motivation for each activity. You can begin working on the major activities when your mind is fresh, then take it easy with easier assignments as you recover and rebuild momentum to tackle the next major activity.
This method can reduce the chances of getting mired down by the constant work demand of school. Changing the thing you are working to align with your resource capacity and motivation provides a better solution than Method 1 and 2 on how to keep productive.
To use this method effectively, you should not make short minor tasks into longer minor tasks. Finishing these shorter tasks is a way of building momentum to tackle other tasks quicker and better.
Regardless of which method you feel best suits your situation, it is always recommended to write down the tasks and assessments.
Extra Tips to Help You
After studying for numerous hours, you may get fatigued or receive diminishing returns for time and work quality. It can be an innovative idea to take a small break to refocus. Below are some recommendations from students:
Get up and stretch for a few minutes after sitting down for so long. Yoga stretches can be used to stretch out your body and to refocus your thoughts.
Spend a few minutes looking away from a computer screen, especially looking longer distances. Going for a short walk can be a part of this.
The length of the break will depend on how fatigued you are. Sometimes the length will be a longer one day but shorter on another day.
Grab a quick snack to eat. Refueling your body with food will help energize you and recover from a fatigued state.
Activity: Time and Energy Management Infographic
Purpose of Activity:
Use an infographic creation program of your choice to create a mind-map to help plan to reflect upon the school-life balance the student would do given 3 situations:
You have approximately 15 hours of schoolwork to do in 10 hours
You have approximately 10 hours of schoolwork to do in 10 hours
You have approximately 5 hours of schoolwork to do in 10 hours
Difficulty Level:
Level One: 30 minutes– Spend 30 minutes on this activity to help you reflect on your own values, beliefs, challenges, barriers, successes, and goals.
Level Two: 1 hour – Spend 1 hour on this activity to help you reflect on your own values, beliefs, challenges, barriers, successes, and goals.
Level Three: 2 hours – Spend 2 hours on this activity to help you reflect on your own values, beliefs, challenges, barriers, successes, and goals.
Learning Outcomes:
Students are able to better identify what they will do in a similar situation, and adjust unbalanced school-life actions.
Students are able to apply graphic design principles such as text and colour to create an infographic.
Task:
In this activity, students will need to create infographic to describe the school-life balance they would be aiming for when situated with different amounts of schoolwork loads. The graphic must incorporate the three situations, information about time management, energy management, and prioritization.
Students can use any design software of their choice – including those recommended in the module itself, or any other software they are comfortable with.
Students should submit their graphics (as long as they feel comfortable) as a JPEG or PDF.
How to Complete This Activity:
Review the content in the Academic Balance section of the Learner Module
Sketch out a rough design for the infographic
Choose a design software to create your infographic
Create the graphic using the software. Remember to include information about time management, energy management, and prioritization.
Review and revise the infographic
If you feel comfortable with sharing your infographic, submit it
An Example:
What do I do with this?
If you are playing along using the Liberated Learner Work Binder, upload your infographic to the Learner Module folder.
If this is the only Liberated Learner activity you plan to do, then save the file wherever you’d like.
Academic Struggles
Key Terms
Individual capability: Your personal skill set. How well read, write, critical think…etc.
The Game of School: A mindset where you focus on only getting grades and everything else is secondary.
Success: Success is getting on the right trail, working towards your goals and expectations, and then surpassing your goals and expectations.
Introduction
In order to reach your academic goals and meet your expectations, you have to do work. Sometimes this work may feel like you are jumping through the hoops that professors or your program created. It may feel like jumping through some hoops is redundant, or it’s a struggle to jump through the hoop. The learning experience and problems you faced while working towards your academic goals can be difficult. University is where you expand your mind and thinking skills. Part of the thinking is not the technical information you learn in class, but how to manage yourself and manage the struggle. This section can help you get through some of the hurdles you may face in order for you to be able to surpass your goals and expectations.
Adjusting your Mindset
Many problems students face can be solved by switching your mindset to view the problem from a different lens or perspective. Many of the problems faced can be categorized into three groups: individual capability (your personal skill set), time (or lack thereof), and Study Strategies (study practices).
Individual capability
In classes, the professor is often looking for you to prove you are capable and competent by the work you do on assignments and tests. They typically mark you based on a scheme that judges how capable and competent you are. Many students work to fit into that judgement to prove they are the most capable and competent. Internal conflict can arise when what you think you can do and what you can actually do, do not align.
Everyone has limits. The limits for post-secondary school are different than what they were in High School. Even if you are given unlimited amount of time to get 100% in a class, your personal capability or skill set will be your limiting factor. Understanding when judgements on marking schemes will be taxing your capabilities, can reduce this internal conflict.
A question that can help you align your goals and expectations to reality: How much study time is required for me to feel confident about the course material?
A common hurdle to jump over is having many tight deadlines and not being able to do what you want with each assignment. It can be disappointing and frustrating knowing you could do better if you had the time. However, it is better to submit half a job than it is to submit nothing. Yes, it is super difficult if you like to perfect everything, but that is not always realistic. Having a balance of what to work on the most and least is a way to reach your goals and expectations.
Transitioning to post-secondary, you may find that the study strategies used in High School are no longer as effective. Improvements upon existing strategies or new strategies were required for them to get on the right path forward to reach their academic goals.
In order to know if the study strategies you used in high school still work in university, you have to try it – but be ready to improve and adapt the strategies to fit your new situation. You will know if the strategies need changes if you are getting too stressed or having an unbalanced study schedule.
Some tips other students found useful about study strategies:
Work smarter not harder: There is often an easy way and a harder way to do things. Example with taking note: if you are finding yourself to be a slow note taker, try to record the lecture on your phone so you can go back to it later, or partner up with a friend and share your notes with each other, or print off lecture slides.
Create to-do lists to keep track of everything you have to do. This could be a list on your computer or calendar.
Give yourself enough time to study. Start with the concepts that you know the least.
Review or re-do old course work (assignments, tutorials, labs, or test) while studying. This can help you learn the information, understand how the instructor writes questions, and the expectations of future work in the class.
Create diagrams to help you understand visually.
Research and reflect upon your individualized study plan. If you are looking for more ideas, ask your peer group to see what works for them.
Contact your instructor or teaching assistants to have a friendly chat about the course materials and expectations.
Understand the course concepts before you memorize them.
Minimize distractions – including from your phone.
The Game of School Mindset
Inputting lots of energy, time, and care into meeting your goals for grades can make you feel overwhelmed and stressed. When the grades do not equal the amount of energy, time, and care that are input, you may feel frustrated.
To avoid the stress and frustration caused by grades, change your perspective to ‘play’ the Game of School. This perspective imagines the school system as a game where you are only focused on finding the easiest path to win and achieve your goals. This can be done analyzing each assignment or test and posing the question “What do I need to do to get the grade I want?”. Once that question is answered, if you do what you need to do, you have avoided the unnecessary stress and frustration of school.
Example 1: An essay requires you to write 1500 to 1800 words to A+. In the perspective of the Game of School, writing 1500-1550 words is ideal as it limits the amount of stress and frustration.
Click on the image below for a larger version.
Created on Canva
Think about this: The instructor assigns homework that is due tomorrow. Answer the following questions
What do you think is the minimum you can do to pass? How would you play the game of school?
What do you think is the maximum you can do?
What do you think is the optimal amount of work/engagement you should do?
Path to Success
Getting on the right trail so you can have success.
With all the detailed work, assignments, and hoops to jump through in school, sometimes students can forget what success looks like. Success is getting on the right trail, working towards your goals and expectations, and then surpassing your goals and expectations. This can look different from student to student as everyone has different goals, objectives, or values.
Finding the right trail
This means you are aligning what you think you want to do, and what you actually want to do. Some students think they want to be in a certain program, join a certain club, or do a certain activity. After realizing what those things entail, they switch to what they whole-heartedly want to do.
After you have experienced the first thing you think you wanted to do, ask yourself if this is actually what you want to do.
Finding the right trail also includes how to do what you want to do. Coming up with a plan so you are able to do what you want to do – to be able to reach your goals. This could mean you change or improve your study strategies; you try different things, you ask others (peer group, guidance counselors) for suggestions.
Just Sayin’. After you know what you want to do, you should develop a plan to accomplish it. There’s some Goals and Expectations help in the Navigator Module. Just sayin’.
Activity: Finding Your Path
Reflection: Fill out the Finding your Path Activity below. Using your answers and combining them together, type, video record or draw a reflection about what you want to achieve and what path you will try to achieve it.
The Technologist Module “beats to study to” were crafted by students in the Seneca Independent Music Programs. Watch the video below, or listen to our Soundcloud Playlist (in a new window) for all of the beats while you go through the module.
This track is called “Derek@Trentu” by Machismono.
The Technologist module aims to help you select, navigate, and learn new technologies.
What will you get out of this?
A method forapproachingand preparingto work with new technology.
An introduction to podcasting and working with audio and the associated software.
An understanding of video content creation tools and how to plan and edit a multimediaproject.
An introduction to graphic design principles and software.
Hey! Watch The Tone!
This module was created by a team of student co-designers and instructional designers, each with their very own personality! As such, the tone of the writing shifts from section to section as we move from writer to writer. Enjoy!
Learning new technologies is part of the post-secondary experience. Whether you are entering your first year of university straight from high school, are an upper-year student, or are getting back into education after years away, you’ll be learning new skills and working with new technologies.
Gentle Reminder – If you’re in a rush, you can look through the Take Out Menu to help you find just what you need.
Learning Outcomes
By the end of this module, you will be able to:
General
Apply a function-based process to learn a new computer program.
Graphic Design
Describe the foundational principles of graphic design.
List some of the commonly used functions in graphic design software.
Create an original visual image that demonstrates the principles of design.
Video
Describe the stages of pre-production, production, and post-production as they relate to video creation.
Define some of the commonly used functions in video editing.
Create an original video that incorporates different framing, lighting, and editing techniques.
Podcasting
Describe the stages of pre-production, production, and post-production as they relate to audio creation.
Define some of the commonly used functions in audio editing.
Create an original audio piece that involves multiple tracks, sounds effects, and audio editing techniques.
There are connections to other Liberated Learner Modules:
First, many of the skills explored in other modules (time management, research, stress management) will serve you well as you try to learn various technologies. The techniques you use to deal with stress or manage your time will help you whether you are trying to study for a final or edit a video.
Second, many of the activities in other modules can replace the activities we suggest in this module. For example, instead of creating a poster hyping your favourite band (as we suggest in the graphic design module), you might instead create a poster that depicts the type of learner you are, or collects a set of resources that you want to use at your school.
Doodle
A Wicked Problem: Life-long Learner While Being Tech Slow
Life-long Learner While Being Tech Slow
by Ather Shabbar
Wicked problems are those without a definitive answer. They can be one of the trickiest problems since everyone’s situation is unique to them. To help guide you we collected stories from students in similar situations, their advice to you and how they overcame it.
This is a story about a mature student returning to university and struggling to adapt to new technology.
The Wicked Problem
I am returning to post secondary education at the age of 60 after taking early retirement from my career. My employer has offered an attractive early retirement package which afforded me to pursue a graduate program. My goal was to be a life-long learner and study subject areas that are of interest to me; i.e., organizational learning and culture change.
I found myself among students that are much younger who use their electronic devices with a high level of proficiency. Most students in my classes were about the age of my children.
I also found that, as an older adult, my biological needs were also different than other students. For example, my hearing and sight were not as sharp as they were when I was younger. My studying habits were also different than younger students; i.e., I took notes using a note book and pen, not using on-line tools such as Evernote.
At work I was accustomed to calling the help desk when I ran into problems with technology. There was instant help available to resolve the problem most of the time, and on a rare occasion, tech help came to my office to resolve the problem I was experiencing. This sort of service was not available to me at university.
My computer skills were limited to email and Microsoft Word. Occasionally, I used PowerPoint to develop presentations. I was not familiar with such e-tools as Google Docs, Survey Monkey, Eventbrite, or the Adobe Suite apps. These were commonly used apps. Other students “wizzed by” in the use of such technological tools, while I often found them very frustrating parts of reentry into academic life. I found that it took me much longer to complete assignments and prepare for classes. This was a major source of frustration for me and much more challenging than completing course work and assignments. I often asked my professors to grant me extensions to hand in my assignments or projects.
To add to the frustration, I was using a new computer with operating system I was not familiar with: a Macbook. This was a mistake. My home computer was old and was the size of a Buick. I had been using the Microsoft operating system.
I also found that the university IT department was not helpful. They often didn’t help to resolve the problem I experienced. They closed the “ticket” before the problem was addressed. I found the school administrators treated a mature student just like any other seventeen year old student, sometimes with a condescending tone.
Finding a Solution
I sought help from another student who understood my frustration and showed me how to use available technology for my studies. I didn’t want to keep asking for help from other students knowing they have their own workload to manage. I slowly learned to use Google Search to learn apps and functions. I also began to use Google Scholar, accessible documents, etc. This was slow and often frustrating, and it took me a long time to get used to it.
I decided to live with the circumstances and took a different perspective, which included:
Recognize it will take longer to get through the course work. Live with the reality I was facing. Know that learning technology will be your friend. The more I used an app, the more confident I became.
Make better use of time management tools. Allocate time to complete the course work as well as learning new technologies.
Ask for help from others who seem to be willing to help. Many people were not suitable for a mentoring arrangement.
When experiencing bad service from the school’s IT help, bring the matter up with senior administrators.
Seek help from the school when possible.
Final Thoughts
There is a quite a heavy burden on learners to “figure out” the technology, and often little support for doing so. And while this may be exacerbated for mature students who are coming back into a far more technological student experience than that in their past, all learners will face this “hidden curriculum” of tools they just need to figure out how to use. Recognizing the environment, culture, and practices you are entering is going to take agility on your part.
Learning these skills can be challenging, especially since they are not always covered in the course. You might need to use a learning management system (Blackboard, Canvas, Brightspace/D2L), or present with a virtual conference tool (Zoom, MS Teams, WebEx). Your instructor might ask you to create a video for an assignment, or a narrated PowerPoint. You might even have your own projects in mind: creating a website for your portfolio, or setting up an online store.
No matter the project, learning new technological skills is a vital part of being a successful student in today’s world.
This module will help you develop skills to address these challenges so that you can learn these technologies in a way that works for you.
Strategic Thinking Analysis
Developing a fluency in computer programs can be difficult, frustrating, and complex. This module presents one approach, focused on identifying specific functions and solving them.
The strategy focuses on a 3-step process: identify the problem, find resources, and practice.
Identify the Problem
The first step is figuring out what you need to do.
Your problem may be specific “How do I submit my assignment in Blackboard” or it can be general, “How do I edit a video?”.
One of these problems is worded in a helpful manner, the other is not.
Try Googling both phrases and look at the top couple results for each.
How do I submit my assignment in Blackboard (replace “Blackboard” with the learning management system that your school uses, such as Canvas or Brightspace)?
How do I edit a video?
Ask yourself the following questions:
Were the results helpful?
Could you solve the problem (submit the assignment or edit the video) from information in the first few hits?
The first thing you might notice is that the results for the first phrase (about submitting an assignment) actually answers the question. You could follow these instructions to submit your assignment. The results for the editing a video are much less helpful.
Why?
There are two issues:
1 – No program is specified. The first few hits are all centred around a specific program to use. That may or may not be one to which you have access or want to use. You may even see a video tutorial that uses a program that is no longer in use.
2 – “Editing” is full of many functions. Are you trying to add text to images? Add music to a slideshow? Cut and arrange clips? Zoom in on something? All of these are specific functions that fall under the umbrella term of “editing”.
The first phrase takes a specific function and puts it into the context of a specific program. The way you submit an assignment changes depending on the program you’re using. The first step in identifying the problem is to determine the function and place it in the context of a program.
You probably already know the program being used, but you should double check and make sure you’ve got it.
Moving from problem to function can be more difficult. Something like “edit a video” is too vague. “Adding text to a video” is not. “Create a podcast” is vague, while “cut audio clips” is not.
A Tip!
If you are stuck at this phase, and can’t specify a function, take a step back and consider some of the following:
Is this for class? Reach out and ask your professor for clarification.
Try researching:
Simple programs to use to create ______.
Introduction to ______.
These two searches should give you enough background to begin identifying functions. The first will help you identify some programs that you might want to use. That will help when searching for resources. The second will give you a familiarity with the sort of functions (and the terminology to describe them) that you might want to know.
Computer programs are full of individual functions. Successful use of a program involves learning how to use different functions to achieve the results you want. The purpose of this initial step is to discover the function that you need and place it in the context of a specific program. This will help when you’re looking for resources.
The more specific the function you can isolate, the more specific the resources you’ll find, which means that there is a higher chance they will help you. Getting specific is a matter of practice, so don’t feel bad if you’re not there yet. Keep that in mind as you move forward.
Find Resources
Once you have identified the function and program that you need to learn, the next step is finding resources. As a student, there are two main sources of help that you can use:
Inside your School
You already know that you pay for classes. Sign up for more classes, and your tuition bill goes up. So, one of the first sources for help is your professor. E-mail them to ask for help: it’s what they are there for. Sometimes your instructor is really helpful, and can help solve the problem or connect you to resources. Other times, they don’t know the answer and you need to look outside of class.
Outside of class, there are a lot of other school resources that you pay for, such as:
The library
The IT department
Student services
Counselling
The tutoring centre
Not all of these resources are helpful to learn new technologies, but some of them are. Check out what workshops the library offers, or if the tutoring center offers lessons and resources for what you need. If you’re new to school and don’t know where to go, start with student services. That’s literally their job: connecting students to services.
Outside of School
Outside of school, the place to go is the internet. This is why determining functions and programs is so important. They help filter all the information to get what you need to know.
For example, let’s say you are using Audacity to create a podcast. And let’s say that you’d like to raise the volume of a certain section. If you Google “how to increase the volume of a clip” you would get results for all sorts of things, and it is unlikely they will apply to Audacity. On the other hand, if you Google “how to increase the volume of a clip in Audacity” you will find the answer you need.
When searching for information, look for YouTube links if you’d like to see a video tutorial, and look for text articles if you prefer to see screenshots and instructions. Both are helpful, and the choice is yours.
Whenever you see a resource, ensure that the visuals or instructions match your own version. It’s possible that a video or article was made using an older version of the software, and the appearance or procedures have changed.
A Tip!
A lot of programs use specific terminology. The best search results come from using that terminology. Google your best guess, then read what is there. If you notice that people use a certain word to describe what you want to do, use that word in future searches.
Remember: You are not the first person in this situation. Others have asked similar questions before. Look for ways to improve your terminology and get more specific results.
Practice – Trial and Error
Once you have some resources, you’ll need to try them out.
When connecting to school resources or any form of help with a live person, bring your phone or laptop if you have one so you can try it out right there. That way, if you run into problems, someone is there to help.
When online, find a resource and try it out. Did it work? If not, what problem did you run into? Do you need to look for a different resource? Or did you run into a different problem and need to change your search?
Either way, this stage is about practice. Keep searching for resources and trying things out until you succeed. Sometimes, the function is straightforward (submitting an assignment), other times, it’s much trickier (blurring someone’s face in a video).
This stage is all about testing out resources and the methods they suggest. You might find something that looks really promising, but if it doesn’t help solve the problem, it’s useless. You won’t know if something is useful or not until you test it out. So, take the most promising and easy to follow resource, and try it out. If it works, great! If not, go back to Step 2 and see if you can find another resource, or go back to Step 1 and find a different function to research.
A Tip!
Be nice to yourself. You’re going to get it wrong sometimes. Your first video, podcast, poster, or website might not be the best. That’s ok. The next one will be better. You won’t end up with something as good as you imagined. That’s ok. Keep trying.
Give yourself time. The first time you do something, it takes a long time. The second time it will take less time. Eventually, it becomes easy. When you are learning things for the first time, give yourself enough time in case things go wrong. In fact, plan for things to go wrong.
This means you shouldn’t wait until the day your project is due to edit your video essay. Give yourself time so that you’re not frantically pulling an all-nighter.
Resources (especially from a real person) take time to schedule and get going. Your instructor might not email you back for a day or two. The next workshop on presentation design might not be until next week. Plan ahead. Give yourself extra time to complete the task.
Putting it Together
Learning a new technology is a process. The most effective way to learn something new is to give yourself a project. It could be for school or something that interests you. With each project, you are trying to do something. That might be writing an Excel formula to add up your monthly expenses, or you might want to block out a license plate in a video you’re creating.
Either way, approaching the problem by determining the functions that you need will allow you to learn. You’ll be able to see your results, as each successful function leads to a real change in your project.
Podcasting
What is podcasting?
A podcast is a series of episodes made of audio voice recordings that someone can listen to either by streaming or downloading the episode.
What you need to get started:
A microphone to record audio (your phone works well).
A free computer program to edit and combine audio files.
An idea.
Why would you create a Podcast?
In school, you might be given the option to create a podcast or audio narration for an assignment.
It can help build your personal brand to reach more people or become part of your portfolio.
With its low bar of entry, it can be a great hobby to share your ideas, opinions, jokes, or interests with the world.
Forms of Podcasting
There are many forms of podcasting, and you can mix up styles from episode to episode. Generally, the types fall into two categories: talking about a topic, or telling a story. When discussing a topic, you could be speaking on your own, with a co-host, or a guest. When telling a story, you could be telling a fiction or nonfiction story. You don’t have to create a series of podcasts – it’s perfectly fine to create a single piece!
Below are some pros and cons to the most common podcasting forms:
Interview Format
This format sees you (the host) interview guests each episode. You could interview multiple guests per episode, or stick to one at a time.
Pros:
Your guests do most of the talking. You just have to steer the conversation.
It opens your show to a new audience because your guests promote their appearance on your show to their fan base.
Cons:
This is an extremely popular format so you might struggle to stand out.
Interviewing is a skill that takes practice and patience.
Finding a new guest for each episode takes a lot of work.
The Monologue
This format relies heavily on your ability to captivate the audience with your own ideas and speaking.
Pros:
The podcast happens on your own schedule and at your own pace.
Editing one voice is much easier than editing multiple tracks.
Your audience gets to know you intimately.
This is powerful for brand building.
Cons:
It’s a lot of talking. Speaking for 30 to 45 minutes is tiring.
You don’t have anyone to bounce ideas off.
With a Co-Host
With two hosts speaking, a natural conversation emerges.
Pros:
You’re only responsible for half of the conversation.
It’s easy to listen to an organic conversation rather than a prepared script.
Cons:
You have to choose topics that you both know about.
It can be tricky to keep the conversation progressing in a way that makes the audience want to listen. For example, inside jokes might not go over well with the audience.
Telling a Story
You might be telling a nonfiction story (think news or documentaries) or a fictional story (think plays and films). It could be narrated by a single person, or involve actors playing characters. Often scripted and practiced, they also often involve sound effects and other audio to build a visual scene in the listener’s mind.
Pros:
This can be a great way to tell a story on a budget. If you are a writer and want to give life to your creation, you can more easily make a podcast than a film.
Can be highly addictive for listeners. Either they listen because they want to know about the nonfiction topic, or they tune in because they need to know what happens next.
Cons:
Requires a lot of planning and practice. Either planning all the facts to make sure you’ve got factual information, or practicing reading lines to get them right.
It could involve a big team, either of actors or people researching topics to ensure a high quality product. This type of podcast is competing with other news sources (print and video) or other entertainment sources (shows and movies).
The Three Steps of Podcast Creation:
Pre-production: Planning the show.
Production: Recording the voices.
Post-production: Editing the voices and adding in other sounds.
Pre-production: Planning the Podcast
Pre-production is all about knowing what you’ll be talking about. It helps avoid rambling, and encourages coherent, captivating content. Think about your own professors: some of them might be really good at rambling and tangents, but others are not. If you, like most humans, aren’t great at rambling, you’re better off creating some sort of script.
All Forms
No matter what style or form of podcast you’ll be creating, the following tips are helpful when planning your content.
Create a structure of how you want the episode to flow and what content you want included.
Practice your speaking voice:
You want to get a talking speed that isn’t too fast or slow.
You want to clearly enunciate your words so you can be understood.
You want to make sure all changes in volume are on purpose for emphasis, not accidentally.
Practice pausing instead of saying “ummm” or “ahhh”. These sounds are usually what our brains do when they are thinking of what to say. Practice being silent when you’re thinking.
Remember, the audience can’t see you staring blankly into space. They won’t know what is going on behind the microphone. You can always shorten pauses during post-production, but it’s much harder to remove “ummms”.
Interviews or Co-hosts
If your podcast will have another person speaking, it’s always good to let them know ahead of time what is being discussed.
Make sure that the guest is a good speaker, and, in addition to being knowledgeable, is able to speak clearly, informatively, and is engaging.
Give out a list of talking points to the co-host and guests. This lets them know what will be discussed, so they are not surprised and can come to the session with some prepared thoughts.
Ask the guest what they want to talk about, too. This helps create a conversation where both folks are knowledgeable and engaged.
Telling a Story
Write out a script and practice it aloud. Make sure it sounds natural. You don’t want to sound like you’re reading something, so practicing the lines beforehand helps you get familiar.
If you’re doing a non-fiction piece, think of what background information the listener needs to know. Ensure that this material is present.
Production
Record yourself using a phone or microphone.
Make sure you pick a place with minimal outside noises. Never record outside unless it is intended for a specific purpose and you want intentional background noise.
Keep a consistent distance from the microphone to avoid “popping Ps” and try not to vary your volume too much. Speak slightly louder than you normally would.
A “popping P” refers to the tendency for us to pronounce words that start with a P louder than normal. This is caused by blowing air when making the P sound.
People tend to start words or sentences strong, especially after a pause. Try to limit this.
When interviewing someone, nod instead of saying “Yes”. This will convey your understanding without causing issues with the audio file.
If you have a co-host or guest, it might be more practical for each person to record their own audio using their own phone. You’ll wind up with two audio files that you’ll have to combine during the editing phase, but it might be easier than crowding around a microphone or figuring out how to connect two microphones to one recording device.
A Tip!
Pauses are your best friend when editing. If you take a breath to psych yourself up for a line, take a 1-2 second pause. This will make removing the breath sound much easier later. If you mess up a line, take a pause, and redo that line. Continue as normal. Giving yourself the 1-2 seconds of silence makes your editing life much easier.
Post-Production
The Waveform
The waveform is a visual representation of an audio file. The X-axis (moving left to right) indicates time. The Y-axis (top to bottom) indicates the amplitude, which is essentially volume.
There is a lot more science and complexity to a waveform, but for our purposes, we only need to understand it as a visualization of our audio recordings. Our main tasks will be chopping out bad clips, adjusting volume, and removing breathing noises.
Podcast Editing
The Two Main Techniques:
A cut and a fade is not just to make your hair look good.
Cut – A clean transition from one piece of audio to the next
Fade – A gradual increase or decrease of the volume of an audio track. Think about how a voice might fade out near the end of a clip, or fade in at the start.
The Goals:
Our main goal is to take a bunch of clips and edit them so that they sound like one, uninterrupted clip. This is called “Continuity Editing”.
This can refer to small-level, such as keeping the volume the same across the entire piece, and ensuring that cuts are done in between words and sound clean. Continuity editing can also refer to bigger picture things, such as cutting off tangents, and adding in important context. When someone says, “Oh, I forgot to add…” we might want to put that where it should have gone.
Here, the value of pauses should be clear. By pausing in between words and sentences, we have more room in the waveform to cut and arrange clips. If we speak quickly, there would be fewer places to make clean cuts.
A Tip!
Continuity editing: Editing audio clips to create a linear and consistent progression of content. This means editing out tangents, sentences that don’t quite fit, and generally making sure that the final result sounds like one long clip, rather than a series of combined clips.
Another important goal is to get rid of Popping Ps.
They are inevitable and take practice to change during the production phase. Speakers should always be striving to limit the Popping Ps and speak at with consistent volume and tone.
Sometimes, they are unavoidable or you don’t notice. There are many strategies to getting rid of that “pop” sound. One is to fade in the P sound, another is to reduce the volume of just the P sound. In the mixer, you’ll have to find the “P” sound and isolate it. It should stand out.
Audio Editing Functions
Inside an audio editing program, there are many functions that you can use to reach the goal of good continuity editing. While these functions are consistent across most (if not all) programs, how they are accessed will differ. Check out the program specific tutorials to get a feel for the layout. Below are some of the most common functions you’ll use:
Select – This lets you select a part of an audio track. Once selected, you can move it, cut it, and manipulate it.
Cut – This will split the audio clip into parts, allowing you to insert something in between, move a piece somewhere else, or delete a part.
A form of cut that removes the beginning or end of a clip is called a “Trim”. Basically, trimming the ends. Maybe you took a breath before you started, or looked for the stop button on your phone when you were done. In either case, you might want to get rid of that little bit at the start or end.
Merge – This function takes two pieces of audio and merges them into one. Just like a cut takes a clip and turns it into two, a merge takes two and turns it into one. This is useful if you want to move this newly merged piece somewhere else, or apply an effect to the entire clip (to save yourself from doing it twice).
Amplify – The Amplify effect will either increase or decrease the volume of a selection in decibels, the measurement of sound.
Fade – Another common effect, this will fade in (increasing) or fade out (decreasing) a clip.
A cross fade is a type of fade that involves something fading in while something else fades out. The point is to have a seamless transition between two clips. An example would be introduction music that fades out as the speaker fades in.
Tracks
A “Track” refers to a recording of sound. If you were to record yourself speaking and load it into a computer, you would have one track. If you and a friend were each recording their own voice in a conversation, this would mean two tracks.
Audio programs allow for multiple tracks, and will play them all at the same time. Best practices say that we should separate different tracks. This way, we can change the background music speed or volume much easier, without changing anything else.
If we were to put everything on one track, things would get very messy very quickly.
Multiple tracks help us organize the audio files that we are using. Put the main host or narrator on the main track. Put background music on another, sound effects on another, and other guests/actors on their own track. The end result is the same, but it becomes much easier to find what you need and visually see the pieces that go into the final product.
Editing Software to Use
There are plenty of free audio editors out there. Audacity is a very popular choice. It is fairly easy to use and has an extensive suite of tools. There is a lot of support and resources for it as well, making it simple to find the solution to whatever problem you’re having.
With a simpler interface than Audacity, this is a great choice if you’re overwhelmed by Audacity’s complexity, but still want something fairly powerful.
Working on a Chromebook? Don’t want to download anything? Audio Cutter is browser-based and, while it is limited in functionality, it can be great if it does what you need.
You might also find something on your phone that works for you. Phone apps tend to be less powerful and more clunky to use (smaller screen, using fingers instead of a mouse or trackpad), but if you’re only doing some light editing (trimming, minimal cutting, juggling only a couple tracks), it might work well for you.
The purpose of this activity is to engage with the topic of the Podcast while simultaneously developing skills in audio recording and editing.
Why are you completing this activity?
To explore your own motivations at school, which in turn helps you better understand yourself as a student.
Difficulty Level:
There are beginner, intermediate, and advanced levels of this activity. See below.
Learning Outcomes:
This activity aligns to these learning outcomes:
Technologist: Record and edit an original piece of audio.
Learner: Understand why you may feel a lack of motivation/engagement with course work and learn how to be more motivated and engaged.
Task:
In this activity, you will be reflecting on your own sense of motivation in school and recording your thoughts on the matter. Once you have recorded your audio files, import them into an audio editing program and begin manipulating the audio into a polished piece.
Time Commitment:
This assignment should take you:
Beginner: 1 Hour.
Intermediate: 2 Hours.
Advanced: 3 Hours.
Success Criteria:
Content: An honest reflection?
Technical: Successful completion of technical markers set out below.
How to Complete This Activity:
After you have completed the motivation and engagement survey (opens in new window) from the Learner Module, review your answers and consider what factors motivate you the most or least. Collect some thoughts about yourself as a student: what motivates you, what doesn’t, how that leads to challenges, and what you might be able to do about them.
Beginner Level
Once you’re ready, grab your phone, and record some of your thoughts. You can record for as little as a minute or two, or as much as 5-10 minutes. It’s up to you.
Once you have recorded some thoughts, open up an audio editing program and import your audio. Listen back to it a couple times and then start editing! The beginner difficulty level of this activity asks you to:
Trim the beginning and end.
Edit out any long pauses, or sentences that don’t quite fit.
Try to cut out or reduce the volume of some breathing noises.
Intermediate Level
If you’re ready for more of a challenge, find a friend to discuss their own motivation factors at school. Lead a conversation between you two about what sort of students you are. Have each person record their own audio. When you’re ready to edit, import both audio files in two separate tracks and complete the following technical tasks:
Import the two tracks into an audio editing program.
When you are speaking, reduce the volume on your friend’s recording (if your words can be heard). Do the same when your friend is speaking.
Trim the beginning and end.
Edit out any long pauses, or sentences that don’t quite fit.
Try to cut out or reduce the volume of some breathing noises.
Fade the beginning of the conversation’s volume in and the ending’s volume out.
Advanced Level
The final activity still asks you to have a conversation with someone else (like the intermediate version), but this time we’re upping the technical components. With the two audio tracks, do the following:
Import the two tracks into an audio editing program.
When you are speaking, reduce the volume on your friend’s recording (if your words can be heard). Do the same when your friend is speaking.
Add music at the start. Fade it out while the conversation fades in.
Add a couple sound effects in a third track.
At least one should be low volume in the background.
At least one should have higher volume and be in the foreground.
Trim the beginning and end.
Edit out any long pauses, or sentences that don’t quite fit.
Try to cut out or reduce the volume of some breathing noises.
Fade the beginning of the conversation’s volume in and the ending’s volume out.
If you are playing along using the Liberated Learner Work Binder, upload your audio file to the Technologist Module folder.
If this is the only Liberated Learner activity you plan to do, then save the file wherever you’d like. Don’t forget to share it with your friends and family to wow them with your podcasting prowess.
Video Production
Video Production at a Glance
Creating a video project can seem daunting at first because it combines all of the elements of visual design and sound design, along with the unique challenges of video. However, getting started on a video project can actually be a surprisingly straightforward and effective way to communicate an idea, tell a story, or show off your work.
What you need to get started:
A camera or phone to record video and audio.
Access to a computer with editing software.
Access to audio (either recorded, or using audio files found elsewhere).
An idea or a story to tell.
Why would you produce a video?
In school, you might be given the option to create one as part of an assignment.
It can help build your personal brand to reach more people or become part of your portfolio.
You might want to create a video to post on social media.
Learning video production can help you improve all manner of creative skills because it pulls in skills from many different creative fields.
Three steps of video creation
There are three major phases as you create your video:
Pre-production: All of the planning work that happens before you actually start recording.
Production: All recording (filming and audio) as well as gathering any assets you are not recording yourself (such as stock footage).
Post-production: Where the footage all comes together and is enhanced with video/audio editing to create the final product.
Pre-Production
Pre-production: Planning
Before anything is filmed, it is all planned out. Here is where you start with an idea: what is it that you want to do? You may write a script and/or create a storyboard to plan out your shoot.
A Tip!
It can be tempting, on smaller video projects, to skip the planning stage. You should always at least have a rough written outline or storyboard even on small projects. It can help you keep things organized and ensure that no shots get missed.
The planning stage is critical for setting your project up for success. By giving yourself a clear outline of what you want to accomplish, you will have not only a clearer path to getting there, but also an understanding of what you will need to get there.
Do you need a specific filming location?
Do you have to track down music or other audio elements?
Are you going to be recording vocals?
All of these questions will help shape what your production phase looks like.
Likewise, your access to production elements like equipment, time, and location will need to be considered while you are still in the planning stage. It’s all well and good to have an elaborate tree-top scene in your video project, but that won’t mean much if you don’t have safe access to a suitable location, or the equipment and training needed to capture it.
Pre-production: Techniques
Filming can be a daunting task, so here are some of the steps taken in the pre-production phase of a project:
Finalize your script: If you have any dialogue, here is where you can finalize it before planning out your shots. This can always change as you go, but you still need that starting point.
Storyboard and shot list: Here is where you begin to plan the visual interpretation of the script. The storyboard helps you lay out the script scene-by-scene, helping you decide what shots to use.
Finding crew and location scouting: So you have the visual guideline to your script, the next step is finding the right people and the locations. You may find that you need to tailor your shots to fit different locations.
Gear: Now that you have figured out your shots and locations, it’s time to finalize what gear you need to make your project happen.
Budget: If your project is big enough to require one, here is where you need to finalize your budget and stick to it. Often, things will change and this is where you may need to find creative ways to achieve your goals while sticking to the budget.
Casting: Now, all there is left to do before you film is find the right actors to bring your script to life. Normally, this is done by holding auditions.
Production
Lights, camera, action!
This is where the shoot actually happens and your plans from pre-production are fully realized. Here, you will be using your equipment to record the video and audio that you will then edit in post-production.
A Tip!
It can be tempting to come into filming with the “I’ll fix it in post” mentality, where, if something in a shot is not the way you want it, you will just fix it in editing. It is MUCH EASIER to get things as close to perfect as possible while recording. You will always achieve better results by being picky with your filming.
Framing
Framing is a way for you as the filmmaker to convey your vision by guiding your audience with your shot. You can manipulate the composition, angles, and size of your shots to say something (without actually saying anything!).
The rule of thirds is a “rule of thumb” for composing/framing visuals. The guideline proposes that an image should be imagined as divided into a 3×3 grid, which equally divides the image into nine parts, and that the important elements should be placed along these lines or their intersections. Smartphone cameras usually have this feature, you may just need to turn it on.
Here are the most common types of shots and their uses:
Wide/Long Shot (WIDE)
This shot is usually used to establish a time or place for the audience. It can also be used to show where the character or object is positioned relative to the environment. The frame usually includes the whole body of the person, or may be a wide frame of the environment (e.g. the New York skyline).
Medium Shot (MED)
This shot is framed from the waist up, allowing the audience to see the character(s) more closely, but far enough to see their gestures and movement. This is a useful shot when more than one person is on screen.
Close-Up (CU)
This is usually framed from the neck upwards, and allows the audience to see the emotions and expressions on the character’s face. It is usually used to convey the emotion of a scene.
Extreme Close-Up (ECU)
Similar to the close-up, this shot is usually used to emphasize a particular object or area of interest. This is used to narrow the attention of the audience to a specific subject.
Lighting is another element used in video making to convey the tone or vision of a scene. Lighting helps to really motivate a scene, complementary to framing. One of the most common ways to set up lights is by using 3-point lighting. This approach includes the following setup:
Key Light: The main area of interest, usually off to one side of the camera.
Fill Light: placed usually opposite to key light, it is used to “fill” in the shadows created by the key light by softening them.
Back Light: Usually placed in the back, above the subject. This is used to separate the object of interest from the background and to create more depth.
The 3-point setup is essential to achieving certain looks, but it does not have to be strictly followed. Here are some other common types of lighting and what they are used for:
Natural lighting: As implied, this type of lighting that uses a natural light source or look (e.g. sunset, dawn). This is usually done using the lighting already available at location.
Practical lighting: This type of lighting refers to sources of light that are on screen (e.g. a lamp, candle, fire). It is usually used in wide shots to create some depth-of-field.
Motivated lighting: This is the type of lighting that uses studio lights to imitate natural light sources (e.g. moonlight, sunshine). This is done by diffusing or bouncing studio lights, and controlling the temperature (colour) of those lights.
Sound is the audio element used in video creation that ties all the visuals together to finish the storytelling medium. Depending on the shot, you might want to give actors individual microphones to ensure that their voices can be heard. If you want narration, you’ll record the audio separately and place it in the right spot during the editing phase.
One of the most popular (and easiest) video formats to create is the screencast or stream. Basically, you are recording your screen and narrating what’s on screen. Using a webcam is optional. The same three stages apply, as it’s good to have a plan before you begin, and you’ll need to edit the video to create something polished. But when it comes to the production, you don’t need a studio or cameras – just your computer.
Note: These are only suggestions, and not the only options available. For audio and video editing, other suggestions can be found in this module. For screen casting, there are many options out there. If you’re unsure, reach out to your library and see if they have any suggestions or resources available.
Post-Production
Post-production is where it all comes together. You have your plan, all of your raw footage and audio, and now it’s time to put it all together in video editing software.
What is editing? It is the ability to take footage and tell a visual story by manipulating elements of the footage and audio.
The Language of Editing
Here are some terms to familiarize yourself with before you begin to edit:
Cut: This refers to the clean transition from one clip into another.
Continuity Editing: A type of edit where different shots are cut together to create an uninterrupted flow. This is usually done with multiple-angle shots of the same action. This type of cutting seeks to maintain a continuous sense of time and space.
Dissolve: A type of transition where the end of one shot overlaps with the beginning of the next, creating a gradual fade. Note: Dissolve is the proper term used for fading between 2 shots. Fade is the proper term for another kind of transition, see below.
Fade: A transition where there is gradual brightening or gradual change into a color at either the beginning or ending of a shot. This is usually used to establish a new time and place.
Jump Cut: A sudden cut that creates lack of continuity in a sequence by ruining the flow. Often it can be seen as a mistake in editing, but if used with purpose, can be used to disorient the audience.
Cutaway: A cut that interrupts the flow of a sequence with another shot that is, in principle, related to it.
Split edit: This is when the visual and the audio of a scene cut at different times during the transition from one shot to another.
Video Editing Functions
There are many elements that can be manipulated in editing for a desired effect, here are some of the things you can play with:
Exposure: This is how bright or dark footage is.
Colour: This could be the shades, or hues you perceive, along with the temperature (warm/cold).
FPS: Frames Per Second. Certain frame rates will make desired effects easier to pull off. For example, if you record at 60FPS and then slow it down to 30FPS, you will get a much smoother slow-mo, because there are more frames to work with. The higher the frame rate, the more frames there are per second.
Opacity: This measures how transparent an image is. You can transition from one scene to another with a dissolve.
Editing Audio
It is important when in pre-production (planning) to have a rough idea of what sounds you think will go best with the visuals you have planned. That makes it easier to tie it all together in the end, audio-wise.
Have an idea of where you can get the audio from. The cool thing about audio is it’s literally all around us and can be pulled from any source, whether naturally (natural sound), stock audio (pre-recorded audio from an audio database), or audio that you create using your own sound effects.
When creating video, it is important to note that audio is added in post-production (editing). Once you have the audio you need, ensure when in post-production that it is in its own track, that way it runs parallel to whatever visual you’ve chosen and won’t overlap with anything else. No matter the software you choose, the principles of editing are the same: if you learn one you can learn them all. The differences will be in commands and layout.
Putting it all together
Here are some software tools that are free and available for most computer systems, and some for your phone:
A cloud-based online video editor that can be accessed from anywhere as long as there is an internet connection.
Stock library with images, videos, and music.
Ability to export videos in 4K resolution.
Easy to create branded templates with a logo, making it great for businesses.
Unlimited cloud storage.
The free version contains watermarks.
Video editing apps for your phone:
Video editing apps on phones by nature will be far more limited than anything that can be used on a computer. Most free versions of these apps come with a watermark. All common mobile devices have a built-in editor. Most social media apps allow you to edit uploaded footage and re-download the edit.
Dig Deeper
Some ideas for where to find some more stuff for your videos.
To create a short vlog using the techniques and principles from the module. What’s a vlog, you may ask? Good question. It’s a video blog. Instead of bloggers writing blog posts, vloggers make short reflective videos and call them vlogs! In this activity you will just be making one vlog post (and not an entire series)
Why are you completing this activity?
MicroVlogs are a great way to practice your video creation skills and pull in multiple elements covered in this module. They are also a fun way to showcase your daily routine on social media or for friends and family.
Difficulty Level:
There are beginner, intermediate, and advanced levels of this activity.
Beginner: Create a short personal vlog of your morning routine (1-3 minutes in length).
Intermediate: Create a short personal vlog of your day, featuring at least one other person (1-3 minutes in length).
Advanced: Create a short personal vlog of your complete day, featuring at least one other person and additional audio or graphical assets that you can share on social media (1-3 minutes in length).
Learning Outcomes:
Demonstrate an understanding of video production phases and tasks.
Apply videography and editing principles to create a vlog.
Incorporate editing styles and media types into a project.
Demonstrate understanding of a chosen editing software and recording equipment to create a final product.
Task:
In this activity, you will need to create a ‘day in the life’ micro vlog of some or all of your daily routine. You will plan, record, and edit your vlog for submission here and/or post it on social media.
You are welcome to use any recording and editing software with which you are comfortable, including what you find for your mobile phone. You are also encouraged to bring in other media elements such as sound or graphics.
Time Commitment:
This assignment should take you approximately 3-5 hours to complete.
Success Criteria:
Produce a final video with multiple shot types and edits.
Showcase an understanding of one or more videography principles.
Incorporate audio and graphic elements.
How to Complete This Activity:
Decide on how you want to capture your daily routine.
Complete pre-production.
Create a storyboard of your routine, including framing, shots, and the other elements you will need to capture.
Record your footage and audio for your daily routine.
This could be in several small snippets throughout the course of the day to capture all of the major events.
Edit together all of your footage, the audio, and any other elements.
Export and submit your finished video (the final length should be between 1-3 minutes).
If you are playing along using the Liberated Learner Work Binder, upload your video file to the Technologist Module folder.
If this is the only Liberated Learner activity you plan to do, then save the file wherever you like. Don’t forget to share it with your friends and family to wow them with your video production prowess.
Graphic Design
What is Graphic Design?
Graphic design means creating visual concepts either by computer software or by hand to communicate a message, idea, or concept that serves a certain purpose. Uses of graphic design include: visual identity, marketing and advertising, user interface design, publication, packaging, motion design, environmental, art, and illustration.
What you need to get started:
A computer with access to the internet and design software.
Some paper, pens, or pencils.
An idea or a goal.
Why would you learn graphic design?
In school, you might be asked to create an infographic, or a slide show, or even a polished text document. All of these can benefit from graphic design skills.
It can help build your personal brand to reach more people or become part of your portfolio.
Graphic design skills are perhaps the most broadly applicable creative skills. Almost every project, assignment, or document you produce can be enhanced by applying graphic design skills and principles.
The Design Process
Designing something from scratch can be a daunting task and indeed many designers find themselves stuck when they first try and launch into a new project. Fortunately, by understanding the basics of a typical graphic design process and doing a little bit of planning and research, you will have a much easier time.
Like all creative projects, it can be helpful to sit down and think about a plan before you start drafting up a design:
What are your goals?
What does the client or assignment ask for?
What kind of style are you aiming for?
Once you have that down, you can start researching and finding images that inspire you or fit the design that you are going for.
You can even compile a bunch of example images into a moodboard for easier reference as you are doing your design.
Once you have a solid understanding of what you are going for, it can be helpful to take a scrap piece of paper and a pencil and very roughly sketch out where you want things to go and how you want the final product to look.
It doesn’t matter how good you are at drawing on paper. The idea here is just to create a rough sketch so you have something to work from and so you can start to see how everything is going to fit together.
Finally, and most importantly, remember that graphic design, like all creative processes, is iterative. That means when you make something, it’s not just finished. You can go back and look at it, change and tweak things, and revise to make it better.
You can do this with an instructor or client, or with friends, or even by yourself, if you take breaks during the design process. Sometimes all it takes is a few minutes away from the screen and a cup of coffee to give you a fresh perspective and help you really refine your design.
You should also not be afraid of going back if you find that some part of your design is not working.
Don’t like how you have the text laid out? Change it.
Not liking the colour palette now that everything is together? Swap it up until you are happy with the results.
Graphic Design Basics
When we talk about graphic design, we are talking about a number of separate ‘elements’ that make up a whole design. You may be familiar with some of these already, but others might be completely new. It is important to think about all of these elements as you are planning and creating your graphic.
Colour
Designers and artists use a set of guidelines called colour theory to help effectively communicate ideas and create eye-catching elements for users. The use of colour theory helps with achieving a designer’s goals, which may be attracting attention, organizing content, and evoking emotion. Colour theory aids the designer in choosing the right colour combination for the desired effect.
Colour terminology: There are a number of terms designers use to talk about colour that can be helpful when creating images:
Hue refers to the specific colour (red, blue, purple, etc.).
Value is the lightness or darkness of a hue (e.g. maroon is a dark red with a different value than cherry red).
Tint is when you add white to a hue.
Shade is when you add black to a hue.
Chroma/intensity is the brightness or dullness of a colour (think of how close to grey, or how vibrant, a colour is).
Colour Harmony
Colours can be combined in various ways, but the common harmonies are monochromatic, analogous, and complementary.
Monochromatic harmony is developed around one hue.
Analogous harmony refers to choosing colours on that are close to each other on the colour wheel.
Complementary harmonies are colours that are opposite of each other on the colour wheel.
A Tip!
Where your graphic will end up will determine the “Colour Mode” you want to work in. Both modes will let you choose any colour, but the modes control how screens or printers display colours. If it is going to be posted online or on a screen, you should use RGB Colour Mode. For printing, you want to use CMYK Colour mode, which is seen in magazines, cards, posters etc.
It can be really helpful when you are starting out to play around with colour schemes to help you get a sense of what sort of colour scheme you might want to use for your design. There are a number of free tools like Coolors or Adobe Color that can help you try out different schemes and easily make different harmonies (you can even see thousands of schemes made by other people).
As much as colour is an important part of a design, it is equally important to consider all of the other design elements when you are working on your project.
More Design Elements
Form
An arrangement of elements in a composition and also the three-dimensional development of a two-dimensional shape, which has depth and encloses a space. There are three basic forms, which are organic, geometric, and abstract. Geometric shapes are man-made and mathematically precise, whereas organic ones are natural and asymmetrical. Abstract shapes are stylized and recognizable but are not real (and usually representing ideas and feelings).
Line
The connection between two points or a single point that continues for a distance. A line can be vertical, horizontal, diagonal, or curved. The purpose of lines is to add style, enhance comprehension, lead the viewer’s eyes, create forms, and divide space. When used alone, lines can provide a framework for the page and as part of a graphic element: they can create patterns, set a mood, provide texture, create movement, and define shapes.
Shape
Flat, two dimensional enclosed areas created with lines, textures, and colours. Shapes can evoke certain emotions and be used to create a particular feeling in a composition. The use of shapes in design helps to express different ideas, the sense of movement, offer texture and dimension, and suggest mood or emotions. As an example, soft, rounded, organic shapes are often associated with calmness, whereas sharp and pointed elements refer to boldness, loudness, or dynamism.
Size
An important function in making a design layout functional, attractive, and organized. It is how large or small an element is in relation to other objects and is used to make other elements or objects stand out, or to create contrast and emphasis. In order to effectively use size in your work, you can make important elements the largest, bring them “forward” or push them “back” to give a sense of scale alongside related objects, and create unity by grouping and making similar elements the same size, such as headlines and body text.
Space
The distance between elements and shapes in a composition, also known as white or negative space. White space is important, as it allows the viewer to understand the hierarchy of the elements as it separates and groups elements, processing them as their own or as a whole piece. Space can also provide a sense of luxury and sophistication to design work, add emphasis to certain elements, invoke imagination, and create a negative space image.
Texture
The visual or implied looks and qualities of a surface area, which suggest how it would feel. Different types of textures include patterns and images, environmental, biological, and man-made, and allow a work to create a sense of depth, evoke feelings, trigger emotions, and suggest the sensation of touch.
Graphic Design Principles
Once you’ve thought about all of the different elements, it’s time to combine them into a full design. There are a few basic principles to keep in mind when you are roughing out your design for the first time (and as you are iterating on it to make it better!). They are: balance, rhythm, contrast, emphasis, and movement.
Balance is the arrangement of the visual weight of objects, colours, texture, and space. Balance creates emphasis, drawing the viewers attention and dividing it into symmetrical, asymmetrical, mosaic, and radial. Visual balance is important and desirable since it provides a sense of comfort for the viewer, allows them to see all areas of the composition, and emphasizes how each part may hold interest. If a composition is unbalanced, it can give a sense of tension. The areas with the most visual weight get the most attention.
Contrast is the difference between two or more visual elements in a composition. This helps to clarify the purpose of your design by creating focal points and diverting attention to the contrasting element, while adding visual interest to a composition. Certain elements that can be used as contrast in a composition include colour, type, alignment, and size. Contrast is important since the difference between the elements makes it easier to compare and comprehend.
Emphasis is when a particular element is designed to draw the attention of a viewer. This is usually an eye-catching focal point and the area that has the most significance. Emphasis can be created by using contrasts in colour, texture, and value for the eye to be drawn to a particular area, and also by strategically placing something in the area of a composition that will draw the most attention.
Movement is the direction the viewer’s eyes naturally move around a composition. This can be created through lines, shapes, edges, colour, and patterns. Movement allows the viewer to know where to look and what to do next. The movement that is made through elements keeps visual interest and lets the viewer know of change. Some effects that create movement are blurs, curves, or the display of something already in motion (e.g. a person running).
Rhythm is the repeating elements in a composition that can unite, direct, and highlight. Rhythm can include elements that are repeating in shape, colour, tone, texture, accents, and direction. Using rhythm in a composition can create momentum and life, especially when used alongside the other principles.
A Tip!
File formats in the graphic design world can be overwhelming. In general, it’s best to save your files as whatever will have the most universal use. In this case, a PDF, PNG, or JPEG at the highest resolution possible. You might encounter the terms Vector and Raster when saving. A raster is an image made up of pixels, and a vector is an image made up of shapes, lines, and points. The difference is that you can always increase the scale of a vector (because it has no pixels), whereas a raster will start to show individual pixels.
Creating Your Design
Now that you have a plan (you’ve roughed out your design and thought through all of its elements while applying design principles), it’s time to actually use some design tools to create it. Most graphic design professionals use Adobe programs such as Illustrator, Photoshop, and InDesign to create their graphics.
Those can be both expensive and difficult to learn. Luckily, there are a number of free or less expensive alternatives that you can use to create your own high quality graphics.
Dig Deeper
Here are some extra options for you to explore for editing images that are free and/or open source.
GIMP
This is a free and open source alternative to Photoshop that allows for photo manipulation, retouching, and restoring, while also providing tools for users to create their own artwork, icons, graphic elements, user interface components, and mockups.
Inkscape
This is a free and open source alternative to Illustrator and includes features for object creation with shapes, drawing, and text tools, as well as object manipulation that allows for grouping, merging, layers, and the transformation of images with multiple format support options.
Gravit Designer
This is a free, browser-based, and full featured vector graphic design application that works on all browsers and operating software. This application allows you to create vector graphics with common tools, along with some photo adjustment, filters, and blending.
scribus
This is a free and open source alternative to InDesign. It is primarily a text processing tool that allows for basic vector elements to be used to create posters, flyers, and documents. This is an easy to use tool to plan layouts or create print documents.
Canva
This is a browser-based design platform that allows users to create a variety of content: videos, infographics, social media posts, documents, presentations, etc. The platform is free to use with a pro version available, and includes templates and the function to collaborate with other members.
Use a design program of your choice to create a graphic poster hyping up a band or show you enjoy. Designing a poster will let you bring in photos, graphics, and text to create a whole new thing.
Why are you completing this activity?
Promotional posters are a great way to practice because they bring together all of the elements of design covered in this module and allow you to create something based on a piece of media you like. It could be a poster for a band, movie, TV show, or a web series you enjoy.
Difficulty Level:
Design a basic poster for something you like.
Pick one of your friends favourite bands, shows, movies, etc., and design a poster to give to them.
Create a promotional poster for an upcoming piece of media you are excited about (such as a new album release or a new season of a show you like) and post it to social media.
Learning Outcomes:
Demonstrate the understanding of design basics including: colour theory, spacing, texture, etc.
Apply graphic design principles to create a promotional graphic for a piece of media.
Incorporate multiple design elements into a project including but not limited to: photos, shapes, colour palettes, and text elements.
Demonstrate understanding of a piece of design software and create an effective final product.
Task:
In this activity, you will need to create a piece of promotional media (such as a poster or social media post) for a piece of media of your choice. It can be a musician or album, a TV series, a movie or franchise, or any other piece of media you wish.
The graphic must incorporate elements of design discussed in this module and should showcase your understanding of design principles from the module.
You can use any design software of your choice, including those recommended in the module itself, or any other software you are comfortable with. Save your graphic as a JPEG or PDF.
Time Commitment:
This assignment should take you approximately 3-5 hours to complete.
Success Criteria:
Incorporate at least three distinct design elements covered in this module.
Showcase an understanding of one or more design principles.
Just Sayin’: You could consider using this activity to enhance your response to an activity in one of the other modules (you can get “2 for 1” credit for it!). For example, instead of making a poster for a band, make one that depicts the type of learner you are for the learner module. Just sayin’.
How to Complete This Activity:
Choose a media franchise or property you like.
Rough out a design for a promotional poster or social media post that includes a graphical element (such as edited photos for Instagram).
Choose a design software in which you will create your graphic.
Create your graphic using the software.
Review and revise (either individually or with a friend or colleague).
If you are playing along using the Liberated Learner Work Binder, upload your video file to the Technologist Module folder.
If this is the only Liberated Learner activity you plan to do, then save the file wherever you’d like. Don’t forget to share it with your friends and family to wow them with your video production prowess.
Technologist Module Checklist
The Technologist Module Checklist
These are all the things to check out and do in order to complete the entire Technologist Module.
Tuned into the Liberated Learner Beats to Study to
Read the Wicked Problem: Life Long Learner While Being Tech Slow
Reviewed the topics:
Technological Fluency
Podcasting
Video Production
Graphic Design
Technologist Module Activities
The three activities listed below are the ones that count towards becoming a Liberated Learner:
Completed the What Motivates You? Podcasting activity
Completed the Mini Daily Routine Vlogactivity
Completed the Fan Poster Design activity
The Navigator
III
Are you worried about starting or returning to your post-secondary journey? Maybe you’ve already started and need a life raft? This module aims to help you navigate that journey.
The Navigator Module “beats to study to” were crafted by students in the Seneca Independent Music Programs. Watch one of the videos below, or listen to our Soundcloud Playlist (in a new window) for all of the beats while you go through the module. The playlist is almost one hour long, so maybe once it’s done, take a break!
The navigator module will support you in navigating the continuum of your academic journey from registration to post-graduation.
Gentle Reminder – If you’re in a rush, you can look through the Take Out Menu to help you find just what you need.
Photo by McKayla Crump on Unsplash
Hey! Watch The Tone!
This module was created by a team of people, each with their very own personality! The tone of the writing shifts as we move from writer to writer. Enjoy!
By the end of the Navigator module you will be able to:
Set goals to identify a direction and create balance in your life
Identify barriers causing you stress
Get to the root cause of your concerns
Develop relevant goals to address your concerns
Outline strategies to accomplish your goals
Set realistic timelines in order to prioritize and manage your workload
Gather information from the program about your timelines and due dates
Create a budget for your personal time management
Develop strategies to complete your work and projects on time
Identify methods to further improve your personal time management
Seek support for wellness, disabilities, and mental health concerns
Recognize the signs and symptoms of when you need help
Identify short-term strategies you can use now to address your immediate needs
Identify long-term strategies that you could use in the future to keep you afloat
Identify strategies to increase access to technology, services, and financial needs
Identify technology and financial services available at your institution
Create a personal financial plan
Locate and advocate for functional workspaces that meet your needs
Communicate when you are faced with barriers in your studies
Access library resources and other academic supports for your program
Inform yourself about the pathways and requirements of your program
Navigate your personal pathway from registration to graduation and beyond
Identify unique requirements as an international student
Locate information within your Learning Management System (LMS) and course materials
Identify who to contact and where to find information on a college/university website
Level Up Your Navigation Skills:
Level 1: Self – these activities can be done on your own to help you reflect on your own values, beliefs, challenges, barriers, successes, and goals.
Level 2: Partner – these activities encourage you to share your thoughts, feelings, ideas, and plans with a partner, peer, family member, Elder, coach, or anyone else you trust and care about.
Level 3: Share – these activities encourage you to share with other students, be they in your own peer group, program, department, college/university, or on the Liberated Learner website to share with learners everywhere.
Navigator Module Doodle
Click on the image below for a larger version.
A Wicked Problem: Lost at Sea
Lost at Sea
Wicked problems are those without a definitive answer. They can be one of the trickiest problems since everyone’s situation is unique to them. To help guide you we collected stories from students in similar situations, their advice to you and how they overcame it.
This is a story about feeling lost and overwhelmed throughout university due to a lack of guidance on navigating life.
The Wicked Problem
Throughout my undergraduate studies and into graduate school I continued to feel “lost at sea”. There was the first year (which many students can relate to I’m sure) which involved throwing 18 year old’s out into the sea to see if they swam or sank. There was the sea of “finding friends at frosh”, “keeping up with readings in classes with 1000+ other fish”, “learning to be in charge of your own health and meals”, “withstanding ego damage as the class average rolled out at a B-“, “everyone wants to be a Doc, but not everyone will make it”, and many more treacherous waters. I kind of felt like Nemo jumping into the East Australian Current with no idea of how to get out or where I was going.
First year was a blur, duuuude. I was also used to being the big fish in a small pond in my hometown, and here I was in a new city amongst the entire Sea Anemone! In addition to feeling lost in my pre-med classes, I felt lost in life. What am I doing here? Why am I taking Calc 2? What is this degree actually going to help me with? I realized that my previous decisions to attend University and shoot for med school were mostly made by “following the other fish”. I didn’t really reflect on my “WHY”. Why are you HERE? At this school. Taking this program. In this city. With these people. Even bigger – Why are you here in this LIFE. This feeling of being “lost in academia” didn’t go away after graduating my undergrad. It continued into grad school and really matured into “lost in life” once I entered the working field. You see, I never really had any courses on “character development” or “aligning your values with your purpose” or “knowing WHO you are and WHAT you stand for”. No-one ever taught me about the importance of voicing my values as they related to academia. I felt like my entire education something was missing in helping me feel like I had a compass to navigate being “lost at sea”. This is a wicked problem because if I DID have a compass to return to each time academia made me doubt myself, I would have struggled so much less!
Finding a Solution
So here is my advice (to myself and to others – students or academic members):
Make connections between academic tasks/experiences and your core values. You value community? Great! Get involved in clubs and group studies. Find your community by attending ALL the events where groups are advertising for new members. Pay attention to WHO your community becomes, because it’s easy to think that you want to join a certain club because everyone else does or there is a certain “prestige” attached to it. That is a quick trap in which students must learn early what THEY want and be able to differentiate it from what SOCIETY or OTHERS want.
Visualize the end result. Professional athletes actually have better performance after visualizing themselves completing the action in their minds. I started to visualize myself working with children in a rehab setting after volunteering to teach swimming lessons to children with disabilities. This became part of my WHY. I think if I had practiced visualization more, I would be able to achieve my academic and career goals in a quicker and more stable way. I would create a goal – break it down, and imagine myself actually executing that part of the goal out. I’d create an image of what I was doing, who was there, the sensory experience and all (smells/tastes/thoughts).
Ask guiding questions – Do I want to work with people (yes or no)? What are my strengths and weaknesses? If I think back to my undergrad and the questions that I asked myself that really altered my academic path it was those ones. I remember choosing between pursuing a research versus professional-based graduate program and I thought, “Do I like people? Do I want to devote my career to serving people?” If yes, maybe research wouldn’t be as fulfilling for me. These questions might have come from an internal source some of the time, but my advice for the wicked problem of “feeling lost at sea in academia” would be to “sit with your shit” – Brene Brown. If you don’t know what questions to ask, do a search about the topic! I remember googling “why do people pursue a PhD” and there were real life accounts of student’s “reasons for WHY”. I then asked myself the same questions they proposed.
Reflect and Journal – Look at how far you’ve come! Set small goals. Reflect on what “feels good” or “sets your soul on fire”. If I think about the academic experiences that felt really good – I think about a Women’s Health course I attended to simply fill a requirement for my Life Science minor (turned out to be one of the most influential courses I took as it taught me about “social determinants of health”). I think about a research project I took on to advocate for recreational activities for children with disabilities. I wanted to tell the whole world about that project. But at the time I felt lost because I wasn’t really listening to what was driving me. I was comparing myself to other student’s and listening to stories about “what success meant” for other people. Also by journaling I could go back and look at what I had written and how I felt in that moment, then make a decision for the future.
Find mentorship – People who are doing what you THINK you want to do. Try it out! Learn and pivot. One of the best things that helped me learn my own compass for academia (then life) was learning about the compass that other people (usually older and wiser) used to navigate. Volunteering under a Physiotherapist in a private practice I learned that he was driven by “checking things off his to-do list”. That gave his work value. Seeking mentorship from senior student’s I learned how the academic experience is more than just learning about a certain subject/area – older students shared their favorite memories being post-exam celebrations, finding new hobbies, and exploring new areas of the city. This helped me “zoom out” of thinking I was “lost at sea” during a major thunderstorm (undergrad), and instead calmly find the wheel and enjoy the ride!
Read – Research – Real Life (find integration and motivation). When I found a research study that related to my personal interest in aquatic therapy for children with disabilities, I was pumped! I later wrote several school projects around this area of interest. It didn’t feel like work anymore! It felt like the activities I enjoyed doing (teaching and swimming) were aligned with my assignments, and thus how I was spending my time in academia.
Meditation in all forms. I highly overlooked the power of meditation – in sports, in yoga, in everyday mindfulness. Now that I can be “an observer of my mind” I can actively choose what thoughts I want to engage with, which impact my mood, and my actions (also known as Cognitive Behavioural Therapy). Which makes me think.. get a counselor! Go to therapy! If that’s what it takes to help you answer some deep rooted questions about why you’re at University. Take advantage of those student benefits and try out all the therapies!
Take courses on self-development. Did you know in Monk school Jay Shetty talks about how the very first “class for children” was on “how to breathe”? If I had actually been taught to control my breath I would have something to come back to every time a stress or worry consumed my thoughts and feelings. A compass! This is science by the way.
Final Thoughts
Take the advice and apply it to all areas of life. The big adventure is the school to real life (work) transition. Enjoy the present moment (easier said than done) by immersing yourself in the things you love. Find a balance between “being” and “doing” and “reflecting on being and doing”. But be very aware that once you find a personal compass to navigate academia, work, or any life event, you have the only tool you will ever need – yourself. So even though undergraduate school felt like a storm that I had no control over, I now realize that the main thing that would have helped me when I felt seriously lost, was to return to myself.
APA Reference
Flindall-Hanna, M. (2021, October 20). Lost at Sea. Liberated Learners. https://wicked.liberatedlearner.ca/learner/lost-at-sea/
Photo by Adam Azim on Unsplash
Goals and Expectations
What are Goals?
Everyone has goals for themselves. Some are reasonable, while others may be too much to ask for. We expect ourselves to work continuously and score higher grades. We hope to have the same level of energy every day. Also, we expect ourselves to be fearless. Setting clear goals is the most effective method to attain achievable results that are realistic.
You may have a long-term goal in mind, but the best approach to achieve it is to break it down into smaller, more achievable goals. Big goals are more challenging to achieve since they can overwhelm us and appear far away. If you keep chipping away at the goal, little by little, you’ll get there.
Whether you’re trying to accomplish your greatest dream, or just get off the couch, this module will help you to set and achieve your goals.
“You don’t have to be great to start, but you have to start to be great.” — Zig Ziglar
Photo by Aziz Acharki on Unsplash
Why Do Goals Matter to Students?
We all know how important it is to set goals. For students, this is a crucial stage because it determines where your energy will be directed. Student life is important because it serves as a stepping stone into one’s profession.
Your energy must be channeled properly, yet we frequently overlook how vital these gifts are as we go through life.
There are numerous advantages and benefits to having a set of objectives to work toward. Setting objectives aids in the initiation of new behaviours, the direction of your focus, and the maintenance of momentum in life. Goals also aid in instilling a sense of self-worth.
The Wicked Problem – 0 to 100 by Catherine McDonald
A story about finding a balance between academics and social experiences in university.
The Wicked Problem
A huge obstacle for me in learning how to be a successful student was learning to find balance within myself and the academic expectations that were placed on me. Often, I found myself studying for a midterm weeks ahead of time which I realized later was unnecessary but I had no real sense of how it was going to be and I was so afraid of failure that I studied way more than ever before. This over studying did lead to some good grades, I did manage a 98 on that midterm and even got my friends to do really well too. But, my mental health did suffer to a degree. I was isolating myself and staring at my computer screen doing every single assigned reading and making outlines of all of it. Eventually what I found was this wasn’t worth it because ultimately there was no need for me to get such high grades. My scholarship and program required an 80 to maintain them and so there was no real need to be such an overachiever academically with little else going on. Furthermore, it began taking a toll on my mental health. This cycle of studying so hard to achieve led me to very high highs of receiving my mark back and then lows of feeling empty because the grade I received did not really fulfill me and my need to be useful to others.
Finding a Solution
With this realization of these habits negatively affecting my life, I started to branch out and get into less academic sides of school, like different societies, campus wide social and sporting events, parties, mock trials and even academic seminars which had some major appeals. This was especially when compared to time spent cooped up in my room all day working on my academic endeavors. Though this disciplined behaviour can be helpful there is definitely a limit to its usefulness and recognizing that limit is incredibly important. Because the difference between a 98 and a 94 really isn’t much, especially when you studied an extra week alone in your room for it. Now, it also depends on what your goals are but overall it tends not to be a healthy thing to do because typically a lack of balance like that is not conducive to other goals one may have in their life. And as much as it is important to take your grades seriously, there is only a limited amount you can learn from a textbook.
In actuality, experiential learning and getting out there and being in the real world will be what makes you distinct from other students and also what will help those around you and yourself most. Getting involved in your community through collaboration is easier than you might think. Any opportunity you see advertised that interests you, take it. Especially during orientation week there are ads everywhere to be a part of everything. And also don’t forget that many others are desperately looking for people to collaborate with too, hence the adverts so don’t second guess yourself too much. Show up, treat everyone with respect and listen closely, and repeat. Now, although you may not feel your results are as immediate as getting a good grade back I think ultimately you will find that your sense of fulfillment significantly increases by helping others and engaging in your broader community.
A lot of times as well through this interaction with the broader community you may find that models of social behaviour or social theory severely flatten the human experience and the dimensions of people’s stories. In interacting with the social world yourself you come to find many more layers of depth and nuance which can not ever truly be captured with thorough enough detail in textbooks. There’s a sensory experience that goes on in person which is hard to capture through other mediums and is maybe a different reality all in itself. And yes, although it is maybe safer to do things online for a little while longer at least, there is still more interaction in that then online textbook. Basically, what I am overall attempting to say is that it is invaluable to get out there and get all of the social experience you can with people of all different walks of life in order to improve your empathy, your collaboration skills, your generosity and many other positive characteristics. Not to say books and other forms of media cannot be helpful in this process as well, but to me there is definitely a hierarchy of experience I think in terms of what it can provide for character building. Still, in interacting with others it is a better idea to try to go in with minimal expectation and bias. This will typically lead to the most authentic and honest experience.
Another helpful habit I picked up was to study with a friend and bounce ideas back at each other. This met my need of wanting to help others, have some social interaction, but also study. Since then, the friend I do this with is now my best friend and we are going to law school together this September. I could not be more grateful for the opportunities attending university has afforded me in terms of getting involved and forming strong connections with others. The real challenge is just going out there and taking them on.
Final Thoughts
Don’t wait until it’s too late to start living. Take risks while you’re young and don’t be afraid of others because most have more in common with you than you may think.
APA Reference
McDonald, C. (2021, October 6). 0 to 100. Liberated Learners. https://wicked.liberatedlearner.ca/learner/0-to-100/
Activities: Navigate Goals and Expectations Your Way
By the end of these activities, you will be able to identify strategies to support your goals and expectations
Identify what barriers are causing you to worry or stress
Develop relevant goals to address your concerns
Outline strategies to accomplish your goals
Level 1 – Goal Setting Techniques
What can I do to set my own goals?
Task: Write your own short- and long-term SMART goals.
Time commitment:
This activity may take between 30 and 60 minutes to complete.
Steps to Complete
Begin by watching this video called “Introduction to Setting Goals“. The video comes from a fantastic resource created by Ontario Colleges called The Learning Portal. We will share a number of pieces from The Learning Portal throughout this module. It’s great stuff.
Continue reading the following sections on writing SMART goals, long-term goals, and short-term goals:
How to write SMART goals
Unclear goals can be difficult to achieve since you may not know HOW to accomplish them. SMART goals take away this confusion.
SMART goals are:
Specific
Measurable
Achievable
Results-Oriented
Time-Based
For example:
Unclear goal: “Work out more.”
This unclear goal is difficult to achieve since you haven’t yet identified how to accomplish it. What does “more” mean to you? What does “work out” mean to you?
SMART goal: “Run 3 kilometres on Monday, Wednesday, and Friday each week to improve my mood, energy, and cardiovascular health.”
The SMART goal, on the other hand, lays out an action plan. You don’t need to make the decision every day of how to work out, and tracking your progress will be easy since you’ve assigned yourself a timeline and hopeful outcome.
How to set long-term goals
What are long-term goals?
Long-term goals are goals that take a long time to accomplish – perhaps several years, or even decades. Examples of long-term goals are things like becoming a carpenter, learning French, or starting a family. These goals can be intimidating, so it can help to break them down into a series of short-term goals. This can make challenging long-term goals seem more doable.
Take a moment to consider what you really want to do over your lifetime. What do you love doing? What have you always dreamed of doing? Write it down. It’s okay if these goals seem far-off, you have years to achieve them, so make them lofty but reasonable. How do you achieve this goal? One helpful strategy is to work backward, creating short-term goals that will help you to get you closer to these long-term, lifetime goals.
How to set short-term goals
Short-term goals are things that you can accomplish in the near future – maybe in the next year, month, week, day, or hour.
These goals can help you achieve your long-term goals, working as stepping stones to bigger accomplishments.
Sometimes, though, you will have short-term goals that don’t clearly fit into your long-term plans: for example, having a clean apartment. These goals aren’t exciting, but they’re a necessary part of life. When you feel overwhelmed, defeated, or motivated about daily tasks, a to-do list can help you break down these goals and develop an action plan.
Now You Try
Write down a long-term goal for yourself through the “My Goals Map” worksheet . As you write down your ideas, you will be prompted to break your long-term goal down into achievable shorter-term goals. You will end up with a to-do list of things you can do daily or weekly that will help contribute toward your long-term goal.
Dig Deeper
Review the following additional resources for more information:
You will know that you have successfully completed this activity when:
You have identified a current list of larger long-term life goals
You have identified many different options to break these long-term goals into shorter-term daily, weekly, or monthly tasks
You are actively completing your daily, weekly, or monthly tasks
Level 2 – Small Rewards for Motivation
How can I motivate myself to achieve my goals?
Task: Consider ways that you can use motivation as a reward for achieving goals.
Time Commitment:
This activity may take between 30 and 60 minutes to complete.
Steps to Complete
Here are the steps you can follow to complete this activity:
Watch the video “Treat Yourself” to learn how you can use small rewards to increase your motivation. Then, consider the following:
There are two types of consequences:
Immediate consequences: Results of your goal that happen immediately. This can be natural (like when someone claps at your presentation), or a reward that you’ve created for yourself (like a treat after you go to the gym).
Delayed consequences: Results that may take days, weeks, months, or even years to happen, like graduating from a program. It can be difficult to persist when you aren’t seeing the daily benefits of all your hard work. In fact, studies have shown that immediate consequences are better motivators than delayed consequences.
If you find that you’re struggling to stay motivated, try tricking your brain by creating some immediate consequences for your goals.
Create some strategies for yourself that will bring immediate consequences to your efforts:
Buy a fancy coffee and share it with a friend. Take this time to also share your goals and thoughts.
Take a hike with a friend. The fresh air will immediately feel good and you will be more energized in your day.
Take a break or do something just for yourself. Give yourself permission to read a novel, go to the movies, get a massage.
Think of other rewards that are meaningful to you. What would make them motivating? How do they bring value to you?
Success Checklist
You will know that you have successfully completed this activity when:
You are able to identify strategies to help motivate yourself to achieve goals
You begin to celebrate not just the big achievements but the small daily wins
Level 3 – Self – Reflecting
How can I overcome other barriers in achieving my goals?
Task: You will identify ways of overcoming barriers that you face in your everyday life as you work toward achieving your goals.
Time Commitment:
This activity may take between 30 and 60 minutes to complete.
Complete the accompanying worksheet to help problem-solve, fine-tune or reframe your goals to improve your chances of success.
Review your responses to the worksheet every time you face that same barrier. Consider:
Are you taking the steps you said you would to overcome your barrier?
What parts of your strategy are working well and should be continued?
What parts of your strategy are not working well and need to be changed?
Are you stuck and need help? Think of a trusted person you could reach out to. Sometimes just discussing an issue with someone else helps to bring clarity to what the next steps should be.
Are you facing new barriers? You may wish to complete the worksheet again and identify new motivators to overcome the new barriers.
If you have overcome a barrier, congratulations! We encourage you to share your experience with friends, family, peers, or others if you feel comfortable doing so. Often, many of us are going through similar experiences and could benefit from the advice and wisdom of others. If you choose to share your experience, think of who would benefit from this information and consider ways you are comfortable sharing. It could be mentioning it in class as a tip for other students, having coffee with a friend and walking them through your steps, or even writing an article for your student council newsletter. However you choose to share, you never know whose life you are changing for the better!
Success Checklist
You will know that you have successfully completed this activity when:
You have created a clear goal map with steps to achieve the goal(s)
You have identified what would make your goal achievable
You have identified ways that you overcome barriers and challenges
You have reflected on the results of your goal-setting and motivators
You have considered passing along your words of wisdom to others
Final Words of Wisdom
It is invaluable to get out there and get all of the social experience you can with people of all different walks of life. This will help to improve your empathy, collaboration skills, generosity, and other positive characteristics. Experiential learning through real-world challenges will make you distinct from other students. Your experiences can not only help you grow but may also help those around you. Setting goals for yourself, overcoming barriers, and getting involved in your community can be easier than you might think. Go for it!
Timelines and Workload
What is Time Management?
Time management is a learned skill involving prioritizing tasks, controlling the amount of time spent on tasks, and allocating tasks appropriately within the time you have available.
Why Does Time Management Matter to Students?
Time management skills help students to reduce stress and emotional overwhelm caused by lack of planning. Students often have to manage a school-work-life balance, which is more than what typical adults have to manage. Learning time management early in one’s post-secondary career will make the experience smoother, and the student is likely to get more out of their education.
The Wicked Problem -Multi-Tasker? More Like “Multi-Failer” by Hidaya Patel
A story about an international student trying to participate in all extracurricular activities, but ends up struggling with time management and dedicating enough time to finishing tasks.
The Wicked Problem
The desire to try everything out and participate in all activities is admirable but can be a huge pain when lacking time management. As an international student, I was instilled with immense dedication to participate in all activities and events and run for every position open in campus clubs. I loved planning to do 7-8 tasks a day and, in the end, not complete either of them. Well, as ambitious as it sounds, without time management, it’s all a waste. I did complete my goal of participating in everything and exploring all activities, but the aftermath was terrible. I found a part-time job too. And honestly, I can get a Guinness world record for being the worst at time management. Balancing academics and co-curricular activities in addition to a part-time job became a nightmare to me. I couldn’t manage my time evenly and often lagged in my academics. I found it very difficult to cope with the syllabus as I was always sleepy during lectures as all my energy would be drained in my job and events. Although I enjoyed being in the limelight very much, I could definitely see my academic status falling. I didn’t even have the time to cover whatever was taught in the lecture during the weekends. I felt despondent and blamed myself for not understanding the material, eventually leading myself to feel dumb.
Finding a Solution
I partially overcame the problem as it was too tiring and stressful not to be able to cope with my studies and have to ask friends for help in assignments constantly. This all happened in my first semester. Around the third month in my first semester, I thought to myself, what is the point of enjoying everything else if my primary goal to achieve academic success is not fulfilled. After lots of thinking and making charts to understand where I was going wrong, I realized that I never gave myself the time to be free and relaxed enough to focus on my academics. The biggest challenge of my life was time management. To be completely honest, I still am not entirely over this problem, but I am way better than before. After that night, I made a to-do list and did not overburden myself with stuff. From 7-8 tasks a day, I reduced it to just 2-3. For instance, on the days I had the job, I just focused on my lectures and nothing extra. On the remaining non-working days, I focused on academics and extras. I wasn’t completely able to follow this, but my condition and mental health were way better than before, and I could see my academic progress. For anybody experiencing the same problem, please give your mental health first preference and don’t tire and stress yourself out. Start with small to-do lists and try to achieve everything on your to-do list. But please start small.
Final Thoughts
Trusting yourself to achieve everything is good, but being practical about it is more challenging. Having the patience to take small steps and then build them into large steps is more important than trying to do it all in the first go. As rightly said by Leo Tolstoy, “The two most powerful warriors are patience and time.” Therefore, everything becomes fine when we just give it time. So give yourself some time, and appreciate yourself even if you achieved the smallest of all things.
APA Reference
Patel, H. (2021, October 15). Multi-Tasker? More Like “Multi-Failer.” Liberated Learners. https://wicked.liberatedlearner.ca/learner/multi-tasker-more-like-multi-failer/
Activities: Navigate Timelines and Workloads Your Way
By the end of this sub-module you will be able to:
Set realistic timelines in order to prioritize and manage your workload
Gather information from the program about your timelines and due dates
Create a budget for your personal time management
Develop strategies to complete your work and projects on time
Identify methods to further improve your personal time management
Level 1 – Create a Personal Time Budget
What can I do to create a time budget?
Task: Filling out a time budget worksheet
Time commitment: This activity may take between 30 min. and 1 hr. to complete.
Steps to Complete:
Write a list of all your commitments, deadlines, activities, including the length of time for each item
Arrange the list from highest priority to lowest priority
Fill in the weekly time budget sheet starting with highest priority items first.
Reflect with friends on how your time budgets can be improved using the advice from the TED Talk videos
Success Checklist:
You will know that you have successfully completed this activity when:
You’ve watched and reflected on the videos
You’ve readjusted your time budget to reflect any new understandings of time management
Level 3 – What you can do to share what you’ve learned with other students
Organizing an ‘Hour of Power’ group
An Hour Of Power!
Task: Hour of Power
Time commitment: This activity will take 1 hour to complete.
Steps to complete:
Gather a group of friends in a workspace
Set a timer for one hour
Completely focus on one individual task or project until the timer goes off. You can make a game of seeing how much you can get done before you hear the alarm.
You will know that you have successfully completed this activity when:
You’ve decided on an activity for your hour of power
Your one-hour timer goes off and you see how much you achieved!
Wellness and Support
What is Wellness?
Well-being is an overall state of happiness, health, and the sense that your life is going well. It encompasses many different aspects of your life such as your physical health, relationships, career, and environment. All of these aspects of your life are connected and affect how happy you are.
It is crucial to understand that wellness is not merely the absence of illness or distress. Wellness is a lifelong process of making decisions to live a more balanced and meaningful life. A good way to enhance your wellness is by evaluating your current state and establishing systems to guide you towards a fuller sense of well-being.
The Global Wellness Institute defines wellness as “the active pursuit of activities, choices, and lifestyles that lead to a state of holistic health.”
Photo by Sasha Freemind on Unsplash
Why Does Wellness Matter to Students?
Students’ health and well-being contribute to their ability to learn in all disciplines including health and physical education. This learning, in turn, contributes to overall well-being. Providing students with the skills to research and analyze knowledge is key to making healthy choices and informed decisions. As a result, students recognize and change their own behaviours as they become critical consumers of health information.
The Wicked Problem – Captain Depresso by Laura Little
A story about the struggles of being on your own.
The Wicked Problem
I was diagnosed with depression at the age of 16 and post-secondary schooling has been difficult in many ways. I started out going to Trent university straight out of high school for honours science with the intention of transferring to the nursing program the following year. I loved the campus and the courses I was taking. However, my mental health got the best of me. I spent many nights alone in my residence room crying and wanting to go home. By December I had already applied to the nursing program at various colleges closer to my hometown of Parry Sound. During the Christmas break, I decided to drop out of school and move home to better my mental health. Although I am an introvert, I found the isolation of post-secondary to be taunting. There were times when I wouldn’t leave my dorm room for days at a time and nobody would check in on me, not even my roommates. After this experience, I was hesitant to continue my education at Cambrian College although I was living with a friend and knew it was closer to home. I continued to struggle mentally and physically. For my physical health, I found it difficult to eat healthy in a dorm room. There was no stove or oven to cook with so it was difficult not to eat Mr. noodles every day. Most cafeteria food is also not very healthy so that did not help.
Finding a Solution
I still struggle with being on my own however I have come up with strategies to overcome that. I have come up with various ideas to better my physical and mental health without the help of others. For example, developing a meal plan helps me to eat healthier and ensures that I do eat more than once a day. also, coming up with a workout plan and taking time for myself each day can help mentally. I have also tried journaling to work through my emotions. For anyone struggling with depression or feeling isolated I would recommend making sure you talk to at least one person each day face to face, even if it is just the cashier at the grocery store. I would also recommend forcing yourself to go outside and maybe go for a short walk each day.
Final Thoughts
I would like to emphasize that every post-secondary institution has many resources available for their students no matter what they are struggling with. it is important to reach out and ask for help if you need it. There is no shame in struggling with any aspect of school even your mental health.
APA Reference
Little, L. (2021, October 20). Captain Depresso. Liberated Learners. https://wicked.liberatedlearner.ca/collaborator/captain-depresso/
Activities: Navigate Wellness and Support
By the end of these activities, you will be able to identify strategies to support wellness, disabilities, and mental health concerns
Recognize the signs and symptoms of when you need help
Identify short-term strategies you can use now to address your immediate needs
Identify long-term strategies that you could use in the future to keep you afloat
Level 1 – Eight Dimensions of Wellness
What can I do to help myself?
Task: Recognize your own personal areas of wellness to become aware of where you are thriving and where you need to focus your attention.
Time Commitment
This activity may take between 45 and 60 minutes to complete.
Steps to Complete
Well-being Assessment
Introduction
Are you wondering what areas of well-being you are thriving in and which might need attention? This assessment will help you to improve your own well-being.
View your scores to see where you can improve. We would also suggest writing them down or taking a screen shot of your results if you want to keep track of your responses.
Complete a Wellness Guide action plan using the Your Wellness Guide from Princeton’s UMatter. You can write your answers on the page and then download the guide (choose download “with your changes”).
Feedback for your scores in each Wellness Dimension:
Scores of 20-28: Outstanding! Your answers demonstrate that you’re already taking positive steps in this dimension of wellness. You’re improving your own well-being and also setting a good example for those around you. Although you achieved a high overall score in this domain, you may want to check for low scores on individual items to see if there are specific areas you might want to address. You might also choose to focus on another area where your scores weren’t so high.
Scores of 15-19: Your behaviours in this area are good, but there is room for improvement. Take a look at the items on which you scored lower. What changes might you make to improve your score? Even a small change in behaviour can help you achieve better health and well-being.
Scores of 14 and below: Your answers indicate some potential health and well-being risks. Review those areas where you scored lower and explore the related modules.
Dig Deeper
We have some extra resources. Like a lot of extra resources. If you want to dig deeper in any of the dimensions of wellness, you can find out more in the drop down below.
More Resources
Well-being Hub – Eight Pillars of Wellness – The Learning Portal
Financial Wellness – Financial wellness and developing financially-smart habits
You will know that you have successfully completed this activity when:
You are aware of your own dimensions of wellness.
You have identified a current list of needs and where to focus your attention.
You have developed awareness of how your behaviours can help you achieve better health and well-being.
Level 2 – Recognizing Signs of Wellness in Others
How Can I Support a Peer, Family Member, or Friend?
Task:Read through the following scenarios and suggested responses. Identify if a scenario has applied to you or someone close to you. Formulate a plan for how you would respond if someone approaches you about one of these issues.
Time Commitment
This activity may take between 60 and 120 minutes to complete.
Steps to Complete
Part 1: Scenarios: Working alone or with a partner, choose one or two of the scenarios below and role play or discuss what you would say as a response.Scenarios adapted from handout “Starting a Conversation about Mental Health: Foundational Training for Students” licensed under a Creative Commons Attribution 4.0 International license (CC BY 4.0 license)
A student who is struggling to balance their studies with caring for their child
Alex is a single parent who is going to school full-time and is unable to find reliable daycare. The daycare on campus is full and Alex is on a waitlist; all the other community daycares are also full. Alex’s daughter, Gemma, is a toddler, and Alex is wary of leaving her with a stranger. Alex has no family in the area, and friends are unable to help as they either work or go to school themselves. With final exams coming up, Alex is having trouble finding time to study and feels options are extremely limited or non-existent. Alex tells you they have been trying to study while Gemma sleeps but cannot keep it up for much longer because they are feeling so sleep-deprived. Alex looks unkempt and has dark circles under their eyes; they look like they are about to cry and seem very stressed.
A student who is genderqueer and has just gone through a bad breakup
You have been paired up with Leslie on a semester-long project in one of your classes. Leslie is upfront about being genderqueer and asks you to use the pronouns they/them. Leslie is enthusiastic, shows up to all the meetings, and completes their portion of the work on time. However, as the semester progresses, Leslie begins missing meetings, is harder to get hold of, and is either late with their contributions or the work is subpar compared with their earlier submissions. When you ask if everything is okay, Leslie admits they are going through a bad breakup and is having a hard time handling it. They are having difficulty concentrating on their work, they aren’t sleeping well, and they are drinking a little more than usual. Leslie tells you they are thinking about dropping out and don’t know what to do.
You are in class when the instructor begins talking about Canada’s residential school system and the abuse and forced assimilation of Indigenous children. As the lesson closes and students begin to pack up, you notice that a usually gregarious Indigenous student is sitting quietly and appears to be wiping tears from their eyes. When you approach the student, they tell you that their grandmother was in a residential school and they found the lesson very triggering.
You are part of a study group that has been meeting regularly throughout the semester. Recently, one member’s attendance has become sporadic. When they do show up, their appearance is dishevelled, and they seem to have a hard time concentrating. When you ask them about this, they confide that they have been evicted from their apartment and must live in their car for a few weeks until they can afford a deposit on a new place. They explain that it’s hard to find a quiet and comfortable place to study or sleep, and their coursework has suffered as a result. They also tell you that they feel a lot of stress and shame about the situation.
A transgender student who needs support with a culturally unsafe instructor
Alexa, a transgender student, approaches you after a LGBTQ2S+ meetup on campus. She tells you that one of her instructors refuses to call her by her name, stating that “preferred names” are optional as per school policy. Occasionally, the instructor will use Alexa’s name, but will self-edit; for example, calling her “Alex” instead of “Alexa.” The student feels disrespected and humiliated by her instructor during class, so if she does attend class she sits in the back and doesn’t participate very much. She explains to you that she needs to do well in the course so she can get into the program she wants. She expresses feelings of sadness, hopelessness, and frustration during this interaction.
An engineering student who appears anxious and rushes out of class
Your classmate usually sits at the very back of your engineering class and keeps to themselves. Today they arrive late, and you notice them taking one of the remaining seats at the busy centre of the lecture hall. Other classmates are engaged in loud conversations with one another. Your classmate appears to become anxious. You notice them frantically shuffling their bodies. As additional classmates fill up the remaining seats, your classmate hastily grabs their belongings and runs out of the class, sweating profusely. You decide to follow them out of class to see how they’re doing. When you talk to them, they tell you that they were just anxious and needed to get out of the room to relax.
An international student who is not able to pay fees
An international student you know from classes is not able to pay all their fees for the semester. The student tells you that they didn’t get any kind of financial aid. They discussed their situation with their parents, but they are not able to send money because their business was shut down during the pandemic. The student is really upset and appears to be on the verge of tears when they talk to you. They are worried they’ll have to drop out and say they feel helpless and very stressed.
An international student feeling overwhelmed by academic and work commitments
Salem arrived in Canada three months ago and is struggling with absorbing school material in English. Salem has to work after classes to support their family, so there is no time for extra tutoring or study club. Because of late-night shifts, they are having trouble keeping a consistent sleep schedule and preparing meals for the week. Salem explains to you that they have a midterm exam coming up. Salem discloses to you that in their culture, grades play a large role in defining one’s self-worth and social status—and this exam is no exception. They are visibly distressed, their eyes swollen with dark circles underneath, and they mention their lack of appetite and lack of communication with their loved ones.
A student worried about failing a course and disappointing their family
Cobie is the first member of their family to attend a post-secondary program, and their parents and grandparents have invested most of their money in their education. Cobie has come up to you, as a teacher’s assistant, in a panicked way after class. They explain that they just got their mark back for an assignment, and they failed it and are unable to improve their mark. They will likely fail the class because of how much the paper was worth. The student is clearly panicking and displaying frantic behaviours like pacing, speaking rapidly, fidgeting with their hands, and being on the verge of crying. They say that they feel guilty for wasting their parents’ and grandparents’ money and are embarrassed to tell them that they failed on the paper. They say they feel helpless and stuck, with no way out of the situation.
A student triggered by an instructor’s comments about weight and body image
Your friend Blue, who is recovering from an eating disorder, just ran out of class because of triggering course content. Blue is non-binary, queer, bi-racial, and neurodivergent. In class, the instructor was discussing nutrition, body image, and healthy eating when they made an implicitly offensive comment about weight and body mass index. This triggered Blue, causing them to run out of the classroom. You also leave class to check on them, and you find them pacing up and down the hallway, scratching their arms, and tugging at their shirt to pull it away from their body.
A student struggling to balance academic pressures with their social life
A student shows up to class after not coming for a couple of weeks. As everyone is packing up their bags at the end of class, you approach the student, who looks tired, is not wearing appropriate clothing for the cold weather outside, and looks like they may not have showered in a while. After talking privately with you in the empty classroom for a few minutes, the student discloses that they are hungover from a weekend of drinking. The student is clammy, sweaty, and breathing quickly. The student continues to tell you that they don’t want to be in school, but they’re under a lot of pressure from their family to be there. The student tells you that the only part of school they enjoy is the social aspect.
Part 2: Take a Moment To Think About Your Responses
Think about how you would respond to the one or two scenarios you have chosen. Alone or with a partner, write down or discuss what questions you would ask your peer, family member, or friend who is sharing their situation with you. Consider how you would show empathy and support, and what actions you may take after learning of their situation. Once you have identified some ideas, continue to the suggested responses below.
Compare these suggested responses with the ideas you came up with alone or with a partner. What is similar? What is different? What would you change about your own responses after reading the suggestions? Below are two examples of responses from the link above.
Scenario 1: Student who’s struggling to balance studies with caring for their child
Possible response:
I can see you really care about your daughter and how important it is to ensure she is safe and well-cared for. I also see how hard you are working to do well by studying while she is sleeping. I admire and respect you for putting yourself through school while raising a child. Is there anything I can do for you right now that would ease your stress? I know it may feel like you are out of options, but perhaps we can figure this out together. We can contact student services on campus. They may have a list of caregivers for this specific reason or resources/referrals for parents. We can also try Facebook and ask the community if they know of any reputable caregivers that have space for your daughter. Perhaps it would be a good idea to speak to your instructors so they’re aware of everything that you’re juggling. They may be able to give you more time for assignments or may have resources or ideas you haven’t thought of yet.
Scenario 2: Student who’s genderqueer and just gone through a bad breakup
Possible response:
I’m sorry to hear about your breakup with your partner. In my time working with you on this project, you have been diligent, hardworking, and enthusiastic. I can see your situation is causing you a lot of stress and sadness and distracting you from your studies. Have you spoken to anyone about this? Do you have support at home or with friends or family? The school has some excellent LGTBQ+-friendly counseling services you can access as well. Maybe it would help to talk to someone about what you are going through? I commend you on continuing to show up and trying the best you can; it’s a testament to your resilience. Although we do need to complete our project, I’m flexible in how we continue with it. Is there anything we can change to ease some of your stress, such as working on it together instead of separating the work and then meeting?
Dig Deeper
There are many more resources available to you for help. Here are some of them.
You will know that you have successfully completed this activity when:
You have the ability to understand your mental stress level and share it with others whom you trust.
You can identify ways to motivate yourself and learn from others’ experiences.
You can listen empathetically and acknowledge another person’s strength and resilience.
You are able to connect someone with counselling services.
Level 3 – Help Someone Like You
What can I do to help someone else navigate wellness and the supports available to them?
Task: Reflect on your own wellness journey and consider sharing what has worked for you.
Time Commitment
This activity may take between 1 and 2 hours to complete.
Steps to Complete
Consider the following areas of your journey:
Emotional wellness is being attentive to both positive and negative feelings and understanding how to handle these emotions. This also includes the ability to learn and grow from past experiences.
Environmental wellness encourages us to live in harmony with the Earth by taking action to protect it. Environmental well-being promotes interaction with nature and your personal environment. You can have a strong environmental conscience simply by raising your awareness of your surroundings. A clean, safe, comfortable environment helps you feel good, whether you are in your home or out in the community.
Financial wellness and developing financially-smart habits during college are valuable investments that will help you achieve your future goals.
Intellectual wellness helps you explore new ideas and perspectives in order to become curious, try new things, and develop an understanding of how you see the relationship between yourself, others, and the environment.
Career wellness is far more than the money you make or the title you hold. It is having a career or vocation that is personally fulfilling.
Physical wellness promotes proper care of your body for optimal health and functioning.
Social wellness refers to the relationships we have and how we interact with others.
Spiritual wellness not only allows you to seek meaning and purpose in human existence but allows you to appreciate your life experiences for what they are.
View the following resources that can help you with your own reflections:
The Mental Health Literacy Pyramid (9:28 mins) by Mental Health Collaborative provides an overview of the Mental Health Literacy Framework and the different states of mental health.
Why Stress Is Good For You (2:32 mins) by Scientific American explains how stress can be viewed as helpful.
Identify what has worked well for you and what challenges you faced:
Did you have to gain access to technology, supplies, tools?
Did you have to advocate for your needs?
Did you find value in the support available at your institution?
Reflect on how you overcame these challenges or barriers:
What plan did you put in place?
Did you address these challenges on your own?
Did you seek support?
Who did you approach?
What steps did you take?
Consider other students who may be facing the same or similar challenges and barriers to access in their studies.
What advice would you pass on to those students?
What were your greatest lessons learned?
What do you wish you would have known before you started college or university?
If you would like to share your advice with peers at your institution, consider speaking to your Student Council.
If you would like to share your advice with students at any institution, consider submitting your reflections either with your name or anonymously to the Wicked Problems website where your story may be featured along with the many others who have shared. Your advice can truly make a difference for another student.
Success Checklist
You will know that you have successfully completed this activity when:
You have reflected on your own personal Wellness journey
You have considered what worked well for you and what challenges you faced
You have identified ways that you overcame those challenges and what the result was
You have identified a way to share your story
Final Words of Wisdom
Every post-secondary institution has resources available for their students, no matter what they are struggling with. It is important that you reach out and ask for help if you need it. There is no shame in struggling with any aspect of wellness. As we’ve learned in this module, the many aspects of wellness are interconnected and important for overall wellbeing. Wishing you a healthy and happy post-secondary journey.
Access and Finances
What is Access?
Access is the basic fundamental need for students to be able to participate fully in their education. This includes access to transportation, finances, technology, tools, services, internet connectivity, learning spaces, safe spaces, mobility, faculty, staff, administrators, peers, and so much more.
Why Does Access Matter to Students?
When elements of access are not available to students due to financial, technological, geographical, social, institutional, familial, religious, cultural, linguistic, physical or other barriers, then students are not able to fully participate in their education. Facing these types of barriers may make you feel frustrated, angry and upset. You may also feel excluded, unsafe, overwhelmed, stressed, unheard, and unseen. Barriers may even appear before, during, and/or after your college or university experience. If this is happening to you, we want to help you to navigate the many ways that you can reduce or eliminate these barriers for yourself and others. In this module, we will focus specifically on technological and financial barriers. Visit the other sub-modules in the Navigator module to discover ways you can tackle other barriers in your life.
The Wicked Problem – Technology and Affordability for Impoverished Students by Fariha Tabassum
A story about students who lack accessibility to computers due to financial barriers.
The Wicked Problem
With advancements and improvements in technology, having access to a computer of some sort is considered common-place and even a basic need. Especially during this COVID-19 pandemic when workplaces and classrooms have quickly shifted to online platforms. You need to have a computer, it is a necessity to complete daily work now, whether it be school work or business. And even more so now, as a student, you need to have a computer as well as a web-camera and a microphone to participate in zoom classes and meetings as that is a requirement set out by many professors and institutions. What many people fail to realize, I believe, is that not everyone and not every student can afford such luxuries. These may not seem like luxuries to some, but to those that are not as financially well-off, it is a luxury. So what do you do when a luxury becomes a necessity and you cannot afford it? This was an issue for me and a barrier that I have faced in pursuit of my academic success. I had a very old computer that I had been using for years, I did not have a proper web-camera or microphone to participate in zoom classes and that made life difficult for me but also made me feel excluded from my peers and professors. However, fortunately for me, I found a solution (explained in the next section).
Finding a Solution
Fortunately for me, around the same time that all classes shifted to an online format, there was a new remote learning initiative where students in need could apply for a free Chromebook that had a web-camera and microphone built-in because in today’s world “not having the correct technology can directly translate to not having access to a quality education” as said by a director of Philanthropy at Trent University. So these Chromebooks would come with the required software and hardware for remote learning. I applied for one and based on financial need, I was able to get myself a Chromebook which I can now use for my online learning.
Final Thoughts
My advice to anyone facing a similar issue would be to reach out and see what kind of initiatives are available for students who have these accessibility to technology issues. If it is a financial concern, reach out to your financial aid office, see if there are any bursaries available for students in need because we all need a little help sometimes. Talk to guidance at your school and do not feel embarrassed, I know for many people they might feel embarrassed that they do not have the financial means to afford the technology required for learning in today’s world and especially if you see your peers that are well-off with expensive MacBooks’ and whatnot while you don’t have that, it can make you feel excluded from your peers, I get that. But I want to assure you, you are not alone. Financial barriers are a real issue that many students face but I feel that it is not talked about a lot so I am grateful for this platform and this opportunity to share my story and hopefully bring a little more attention to the issue. The truth is that no student should be left behind or excluded based on how much they have in their bank account.
APA Reference
Tabassum, F. (2021, October 7). Technology and Affordability for Impoverished Students. Liberated Learners. https://wicked.liberatedlearner.ca/technologist/technology-and-affordability-for-impoverished-students/
Activities: Navigate Access and Finances Your Way
By the end of these activities, you will be able to identify strategies to increase access to technology, services, and financial needs
Identify technology and financial services available at your institution
Create a personal financial plan
Locate and advocate for functional workspaces that meet your needs
Communicate when you are faced with barriers in your studies
Access library resources and other academic supports for your program
Level 1 – Financial Planning and Goal Setting
What can I do to navigate my access and financial needs?
Task: Create a personal financial and study plan by identifying the technology, financial, library, and academic services available at your institution.
Time Commitment
This activity may take between 30 and 60 minutes to complete.
You will know that you have successfully completed this activity when:
You have reflected on your own personal academic journey when it comes to access and finances
You have considered what worked well for you and what challenges you faced
You have identified ways that you overcame those challenges and what the result was
You have considered passing along your words of wisdom to another student
You have identified a way to share your story
Information and Pathways
What is Information Literacy?
Information literacy is the ability to source information, manage the information, evaluate the relevance of information, and to apply relevant information to solve problems. Information literacy is essentially the ability to locate the information needed to answer one’s own questions, or to locate contact information for someone who has the answers.
Why does Information Literacy Matter to Students?
Information literacy is an important skill-set for students to learn because it contributes to independence, adaptability, and problem-solving skills, which are all requisites for employability and life-long success.
Activities: Navigate Information and Pathways Your Way
By the end of these activities, you will be able to gain clarity about the pathways and requirements of your program.
Navigate your personal pathway from registration to graduation and beyond
Identify unique requirements as an international student
Locate information within your LMS and course materials
Identify who to contact and where to find information on a college/university website
Level 1: What you can do to help yourself
Where can I find specific information on a College/University website?
Task: Learning to Navigate the College/University website to source information
Time commitment:
This activity may take 2 hours to complete. More if you attend some activities!
Steps to Complete
Register for, and attend student orientation activities.
Often these activities include a virtual scavenger hunt, which will help you orient and navigate the website
Often, colleges and universities have YouTube videos that show how to find information on their website. Search your institution on YouTube to see if they have “How-to” demonstrations
Watch the video below, for an example from Athabasca University.
Go to the library website. When in doubt, always ask a librarian, they know how to find resources and services.
Libraries sometimes offer workshops that can help new students navigate university life.
Dig Deeper
Have a look at these resources to dig deeper into navigation of institutional websites.
You will know that you have successfully completed this activity when:
You’ve booked an appointment with your program advisor
Your list of questions is answered and/or the program advisor has pointed you in the right direction to have them answered.
Level 3 – What you can do to connect with other students
Where can I network with other students, and find clubs and associations that offer helpful services?
Task: Join or form a departmental club to help orient new students, or partner with your school’s student association to plan useful orientation activities.
Time commitment:
This activity may be an ongoing commitment.
Steps to Complete
Using a similar online search to the other tasks, see if any academic groups or societies exist for students on your campus that you’d like to join.
If not, you can create a student club and/or approach your student association about a partnership.
Design activities from a student perspective that will help new students with orientation.
Host club meetings, workshops, or orientation activities.
The Collaborator Module “beats to study to” were crafted by students in the Seneca Independent Music Programs. Watch one of the videos below, or listen to our Soundcloud Playlist (in a new window) for all of the beats while you go through the module. The playlist is almost one hour long, so maybe once it’s done, take a break!
The Collaborator Module is all about supporting and being supported. By dabbling in the content and activities you will be taking social, cultural, strategic, and organizational approaches to engaging in efficient and enjoyable cooperation amongst your peer-groups, as well as with the staff and faculty members at your institution.
Hey! Watch The Tone!
This module was created by a team of student co-designers and instructional designers, each with their very own personality! As such, the tone of the writing shifts from section to section. Enjoy!
Gentle Reminder – If you’re in a rush, you can look through the Take Out Menu to help you find just what you need.
By the end of this module, you will be able to:
Getting Ready to Collaborate
Discover what a study group is and how it can be an invaluable resource throughout your academic career
Find and create a study group that is right for you
Create constructive rules and expectations for your group and group members
Troubleshoot and solve potential group issues and conflicts
Self Advocacy
Practice and apply methods to raise confidence and voice your opinions
Recognize imposter syndrome and practical, effective ways to boost self-esteem
Plan and prepare for uncomfortable situations
Allyship
Give meaningful and constructive feedback to peers
Choose to embrace and consider other perspectives
Discover strategies for developing collegial and empathetic relationships
Networking
Taking the slow and steady approach to networking
Finding (and being) a mentor
Collaborator Module Doodle
Click on the image below for a larger version.
A Wicked Problem: We're All in This Together
We’re All in This Together by Sarah Rose
Wicked problems are those without a definitive answer. They can be one of the trickiest problems since everyone’s situation is unique to them. To help guide you we collected stories from students in similar situations, their advice to you and how they overcame it.
This is a story about overcoming the issues students face during group projects in university.
The Wicked Problem
One of the problems I faced in pursuit of academic success was group projects. In secondary school, group projects were usually done with friends you trusted and worked well with. Group projects in university were my worst nightmare. They were often weighted heavily and groups were either assigned or put together by who you were sitting next to in a lecture hall. I had very high standards for myself and my marks were super important to me. I would get stressed enough over assignments I was completing myself. Group projects require working with and trusting strangers. I experienced projects where group members don’t answer messages, don’t contribute until the last minute, or don’t contribute at all. This led to many members stressing and working on the project last minute to finish the absent persons part. Group projects seemed like a worst case scenario in university and seeing it on the syllabus would make me anxious.
Finding a Solution
I was able to overcome my wicked problem. It required me to step out of my comfort zone and act as a leader in group situations (I am more of an introverted person naturally). Communication and organization is key when working with other people.
It is important for all group members to have a fast and easy way to communicate with each other. Group chats through messenger or a text group works better than email. It is important to get contact information in class when you meet your group members. Meeting in person with group members, fleshing out the project, and dividing up the work makes it clear to everyone what they need to do. Asking questions about the project and checking in with other group members is important. Collaboration can also happen by asking partners to edit each other’s sections, working on it in person or on video chat and using an accessible document everyone can contribute to. Working in Google Docs or Slides allows everyone to see, edit, comment and contribute.
Organization is so important when working with others. Scheduling time that works for everyone to meet or come together online is important. Talking things out can be easier than sending texts or emails. Meeting more than once can also be super beneficial. When possible I would try to meet with members to work on the project together. Even when we have our own sections, working together and talking it out can make the project come together better. Meeting 2-3 times is also beneficial. I would also make sure to meet a week before the project was due to go over the project and edit. This gives a due date from all group members to get it done early. If a group member doesn’t get their section done, it allows for other members to help them before its due. This system worked better and allowed for collaboration to happen, instead of a project awkwardly pieced together.
Final Thoughts
Working with other people, especially strangers can be hard. It is important to work outside your comfort zone and see group work as an opportunity to collaborate with like minded people, instead of something to dread. Stepping up as a leader can allow you to get the group together, set dates and times to meet and make sure the work is divided evenly. It is important to remember that you’re all human. Your group mates have other work, classes and stress that they are facing. Be understanding of other people and work together to find time that works for everyone. Everyone is trying their best! Group projects can be stressful and a lot of work but if you work ahead, communicate with your group members and try to truly collaborate it can be a great experience. You might learn from your partners and make something to be truly proud of.
APA Reference
Rose, S. (2021, September 29). We’re All in This Together. Liberated Learners. https://wicked.liberatedlearner.ca/collaborator/were-all-in-this-together/
Getting Ready To Collaborate
In This Section
We’ll have a look at the following topics:
Managing Group Work (that is assigned to you)
Finding Your Peeps (and forming a study group)
Keeping Group Work on Track
And work towards meeting these outcomes:
Creating constructive rules and expectations for your group and group members
Finding and creating a study group that is right for you
Group work, amirite? Not everyone’s favorite thing ever, we know. It is, however, probably inevitable that you have to do some work in groups in your program. It’s also possible for it to be great. Well, maybe more like… not so bad. This section is here to guide you in preparing yourself to collaborate with the best of them. Maybe you’ll help nudge that group project experience from bad to better!
A Wicked Problem: Managing Group Work
Trent University student Sarah Rose’s story – We’re all in this together describes a number of tips that worked for her as she struggled to achieve an outcome similar to the high bar she had set for herself through her independent work (work she preferred and enjoyed). These tips centre around communication and organization. We’ve summarized not only what Sarah learned here, as well as included additional insight from successful learners that will help better manage your next group project.
Communication is Key
Reach out to your group members as soon as you can, the earlier the better.
Determine early on what everyone’s main preferences are around communicating. Default to the easiest method. If everyone texts – set up a group message. If everyone prefers to use a particular platform (e.g., Facebook Messenger, WhatsApp, Discord), use that. Get all group members contact info up front.
Collectively communicate your availability for the next days/weeks working backwards from the project deadline date.
Get to know the members in your group, their strengths and preferred ways of working. Try to recognize that everyone has an opinion and that individuals have different methods of working and learning. Consider building in an icebreaker activity to get everyone comfortable with knowing each other and sharing with one another.
Ideally, start off with one face-to-face meeting. The remainder of your collaboration can be online/virtual, but the in-person meeting will help foster trust and familiarity with your group members.
During this kick-off group meeting, spend some time mapping out a group ‘charter.’ You don’t have to call it a charter – it can be group ground rules, group agreement, etc. Here’s a sample template that you can complete on your own in crafting this:
Your group charter will provide a pathway for the work ahead – including setting meeting dates/times, contact methods and preferred working styles. It can also help everyone get to know what their strengths, experiences and interests are, which can provide insights into everyone’s role and tasks. Whether or not your group has assigned a leader as part of your group charter or planning meetings, at one point or another, you will be asked to take a leadership role. Many of the tips contained in this module highlight what it takes to effectively lead within your groups.
Decide what Collaborative Tools your Group will use
Sarah talks about how her group projects benefit from the use of collaborative tools that facilitate the ability for all group members to be able to access and work on planning and development docs and files in real time. Both Microsoft and Google applications provide this ability (through Office 365 and Google Workspace) and can also help with version control in case of any hiccups along the way! They also can be used to build in a peer review loop – evaluating and providing feedback on project assets along the way. Find out at the outset what tools everyone is familiar and comfortable with using.
Just Sayin’. If time is in abundance, maybe you could dabble in the Technologist Module (opens in a new window) to help your group enhance the fanciness of what is produced in the project. Just sayin’.
Assign Roles and Tasks
Split the work to be done into different tasks that make use of individual strengths. Having roles both in the execution of your tasks and in meetings / discussions (e.g. Arani is responsible for summarizing discussions, Joseph for ensuring everybody has a say and accepts resolutions etc.) can help to make a happy, effective team. Distribute work between members can also make it less overwhelming and easier to complete because group members can work independently on their sections.
Here are some possible roles and their responsibilities that you might consider:https://uwaterloo.ca/student-success/sites/ca.student-success/files/uploads/files/TipSheet_GroupWork_0.pdf
Leader
Leads discussion with open-ended questions
– Encourages all group members
– Facilitates brainstorming by summarizing and clarifying group comments
– Helps guide conversation and focuses on positive statements
– Checks for consensus or questions from group members
Organizer
Schedules meetings
– Keeps the project on track
– Thinks about the ‘big picture’
– Ensures meetings follow a timeline/agenda
– Takes notes at meetings to send to everyone afterwards
Editor(s)
Edits completed work
– Compiles different pieces of reports/presentations from different group members to create ‘flow’ and consistency
Researcher(s)
Researches topics for the project
– Presents information to the group
– Provides the group members with sources and information
Writer(s)
Writes the project/report/presentation
– Responsible to follow guideline so that editor(s) have time to review and compile information
Trouble-Shooter/Brainstormer
Thinks about positive/negatives of ideas presented by the group
– Thinks about possible solutions to problems
– Critiques project based on assignment expectations/rubric to ensure success
Presenter(s)
Works with group members to compile and create presentation
– Presents information to class
Create a Timeline
Now that you have landed on how you will communicate, collaborate and who will do what, it’s time to map out your project plan timeline. It’s important to start at the project due date and work backwards to make sure you have allowed enough time to not only complete each task/activity but also build in time for review and feedback. Sticking to a predetermined timeline ensures items are left until the dreaded last minute!
Have Clear Objectives
At each stage along the timeline you should include agreed upon goals or deliverables. These are markers of progress on the project as well as more immediate goals (e.g. to agree on an approach to the assignment by Friday). Each meeting or discussion should also begin with a goal in mind (e.g. to come up with a list of tasks that need to be done).
Leading Effective Group Meetings
Effective group meetings involve deliberate and planned effort. Following these steps will help you and your group to meet and work more effectively together.
Set ground rules. Meetings can become disorderly and can discourage shyer group members from participating if you don’t have procedures in place for encouraging discussion, coming to resolution without becoming repetitive, and resolving differences of opinion. Set rules at the outset as part of your group charter and revisit or modify them as necessary along the way. An interesting rule that one group made was that anybody who missed a meeting would buy the rest of the group a cup of coffee from the coffee shop. Nobody ever missed a meeting after that.
Build consensus. People work together most effectively when they are working toward a goal that they have agreed to. Ensure that everyone has a say, even if you have to take time to get more withdrawn members to say something. Make sure you listen to everyone’s ideas and then try to come to an agreement that everyone shares and has contributed to.
Clarify. When a decision is made, this must be clarified in such a way that everyone is absolutely clear on what has been agreed, including deadlines.
Keep good notes and records. Assign a notetaker for each meeting and include a summary of discussions and decisions. Share them with all group members afterward so all are in the know and also to refer back to. This includes clear indication of who has agreed to do what.
Revisit your timeline to monitor progress and stick to deadlines. As a group, discuss progress in relation to your timetable and deadlines. Make sure that you personally meet deadlines to avoid letting your group down.
Whew, that was a lot of advice on how to participate in a collaborative group project. Likely you won’t (or won’t be able to) take all this advice or try all of these steps. Some more advice about all this advice is to choose the tips that you think will work best for your situation.
Finding Your Peeps
Now that we’ve discussed some strategies for dealing with group work that you have been assigned, let’s have a look at some reasons you might even *gasp* seek out groups yourself! We have some suggestions on how to go about finding groups of people that can support you for various needs like a study group, support group, or myriad other reasons.
As suggested by UBC Science’s “The Distillation Blog“, it’s helpful to consider The Learning Pyramid to get a sense of just how deep (or shallow) some of our typical learning practices are. As you can see in the image to your right, as you go deeper into the pyramid (and learning gets better), things get more participatory. Working in a study group, according to the pyramid, is only behind actually doing the thing you are being taught, and teaching it to others as an effective way to learn. Sounds pretty effective to be in a study group, huh? We’d even go as far as suggesting that just being in that study group could enhance your retention. When taking in a lecture, reading your text, or viewing course content videos you would likely pay closer attention when you have the expectation that you’ll be discussing this stuff with your study group pals later. Some of that good old accountability!
Filling gaps in your knowledge and reinforcing information
Exposing you to different ways of thinking
Supporting and motivating learning
Developing problem-solving and critical thinking skills
Increasing confidence in group discussions
Helping you learn how to work as part of a team
How to Create a Study Group
Want some advice for starting a study group? We’ve curated these tips from you from a few little places like Rutgers, Harvard and UBC (among others).
Find Other Students
There are numerous ways to identify students who are potentially interested in joining a study group:
During class or office hours, ask other students if they’d be interested in joining a study group. If the lecture is over video chat, you can message students via chat during breaks or in smaller break out rooms.
Ask the professor to send out an email or announcement to the class to see if any students are interested.
Start a discussion board thread using your school’s learning management system (e.g., Blackboard, D2L, Canvas, etc.) to connect with other students.
Post on social media. Many post-secondary institutions have official Facebook groups for classes or specific programs where you can reach out to other students.
An effective study group consists of 3-5 members, as more than 5 members may be counterproductive and difficult to manage.
Before asking classmates to join your study group, look to see if they’re actively engaged during class, as these students tend to be the most reliable and diligent. If possible, see how compatible you are with a potential group member by discussing common goals (e.g., are they also trying to achieve a good grade?), commitment (e.g., do our schedules align? Are they able to commit to meeting regularly?), and abilities (e.g., are they able to stay focused and work effectively in group settings?).
As someone forming the study group, you’ll need to connect all the group members. The easiest way for everyone to keep in touch is by creating a group chat using Facebook, Instagram, WhatsApp, iMessage, SMS, Discord, Snapchat, Microsoft Teams or any other newfangled tool the kids are using these days.
All group members should discuss their preferred meetup times (e.g., Thursday 2-3 PM) and frequency (e.g., once or twice a week) so that meetups can be scheduled in advance. Ideally, try to keep the meetup times consistent, so you don’t have to worry about scheduling every week.
Figure out the location of meetups. The group study sessions should take place in a quiet, tidy, distraction-free area that is large enough to study comfortably. Common areas to study include common rooms across campus, empty classrooms (check availability), the student learning centre, or the library (reserve a specific room if possible). If the study group is meeting virtually, you’ll need to agree on a video chat platform, such as Zoom, Google Hangouts, or Skype.
Before every meeting, the group needs to establish everyone’s role, the agenda for the study session (outlines the structure of the session), and determine what needs to be prepared.
In terms of roles, the group needs at least a facilitator/leader to keep meetings on track and another person to organize the meetings (i.e., schedule and plan future meetings). These roles can rotate every week or remain constant depending on what the group decides.
The structure/format of your group study session is dependent on your group’s needs. Whether you compare notes, discuss readings, work on assigned problems, or complete other tasks is up to your group.
Sample Agenda
Introduce topic to be covered
Review and compare class notes
Discuss readings and concepts
Ask questions
Work on assigned problem
Plan for next meeting
Discuss how everyone should prepare for the meeting. This could include completing the weekly readings or a set of questions. If multiple topics are being covered, you can potentially divide the readings or topics among the group, and each member can present it to the group at the next meeting.
Collaboratively Develop Group Goals and Expectations
During the first group meeting, discuss your goals as a group (i.e., what does the group want to achieve?) and come to an agreement on group expectations or rules regarding punctuality, absenteeism, staying on task, being respectful of other people’s ideas, conflict resolution, coming prepared and other expectations important to the group.
Also, determine actions to be taken if people don’t meet expectations (e.g., removing members who consistently skip meetings, etc.)
Continually evaluate the effectiveness of your study group by comparing expectations, goals, and plans to actual outcomes. Identify areas where you can improve as a group and find ways to address problem areas. If you or others find that the group members aren’t compatible or productive, then it’s okay to tell them that it isn’t working out in a respectful manner.
Come prepared! Ensure you are familiar with the material so that you can identify gaps in your knowledge or areas you’re struggling with. It will also ensure a more productive group study session (i.e., you won’t need to waste time reviewing the material on your own).
Support and encourage each other, especially when members may not be at their best due to life circumstances.
Listen carefully and avoid talking over other people.
Allow everyone to participate. Nobody should dominate the study session. Try using a timer or taking turns doing different roles to prevent this.
Recognize that working collaboratively can pose challenges at times but work together to make it a positive experience for everyone.
Projects are made up of tasks. Lots of them, and in an ideal world, assigning these tasks to groups of individuals rather than one person is meant to ease the completion process while maintaining or even increasing the quality of the completed work. However, even the most carefully planned projects can get easily off track.
A scenario that may be all too familiar to most of us here is when you’ve gone through all the trouble of dividing up the tasks, assigning roles, setting up deadlines, and all the jazz that led you to believe that your group is in a good standing with a semi clear picture of the work ahead and what each member must do for a successful collaboration. However, time marches on, and one (or more!) of your teammates (GASP!), or maybe you (even bigger GASP!) have missed deadlines, and the project has officially gone off track. But time waits for no one, and the closer you get to the final project deadline, the more stressed you and your members get! Unproductivity from one or more members of the group often leads to the others having to work overtime to meet the deadline.
However, it is important to recognize that unproductivity can be highly contagious. Being thrown off course can be highly demotivating and demoralizing. The unproductivity bug, when caught by one member, can spread to others, turning them into idle zombies that don’t know how to meet project deadlines. I think we can all agree that being the one survivor doing all the tasks while dealing with lazy zombies feeding off your brain in a group project gone horribly wrong is just no fun.
But don’t panic just yet! In this section, we will tell you everything you need to know about task management and the steps you can take to keep yourself and your team on track. So, without further ado, lets dig into this little survival kit.
First impressions are everything! This may be cliché, but that doesn’t mean it isn’t true. First impressions are so important, because they have lasting effect. The very first time that you meet with your teammates, you can quickly judge their trustworthiness and level of dedication to the project. Your initial character judgement will influence how you behave towards your group members and will also play a crucial role when it comes to the tasks of assigning roles. Therefore, it is important that you yourself exhibit the right attitude and behaviour. So, make sure that your initial attitude is an excited, dedicated, and open one.
Group work can quickly turn sour if even just one member (Swain, 2021):
Becomes overly aggressive
Displays unhappiness with any decisions made
Disrespects others
Rudely criticizes other’s ideas without suggestive comments
Distracts during group meetings
Fails to contribute
Listens too little and/or frequently interrupts others
Dominates the discussion by talking too much
Having had said that it’s important to realize that disagreements are inevitable, especially in collaborative work with an impending deadline (Swain, 2021)Swain, Rachel. “3 Tips for Successful Group Work.” Prospects.ac.uk, Dec. 2021, https://www.prospects.ac.uk/applying-for-university/university-life/3-tips-for-successful-group-work. So, when they do occur, it’s best to not make things personal (Swain, 2021). Try to ensure that the disagreement and the discussion surrounding it remain professional, constructive, and focused on the task in hand (Swain, 2021). For example, if you have an issue with the level of productivity, contribution, or commitment of a certain member, first try and speak to them privately. First check to make sure that there isn’t anything else going on with them that they may require your support with. In an argument, it’s helpful to put yourself in other people’s shoes, and think of how you would like to be treated.
It’s all about the right mindset. Your mindset is the collection of attitudes that influence the way you see, interpret, and behave in a situation (Brown, 2016). When assigning roles in a group setting, if you choose to exclude a member or two from a specific task because you think they just won’t get it, that’s your mindset hard at work (Brown, 2016)Brown, Dan. “Collaboration & Creativity: Getting into the Right Mindset.” Medium, EightShapes, 30 June 2016, https://medium.com/eightshapes-llc/collaboration-creativity-getting-into-the-right-mindset-b9d5d6eaf9f6. Your mindset is manifested through your behaviour, so if you undertook someone’s mindset, then you’d understand the logic or reasoning behind their actions (Brown, 2016). It’s worthwhile to spend a minute or two here reflecting on different mindsets, because they can help you decipher the logic behind some notoriously self-defeating behaviours that your teammates may have exhibited in the past.
Growth versus Fixed Mindset
o People with a fixed mindset do not think that others, including themselves, can change their talents, abilities, and intelligence (Gottfredson & Reina, 2020)Gottfredson, Ryan, and Chris Reina. “To Be a Great Leader, You Need the Right Mindset.” Harvard Business Review, 13 Sept. 2021, https://hbr.org/2020/01/to-be-a-great-leader-you-need-the-right-mindset. When faced with a challenging task, those with a fixed mindset would choose not to do it, because they are afraid of failure that may call into question their intelligence and capabilities. Those with a fixed mindset deflect tasks rather than risk shattering their confidence and view of themselves.
“When a team member waits until too late to ask for help, I understand that they see that request as a failure. With a fixed mindset, asking for help is tantamount to admitting they can’t do an assigned task.” (Brown, 2016)
“A team member preoccupied with the tone of direct feedback, and not its content, shows they’re reluctant to reflect on their own work. With a fixed mindset, the urge to deflect any criticism is strong.” (Brown, 2016)
o In contrast, those with a growth mindset view challenges and failure as a learning opportunity. Those with a growth mindset take advantage of feedback and adopt the most effective problem-solving strategies (Gottfredson & Reina, 2020). They are very effortful and persistent in seeking to accomplish goals, contrasting the deflective nature of those with a fixed mindset (Gottfredson & Reina, 2020). However, the mindset that you adopt, be it a fixed or growth one, can depend on the task or type of challenge. You may be very eager and open minded when it comes to the challenge of trying a new recipe, while resisting other challenges, such as practicing the piano (Brown, 2016).
Assertive versus Passive Mindset
Teamwork depends on every participant having the equal opportunity to share their opinion and offer critique (Brown, 2016). The ability to express one’s thoughts hinges heavily on one’s ability to remain confident while fellow group mates subject your work to judgement and criticism. Those with an assertive mindset have the natural tendency to overcome the thought that their opinions or questions aren’t up to par with everyone else’s (Brown, 2016). Whereas those with a passive mindset tend to lose their voice quickly and overthink. It is important for those with an assertive mindset, usually the members dominating discussion, to recognize the passive members. It is important to ask your members for their opinion every step of the project because your members may have highly valuable thoughts or questions that they are otherwise too shy to contribute to the discussion. Moreover, knowing how to deliver constructive feedback as to not shatter the confidence and morale of other members is key for those with an assertive mindset. In addition, one trick for the passive mindsets is to simply admit that they don’t know. Don’t be afraid to admit when you are confused or don’t know the answer. Never wait until it is too late, and don’t be afraid to ask for more time to research, analyze, or work on a task.
o Great collaboration finally depends on every participant having a voice, the freedom to express their opinions and offer critique.
The important point to take away from this discussion is that your mindset plays a critical role in working with others. It impacts the way you approach or tackle challenges. It can also cause you to react counter-productively to conflict situations (Brown, 2016). By understanding different mindsets, you can decipher complex situations more clearly, and tailor your behaviour towards your teammates such that you are able to unlock productively.
Wrap Up
This section of the Liberated Learner program was designed to get you ready to collaborate by giving you tips on how to participate in group projects, and how to find and set up a study group. Next we will take a step back a little, into yourself, and examine just how you might become your own best advocate in collaborative situations.
Dig Deeper
Here are some resources to help you dig a little deeper into some of these topics.
The purpose of this activity is to apply what you learned in the ‘getting ready to collaborate’ section, conduct independent research, and reflect on your needs in order to create or join a group that would benefit you.
Level 1: Research and Reflect
Task: In this task you will familiarize yourself with different types of groups and identify a group that would benefit you.
Time commitment: This activity will take between 10 to 30 minutes to complete.
Steps to complete Level 1:
Review the list of support groups here and do your own research on different types of groups that exist in your area or post-secondary institution. Examples of groups to search for are peer support groups, group therapy, study groups, and student-run clubs and groups at your post-secondary institution.
On a piece of paper, jot down one or more problems you are facing that could be addressed by one of the groups. For example, feelings of isolation on the basis of race or ethnicity could be addressed by joining a racial/ethnic student organization (e.g., Black Students Association, Chinese Students Association, etc.).
Write down how the group would benefit you. For example, a racial/ethnic student organization could help one feel less isolated by connecting them with others who share a similar identity and lived experience.
Note: Spend some time to reflect on problems you’re facing in life. It may not be evident at first. Some problems may seem less significant than others, but nonetheless, they’re still valid problems. Problems can range from mental health issues or discrimination, to lacking involvement in extra-curricular or social activities. There are likely a multitude of groups that exist to address your various needs. However, if the group you’re looking for doesn’t exist in your area, then maybe you can create a new group (continue to level 2 and 3 if you want to learn more)!
Success Checklist:
You are aware of the various groups that exist on and off campus.
You have identified a problem that could be addressed by joining a group.
You understand how the group is able to help you.
Level 2: Plan
Task: In this task you will brainstorm rules and regulations required for the group you’ve identified to function effectively.
Time commitment: This activity will take between 10 to 30 minutes to complete.
Steps to Complete Level 2:
On a piece of paper, write down at least 5 rules and regulations you’d expect from the group you identified in Level 1. Rules and regulations can include punctuality, absenteeism, staying on task, being respectful, conflict resolution, coming prepared and other expectations that may be important to your specific type of group.
Reflect on what course of action you would take if the rules and regulations weren’t being followed by other members.
Success Checklist:
You have come up with 5 or more rules and regulations you’d expect from the group you identified in Level 1.
You have determined what course of action you would take if the rules and regulations were broken.
Level 3: Act
Task: In this task you will either start to create or join the group you identified.
Time commitment: This activity will take 10 to 60 minutes to complete.
Steps to Complete Level 3:
If you are joining a group, reach out to the group via the indicated method of communication (e.g., email, etc.) to say you are interested in joining the group and why, as well as ask how you would go about joining or any other questions you may have.
If you are creating your own group, post an advertisement about it online via social media (e.g., Facebook). The ad should include the name of the group, the objective, goals, contact information, meet up times, locations (e.g., park, café, library) or online platform (e.g., Zoom). You should consider registering your group with your post-secondary institution (check your institution’s website), as they may help reimburse some of the costs associated with your group.
Success Checklist:
If you are joining a group, you have emailed the group about your interest in joining.
If you are creating a group, you will have created an advertisement and posted about it online to see who’s interested in joining.
Dig Deeper
Refer to following resources for further information about creating different types of groups.
*Note: check out your post-secondary institution’s website to find information about creating student-led clubs and groups (varies between institutions).
If you are playing along using the Liberated Learner Work Binder, upload your “Creating a Study Group” file to the Collaborator Module folder.
If this is the only Liberated Learner activity you plan to do, then save the file wherever you like.
Self-Advocacy
In This Section
We’ll have a look at the following topics:
Finding your voice (raising your confidence)
Curbing imposter syndrome (boosting self-esteem)
Planning ahead (conflict/discomfort)
And work towards meeting these outcomes:
Practicing and applying methods to raise confidence and voice your opinions
Recognizing imposter syndrome and practical, effective ways to boost self-esteem
Planning and preparing for uncomfortable situations
Finding Your Voice
If you experience fear of speaking up and sharing your ideas in various group settings, know you’re not alone. Many of us experience anxiety at the thought how how people might react to the things we say, especially in contexts with strangers or colleagues. “Is what I’m saying wrong?”, “Will I sound stupid?”, “What if I stutter?” These types of concerns are common and valid, but giving into them is doing yourself, and everyone around, a disservice. So, if you’re someone who can relate to these feelings, like in the Wicked Problems “Hi-5? More like Hi-Shy” or in “Lone Walker”, next are some tips to overcome these fears.
Be Kinder to Yourself
We’re all our own greatest critics. It’s important to give yourself the same compassion you would give others. So, don’t be too hard on yourself – it’s incredibly unlikely that anyone else is analyzing the things you say or do in the same way you analyze yourself. Show yourself some grace, and take the time to express your assets to yourself every now and then (Reach Out, n.d.)Reach Out.com. (n.d.). 10 tips for improving your self-esteem. Reach Out.Com. https://au.reachout.com/articles/10-tips-for-improving-your-self-esteem. Talk yourself up and show yourself the love you deserve – it might sound silly, but we all need reminders of why we’re great, especially from ourselves. Don’t forget to celebrate all of your successes, the big and the small.
Make Mistakes
If your fear surrounding speaking up is related to your fear of making mistakes, then the solution, which is easier said than done, is to embrace your mistakes. Making mistakes is a natural and expected part of life; it’s the way in which we do some of our best learning. And so, as scary as it sounds, rather than being so afraid of making a mistake, it’s important to instead embrace the fact that mistakes are going to happen.
Consider what happens when you do make a mistake – even when picturing the worst case scenario – think: 1) how likely is it for this to happen? and 2) is it really that bad? Know that, as long as you’re coming in with good intentions and aren’t hurting anyone, people won’t linger on the mistakes you might make in the same way that you might. On the contrary, people might not even register the mistakes you catch yourself making or will quickly move on and forget about it. And more importantly, we need to shift our focus onto the things that are in our control, such as sharing our thoughts, and less on the things we can’t control (Reach Out, n.d.).
Take chances – you can start small
You might not be ready to dive in completely to taking chances, so here are some steps you can take to work your way up. If you still experience fear sharing your thoughts, maybe start by asking questions instead. As Garfinkle (2021)Garfinkle, A., J. (2021). 10 ways to increase visibility in meetings. Garfinkle Executive Coaching. https://garfinkleexecutivecoaching.com/articles/stand-out-and-get-noticed/10-ways-to-increase-visibility-in-meetings puts it: “Leverage your knowledge and expertise to probe deeper into what others are saying. You will feel more engaged and become an active participant, which will help facilitate a more powerful meeting and provide opportunities for others to truly see you.” Other suggestions include picking a topic ahead of time that you would like to discuss in your class, group meeting or work meeting – that way you’ll come prepared to participate in the discussion (Garfinkle, 2021). You can also challenge yourself by setting a goal of how many times you’d like to speak in a specific setting and/or by allowing yourself to say the first thing that pops into your head. As you start to do these things (you might be forcing yourself to at first) you’ll eventually build the habit of jumping into conversations without the overriding or lingering fears – it might even become second nature!
Imposter Syndrome: A Wicked Problem by Sevda Montakhaby Nodeh
A story about how imposter syndrome can take the joy out of life.
The Wicked Problem
“Anyone could do it” | “I don’t deserve to be here” | “It’s really not that hard”
“I’m not good enough” | “Anybody could get in” | “I don’t deserve this”
“It could’ve been anyone” | “You’re a fraud” | “I’m a fraud”
When I first came to Canada in grade 7, my English vocabulary consisted of “Hi” and “Ok”. I thought to myself, I am never going to learn an entire language, I’m done for. A year later I was reading the Hunger Games aloud in class to my peers during English, and I thought to myself, “that was easy, anyone could do it”. In grade 10, I was transferred to regular English classes, and out of ESL (English as Second Language) classes ahead of all of my friends who had immigrated to Canada earlier or around the same time as me. When I entered the grade 10 English class, everyone was a native speaker, and I thought to myself, “I don’t deserve to be here”. After receiving great grades all through high school I thought to myself, “it’s not really that hard”.
In high school suddenly marks mattered, and the university I had my heart set on required an average higher than 90%. I used to religiously check my home’s mailbox, anxiously waiting for a response from McMaster. one moment thinking “oh yeah, I will get in”, and the next thinking, there is “who do you think you are? There is no way. I’m not good enough”. On the day when I finally received my acceptance letter from McMaster, I didn’t scream in excitement, or celebrate in any special way. I just thought: “anybody could get in”.
The point is: I think that a task is near impossible, hard, and a great achievement reserved for only the best of the best, until I do it. Then I dismiss it as east. I could do it, anyone could.
Imposter syndrome takes the joy out of life. You put in the hard work. You go through the ups and downs. You suffer through all the stress and anxiety. All to amount to a little voice in your head saying, “you’re a fraud”. If you’re also suffering from this toxic mindset, I want you to know that you are not alone.
Finding a Solution
There is no one solution fix all. Curbing imposter syndrome is a life-long battle. Some battles you may lose, but the goal here is to win the war. The first step in the right direction is acknowledging imposter syndrome. Don’t run away from your negative feelings, instead start dancing in the rain ruining your parade.
As the negative feelings wash through you, the most important distinction I want you to make is one between humility and fear. There is a such thing as taking humility in your work and accomplishments, which is a good thing, an excellent thing in fact. But then, on the opposite side is the darker, deeper end of the pool, and as you venture out towards it, you will start to lose your footing, and before you know it, you’re stranded. This sinking feeling, that’s imposter syndrome. You must not give into your fears or try to justify them by riding them off as humility. That’s not coping with imposter syndrome, that’s dismissing it completely.
Kindness is your lifeguard. At the heart of it, imposter syndrome is about feeling unworthy. When you feel unworthy, then any achievement or good thing happening in your life may feel like luck. To escape this feeling of unworthiness, you must be kind to yourself. Bask in the glow of your achievements. Imposter syndrome isn’t loud, it’s a voice residing inside you, bringing you down within the privacy of your own mind.
It’s good to hold yourself up to a high standard, but you’re crossing a line when you’re beating yourself down. Kindness and forgiveness go together like peanut butter and jelly. Be kind to yourself and treat yourself the way you would like others to treat you.
Relinquish a bit of control, I promise you the world won’t end. Let others take the lead sometime, use their strengths, enjoy their input. I hate to break it to ya, but people are kind of amazing. Beautiful things come out of collaboration, such as this little module you’re reading right now.
Final Thoughts
One parting thought is: it always helps to talk to someone. Imposter syndrome is a lonely place to be because you constantly feel like a fraud, and a fraudster’s worst fear is being found out. However, speaking to someone, either a professional, mentor, a friend, or a family member can go a long way. Sharing your thoughts and experiences is part of the human experience, and it can be quite liberating. Vocalizing your negative thoughts, feelings, and issues by walking someone else through them can help you feel better equipped to deal with your imposter syndrome.
Planning ahead (for conflict and discomfort)
What is an uncomfortable or conflicting situation?
What defines an uncomfortable or conflicting situation varies from person to person. However, an uncomfortable or conflicting situation can occur when individuals are unwilling to compromise or have different opinions and perceptions. Some examples of uncomfortable situations for students include a peer taking credit for another person’s idea, receiving a rude email from a peer, reporting negative feedback about a peer, dealing with a peer that micromanages, or confronting a peer about how they mistreat others.
Why is it important to learn how to manage uncomfortable/conflicting situations?
If uncomfortable situations such as conflicts and disagreements aren’t managed, it could lead to a strained relationship between peers and foster a negative environment. The resulting discomfort and tension may hinder your ability to complete tasks successfully, impact your reputation, and create unnecessary stress for yourself. Thus, by learning how to manage uncomfortable situations at school, it’ll create a happier and more motivating environment, as well as dissipate the associated stress.
How to Manage an Uncomfortable Situation: Prepare, Plan and Act
Identify the issue and purpose of the conversation: Before approaching the situation, it’s important to figure out what the issue is and what the outcome of the conversation will be. Some examples of clear outcomes include problem-solving together or learning the other persons perspective. However, if your only purpose is to vent or your upset feelings are unjustified then a conversation likely isn’t necessary.
Make a plan: Planning out what to say and rehearsing it beforehand can help you keep the conservation focused on the issue at hand. When explaining your perspective, ensure to use respectful language and a polite tone to effectively get your point across without offending the other person. It’s also important to not dominate the conversation and listen to the other persons perspective. Being a good listener means to give the speaker your undivided attention by facing the speaker and holding eye contact.
Invite the person to the conversation: When inviting the other person to the conversation, make sure your purpose is clear. It’s best to schedule a conversation so that the other person has time to plan. For instance, you can say “hey, I felt a bit uncomfortable with the conversation during the group meeting so I’m wondering if we can schedule a time to talk about it? I’d like to understand your perspective and for you to understand mine as well.” This demonstrates that you’re genuinely interested in listening to their perspective and sharing your perspective in order to come to a conclusion.
Determine the best method of communication: Some individuals may feel more comfortable communicating using text, email, calling, video chat, or an in-person meeting depending on their preference.
Have the conversation: Ideally, the issue will be resolved by the end of the conversation. However, sometimes the differences in perspectives are too extensive. In these cases, try to find commonalities, such as maintaining a positive environment at school, and sustaining professional interactions going forward, despite the differences. In situations where to other persons behaviour is adversely impacting you in ways that you cannot look past (e.g., they are continuing to use harmful language or acting unethically), then it’s important to bring up the situation to a superior, such as a professor at school.https://kpu.pressbooks.pub/hrcommunication/chapter/managing-uncomfortable-situations/https://www.psychologytoday.com/us/blog/people-planet-profits/202008/how-prepare-difficult-conversationhttps://www.judyringer.com/resources/articles/we-have-to-talk-a-stepbystep-checklist-for-difficult-conversations.php
Activity: False stereotypes
Purpose of Activity
The purpose of this activity is to develop an understanding of why we shouldn’t pass brash judgments onto others. The activity is meant for us to consider why we receive certain judgments, and consider how we can respond to the judgments passed on us.
Task:
Think of the different ways in which you feel you have been perceived by others. Did you ever feel you have been pigeonholed or stereotyped as a result of a trait you possess, an experience you had, a habit you have, your working process, or other reasons? For instance, some of us may have been called high strung for caring too much about how our work should be completed, and some of us may have been stereotyped as lazy for dropping the ball in a group project. Consider the ways in which you might have been stereotyped, then consider what you wish people knew or understood about you in regard to that stereotype. In thinking about the ways you have been misunderstood and how it made you feel, consider the times you may have passed judgement onto someone else, and whether there could have been more to the story from that person’s perspective.
Learning Outcomes
Plan and prepare for uncomfortable academic and school situations.
Practice and apply methods to boost your confidence and voice your opinions
Level 1
Consider the ways you feel you have been stereotyped in the past. What judgments have been passed on to you and why? How did they make you feel? Was there anything you could or should have done differently? (Approximately 5 – 10 minutes).
Level 2
Now that you’ve reflected on the ways you’ve been stereotyped, think of the things you wish people knew or understood about you. How could others knowing these things about you help? Consider times you have passed judgement onto others and how those feelings would have influenced how you interacted with them. (Approximately 5 – 10 minutes).
Level 3
Share your reflections with someone, whether it be a family member, friend, or colleague. Reflect on how the conversation goes; see if taught you anything (Approximately 5 – 10 minutes).
Time Commitment
This activity should take approximately 15 – 30 minutes to complete.
Success Criteria
Honest and genuine reflection.
Develop an understanding of how others respond to us.
Prepare ways of communicating the things we wish people understood about us.
Develop practices to understanding and empathizing with others.
What do I do with this?
If you are playing along using the Liberated Learner Work Binder, upload your “False Stereotypes” file to the Collaborator Module folder.
If this is the only Liberated Learner activity you plan to do, then save the file wherever you like. Don’t forget to share it with your friends and family to wow them with your insightful reflections.
Wrap Up and Look Ahead
In this section we’ve tried to set you up to advocate for yourself in collaborative experiences. Next we will take it a step further, and examine how you might also advocate for others as an effective ally.
Allyship
In This Section
We’ll have a look at the following topics:
How to give constructive feedback to peers
How to be open to diverse perspectives (culturally sensitive)
How to collaborate with empathy (empathy skill-building)
Positionality – what it is and why it’s important
And work towards meeting these outcomes:
Giving meaningful and constructive feedback to peers
Choosing to embrace and consider other perspectives
Discovering strategies for developing collegial and empathetic relationships
Describing what positionality is and why it is important to collaboration
Giving Constructive Feedback using the “Sandwich Method”
When formulating your feedback, you should be approaching it with positive intentions and constructive feedback, as a supportive communication tool to address specific issues or concerns.
To make your feedback more helpful, you should base your feedback off the individual’s behaviour rather than your interpretations or assumptions about how they perform. You should focus on things that can be changed or improved, rather than something that may be out of the other person’s control. Remember, when providing feedback, you have a real opportunity to be helpful. Providing feedback is not just a learning moment for the person you are critiquing, but also one that helps you learn problem solving. It may be the case that things you pointed out are things that you also have been working on, so it can be beneficial to you both.
When providing feedback, think of how you would like to be critiqued. Don’t begin it by instantly bombarding the other person with the issues you want to address. You want to begin with some positive comments regarding the situation in question. This first compliment is usually general, we can call this the bottom bun. Then you want to get a bit more specific and point out at least two strong points that the person excelled at. Now here is when things get a bit cheesy. Here you must clearly deliver your criticism. One trick you can use is by thinking about how you would like to be made aware of a mistake or area that requires further attention. Then you can remind the person again of their strong points. Finally, you can finish up the sandwich with a second bun on top, by giving thanks for your peer’s hard work and offering support.
Overall, the sandwich method works for both parties. It enables both you and your peer to feel better about the situation. It will make your peer feel as if all that hard work didn’t go to waste– they have done great so far, but that there is still room for producing even better work.
Being Open to Diverse Perspectives
Hearing diverse perspectives can be difficult, especially when they directly challenge your own beliefs and values. However, it’s important not to become defensive when you are presented with different opinions. Being open to diverse perspectives not only makes everyone feel heard and understood, but also helps to broaden your worldview and makes you think outside the box. A major reason for diverse perspectives is cultural diversity. A person’s culture is shaped by personal experiences, such as ethnic and racial identity, religion, age, educational level, body size, heritage and family tradition, physical and cognitive abilities, sexual orientation, gender identity, and geographic and socioeconomic experiences.https://www.pta.org/docs/default-source/uploadedfiles/guide-to-cultural-awareness-iiihttps://blog.schoox.com/the-value-of-embracing-different-perspectives-at-work/
What is cultural sensitivity?
Cultural sensitivity is a key component of becoming open to diverse perspectives. According to the American Psychological Association (2020), cultural sensitivity is defined as “awareness and appreciation of the values, norms, and beliefs characteristic of a cultural, ethnic, racial, or other group that is not one’s own, accompanied by a willingness to adapt one’s behavior accordingly.” By becoming more culturally sensitive, you’ll be able to better understand other people’s perspectives and behaviours and how to respond appropriately.https://dictionary.apa.org/cultural-sensitivity
How to be culturally sensitive
Learn about your worldview and your biases
Learning about your worldview includes thinking about how your background, experiences and heritage has shaped who you are. Compare yourself to other people with a similar heritage and notice how there are differences between you (e.g., someone of the same ethnicity may have differing beliefs and values due to upbringing). Furthermore, analyze your own perspective, prejudices, biases and stereotypes regarding other cultures. It can be difficult to question your own beliefs and worldview. However, you are more likely to embrace alternative cultures if you understand your own culture and misperceptions you may hold.https://classroom.synonym.com/can-person-culturally-sensitive-others-perspectives-21353.html
Learn about other cultures
The best way to learn about other cultures is to draw from various sources of knowledge. For instance, you can take a formal course at school (e.g., an Indigenous studies or world cultures course), you can read books or academic journal articles by diverse authors, watch documentaries regarding other cultures, learn a second language, travel to other places, or even use social media as a way to learn and connect to other cultures. However, it’s important to recognize that not all information you come across is accurate. Social media, TV and movies can potentially perpetuate harmful stereotypes and prejudices about other cultures. Hence, try to do your own research to validate the information you come across.https://classroom.synonym.com/can-person-culturally-sensitive-others-perspectives-21353.htmlhttps://www.apa.org/gradpsych/2010/09/culturally-competent
Learn by asking questions
Although you can learn about other cultures, it’s impossible to become an expert on every culture. In addition, every person experiences their culture differently. Hence, even if you think all people from a certain heritage behave a certain way or have specific customs, the particular person that you’re dealing with may not. To clarify any assumptions, take a curious approach by asking them about their traditions, customs and everyday life. This way, you can better assess their own perspective and avoid offending them.https://www.mentalhealthfirstaid.org/2019/07/five-ways-to-be-more-culturally-aware/https://classroom.synonym.com/can-person-culturally-sensitive-others-perspectives-21353.html
Avoid Pitfalls
Don’t be defensive when corrected about cultural terms, customs or expectations.
Don’t demand or expect other people to educate you on their culture or customs. Not everyone is open to talking about their culture, so it’s important to accept that the other person may feel uncomfortable.
Don’t take defensiveness personally. People of other cultures may feel less empowered or comfortable opening up.
Don’t stop learning! Becoming truly culture conscious is an ongoing process. Engaging with people from other cultures can be fun and is the best way to understand diverse perspectives.https://www.onlinemswprograms.com/resources/social-issues/how-to-be-culturally-sensitive/https://thetempest.co/2016/07/24/culture-taste/culture/5-steps-anyone-can-take-to-become-more-culturally-sensitive/
How to Lead and Collaborate with Empathy
If you’ve taken the time to read all of The Wicked Problems uncovered and shared by learners during the Liberated Learner development, there are many common threads. One that stands out is the critically important skill of empathy. Molly Flindall-Hanna’s story “In Their Shoes” tells of her “learning to walk in the shoes of my clients in the field of cultural safety,” in “Le Mouton Noir,” Matilde Chagnon tells of finally feeling barriers lifted after conversations with a student life aid who truly listened without judgement and took on her perspective to find solutions. And empathy is just that – perspective taking, judgement-free and taking in the emotions and feelings of others and communicating it back to them in a way that helps, not hinders. This animated video from RSA Shorts illustrates this best:
Let’s break down those skills again on how you can be a better empath when you’re collaborating with others.
Perspective Taking
Perspective taking is at the very heart of empathy. We normally learn how to take on another’s perspectives from our parents or primary caregivers while growing up. And the unfortunate reality is that the more your perspective aligned with dominant culture (in Canada that would be white, Christian, educated, middle class and heterosexual), the less you likely learned about perspective taking. All of our characteristics and experiences influence how we see the world – our own truth – which is different and unique for each of us. Perspective taking is viewing and listening to other’s truths and acknowledging it as true. It is the “art of looking at a situation through the identity lens and experiences of the person having the experience – not through your own identities/experiences.” (https://health4u.msu.edu/articles/2019-the-basic-building-blocks-of-empathy )
Learning more about another person can help you to imagine what life feels like for them – how they may respond to different situations and circumstances. This is a skill – you need to have the ability to feel, share, interpret and understand emotions in order to ‘put yourself in their shoes’ in order to see the world from their perspective. This can be difficult for some as you need to be able to imagine attitudes, expectations and intentions that could be quite different from your own.
How can you build your perspective taking skills?
You can build your skills on seeing things more clearly from another’s viewpoint through a few simple measures:
Be an active listener and ask more questions of others. We all find that person who talks non-stop about themselves a tad annoying. Consider how you converse and connect with others and modify it to open yourself up to learning more about the other person.
Read fiction books. Yes, this can be difficult to do as a student, as you might at times be overwhelmed with course-related reading. But fiction (particularly dramatic fiction) can transport you to become emotionally and empathically-invested in a story and take on the perspective of the characters in the book.
Watch dramatic films. If fiction books aren’t your thing, consider watching dramatic movies – a more subdued film about relationships can teach you more about emotions and empathy than a slapstick comedy. And plus – who doesn’t love the movies?
How can you stay out of judgement?
In the RSA short, Brene Brown points out that when you judge another person’s feelings it discounts their experience – and sometimes this is a defense mechanism to protect ourselves from their pain. If we are honest with ourselves, we all can recount a time where someone was sharing their pain caused discomfort for us and perhaps even made us think to ourselves ‘why are they getting so upset?” – or worse, commenting something along the lines of “it’s no big deal.” But empathy is not about you – it is about others – and staying out of judgement means you have to push down any feelings or comments that invalidates the other person’s experience.
A Judgment-Free Self
You can build your judgement-free self in many ways – but here’s a few to try:
Keep a “judgement journal.” Over a period of a few days, take stock of when you catch yourself thinking (or saying) negative thoughts about someone else and ask yourself what prompted this reaction. You may start to notice some patterns.
Rethink your reactions. If you are working with someone who seems distracted, instead of thinking “Fran is so lazy.” you could reframe this as “I wonder why Fran is so preoccupied? Maybe she has something going on in her life that is causing her to act this way.”
Take a social media hiatus. Social media can be a festering ground for public judgement. We’ve all gotten riled up by social media posts at one point or another – and perhaps even drawn into a comments section battle with a complete stranger (or bot!). This often has zero positive outcomes and rarely results in a changed behaviour. But you can change yours by taking a break, or if that’s too difficult, “hide’ the posts or feeds that may get you the most riled up.
How can you better identify what that person is feeling?
Understanding others is a cornerstone of empathy. Think about the last time you went to the doctor when you were unwell. You likely were trying to convey your symptoms but a good physician would also be trying to figure out your emotions and using those to make a better diagnosis. It’s not just about words in a conversation, it is all the various other methods we have of communicating.
You can better understand what a person is feeling by
Notice the non-verbal or sub-text. Observing their body language, tone of voice, and other non-verbal elements of communication can directly impact interpretation and meaning behind the words spoken. This can be difficult when engaging with people digitally – in this case you should notice sub-text.
Listen – actively and closely. Steven Covey, author of The 7 Habits of Highly Effective People: Powerful Lessons in Personal Change, once said “Most people do not listen with the intent to understand; they listen with the intent to reply.” Simple measures such as holding eye contact, nodding and saying “mmmhmm” can subtly encourage others to continue to share their thoughts.
Make what you say meaningful – and not about you. Reflecting and paraphrasing what they said back to them can also help create a better understanding. Asking questions can also help clarify. Avoid comparing their experiences to yours. We sometimes think bringing up a similar anecdote is helpful, but it can discount and minimize the experience they are sharing with you
How can you demonstrate care that the person is feeling what they are feeling?
Showing that you care about others and their feelings can build trust and engagement in any relationship – be it personal, academic or professional. It’s one thing to say you care about others, but it is another to act upon it through your daily interactions with others. All of the earlier tips on building empathy apply here – listening, asking questions, showing interest in what people are saying.
Activity: Building an Empathy Map
This exercise asks you to empathize with a person —in whatever situation – could be as part of a group project, your family, your roommate, your co-workers —to identify an approach to guide how you can better collaborate with them. For this purpose we will identify that person as your peer, but really it can be anyone – you can even use this exercise to identify characteristics and experiences for a group of people. You are going to create an empathy map! What does an empathy map look like? Here is an example that you can use as a template:
Create an empathy map following these steps:
Reflect on all of the information you know about your peer(s). Try and utilize the information that you have already acquired or know to be true through conversations, text exchanges, emails and other forms of formal or informal communication. You might even want to schedule a time to have a conversation to uncover more details about that person and their experiences.
Ask/gather information about what your peer(s) think, feel, say, do, see, and hear. What might they have challenges with in your collaborative context??
Think about the various experiences of your peer(s). What notions around access, ability, inclusion, and diversity can help better design your collaborative practices so that it is useful to all?
What are pain points and gain points? Basically pain points are anything particularly difficult to overcome (ex. All my classes are in the evening and it is the worst time for me to learn!), and gain points are anything particularly helpful (ex. I love that classes are recorded!)
Reflect on the information and/or feedback you have collected from your peers and begin sketching your empathy map. Use the Empathy Map Template with fields to respond to the above guiding questions.
To use the template, go into the File menu on the Google document and make a copy of the file. Rename the file for yourself and complete the template.
After your Empathy Map is complete, try to get additional feedback by seeking out a friend to discuss with your empathy map with them. See if there are shared concerns, or perhaps strategies they might suggest that you have not considered.
If you are playing along using the Liberated Learner Work Binder, upload your Empathy Map file to the Collaborator Module folder by taking a picture of it (if done on paper)
If this is the only Liberated Learner activity you plan to do, then save the file wherever you like. Don’t forget to share it with your friends and family to share with them your insightful reflections
Positionality
What is your Positionality?
“Positionality refers [to how] differences in social position and power shape identities and access in society” (CTLT Indigenous Initiatives, n.dCTLT Indigenous Initiatives. (n.d). Positionality & intersectionality. The University of British Colombia: Vancouver Campus. https://indigenousinitiatives.ctlt.ubc.ca/classroom-climate/positionality-and-intersectionality/). Our positionality derives from different facets of our social and political contexts and the ways in which we identify ourselves in terms of gender, sexuality, race, ethnicity, class and ability status. The different social and political markers we carry as part of our identity influence the ways in which we view and function within our society (Ladson-Billings, 1995Ladson-Billings, G. (1995). Toward a theory of culturally relevant pedagogy. American Educational Research Journal, 32(3), 465–491.; Gay, 2013Gay, G. (2013). Teaching To and Through Cultural Diversity. Curriculum Inquiry, 43(1), pp. 48-70.). As such, everything we put into the wold also stems from this same lens – our positionality (Hamachek, 1999 as cited by Gay, 2013).
Why is knowing your positionality important?
Knowing your positionality is extremely important as it gets you better acquainted with yourself, your social and political context, and your beliefs. Understanding your positionality gives you insight on the lens through which you view the world, as well as your position within the world and its systematic structures. Your positionality will in turn allow you to recognize your privilege, as well as manage your biases and the ways in which they are manifested in your everyday interactions and behaviours. Your positionality also allows you to examine and manage the existing power dynamics within different interactions, which can help you to find your voice in order to advocate for yourself and support others. Knowing your positionality means constantly engaging in self-reflection that allows you to both learn about the social plights of our day and age and unlearn the status quo which systematically marginalizes those who do not belong to the “dominant group” defined by colonial history.
Activity: Positionality Identity Tree
Purpose of Activity
The purpose of this activity is to develop/become more aware of your positionality by exploring all of the things that relate to your identity.
Task
Reflect on yourself by thinking of all the past and current aspects and experiences that have shaped who you are. Present your findings in an identity tree and reflect on what this means in regard to your positionality, privilege, and interactions.
Level 1
Sketch out an identity tree: start by writing your name in a circle at the centre of a piece of paper, then link the various aspects of your identity to your name. Aspects of your identity include your cultural and linguistic backgrounds, education, employment, context you grew up in (Where? Parents/guardians? Siblings?, etc.), sexuality, socio-economic class, hobbies, skills, likes and dislikes, travel, etc. (10-15 mins in length).
Level 2
Now that you’ve sketched out your identity tree, think about what it means to you. Did it help you realize or re-discover anything about yourself? What opportunities and/or limitations did your identity tree present in regard to your privilege? What kind of person would you like to be moving forward? Write your thoughts in a short paragraph (5-10 mins in length).
Level 3
Think about what your identity tree could mean in regard to others. Consider what your identity tree tells others about you and what are its implications within different interactions. For instance, what are you bringing to the table and what power dynamics are at play when speaking to different groups? What aspects of yourself should you try and be cognizant of when interacting with other? Write your reflections in a short paragraph. (5-10 mins in length)
Learning Outcomes
Developing a better understanding of self by reflecting on one’s positionality.
Demonstrate an understanding of the implications of one’s positionality.
Developing an awareness of inherited power dynamics within different interactions.
Time Commitment
This activity should take approximately 15 – 30 minutes to complete.
How to Complete This Activity
Think of the different components that make up your identity.
Make your identity tree by writing down the different components on a piece of paper or using any of the following software: Mindmup , Text2MindMap , OneNote, or Google Draw
Reflect on what your identity tree means to you, its implications, and who you want to be.
Type your reflections.
Success Criteria
Sketch an identity tree.
Honest and genuine reflection.
Developing your positionality and better sense of self
Understanding one’s opportunities and/or limitations in regard to their privilege.
Consider potential power dynamics in different contexts and ways to manage them.
If you are playing along using the Liberated Learner Work Binder, upload your identity tree file to the Collaborator Module folder by taking a picture of it (if done on paper)
If this is the only Liberated Learner activity you plan to do, then save the file wherever you like. Don’t forget to share it with your friends and family to share with them your insightful reflections.
Wrap Up and Look Ahead
In this section we’ve gotten set up to be the best ally you can be. Next we will take everything we’ve learned so far, and try to put it to use as you work to broaden your own personal learning network.
Networking
In This Section
We’ll have a look at the following topics:
What a network is and what it can do for you
How to network effectively
Finding and being a mentor
And work towards meeting these outcomes:
Describing what networking is and why it is important for future professional and social success
Planning how to use the Web to network for employability and professional pursuits
Finding, and being, a supportive mentor
Networking, amirite? Much like group work, thinking about networking sounds like it could be exhausting. Building an entire network sounds a little overwhelming, too, while we’re at it. That’s why in this section we break it right down so you can chip away at building a network, one small connection at a time. When you take it slowly and steadily, you maybe won’t even notice that you’re building it until one day you sit back and realize “hey I got a lot of support out here! Nice!”
What is Networking?
And what can it do for you? Networking is about building and sustaining mutually beneficial relationships with people who may influence your professional development. It may seem like an intimidating concept at first, as many students associate it with ingenuine and socially anxious interactions. However, networking takes many different forms – it ranges from formal interactions at specific events and conferences to informal interactions over social media. You’re likely networking in everyday life without realizing it. Most people think of your network consisting of professionals in your field of interest, but it also includes friends, family members, other students, customers, and more. You never know the connections you’ll make through the people you’ve already encountered in life. Yet, it’s also important to continue expanding your network in different ways to maximize your potential to develop professionally.
Why is networking important to your future professional and social success?
New career opportunities
When you think of networking, career opportunities are probably what comes to mind first. As a post-secondary student, building your network early on can help get you where you want to be post-graduation and beyond.Canadian Association of Graduate Studies, 2007. 36th Statistical Report, 1992- 2004. CAGS, Ottawa, Canada. For instance, developing a professional relationship with your professor throughout university could result in a job opportunity to work for them or one of their colleagues, which may have not been possible otherwise.Faculty of Graduate Studies, University of Western Ontario, 2007. Principles and Guidelines Regarding Graduate Student Supervision. http://grad.uwo.ca/supervis/supervis.html
Career advice
By connecting with individuals in your field, you can learn from their experiences and expertise. They can help guide you on the right path by discussing what made them successful, challenges they faced, the trajectory of the field, courses they recommend or ways to get involved as a student in order to get your foot in the door. Their advice can help ensure that you’re taking the right steps to get where you want to be in your career.
Improve your social skills
The more interactions you have with people, the more likely you’ll be confident in your ability to converse with others. You’ll figure out what works and what doesn’t through practice and by observing others. Becoming more socially adept will strengthen your relationships, improve your chances of employment and increase your performance in the workplace.
Develop lifelong friendships
Networking is about more than just furthering your career. It’s an opportunity to make genuine connections with people who could potentially become lifelong friends. This isn’t surprising since you’re likely to share similar interests and goals as people in the same area of work..
Planning How to Network Effectively Using the Web
Take a minute and think about your experience of learning as a post-secondary student: who are the people that you learn with? Is there someone in your college/university community who you often seek out to talk through difficult concepts? Or maybe you prep for exams with a study buddy? Who do you turn to (in-person or online) for advice on the best way to approach a problem or topic?
It’s likely not just one person: your learning network might be made up of dozens or even hundreds of people with different interests and areas of expertise. And you probably engage with them through a variety of spaces, online and in real life. They may include people that live halfway across the globe that you’ve never even met!
So you may have an informal Personal Learning Network that surrounds you – and, indeed, these networks are meant to be informal – but as we look at Personal and Professional Learning Networks, or PLNs, in more detail, we’ll encourage you to think about how you can develop your PLN to better support your learning and professional goals.
What are Personal Learning Networks?
Personal, or more accurately, personalized – might be organized around personal or professional interests, but they are uniquely yours. You have ownership and autonomy over who’s in your network, and how you choose to engage with them. You might communicate with your learning network through the same tools that you use for primarily social purposes, but PLNs are – at their core – meant to promote your own growth, development and understanding in an area of interest.
These connections are built and strengthened through shared interests, conversations and other interactions, like posting links to useful articles or offering insights from one’s own experience. Of course, the notion that we learn with and from a group of peers – is hardly new. But what’s unique to the formulation of Personal Learning Networks within it – is that it speaks specifically, inseparably to how these connections between people take place in a digital space, and how they are fundamentally transformed by our interactions with and through digital technologies.
Leveraging the affordances of digital technologies means that the types of activities we can engage in as part of a personal and professional learning network – and the people or organizations we can engage with – take on a vastly different form. Sure you might be able to find out how to get your voice to sound like Darth Vader on your podcast by doing your own research. But it’s more fun to find out if your network already knows how to do that!
You might share an assignment you’ve drafted with your network and get feedback on what you’ve done from a variety of perspectives. Or you might be inspired by a provocative article that someone else in your network has posted. Or you might remix someone else’s work (license permitting) as a way of taking their idea – and the conversation around it – further. While digital technologies aren’t required for these learning activities to happen, they enable us to engage in them in novel, more, and easier ways.
The digital technologies which help to facilitate PLNs also mean that they are not bound by the same limitations as, say, the physical – or even virtual – space of a post-secondary course. You may use tools like Twitter, LinkedIn, social media, blogs and RSS readers as their primary technological platform or platforms for communication and learning.Pegrum M. ‘I Link, Therefore I Am’: Network Literacy as a Core Digital Literacy. E-Learning and Digital Media. 2010;7(4):346-354. doi:10.2304/elea.2010.7.4.346
Strategies to Build a PLN
PLNs don’t just happen: they take time and effort to develop through conversations and exchanges. You are effectively building and maintaining a social network focused on a personal or professional learning goal. Many of the same strategies that you use to cultivate your social media presence are useful to remember, with a few extra things to keep in mind.
As you progress in your discipline, you might find that your learning network becomes more defined and focused on your subject; you might also find that it becomes more important to your learning as you begin to seek information and knowledge from a broader range of sources. You are cultivating a network in a purposeful way, an ongoing process as you progress in your studies and edge closer to your career.
As you develop in your academic career, you might seek out certain spaces, organizations and groups where you can build your PLN in an attempt to cultivate your career pursuits. Here are a few strategies:
General guidance:
Attend conferences (take advantage of that student rate and/or funding opportunities aimed at supporting student representation at conferences),
Carefully select and join social media groups related to your topic. Strengthen your connections by commenting and sharing the work of others, and contributing back.
Be authentic – build your PLN around your sincere interests, and don’t just focus on networking in a way aimed only at landing a job.
Be strategic – take your cues from people in your network; if you notice at a conference that a number of presenters are posting their Twitter account names, that is likely the place where others will be found; Twitter certainly is one of the most popular PLN tools, but it might not be the common gathering place of your discipline (designers for example might be on Dribbble)
Think before you share – but in a more intentional way, consistent with the identity you are projecting (i.e. it’s okay to be personal, but not too personal)
Using Twitter to Build your PLN
The Liberated Learner modules build upon the original Ontario Extend program for Empowered Educators. A critical part of Ontario Extend was to engage participants in building their PLN using Twitter. Check out how this PLN was born and note the connections growing – and also recognize they have continued to grow since then!
Get started building your own PLN using Twitter by:
Creating an account if you don’t have one already and build your profile and bio, paying attention to how you want to represent yourself – a real photo is recommended and use those 160 characters available for your bio wisely.
Follow people – if you start with a few similarly minded fellow students, instructors or people you admire, generally their list of followers can prompt further connections
Lurk – if you’re new to Twitter, you might want to spend the first few weeks occasionally opening the feed and checking out the conversations and how people you may want in your PLN converse with one another before diving in.
Contribute – once you’re comfortable, start liking, retweeting and tweet away!
Other Methods to Build your PLN
Twitter isn’t the only space of course. It may not be the place to start for you – there are many other choices you can make about how to use the web to build your PLN – and sometimes this is guided by what discipline you are in. Here are a few other tools and methods you might consider:
Using a Blog to Build your PLN – if you’re more ambitious, you may want to explore using a blog to share content and build your PLN in a more focused way.
LinkedIn – LinkedIn can help, particularly with building a professional learning network. Generally the first few search results when someone looks up your name are LinkedIn and Facebook profiles, so you want to make sure they are cultivated carefully. This tipsheet from Humber College can help with the creation of a solid profile and offers guidance on building connections.
Above all, recognize that although a PLN is emergent, it doesn’t just happen, It requires attention and cultivation.Content adapted from the “Digital Literacy for Learning” course by Joanne Kehoe and Devon Mordell licensed under a Creative Commons Attribution-NonCommercial 4.0 International License.
Dig Deeper
If you’re interested in digging into these topics more deeply, check out these other great resources:
An internet search of the term “Personal Learning Network” or “PLN” will yield many results which too often emphasize the tools that can be used to build and maintain a PLN, not the people who are in them – and networks *are* people.
The ‘Mapping Your Personal Learning Network’ activity asks you to consider and then represent who belongs to your PLN.
For the activity, use a tool like Google Drawings, Coggle (a Google Drive app for mind mapping), PowerPoint, or good old pen and paper to create a visual diagram of the people – and groups, collectives and other beings – in your PLN. If creating a visual diagram presents a barrier for you, you can alternatively create an audio or video reflection.
Level 1: For Your Eyes Only
Choose an interest around which to organize your PLN.
Indicate your topic somewhere on your diagram (you *could* put it in the central node, but actually, you are at the centre of your learning network!)
Identify a few people who already belong to your network as it relates to your interest or topic: your nodes. They might be friends, influential instructors, mentors, people you’ve met at conferences or events, and so on. Then think of a few more nodes that you may not (yet) know personally but who you would include in your network. Who are the noted scholars or experts in your area of interest that you might follow?
Map the nodes (names) that you’ve brainstormed onto your diagram. Your diagram should include at least 10 nodes, although they can be specific individuals or they can be groups.
Rearrange and mark up your diagram to uncover more about the nodes in your PLN and how you interact with them. You might indicate any of the following in the design of your diagram (e.g. by grouping, using different colours or symbols or text labels, etc.):
their role (e.g. student, instructor, science educator, blogger, etc.)
their role in your network (e.g. collaborator, mentor, provocateur, consultant, etc.)
the relative weight of the connection (i.e. strong tie or weak tie?)
the reciprocity of the connection (i.e. is it one-way, or a dialogue?)
the technologies you use to connect to your network
the relationships between nodes to each other (i.e. are there clusters of nodes who interact?)
anything else you’d like to represent on your diagram that helps to illustrate your interactions – past, present or future
Level 2: Share With One Friend
Export or snap a pic of your diagram and share it with one other person (likely one you are close to) in your PLN. Have a chat about it with them. You might even encourage them to create their own version and share what strategies work better than others and what connections are more valuable.
Level 3: Share With a Group/The World!
You can take this activity a step further by sharing the image or representation of your PLN in your preferred tool (e.g., Twitter, blog, RSS feed, etc. etc.) and reflecting upon it. You might consider asking for suggestions of who might be missing in order to avoid being trapped in a filter bubble.
If you are playing along using the Liberated Learner Work Binder, upload your “PLN Map” file to the Collaborator Module folder.
If this is the only Liberated Learner activity you plan to do, then save the file wherever you like.
Mentorship
Finding a Mentor
Understanding what a mentor is and isn’t
A mentor is usually someone, with experience, working in a similar field or role as you, but it’s also possible they are in a field or role you aspire to become a part of. According to Roepe (2022), a mentor is meant to support and guide you through your career growth. Mentors can encourage you to take chances, help you navigate through challenging situations, and guide you in advancing your career; they answer questions and offer advice. It’s important not to confuse a mentor with a sponsor; sponsors can be a boss, recruiter, or employer, which traditionally by-pass the mentor role.
Know your Goals
It’s really important that you understand what you’re looking for and what your goals are before getting anyone else involved. Deciding on your goals can be really difficult, but it’s important you take the time to research and reflect on what you’re hoping to achieve – these are decisions that only you can make for yourself. When you’re going through this process, make sure to make short-term goals as well as long term ones.
Just sayin’: The Navigator Module gives a great run down of goals and expectations that you can have a look at or review. Just sayin’.
Don’t ask a stranger
According to Caprino (2014)Caprino, K. (2014). How to find a great mentor— first, don’t ever ask a Forbes. https://www.forbes.com/sites/kathycaprino/2014/09/21/how-to-find-a-great-mentor-first-dont-ever-ask-a-stranger/?sh=71e6aeb2dfa1, asking a stranger to be your mentor could be a disservice to yourself. First off, anyone you find online as a result of their success is already very busy, and likely receiving many similar requests. Also, you would benefit from a mentor who already knows you and has some idea of how you operate.
If there is a stranger who you really admire, Caprino (2014) suggests that you start by following their work in helpful and supportive ways instead of asking for mentorship. Some ways to do this include sharing their updates, posts and/or work, referring others to their work, start a discussion with them by drawing on one of their works/posts. Other strategies can include finding common ground (working in the same industry or having gone to the same school) or asking a mutual contact to introduce you (Roepe, 2022)Roepe, R., L. (2022). 10 tips for finding a mentor - and making the relationship count. The Muse. https://www.themuse.com/advice/how-to-find-a-mentor. Developing a relationship in these ways can make it a lot easier to eventually reach out about mentorship down the road, as you will have started a relationship, no longer making you a stranger.
At the end of the day, your mentor is someone you’ll want to be able to share doubts about yourself and your work with, so it’s important they’re someone you feel you can be comfortable and honest with (Roepe, 2022).
Making the Ask
Asking someone to be your mentor can be fairly nerve-racking. If you’re asking someone you know, you can start by telling them what you admire about them as a leeway (Roepe, 2022). Before asking anyone to be your mentor, be prepared to tell them what your goals are (be specific) so that you can help the person understand what you want and how/why you think they can help you; defining what problems or questions you have will be a big help (Roepe, 2022; Krbechek et al., 2020)Krbechek, S., A. & Tagle, A. (2020). The right mentor can change your career: Here’s how to find one. NPR. https://www.npr.org/2019/10/25/773158390/how-to-find-a-mentor-and-make-it-work. Don’t forget to include details such as what your time-commitment is and what you’re willing to put into the relationship.
Being a Mentor
Be an Active Listener
As a mentor, it’s invaluable that you are actively listening and communicating; you want your mentee to feel seen and heard. Help them navigate their problems and offer next step solutions, but don’t force anything onto them (Francis, 2021Francis, L. (2021). 7 tips about how to mentor someone. Association for Talent Development. https://www.td.org/insights/7-tips-about-how-to-mentor-someone; Kerpen, 2018Kerpen, C. (2018). If you want to be a great mentor do these 5 things. Forbes. https://www.forbes.com/sites/carriekerpen/2018/06/18/5-things-great-mentors-do/?sh=528c1bbb6b58; Peek, 2021Peek, S. (2021). 5 ways to become a better mentor. Business News Daily. https://www.businessnewsdaily.com/3504-how-to-mentor.html). Even when you know better, your role is to show understanding and support your mentee through their own learning process, not to do things or make decisions for them (Peek, 2021).
Give honest and constructive feedback
As a mentor, you’re in a position where your feedback is being sought, and so it’s important you’re honest but not unnecessarily harsh (Kerpen, 2018). Provide feedback that will be useful, such as how something can be improved or next steps. If you ever feel that you have had a relatable experience, sharing that experience with your mentee can be a great way to indirectly deliver feedback and advice (Peek, 2021). For instance, sharing what your mistakes were and how you did or wish you had dealt with it.
Be Empathetic
Being mentor, you become part of someone else’s learning process and are in a position where they should be comfortable to be vulnerable about their struggles. As such, it’s important that you create a judgement free and compassionate zone for your mentee. Ways you can harness your empathy include: “listening more, being curious about others, appreciating those who are different from you, illuminating any innate judgments, and educating yourself to break false stigmas and ignorant notions” (Peek, 2021).
The purpose of this activity is to find potential mentors, as well as be a supportive mentor.
Task
For this task, you will brainstorm what kind of mentor you’re looking for to help guide you in your post-secondary journey and beyond. You will also consider the kind of mentor you can be (and for who).
Learning Outcomes
Sort future aspirations.
Find a supportive mentor.
Consider ways of being a mentor.
Level 1
Part 1:
Think about what you’re looking for and what your goals are in regard to your academic/work endeavours. Is there anyone you know (or can think of) that would be well suited to guide you through this process? Brainstorm 3 names, and if you can’t think of anyone, then it will be imperative to research what/who is out there. For instance, you can take a look at your faculty members and see if anyone appeals to you based off of their areas of research. (Approximately 10 minutes to 1 hour)
Part 2:
Think about yourself as a mentor and consider everything you have to offer, such as your assets and the experiences you’ve had thus far. Brainstorm 3 names for people who would benefit from your guidance; if you can’t think of anyone specific, consider broader groups first. For example: As a post-secondary student, you can be a great guide for others who are considering a post-secondary education. (Approximately 10 – 20 minutes).
Level 2
Part 1:
Think about why you want the people you chose as potential mentors. Consider what you hope to gain from a mentor: What role do you want them to play? How can they help? What is your time commitment? (Approximately 15 – 25 minutes)
Part 2:
Think about how you can be a good mentor to someone else. What does it entail? What do you have to offer? How can you best guide them? (Approximately 15 – 25 minutes)
Level 3
Part 1:
Draft a letter to one of the 3 people you chose asking if they would be willing to mentor you. (Approximately 1 – 2 hours)
Part 2:
Search for work or volunteering experiences that require you to guide or mentor others. For instance: giving guided tours to newcomers at your post-secondary institution or getting involved with a big sister/brother program. What could you gain from an experience like this? Apply to anything that interests you.
Time Commitment
This activity should take approximately 1 – 3 hours to complete.
If you are playing along using the Liberated Learner Work Binder, upload your “Influence Tree” file to the Collaborator Module folder.
If this is the only Liberated Learner activity you plan to do, then save the file wherever you like.
Wrap Up
In this section we looked at what a network can do and some ideas for how to get your network growing and working for you.
Collaborator Module Checklist
The Collaborator Module Checklist
These are all the things to check out and do in order to complete the entire Collaborator Module.
Tuned into the Liberated Learner Beats to Study To
Read the Wicked Problem: We’re All In This Together
Reviewed the topics:
Getting Ready To Collaborate
Self-Advocacy
Allyship
Networking
Collaborator Module Activities
The four activities listed below are the ones that count towards becoming a Liberated Learner:
Completed the Group Up activity
Completed the False Stereotypes activity
Completed the Preparing for Allyship activities
Completed the Network Startup activities
Culminating Activity: More Problems, Please
1
Activity Title: More Problems, Please
Purpose of Activity:
To reflect on your experience participating in the Liberated Learner program, and to add more stories to the pool of Wicked Problems.
Difficulty Level:
Level One: 30 minutes: Write a one-draft reflection on a “wicked problem” you have faced in pursuing your post-secondary education.
Level Two: 1 hour – Either revisit your draft after letting it sit for a day or two and revise/expand it into a more fleshed out response.
Level Three: 2 hours – Create a multi-media version of your story in video, podcast, or infographic form.
Task:
In this activity you will be reflecting on your own experience as a learner and, optionally, share the completed story to the Liberated Learner: Wicked Problems site.
Reflect on your experience and decide on a story you’d like to share.
Name your wicked problem. (Think of a catchy title for your problem that is both engaging and explanatory. Ex. “President of Procrasti-Nation”). You may want to do this step last instead of first.
Explain your wicked problem. (Tell the story of your struggles. What was one major barrier that you faced in pursuit of academic success throughout your undergrad? Provide details)
Did you overcome your wicked problem? If so, how? What advice could you provide someone experiencing a similar problem? If not, explain the result, and reflect on what you could have done differently to produce a better outcome. (We understand and acknowledge that the problem outlined may not have been solved as a result of barriers that are beyond your control)
Provide any final words of wisdom regarding your wicked problem. (Cap this off with a memorable ‘clincher’ statement)
Leave the story alone while you decide whether or not to take this to “Level 2” (see above)
Revise/expand if you have decided to do so.
Move on to “Level 3” if you have decided to do so (again, see above.)
If you are playing along using the Liberated Learner Work Binder, upload your story to the Culmination folder.
If this is the only Liberated Learner activity you plan to do, then save the file wherever you’d like.
More Stuff Because You Can't Get Enough
2
Have you gone through everything and just can’t get enough? Want even more resources or fancy learning moves? Here are some other highly recommended resources from the modules.
Learner
The Open Learner Patchbook
The Open Learner Patchbook: A collection of student-written advice on how to get your learning done. A “community quilt” of learning advice.
Navigator
Web Literacy for Student Fact Checkers
Web Literacy for Student Fact Checkers: One of the best free and open student resources of all time. And one of the most important. With the amount of misinformation here on the Internet, this book will hone one of the most important tools you need to have: your bullshit detector.
Technologist
Learning To Learn Online: Digital Literacies
Digital Literacies: A chapter of a wonderful Open Textbook called “Learning To Learn Online” from BCCampus.
Collaborator
Looking for extra support in Ontario?
You might find help in here:
For Black Communities
Black Health Alliance: Includes lists of different services, including mental health services in Ontario
Across Boundaries: Offers services in a variety of languages (Caribbean, Central Asian languages, Mandarin, South Asian languages, African languages). Offers services for BIPOC LGBTQIA2+
Taibu: Primary Health Resources for black communities
Unison: Has a list of mental health resources for black communities
Fashion Magazine: Has a list of mental health resources for black communities
eMentalHealth.ca: List of publicly funded/free services in Ontario for post-secondary students
Badges
3
Finish all the work in the Learner module? You get a badge! Right click to save them for yourself.
Finish all the work in the Technologist module? You get a badge!
Finish all the work in the Navigator module? You get a badge!
Finish all the work in the Collaborator module? You get a badge!
Finish all the modules? You get even another badge!
En Français
4
Bientôt disponible. Merci pour votre patience.
Roll Credits
5
There were enough fabulous people contributing to this project (built in 2021-2022) to fill up an end-credit scene like in the movies. So we made one! We used more of the great music crafted by the Seneca College Independent Music Programs.


 What’s Your Problem?


 Planning on going all the way and finishing the whole program? Nice move! The “Liberated Learner Work Binder” should help you stay organized.


 The Dig Deeper Icon. Little Birdy shows you more resources to check out if you want to find out more about a topic.
 The Checklist Icon. Little birdy reminds you of the things to check out and do in the module.


 This module aims to help you analyze, identify, and solve your unique learning challenges.

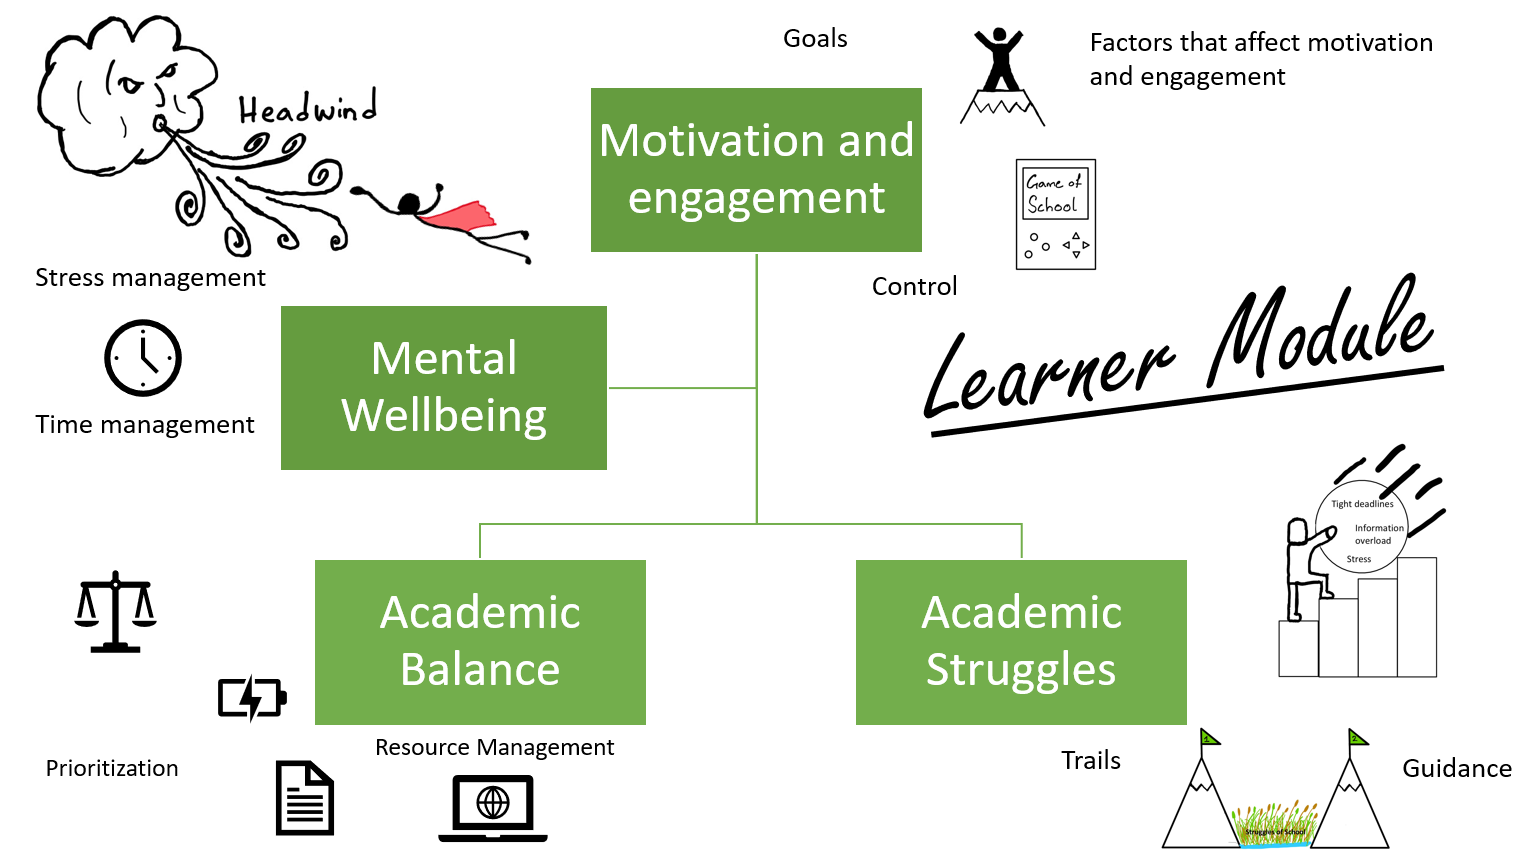


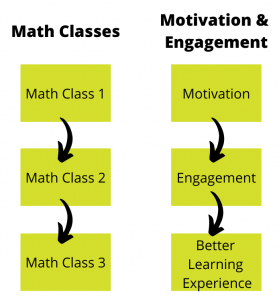

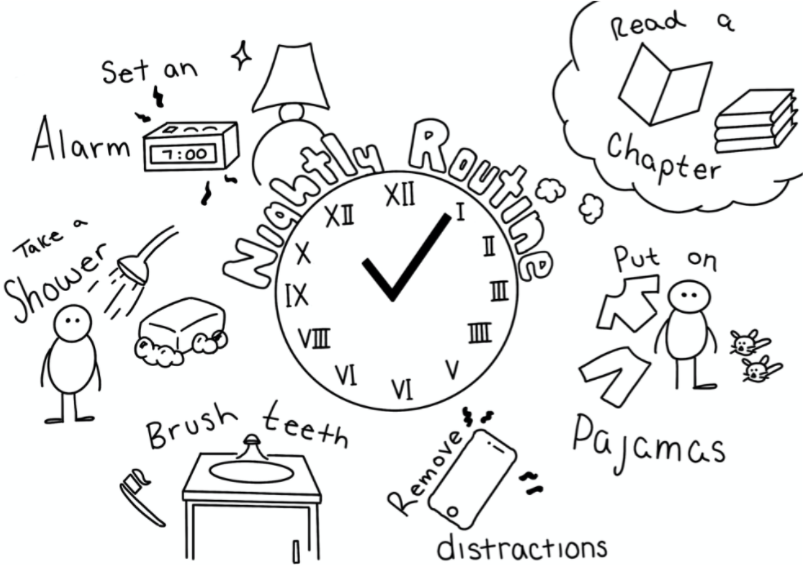
 Fun fact, did you know bananas are filled with tons of nutrients, some of which can help enhance your sleep! Try eating a banana before bed to help fall asleep.
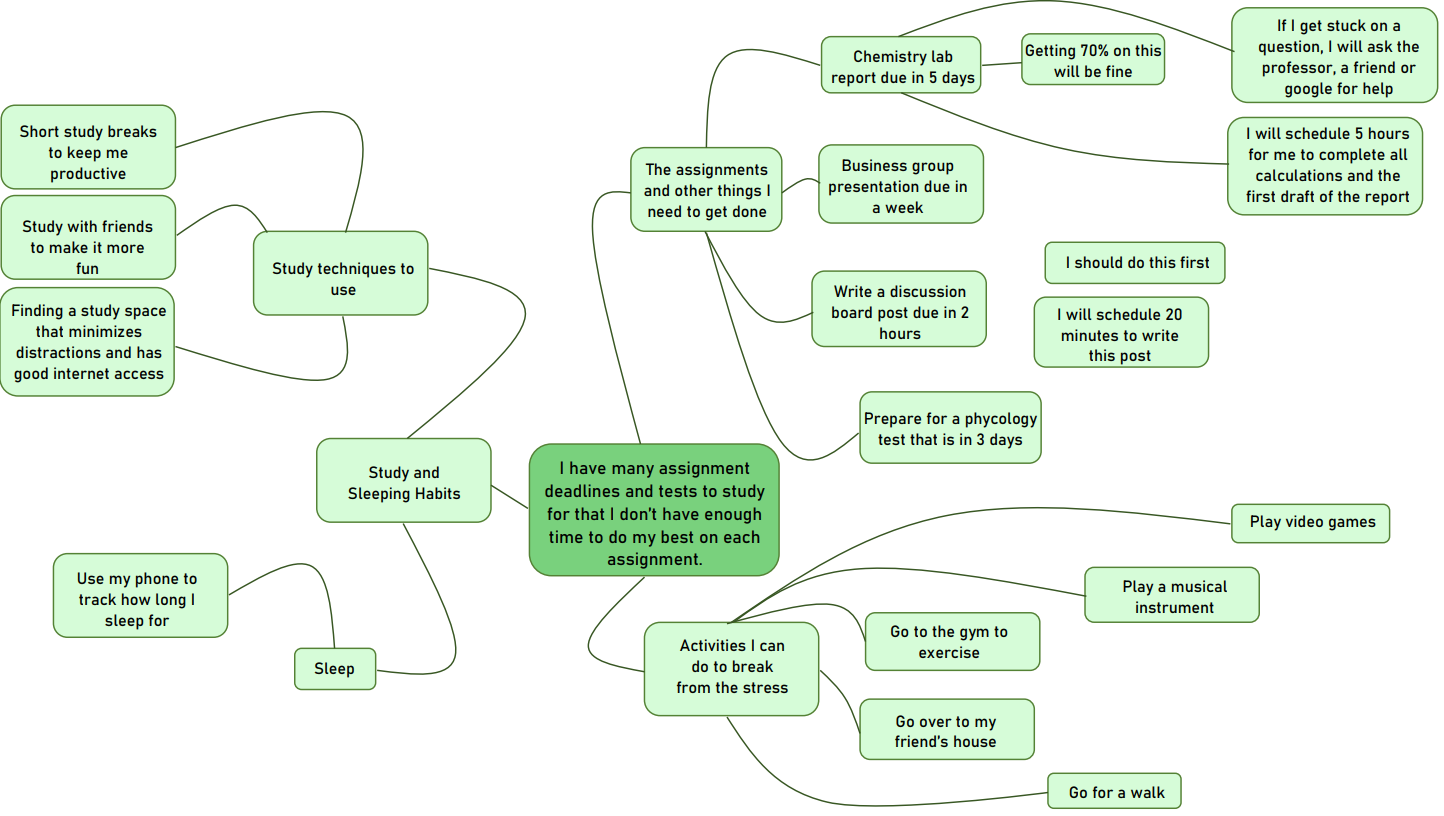

 After studying for numerous hours, you may get fatigued or receive diminishing returns for time and work quality. It can be an innovative idea to take a small break to refocus. Below are some recommendations from students:
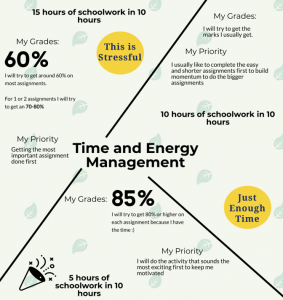

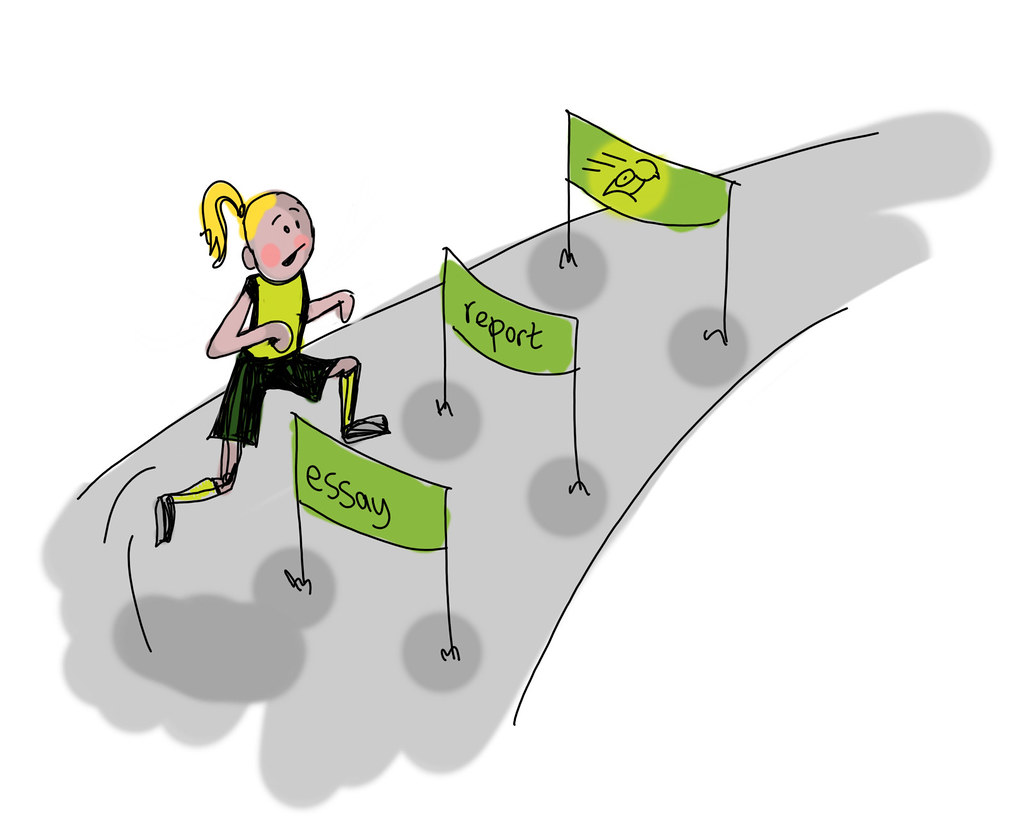 A common hurdle to jump over is having many tight deadlines and not being able to do what you want with each assignment. It can be disappointing and frustrating knowing you could do better if you had the time. However, it is better to submit half a job than it is to submit nothing. Yes, it is super difficult if you like to perfect everything, but that is not always realistic. Having a balance of what to work on the most and least is a way to reach your goals and expectations.


 This module helps you prepare to learn whatever new tech you may need to figure out.


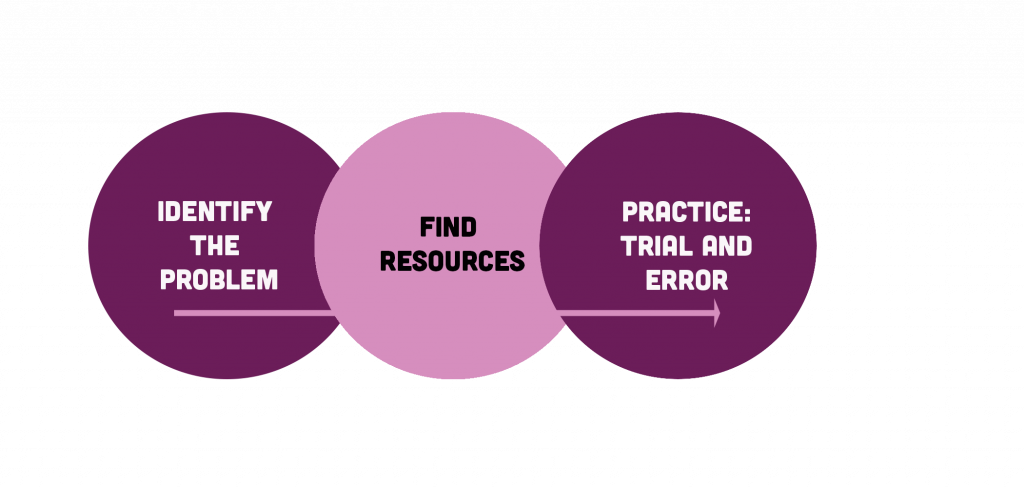
 Outside of school, the place to go is the internet. This is why determining functions and programs is so important. They help filter all the information to get what you need to know.
 A cut and a fade is not just to make your hair look good.


 Finally, and most importantly, remember that graphic design, like all creative processes, is iterative. That means when you make something, it’s not just finished. You can go back and look at it, change and tweak things, and revise to make it better.


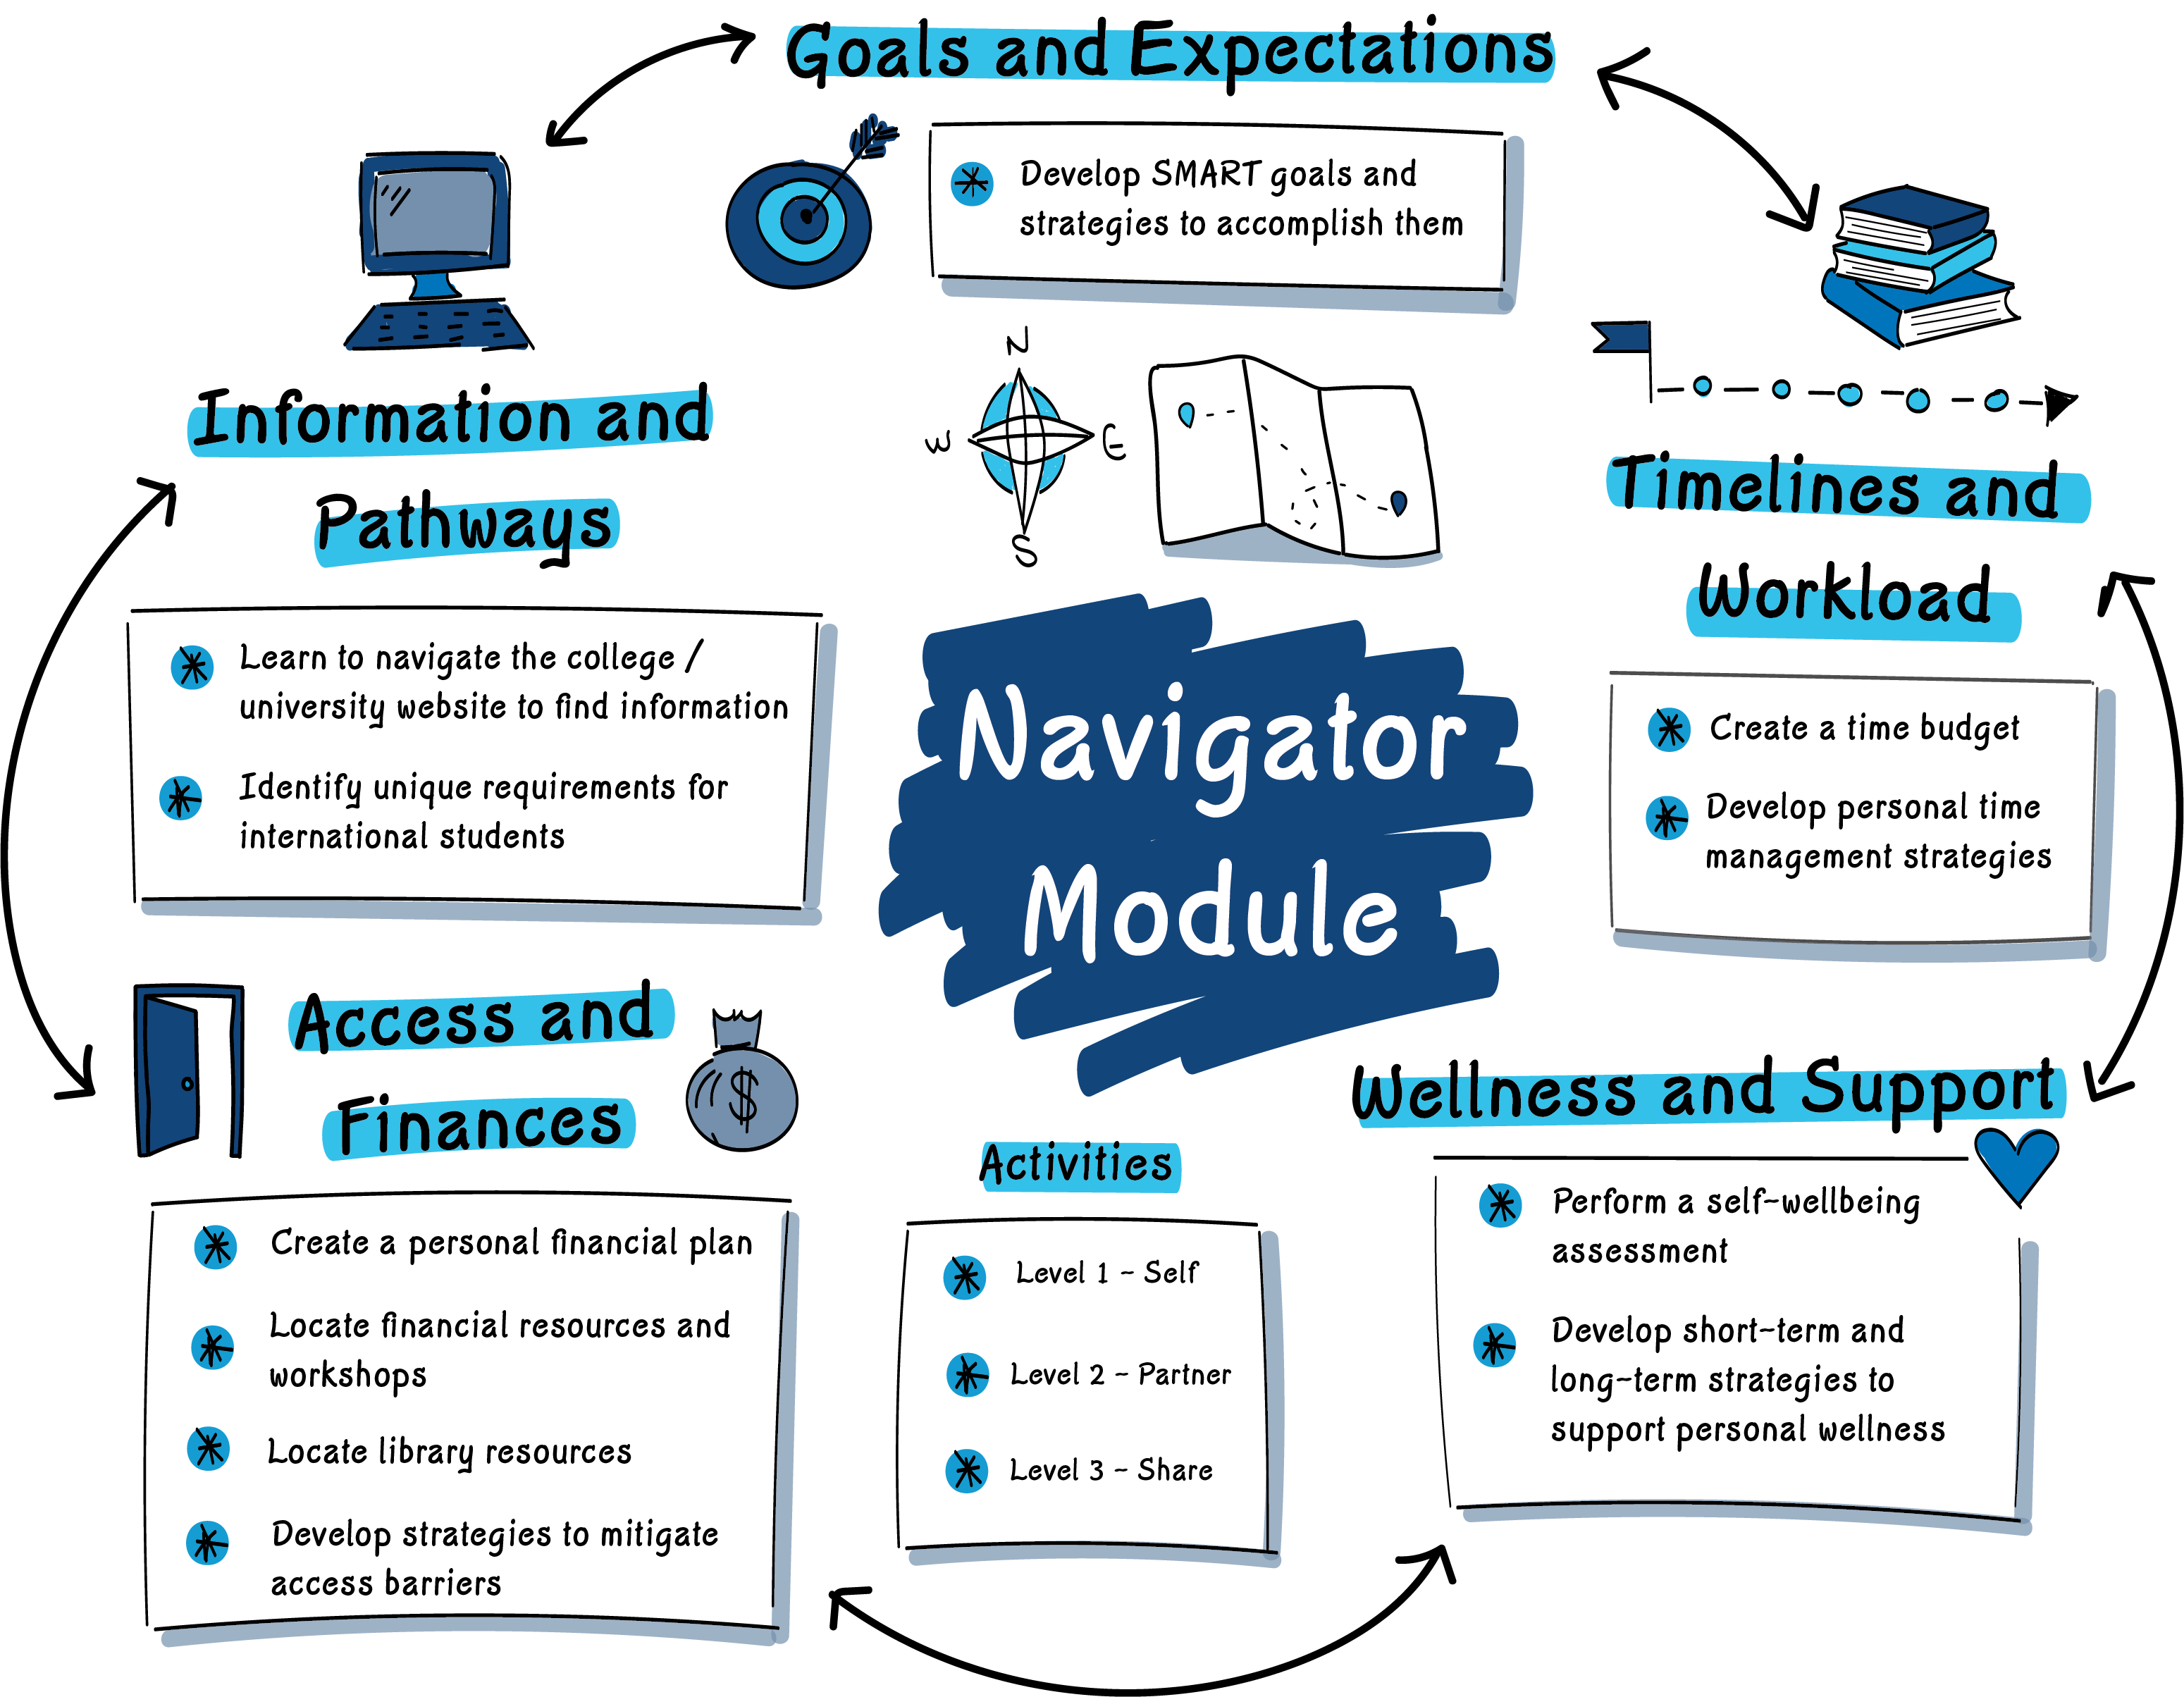


 Your energy must be channeled properly, yet we frequently overlook how vital these gifts are as we go through life.


 When elements of access are not available to students due to financial, technological, geographical, social, institutional, familial, religious, cultural, linguistic, physical or other barriers, then students are not able to fully participate in their education. Facing these types of barriers may make you feel frustrated, angry and upset. You may also feel excluded, unsafe, overwhelmed, stressed, unheard, and unseen. Barriers may even appear before, during, and/or after your college or university experience. If this is happening to you, we want to help you to navigate the many ways that you can reduce or eliminate these barriers for yourself and others. In this module, we will focus specifically on technological and financial barriers. Visit the other sub-modules in the Navigator module to discover ways you can tackle other barriers in your life.
 Why does Information Literacy Matter to Students?


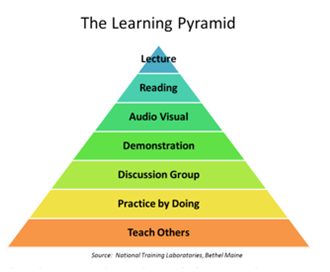 As suggested by UBC Science’s “
 A scenario that may be all too familiar to most of us here is when you’ve gone through all the trouble of dividing up the tasks, assigning roles, setting up deadlines, and all the jazz that led you to believe that your group is in a good standing with a semi clear picture of the work ahead and what each member must do for a successful collaboration. However, time marches on, and one (or more!) of your teammates (GASP!), or maybe you (even bigger GASP!) have missed deadlines, and the project has officially gone off track. But time waits for no one, and the closer you get to the final project deadline, the more stressed you and your members get! Unproductivity from one or more members of the group often leads to the others having to work overtime to meet the deadline.
 Wrap Up
 If your fear surrounding speaking up is related to your fear of making mistakes, then the solution, which is easier said than done, is to embrace your mistakes. Making mistakes is a natural and expected part of life; it’s the way in which we do some of our best learning. And so, as scary as it sounds, rather than being so afraid of making a mistake, it’s important to instead embrace the fact that mistakes are going to happen.
 When providing feedback, think of how you would like to be critiqued. Don’t begin it by instantly bombarding the other person with the issues you want to address. You want to begin with some positive comments regarding the situation in question. This first compliment is usually general, we can call this the bottom bun. Then you want to get a bit more specific and point out at least two strong points that the person excelled at. Now here is when things get a bit cheesy. Here you must clearly deliver your criticism. One trick you can use is by thinking about how you would like to be made aware of a mistake or area that requires further attention. Then you can remind the person again of their strong points. Finally, you can finish up the sandwich with a second bun on top, by giving thanks for your peer’s hard work and offering support.

 Leveraging the affordances of digital technologies means that the types of activities we can engage in as part of a personal and professional learning network – and the people or organizations we can engage with – take on a vastly different form. Sure you might be able to find out how to get your voice to sound like Darth Vader on your podcast by doing your own research. But it’s more fun to find out if your network already knows how to do that!